> ## Documentation Index
> Fetch the complete documentation index at: https://landinglens.docs.landing.ai/llms.txt
> Use this file to discover all available pages before exploring further.
# Splits
export const vp = 'Visual Prompting';
export const smartLabel = 'Smart Labeling';
export const productLL = 'LandingLens';
export const mi = 'Mobile Inference';
export const llsf = 'LandingLens on Snowflake';
export const companyName = 'LandingAI';
*This article applies to these versions of LandingLens:*
LandingLens
LandingLens on Snowflake
✓
✓ (see exceptions below)
The information in this section is not applicable to Visual Prompting.
Computer vision models are trained based on sets of labeled images. The model training process requires the images to be split into three distinct subsets: the **Train set**, **Dev set**, and **Test set**. These sets are referred to as **splits**.
If the concept of setting splits is new to you, you don't have to worry about it—LandingLens will automatically split your dataset into the sets if you use [Fast Training](./train-models) (the default training method). If you are familiar with splits, you can use various tools in LandingLens to manage and assign splits.
Once a set is assigned to an image (either manually or automatically), the image stays in that set unless it is manually assigned to a different set.
Learn more about splits in the following video tutorial.
## Sets
Each set serves a different purpose during the model training process. The three sets are:
* [Train Set](./splits#train-set)
* [Dev Set](./splits#dev-set)
* [Test Set](./splits#test-set)
### Train Set
The model is trained on the images in the **Train set**. The model learns about patterns and objects of interest from these images.
In Anomaly Detection projects, the Train set can only include Normal images. For more information, go to [Anomaly Detection](./anomaly-detection).
### Dev Set
After the model trains on images from the Train set, it validates its training and predictions on images from the **Dev** set. LandingLens continues to fine-tune the model based on its performance on the Dev set.
The Dev set helps prevent [overfitting](./splits#splits-prevent-overfitting). Overfitting is when a model simply “memorizes” the pictures and doesn’t understand what characteristics to look for when identifying objects of interest.
The "Dev set" is short for "Development set". This set is also known as the “Validation set”.
### Test Set
After the model trains on the Train set and fine-tunes on the Dev set, it makes predictions on images in the Test set. The model hasn't "seen" (been trained on) images from the Test set, so the performance on the Test set provides insights into how well the model performs in real-world scenarios.
We recommend that your Test set be as exhaustive and representative of your actual use case as possible. The Test set is your opportunity to see how well the model will perform on your real-world images.
The “Test set” is also known as the “Holdout set” and the “golden dataset”.
## LandingLens Automatically Assigns Splits in Fast Training
If you haven't assigned splits to your images, LandingLens automatically assigns splits to labeled images during Fast Training (the default training method). By default, LandingLens assigns sets based on the following percentages to *labeled images that don't have sets assigned yet*:
* **Train**: 80%
* **Dev**: 20%
## Splits Prevent Overfitting
In the machine learning world, you can overtrain a computer vision model. This concept is similar to overstudying for, say, a test. For example, what if Jane uses flashcards to study? If Jane studies too much this way, she'll memorize the answers to the questions without understanding why these are the answers or how to arrive at those answers. Models can have similar results if you overtrain them. This concept is called **overfitting**. Here's how it works:
Suppose you have a model trained to detect cats. What if the cats in all the images used for training all have collars on?
If you overtrain your model, the model may learn that an important feature of cats is their collars. In this case, if you deploy your model and show it images of wild cats, the model may not detect these cats because they aren't wearing collars.
Detecting whether your model is overfitting can be tricky, which is why LandingLens offers the solution of splitting your images into different sets during model training.
## Assign Splits
You can assign splits using a few different methods. The following table highlights some of the differences, which can help you pick the right method to use for your specific use case.
| Location/Method | Are the images already uploaded? | Can you apply splits to multiple images at once? | When to use? |
| --------------------------------------------------------------------- | -------------------------------- | ------------------------------------------------ | --------------------------------------------------------------------------------------------------------------------------------------------------------------------------------- |
| [Fast Training](./train-models) | Yes | Yes | You don't understand the concept of splits. LandingLens automatically assigns splits to labeled images during Fast Training. |
| [Image View](./splits#set-splits-in-image-view) | Yes | No | You don't have many images. |
| [Build tab](./splits#set-splits-for-multiple-images-in-the-build-tab) | Yes | Yes | You want to assign a specific split to multiple images. |
| [Upload Page](./splits#set-split-at-upload) | No | Yes | You're uploading labeled images.
If you're using {llsf}, setting splits at upload is not supported when [loading images](./load-images-from-snowflake) from Snowflake. |
| [Auto Split](./splits#auto-split) | Yes | Yes | You want to assign all unlabeled images to the three splits at the same time. |
| [Custom Training](./custom-training#split-setup) | Yes | Yes | You want to assign all unlabeled images to the three splits at the same time during Custom Training. |
Learn more about how to assign splits in the following video tutorial.
### Set Splits in Image View
After you've uploaded images to your project, you can manually split images into different sets one at a time, when viewing an image. To do this:
1. Open the project.
2. Click the image you want to assign to a specific set.
3. Select the set you want to assign the image to from the **Split** drop-down menu.
4. LandingLens automatically saves this change.
### Set Splits for Multiple Images in the Build Tab
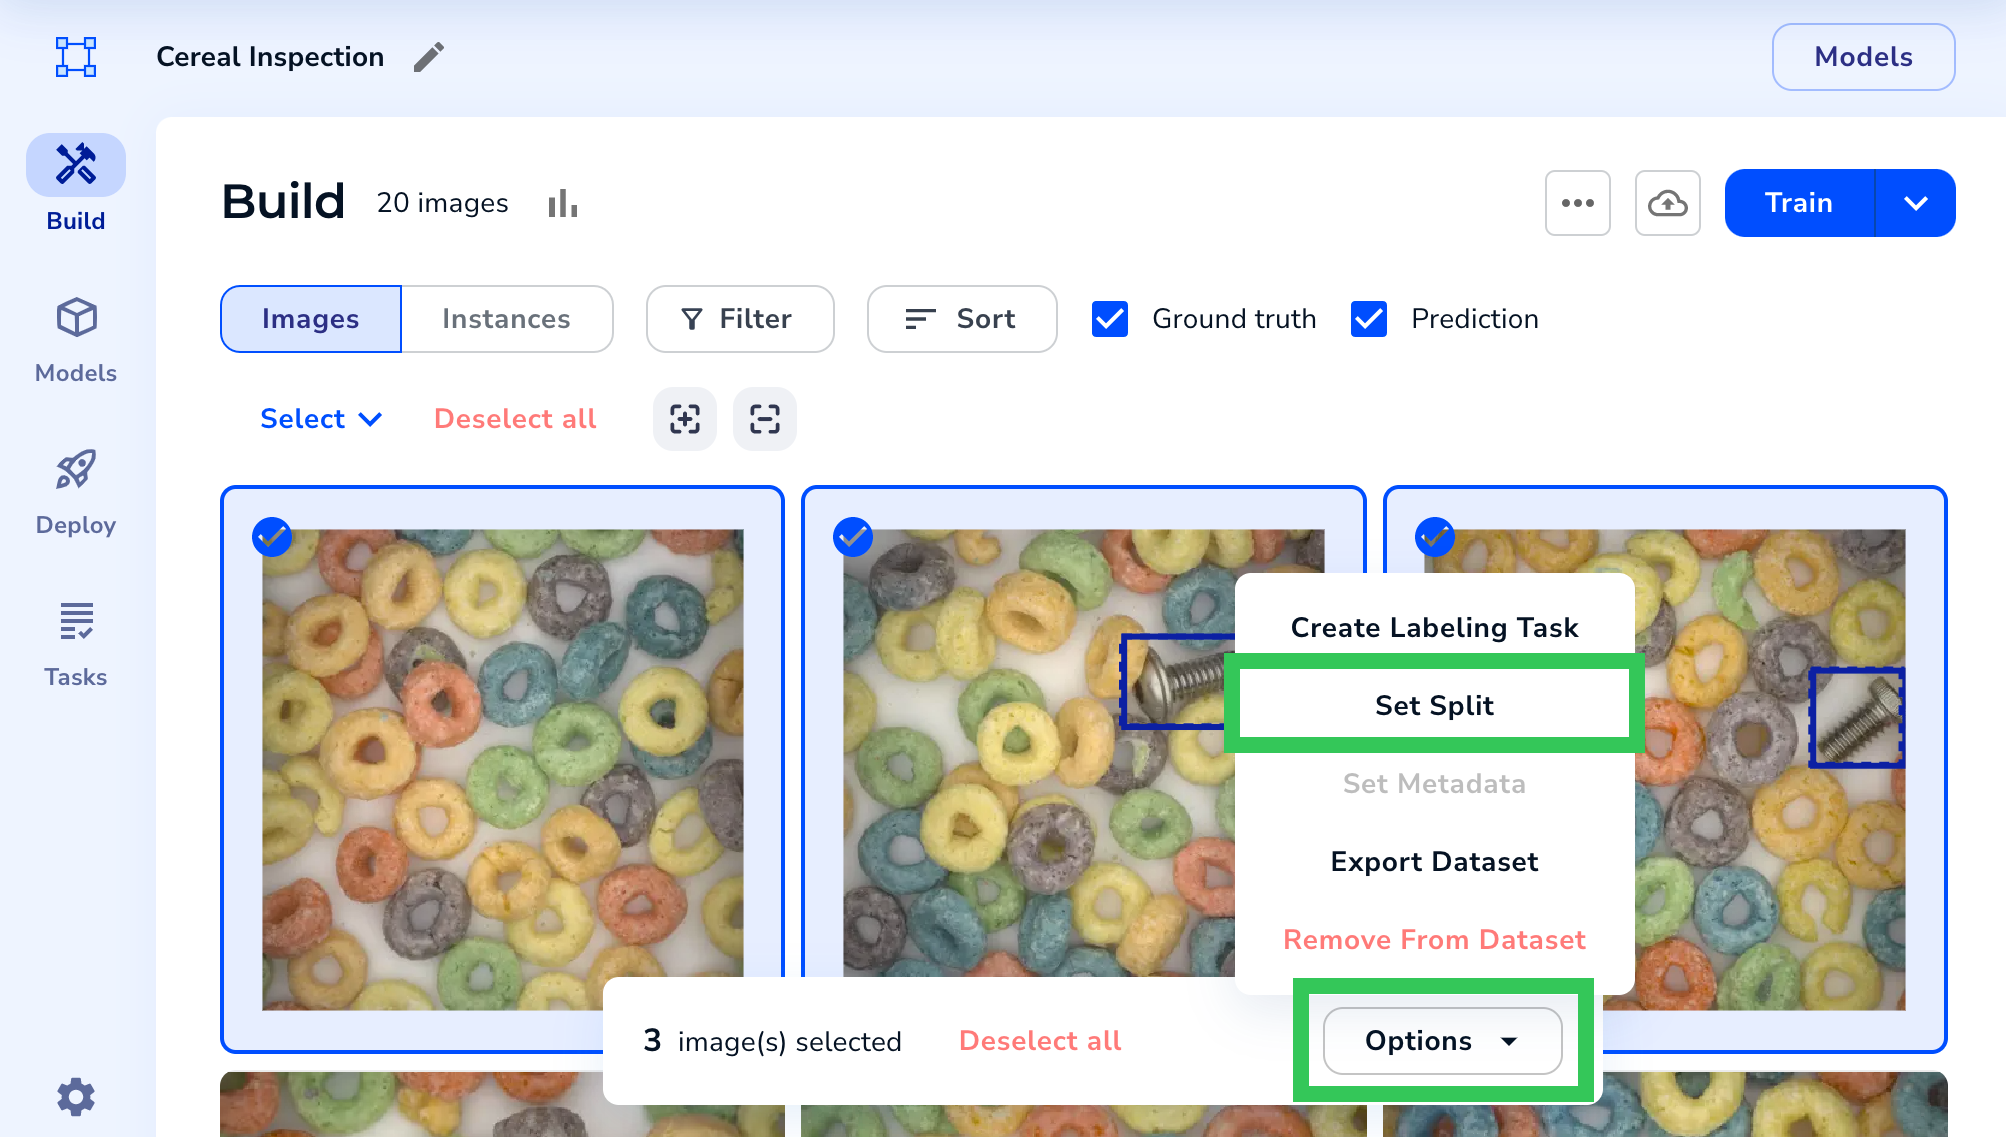
After you've uploaded images to your project, you can manually assign multiple images into a specific set at once. You can repeat this process for each set. To do this:
1. Open the project.
2. Select the images you want to assign to a specific set.
3. Click **Options** in the action bar near the bottom of the screen and select **Set Split**. (You may need to scroll to see this option.)
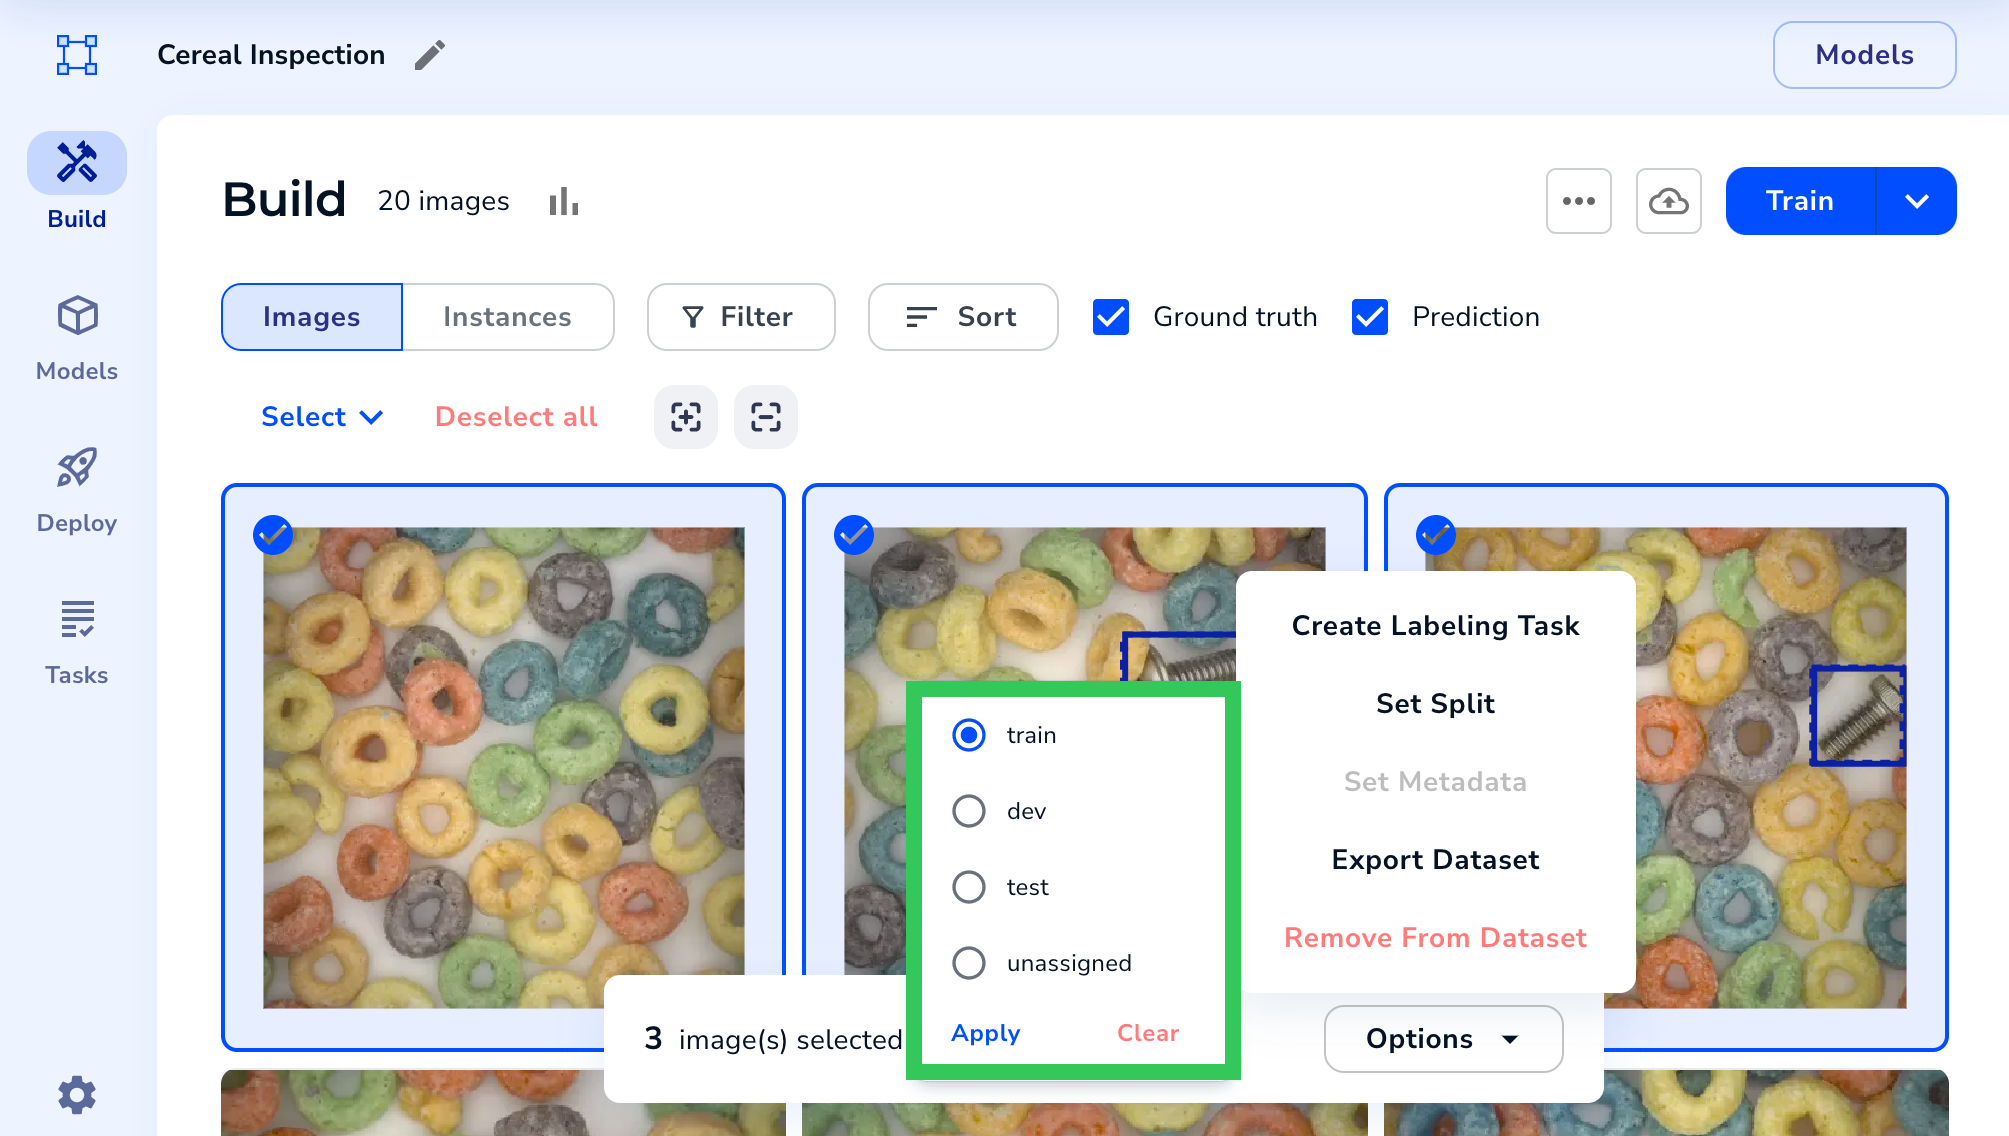
4. Select the set you want to assign the images to.
5. Click **Apply**. The images are assigned to the selected set.
6. To deselect the images, click **Deselect All**.
### Set Split at Upload
If you're using, setting splits at upload is not supported when [loading images from Snowflake stages](./load-images-from-snowflake).
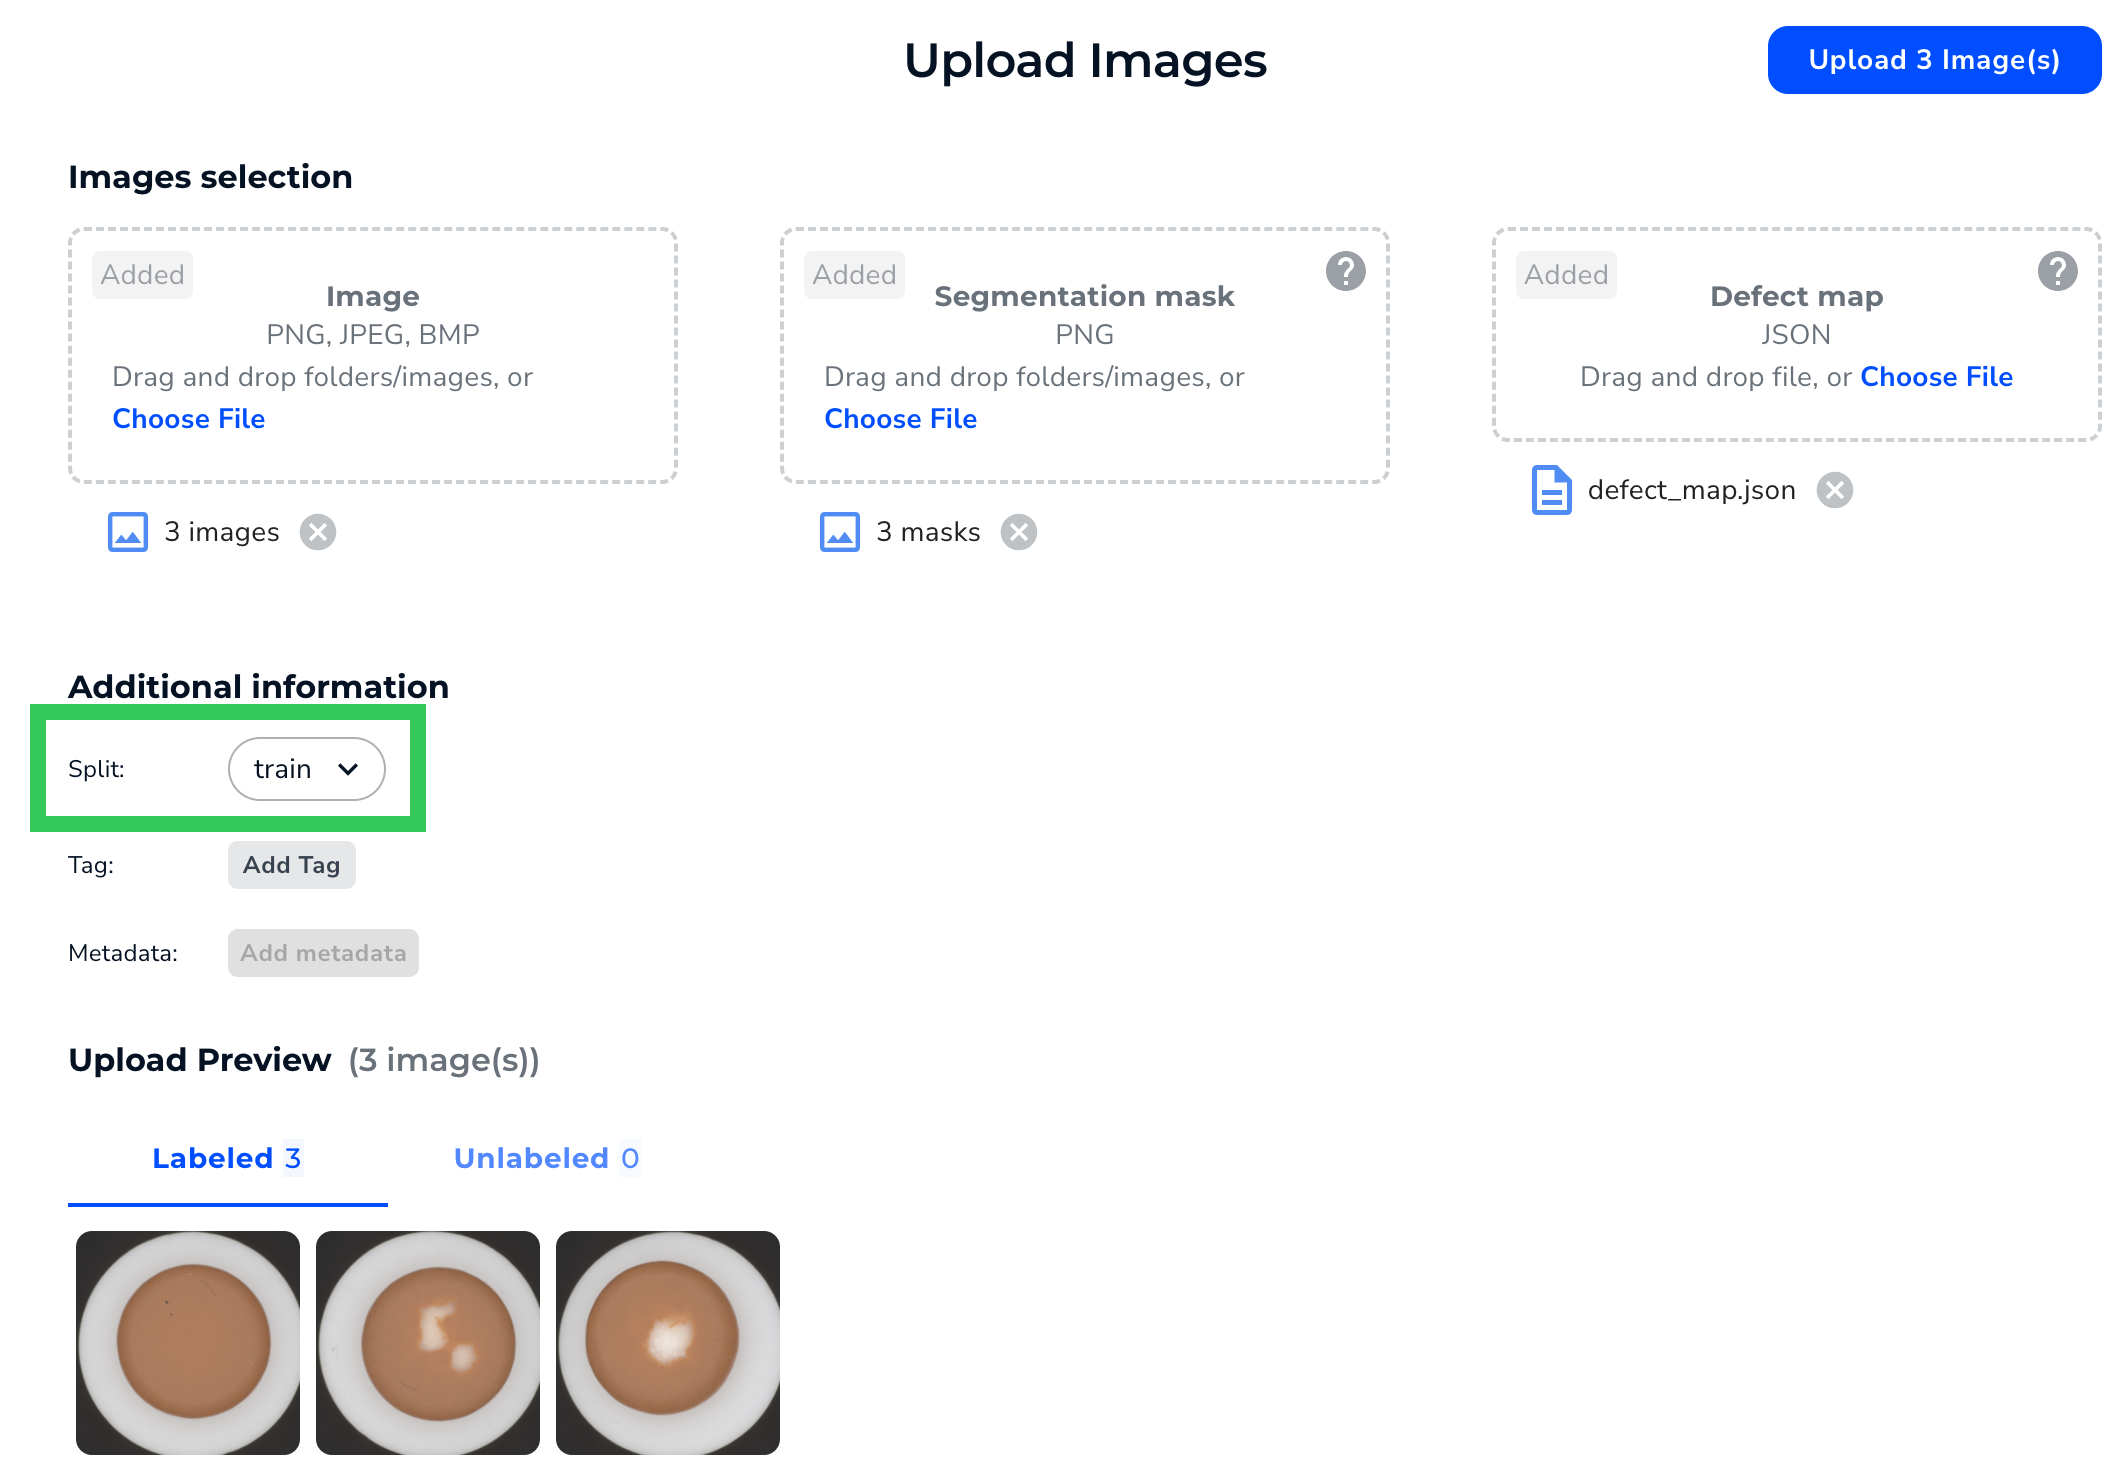
If you're uploading labeled images, you can assign a split to all the images you want to upload. Splits can only be assigned to labeled (annotated) images, so splits can only be assigned at upload if the classes/labels are also assigned at upload, which happens in these situations:
* [You're uploading labeled images to Object Detection projects](./upload-labeled-images-od)
* [You're uploading labeled images to Segmentation projects](./upload-labeled-images-seg)
* [You're applying classes to images when uploading to Classification projects](./classification#upload-classified-images)
* [You're applying classes to images when uploading to Anomaly Detection projects](./anomaly-detection)
When you upload images in any of the scenarios listed above, you can select an option from the **Split** drop-down menu on the Upload window.
### Auto Split
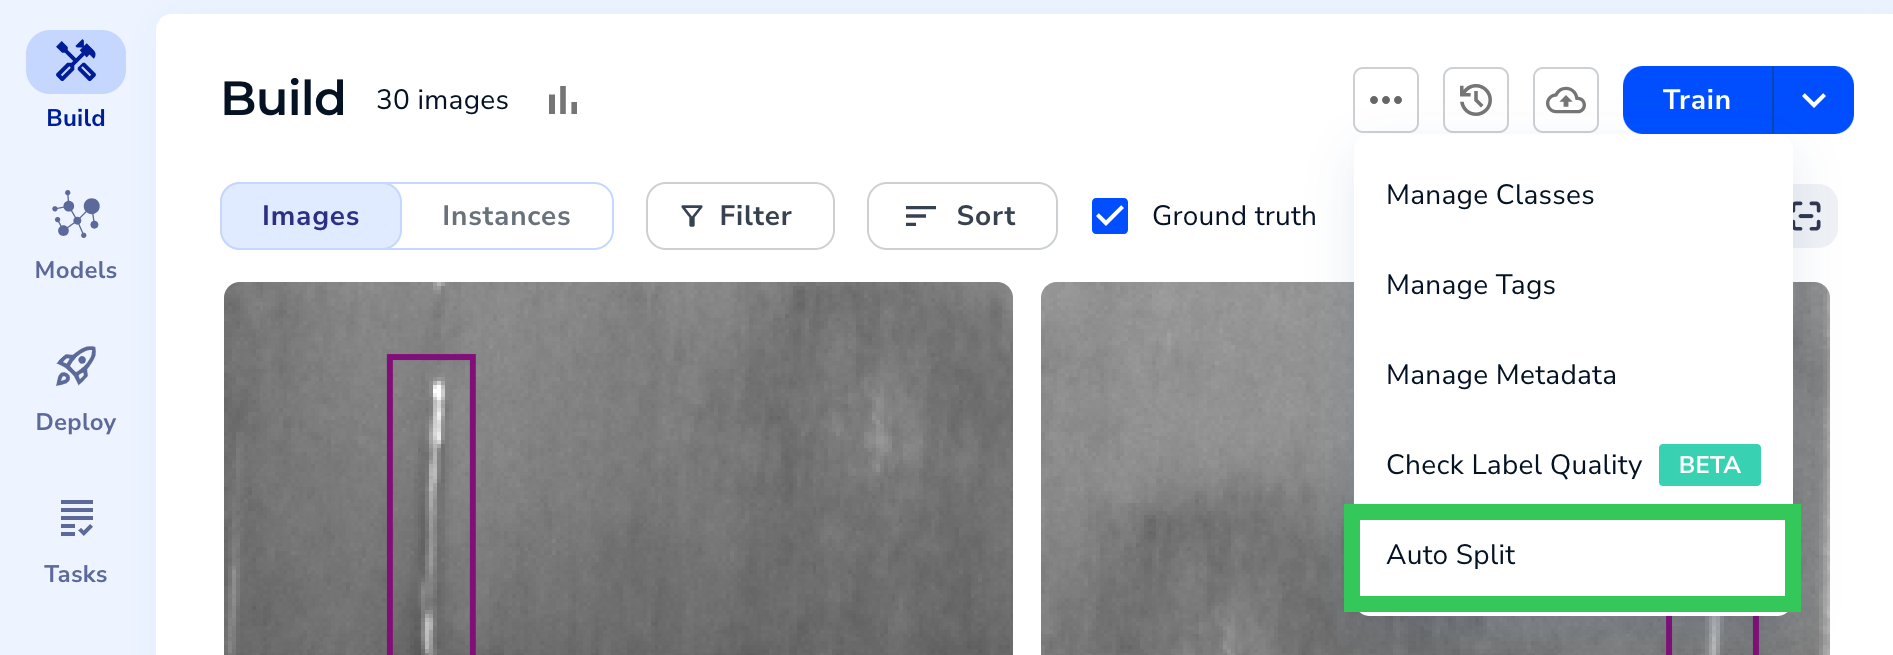
You can automatically split images into all three sets at once by using the Auto Split tool. This tool allows you to select what percentage of images with each class to assign to each set. To do this:
1. Open the project.
2. Click the **Actions** button (ellipses) and select **Auto Split**.
3. If you want to override sets already assigned to images, select this checkbox: **Include assigned train/dev/test media to reassigned**.
4. Review the **Classes** section. For Object Detection projects, this shows how many bounding boxes are used for each class. For Segmentation and Classification projects, this shows how many images have each class.
5. Click **Next**.
6. If you want to adjust the split percentage for all classes at the same, keep this checkbox selected: **Adjust value for all defect types together**. When this checkbox is selected, moving the slider for one class moves the slider for all classes.
7. Adjust the sliders to pick the percentages you want for each set.
8. Refer to the charts on the page to preview the split.
9. When you're done adjusting the split percentages, click **Assign Split**.
10. LandingLens shows you the charts to confirm the split. Click **Close**.
 If you overtrain your model, the model may learn that an important feature of cats is their collars. In this case, if you deploy your model and show it images of wild cats, the model may not detect these cats because they aren't wearing collars.
Detecting whether your model is overfitting can be tricky, which is why LandingLens offers the solution of splitting your images into different sets during model training.
## Assign Splits
You can assign splits using a few different methods. The following table highlights some of the differences, which can help you pick the right method to use for your specific use case.
| Location/Method | Are the images already uploaded? | Can you apply splits to multiple images at once? | When to use? |
| --------------------------------------------------------------------- | -------------------------------- | ------------------------------------------------ | --------------------------------------------------------------------------------------------------------------------------------------------------------------------------------- |
| [Fast Training](./train-models) | Yes | Yes | You don't understand the concept of splits. LandingLens automatically assigns splits to labeled images during Fast Training. |
| [Image View](./splits#set-splits-in-image-view) | Yes | No | You don't have many images. |
| [Build tab](./splits#set-splits-for-multiple-images-in-the-build-tab) | Yes | Yes | You want to assign a specific split to multiple images. |
| [Upload Page](./splits#set-split-at-upload) | No | Yes | You're uploading labeled images.
If you overtrain your model, the model may learn that an important feature of cats is their collars. In this case, if you deploy your model and show it images of wild cats, the model may not detect these cats because they aren't wearing collars.
Detecting whether your model is overfitting can be tricky, which is why LandingLens offers the solution of splitting your images into different sets during model training.
## Assign Splits
You can assign splits using a few different methods. The following table highlights some of the differences, which can help you pick the right method to use for your specific use case.
| Location/Method | Are the images already uploaded? | Can you apply splits to multiple images at once? | When to use? |
| --------------------------------------------------------------------- | -------------------------------- | ------------------------------------------------ | --------------------------------------------------------------------------------------------------------------------------------------------------------------------------------- |
| [Fast Training](./train-models) | Yes | Yes | You don't understand the concept of splits. LandingLens automatically assigns splits to labeled images during Fast Training. |
| [Image View](./splits#set-splits-in-image-view) | Yes | No | You don't have many images. |
| [Build tab](./splits#set-splits-for-multiple-images-in-the-build-tab) | Yes | Yes | You want to assign a specific split to multiple images. |
| [Upload Page](./splits#set-split-at-upload) | No | Yes | You're uploading labeled images.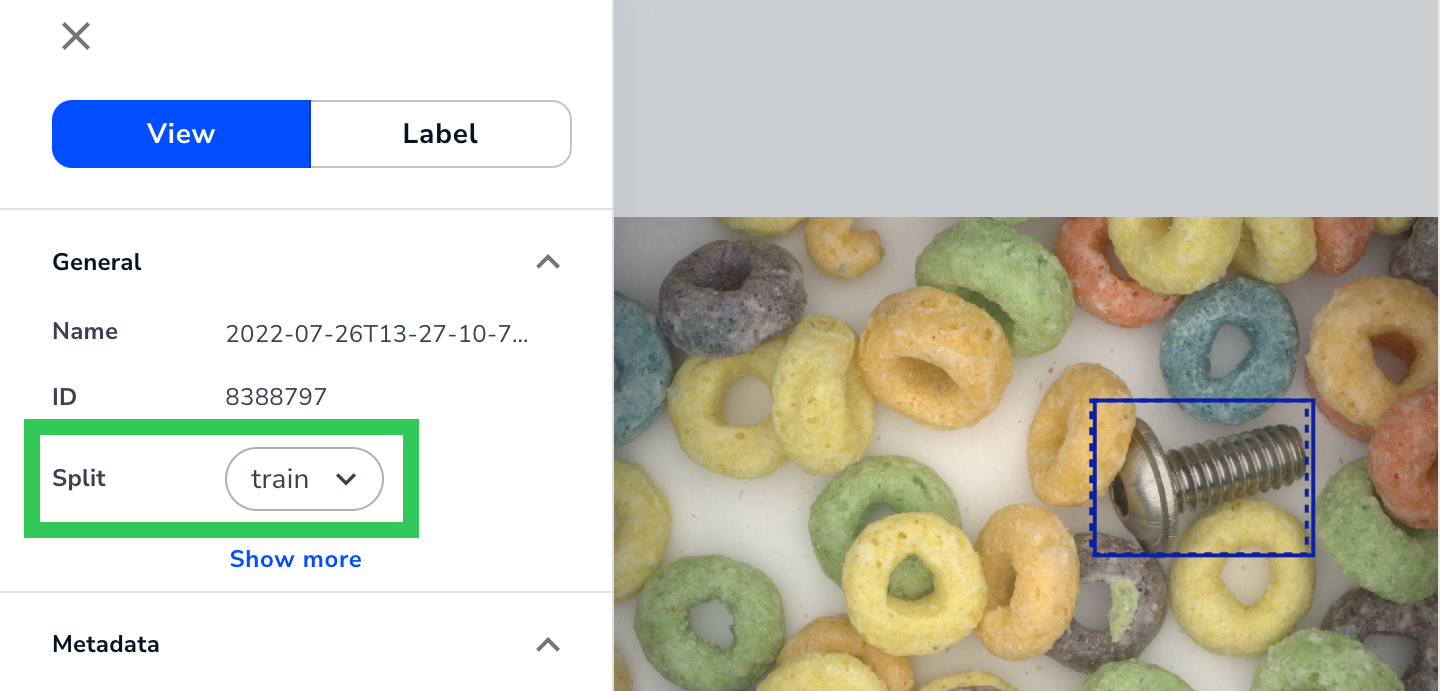 4. LandingLens automatically saves this change.
### Set Splits for Multiple Images in the Build Tab
After you've uploaded images to your project, you can manually assign multiple images into a specific set at once. You can repeat this process for each set. To do this:
1. Open the project.
2. Select the images you want to assign to a specific set.
3. Click **Options** in the action bar near the bottom of the screen and select **Set Split**. (You may need to scroll to see this option.)
4. LandingLens automatically saves this change.
### Set Splits for Multiple Images in the Build Tab
After you've uploaded images to your project, you can manually assign multiple images into a specific set at once. You can repeat this process for each set. To do this:
1. Open the project.
2. Select the images you want to assign to a specific set.
3. Click **Options** in the action bar near the bottom of the screen and select **Set Split**. (You may need to scroll to see this option.)
 4. Select the set you want to assign the images to.
5. Click **Apply**. The images are assigned to the selected set.
4. Select the set you want to assign the images to.
5. Click **Apply**. The images are assigned to the selected set.
 6. To deselect the images, click **Deselect All**.
### Set Split at Upload
6. To deselect the images, click **Deselect All**.
### Set Split at Upload
 ### Auto Split
You can automatically split images into all three sets at once by using the Auto Split tool. This tool allows you to select what percentage of images with each class to assign to each set. To do this:
1. Open the project.
2. Click the **Actions** button (ellipses) and select **Auto Split**.
### Auto Split
You can automatically split images into all three sets at once by using the Auto Split tool. This tool allows you to select what percentage of images with each class to assign to each set. To do this:
1. Open the project.
2. Click the **Actions** button (ellipses) and select **Auto Split**.
 3. If you want to override sets already assigned to images, select this checkbox: **Include assigned train/dev/test media to reassigned**.
4. Review the **Classes** section. For Object Detection projects, this shows how many bounding boxes are used for each class. For Segmentation and Classification projects, this shows how many images have each class.
3. If you want to override sets already assigned to images, select this checkbox: **Include assigned train/dev/test media to reassigned**.
4. Review the **Classes** section. For Object Detection projects, this shows how many bounding boxes are used for each class. For Segmentation and Classification projects, this shows how many images have each class.
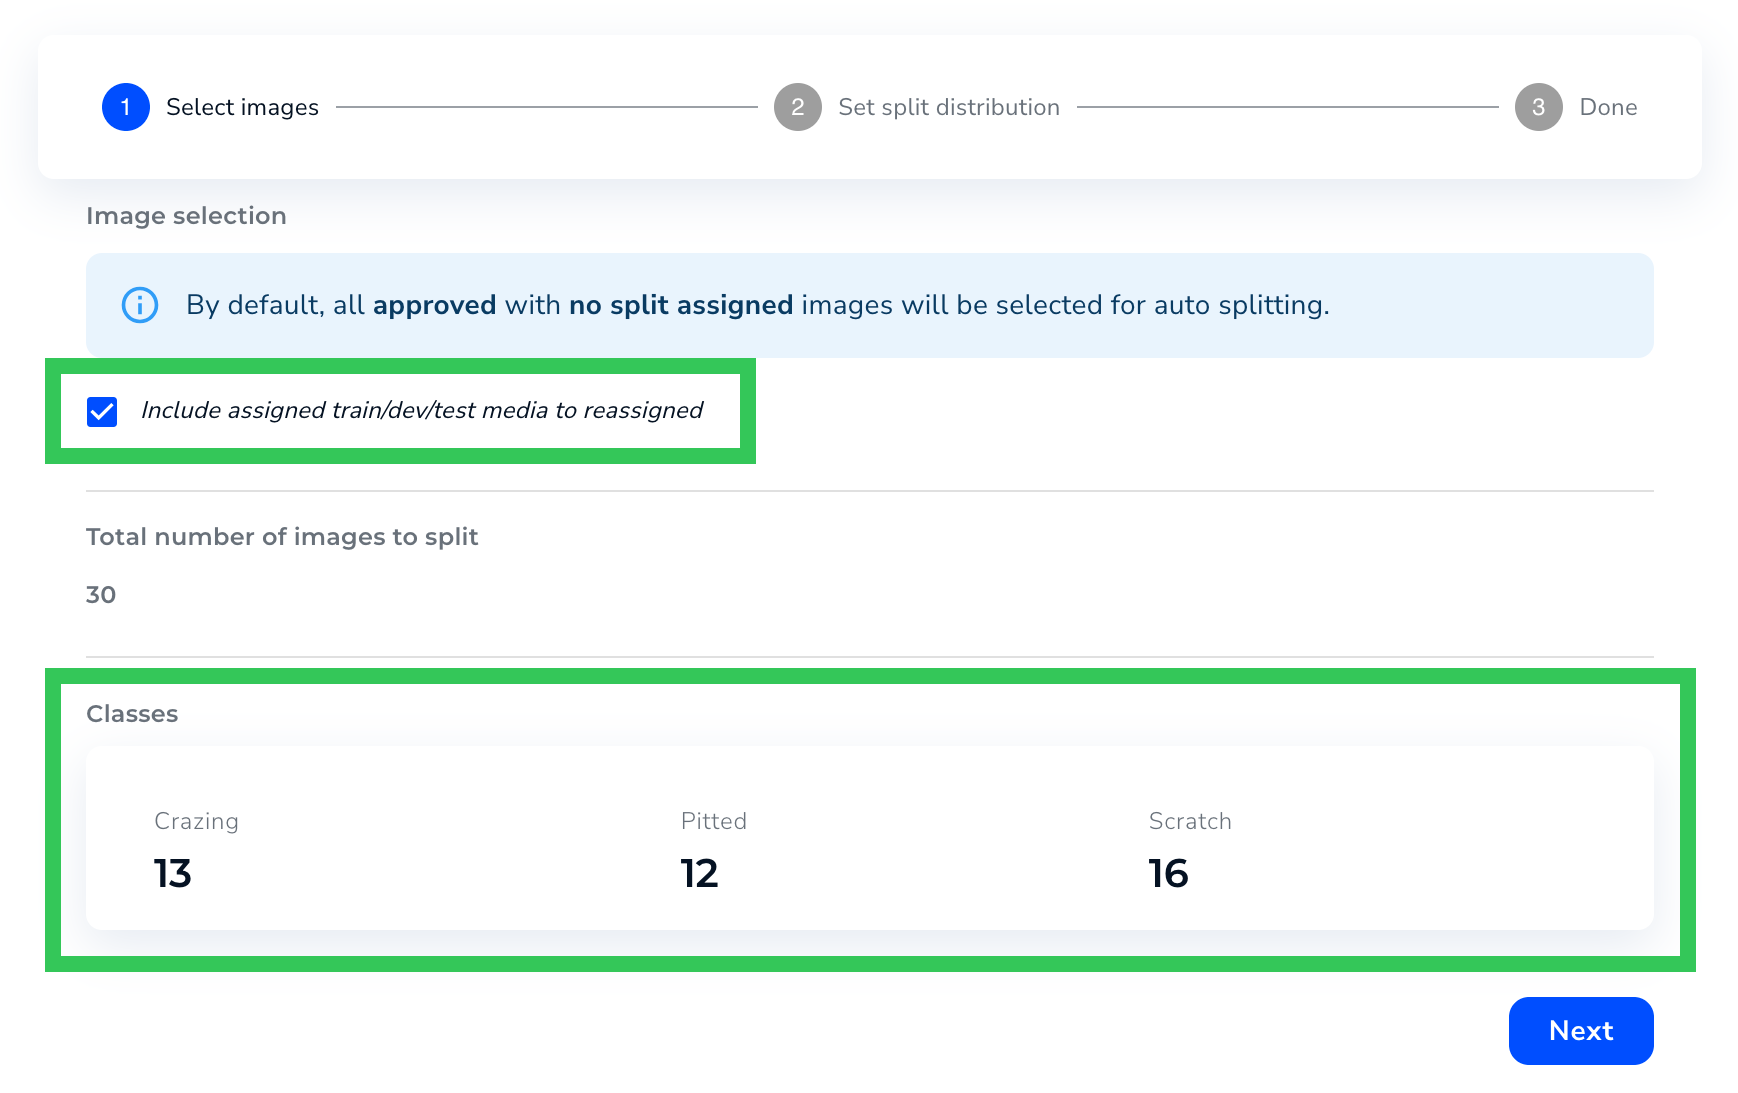 5. Click **Next**.
6. If you want to adjust the split percentage for all classes at the same, keep this checkbox selected: **Adjust value for all defect types together**. When this checkbox is selected, moving the slider for one class moves the slider for all classes.
7. Adjust the sliders to pick the percentages you want for each set.
5. Click **Next**.
6. If you want to adjust the split percentage for all classes at the same, keep this checkbox selected: **Adjust value for all defect types together**. When this checkbox is selected, moving the slider for one class moves the slider for all classes.
7. Adjust the sliders to pick the percentages you want for each set.
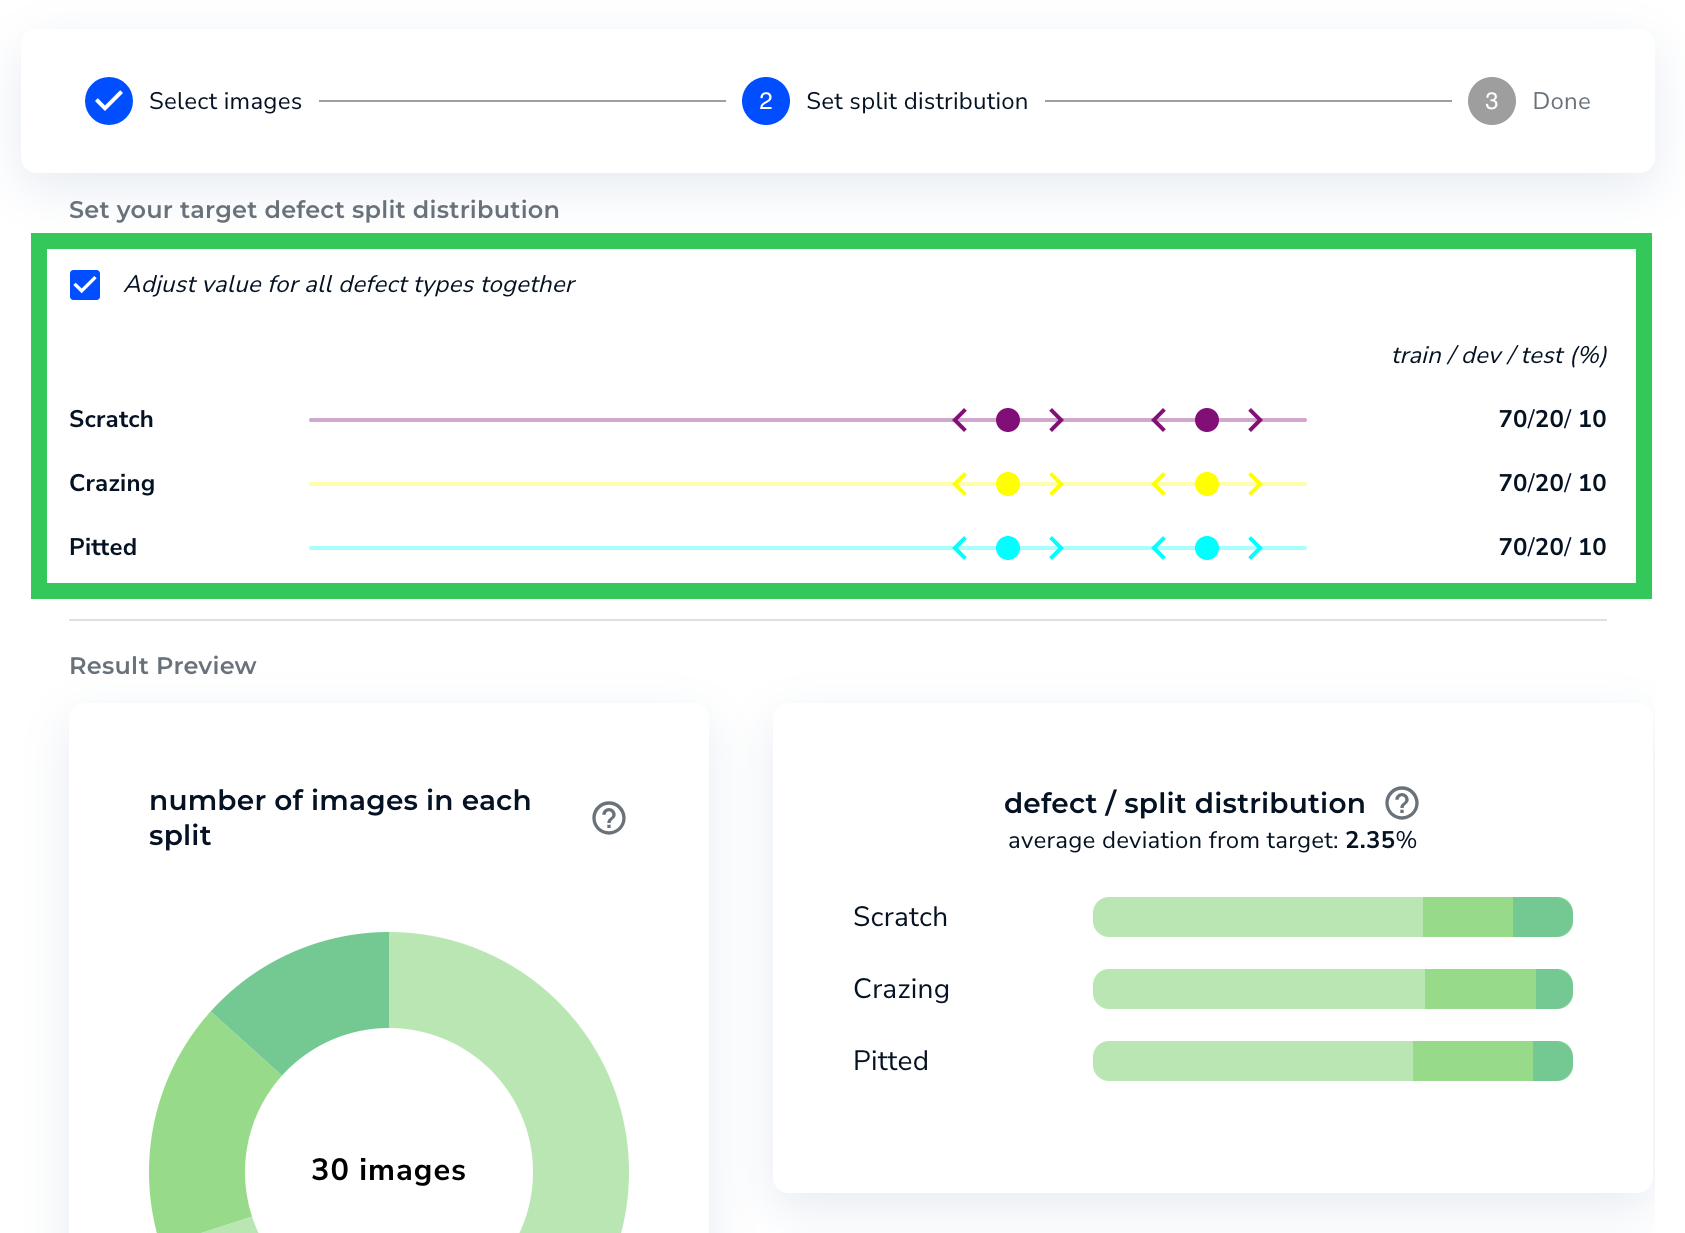 8. Refer to the charts on the page to preview the split.
9. When you're done adjusting the split percentages, click **Assign Split**.
10. LandingLens shows you the charts to confirm the split. Click **Close**.
8. Refer to the charts on the page to preview the split.
9. When you're done adjusting the split percentages, click **Assign Split**.
10. LandingLens shows you the charts to confirm the split. Click **Close**.