> ## Documentation Index
> Fetch the complete documentation index at: https://landinglens.docs.landing.ai/llms.txt
> Use this file to discover all available pages before exploring further.
# Segmentation
export const vp = 'Visual Prompting';
export const smartLabel = 'Smart Labeling';
export const productLL = 'LandingLens';
export const mi = 'Mobile Inference';
export const llsf = 'LandingLens on Snowflake';
export const companyName = 'LandingAI';
*This article applies to these versions of LandingLens:*
LandingLens
LandingLens on Snowflake
✓
✓ (see exceptions below)
**Segmentation** is used to identify objects with great precision. This is done by using a "brush" or {smartLabel} to mark the exact location of an object you want your model to detect. This object type is commonly used for identifying irregular shapes.
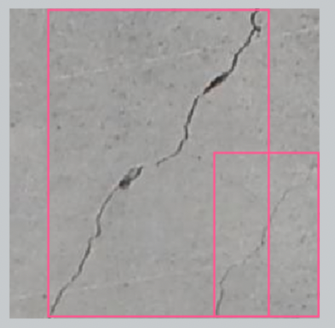
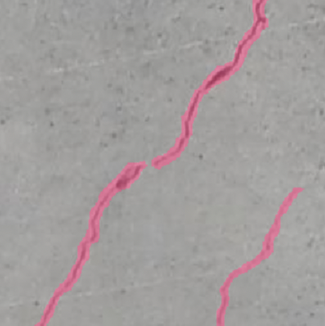
Let’s say you want to identify cracks in cement. You could use Object Detection; however, bounding boxes would include too much background (or space that you do not want to include in your label). During model training, the model will look at every labeled pixel. If you include extra, unimportant pixels, the model might think these pixels are also important. Instead, use Segmentation so that you can precisely label the relevant areas. Compare the labeling options in the following images:
## Labeling Tools for Segmentation
Segmentation offers the following tools to label objects. You can mix and match tools when labeling.
* [Smart Labeling](#label-an-object-with-smart-labeling): Click an area to auto-detect objects. {smartLabel} is not available in {llsf}.
* [Polygons](#label-with-polygons): Create a shape to fill the object you want to detect. You can also use this tool to "erase" labeled regions.
* [Brushes](#label-with-brushes): "Paint" over the object you want to detect. You can also use this tool to "erase" labeled regions.
* [Polylines](#label-with-polylines): Create lines over the object you want to detect.
## Label with Smart Labeling
{smartLabel} is a labeling tool powered by [SAM 2](https://ai.meta.com/research/sam2/), Meta's open-source Segment Anything Model, that helps you label objects in Segmentation projects faster than using traditional methods.
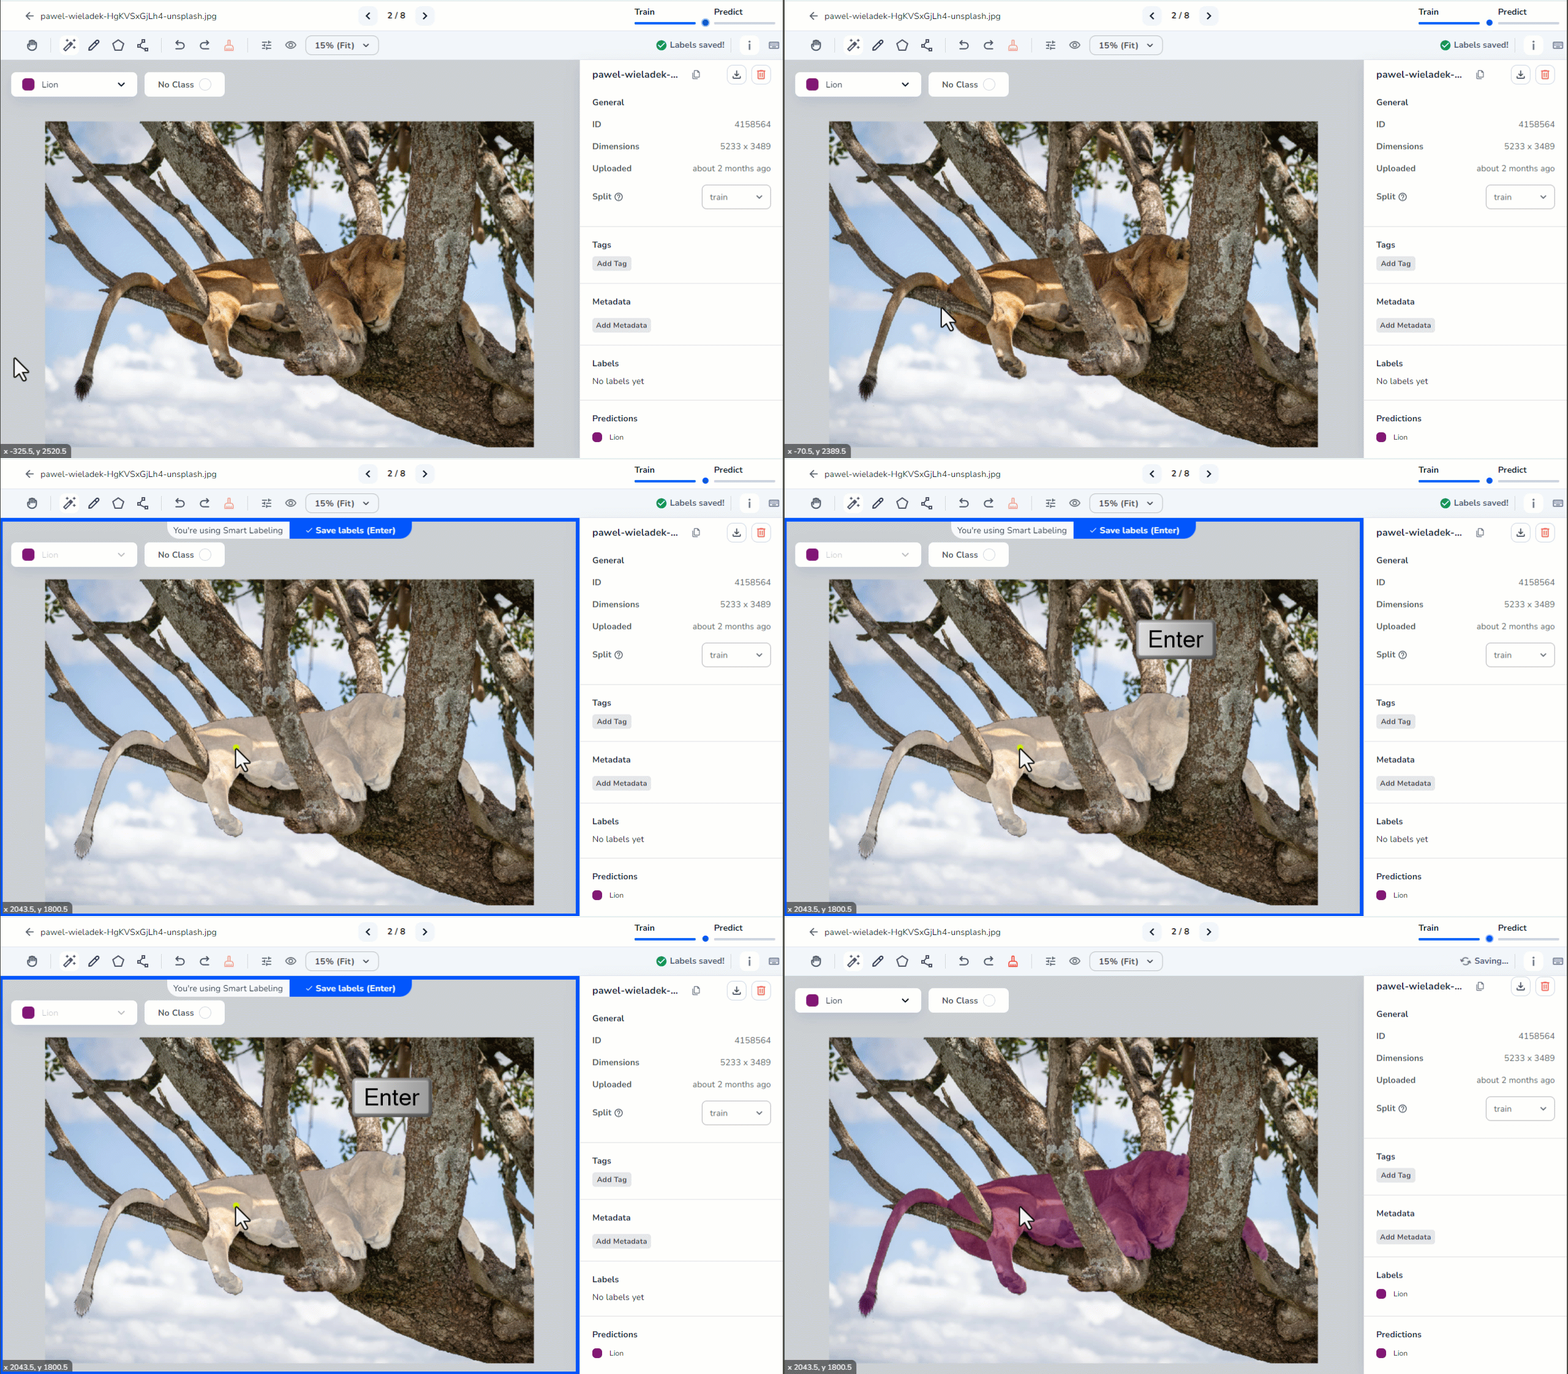
To use {smartLabel}, simply select the tool (or press Q), hover over and click the object you want to select. {smartLabel} automatically detects the shape of the object and adds a gray overlay to it. To confirm that {smartLabel} detected the correct object, press **Return** (Mac) or **Enter** (Windows) to confirm.
{smartLabel} is not available in {llsf}.
### Label an Object with Smart Labeling
To label an object with {smartLabel}:
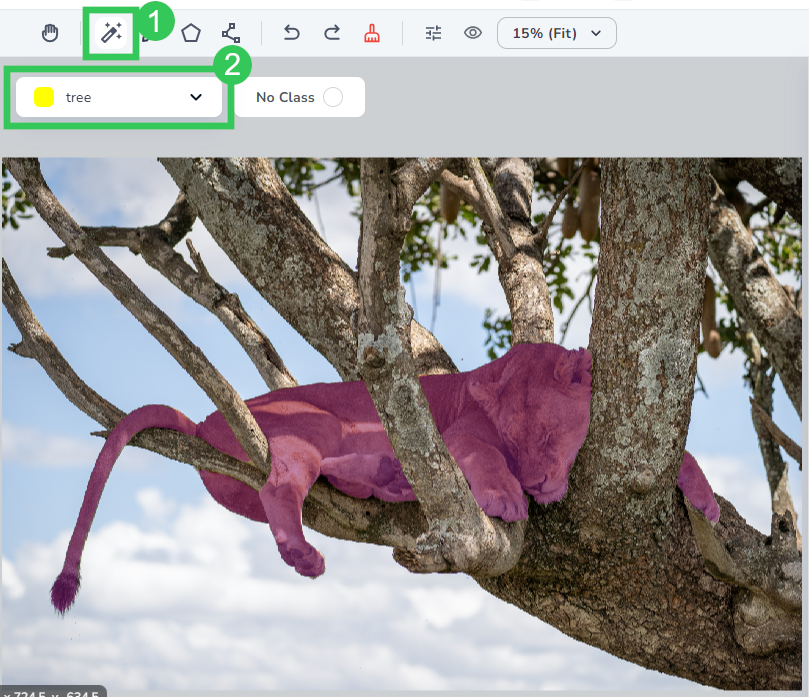
1. Click the **{smartLabel}** icon if it isn't selected, or press **q**.
2. Select the **Class** you want to label from the drop-down menu.
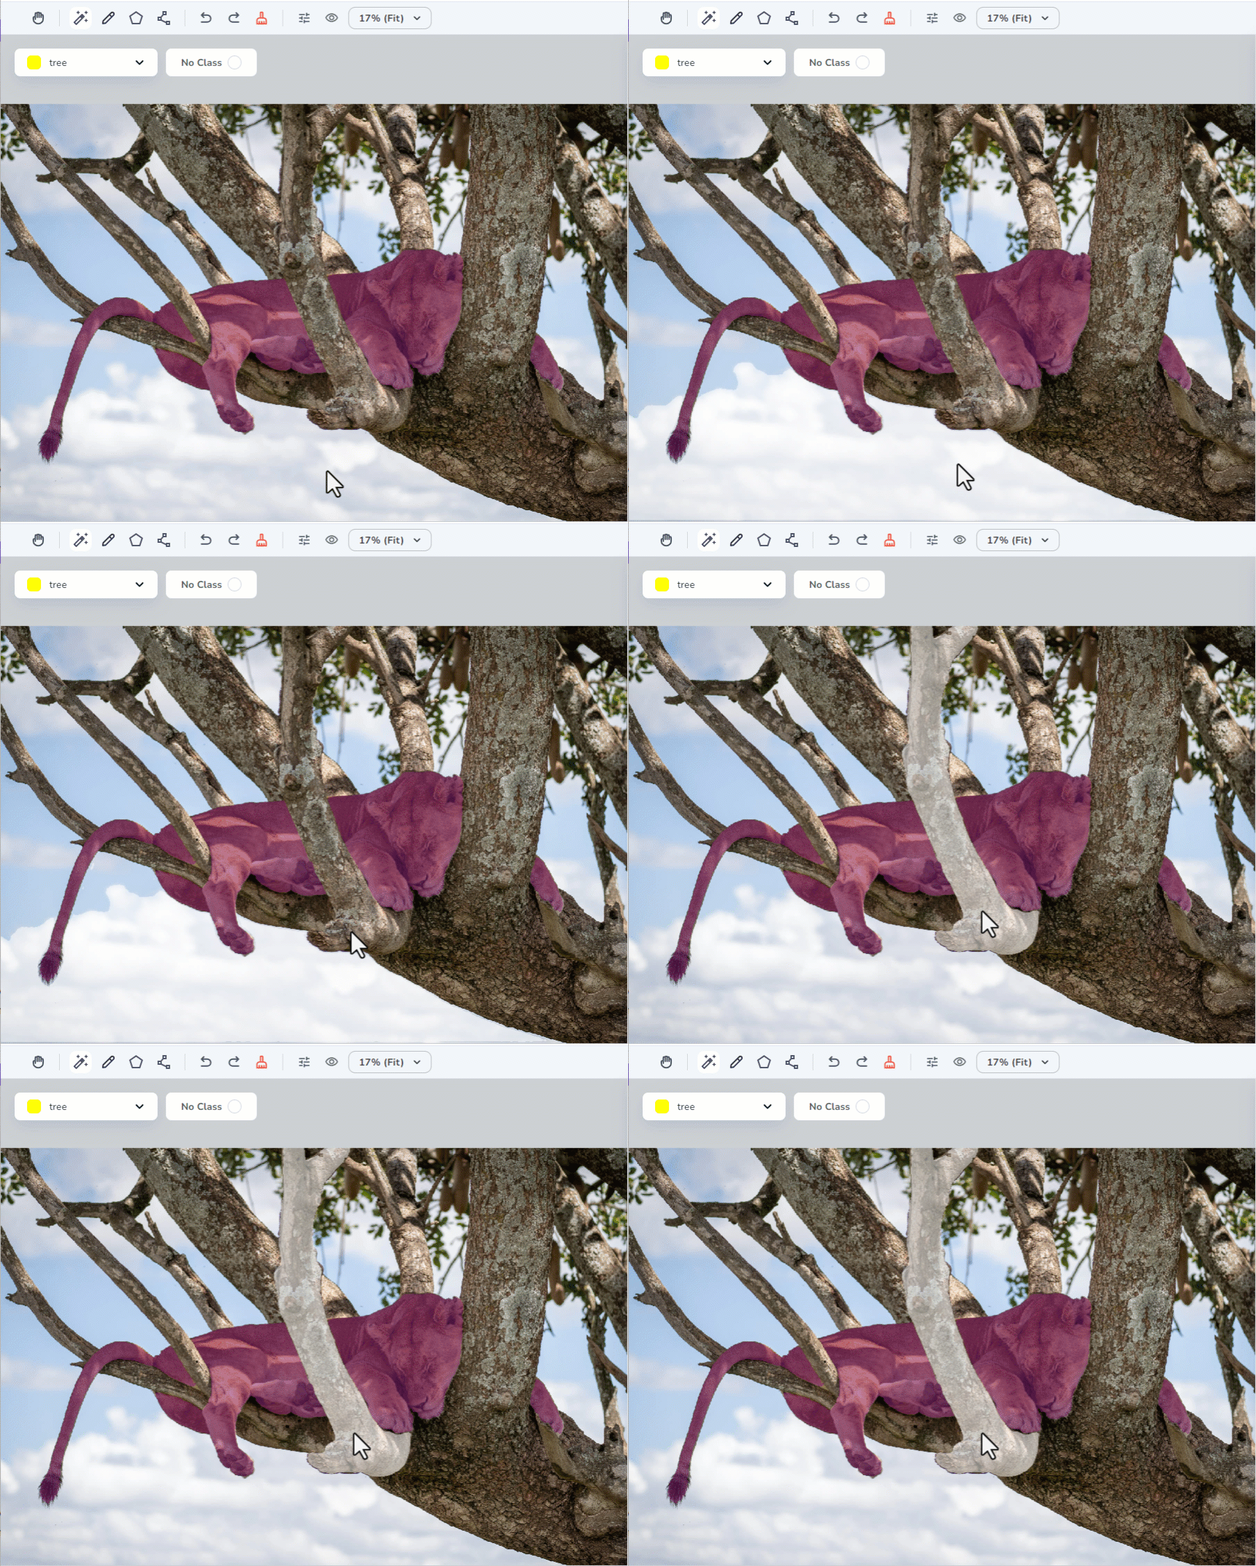
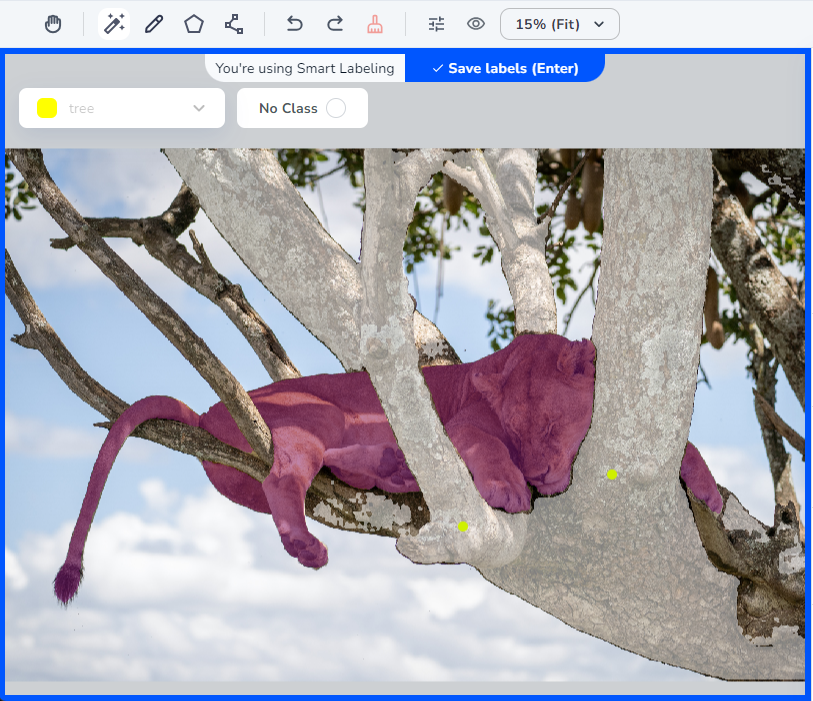
3. Hover over the object you want to select. Smart Labeling adds a gray overlay over the object it "thinks" you want to select.
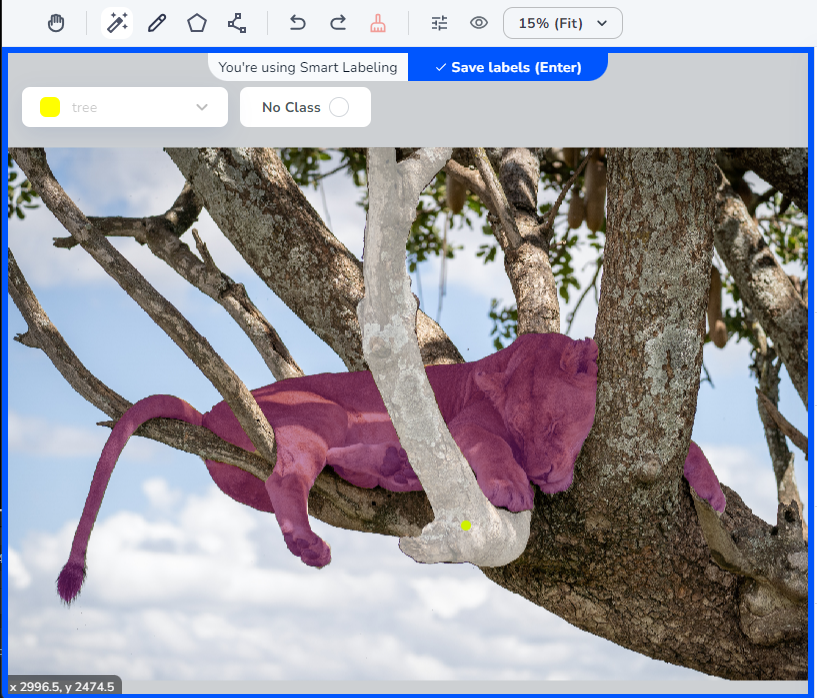
4. Click the object. {smartLabel} adds a green dot where you clicked. This, along with the gray overlay, help you track what regions you've selected. Clicking the object also adds a blue border to your frame, which indicates that you're using {smartLabel}.
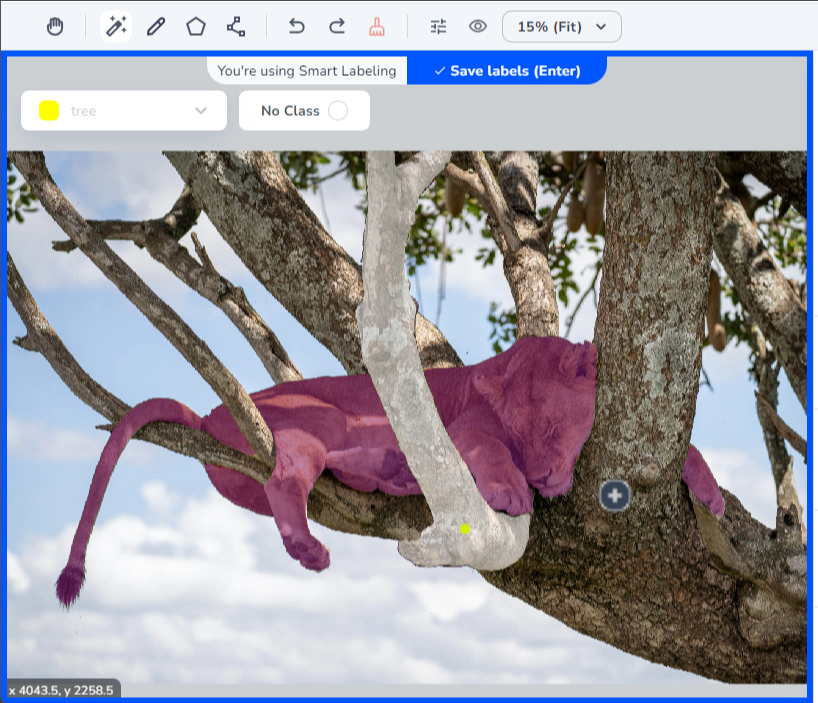
5. If you want to add another region to the same object, hover over that region. The cursor turns into a **+** (plus).
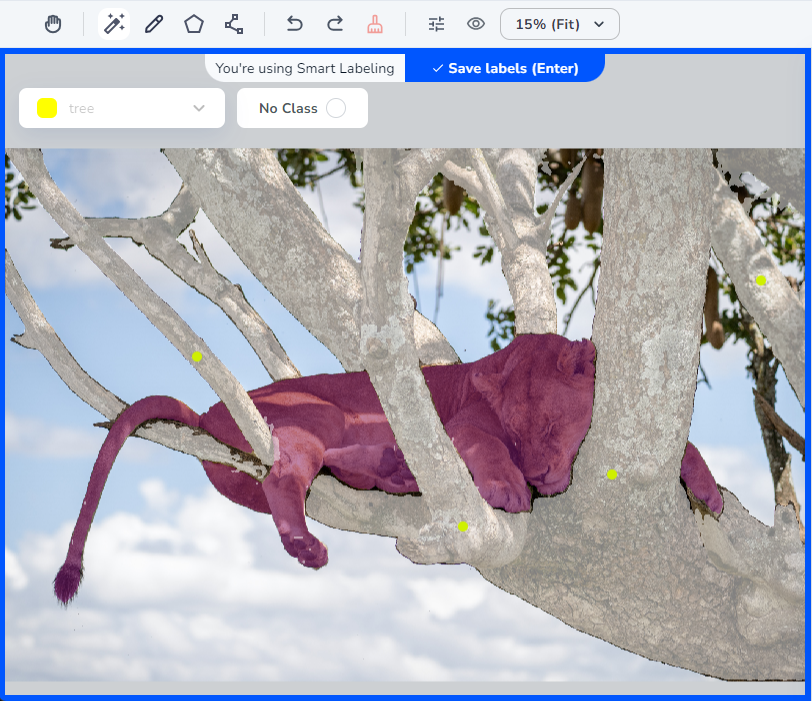
6. Click the object. Smart Labeling adds a gray overlay to the object and adds a green dot where you clicked.
7. You can continue to add regions using this method.
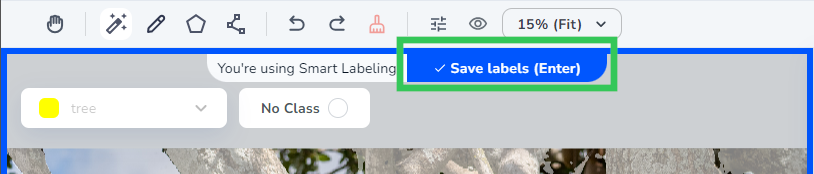
8. Once you've labeled all regions of the object, either click **Save Labels (Return)**, or press **Return** (Mac) or **Enter** (Windows).
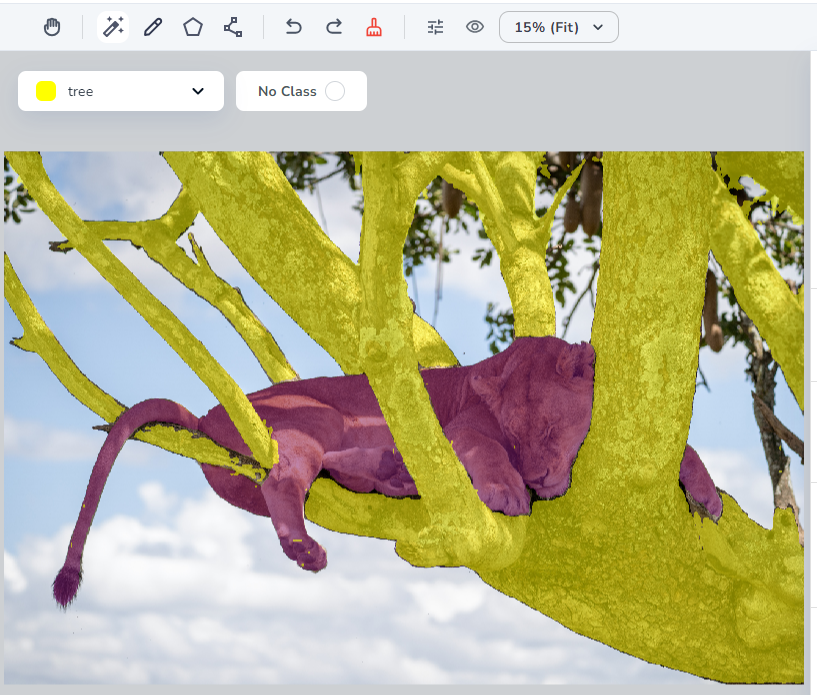
9. Smart Labeling labels the object with the selected Class.
### Remove a Region from a Selection
Let's say a region gets accidentally added to your selection. While {smartLabel} is selected, you can hover over that region until the cursor turns into a **−** (minus). Then click that region. {smartLabel} removes the selection. When you're done, press **Return** (Mac) or **Enter** (Windows).
To remove a region from an object (assumes that {smartLabel} is enabled, and you just labeled an object):
1. Hover over and click the labeled region. Smart Labeling removes the overlay and adds a red dot where you clicked, which helps you track what regions you've removed.
2. Continue to click selected regions until you've removed all the selections you want.
3. When you're done removing regions, press **Return** (Mac) or **Enter** (Windows).
### Tips for Labeling Multiple Objects in an Image
Let's say you're developing a model that detects tractors in construction sites. When using {smartLabel}, we recommend that you label each tractor one at a time, instead of labeling them all at once. In other words, label one tractor, and then press **Return** (Mac) or **Enter** (Windows). *Then* label the second tractor, and so on.
We don't recommend labeling all tractors at once, and then clicking **Enter**/**Return**. Doing that makes {smartLabel} think that these areas are the same object, and not the same *type* of object. If you do this, you might notice additional areas added to the object that aren't actually part of that object.
## Label with Polygons
The **polygon** tool lets you draw an outline of a shape. After the outline has been completed, the shape will be automatically filled. You can also use this tool to erase labeled regions.
To label with polygons:
1. Open the Segmentation project you want to edit.
2. Open the image you want to label.
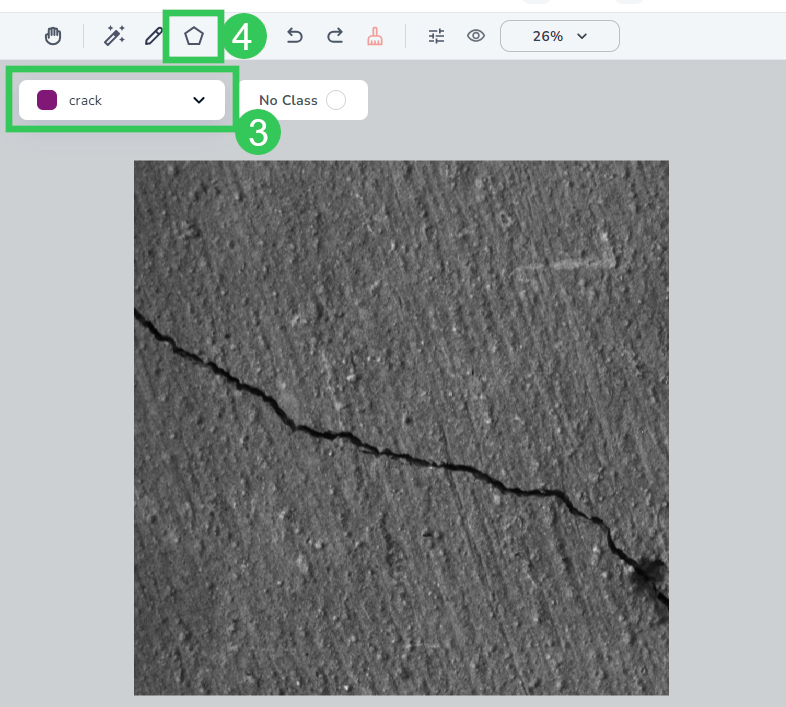
3. Click the **Polygon** icon. (You can also press **W** on your keyboard.)
4. Select a class from the drop-down menu.
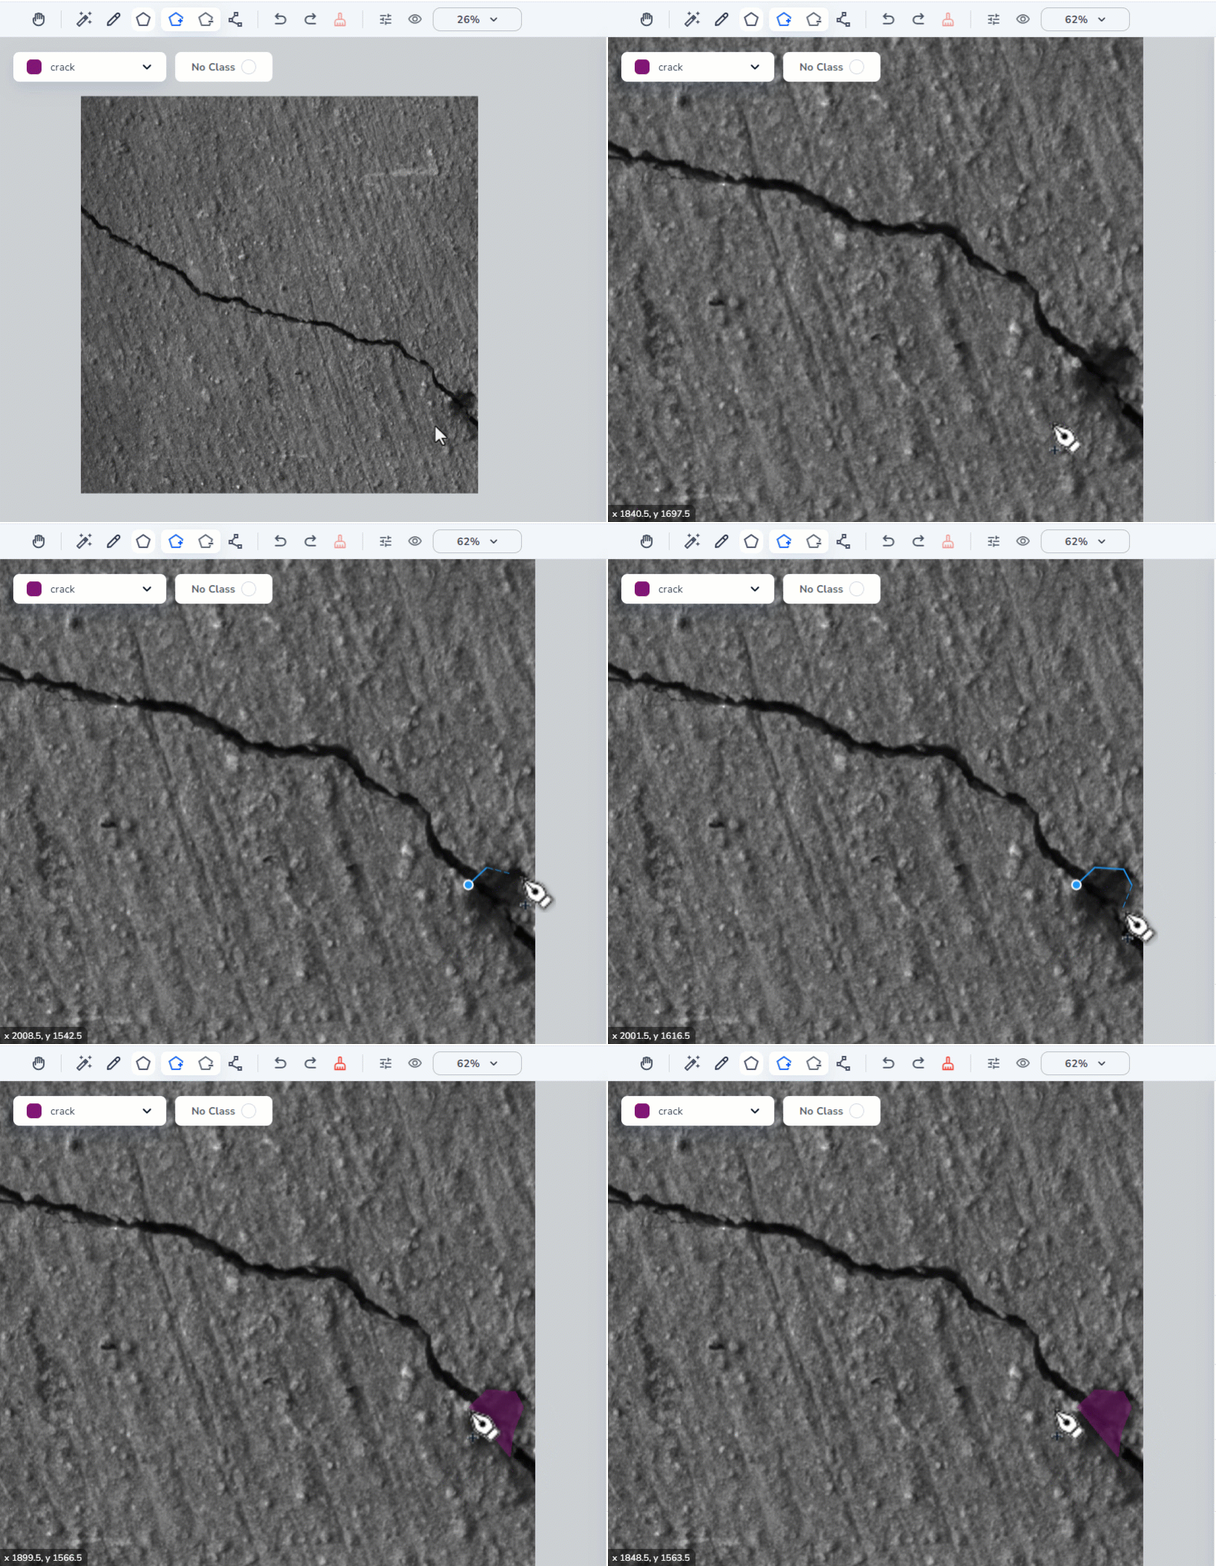
5. Click where you want to start your shape. A blue circle displays, indicating the start of the shape.
6. Click to continue creating your shape.
7. Complete your shape by clicking the blue circle. The shape automatically fills with the color of the class.
## Label with Brushes
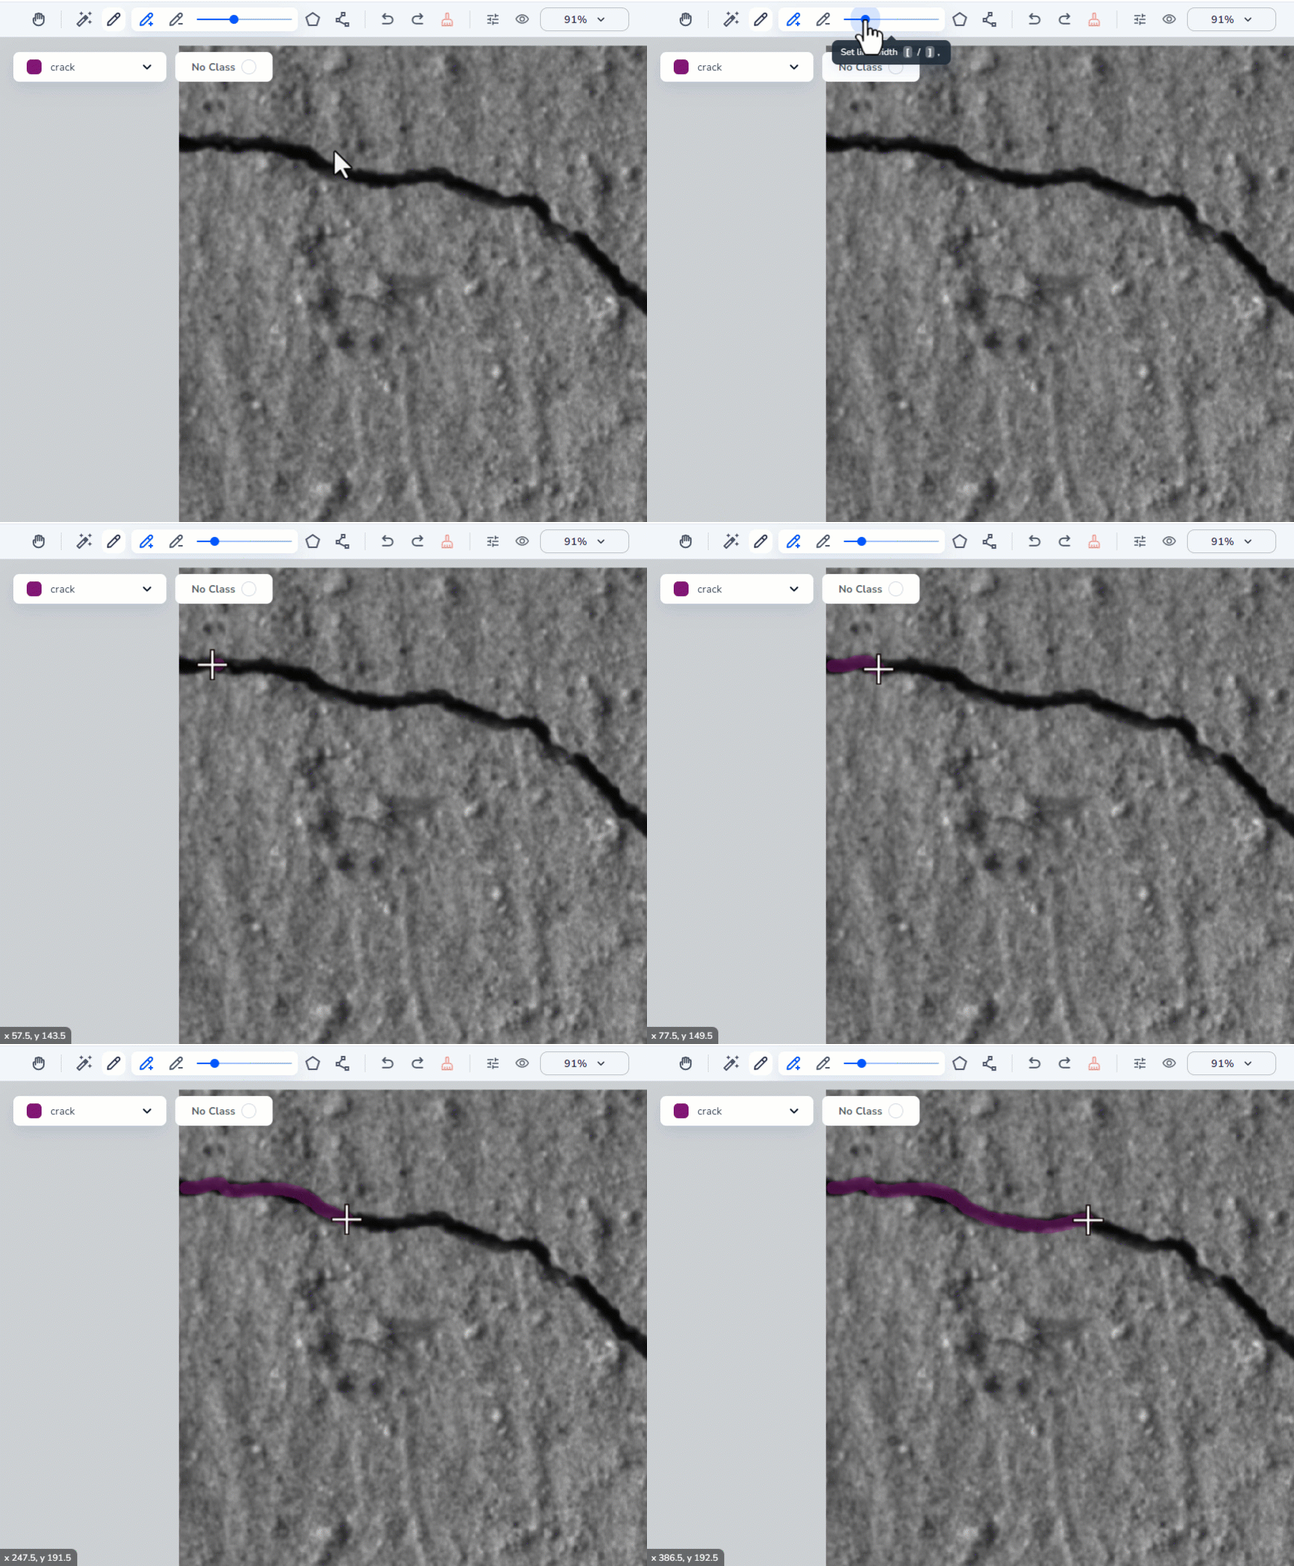
The **brush** tool lets you paint over the object of interest. You can also use this tool to erase labeled regions.
To label with brushes:
1. Open the Segmentation project you want to edit.
2. Open the image you want to label.
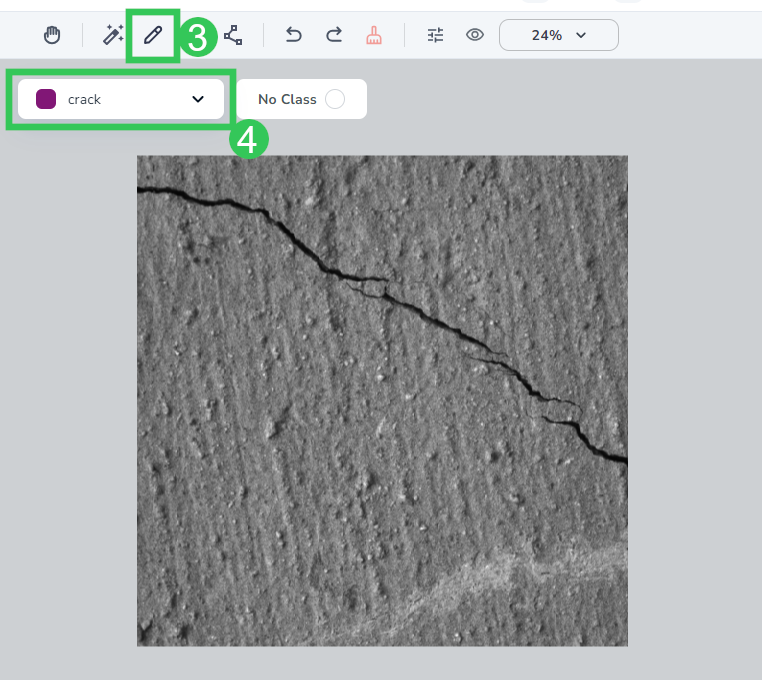
3. Click the **Brush** icon. (You can also press **B** on your keyboard.)
4. Select a class from the drop-down menu.
5. Adjust the size of the line width accordingly.
6. Click and drag your cursor to "paint" over the area you want to identify.
7. Release the mouse to complete your edits.
### Remove Excess Labels with Brushes
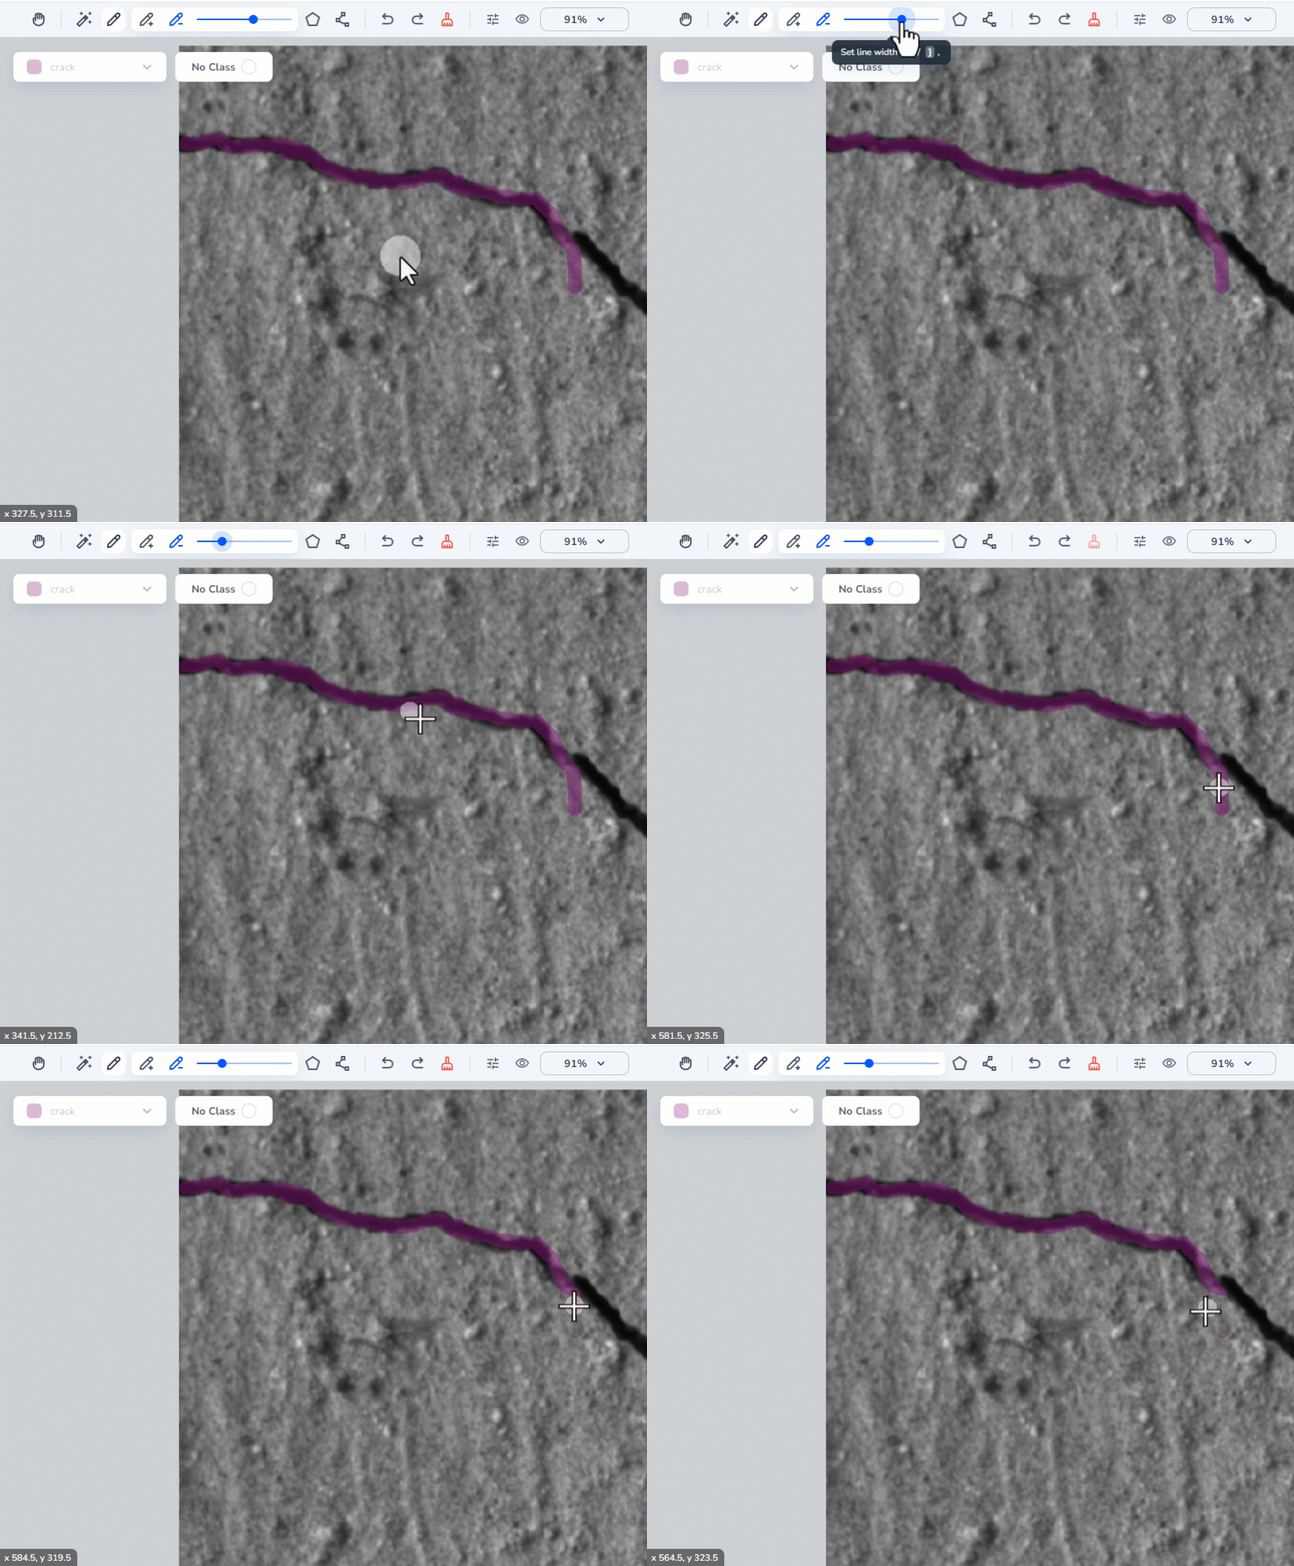
You can also remove excess labels with Polygons. This process is similar to the procedure in this section. For more information on how to use the Polygon tool, go [here](#label-with-polygons).
To remove excess labels with a Brush:
1. Open the Segmentation project you want to edit.
2. Open the image you want to label.
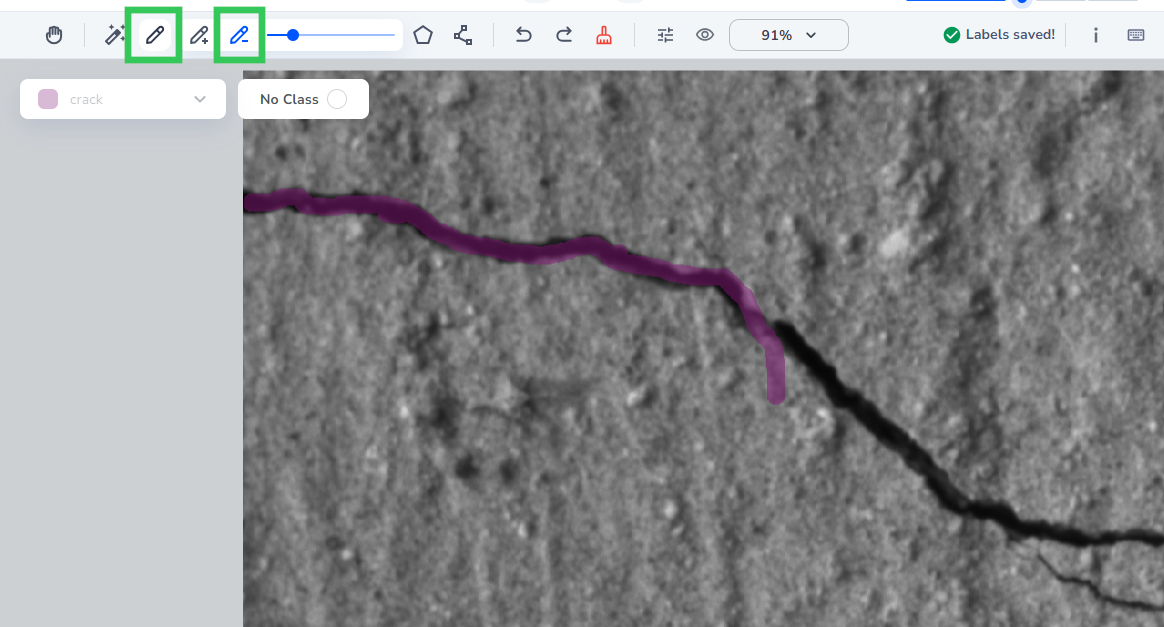
3. Click the **Brush** icon. (You can also press **B** on your keyboard.)
4. Click the **Erase** icon. (You can also press **E** on your keyboard.)
5. Adjust the size of the eraser accordingly.
6. Click and drag your cursor over the area you want to remove.
7. Release the mouse to complete your edits.
## Label with Polylines
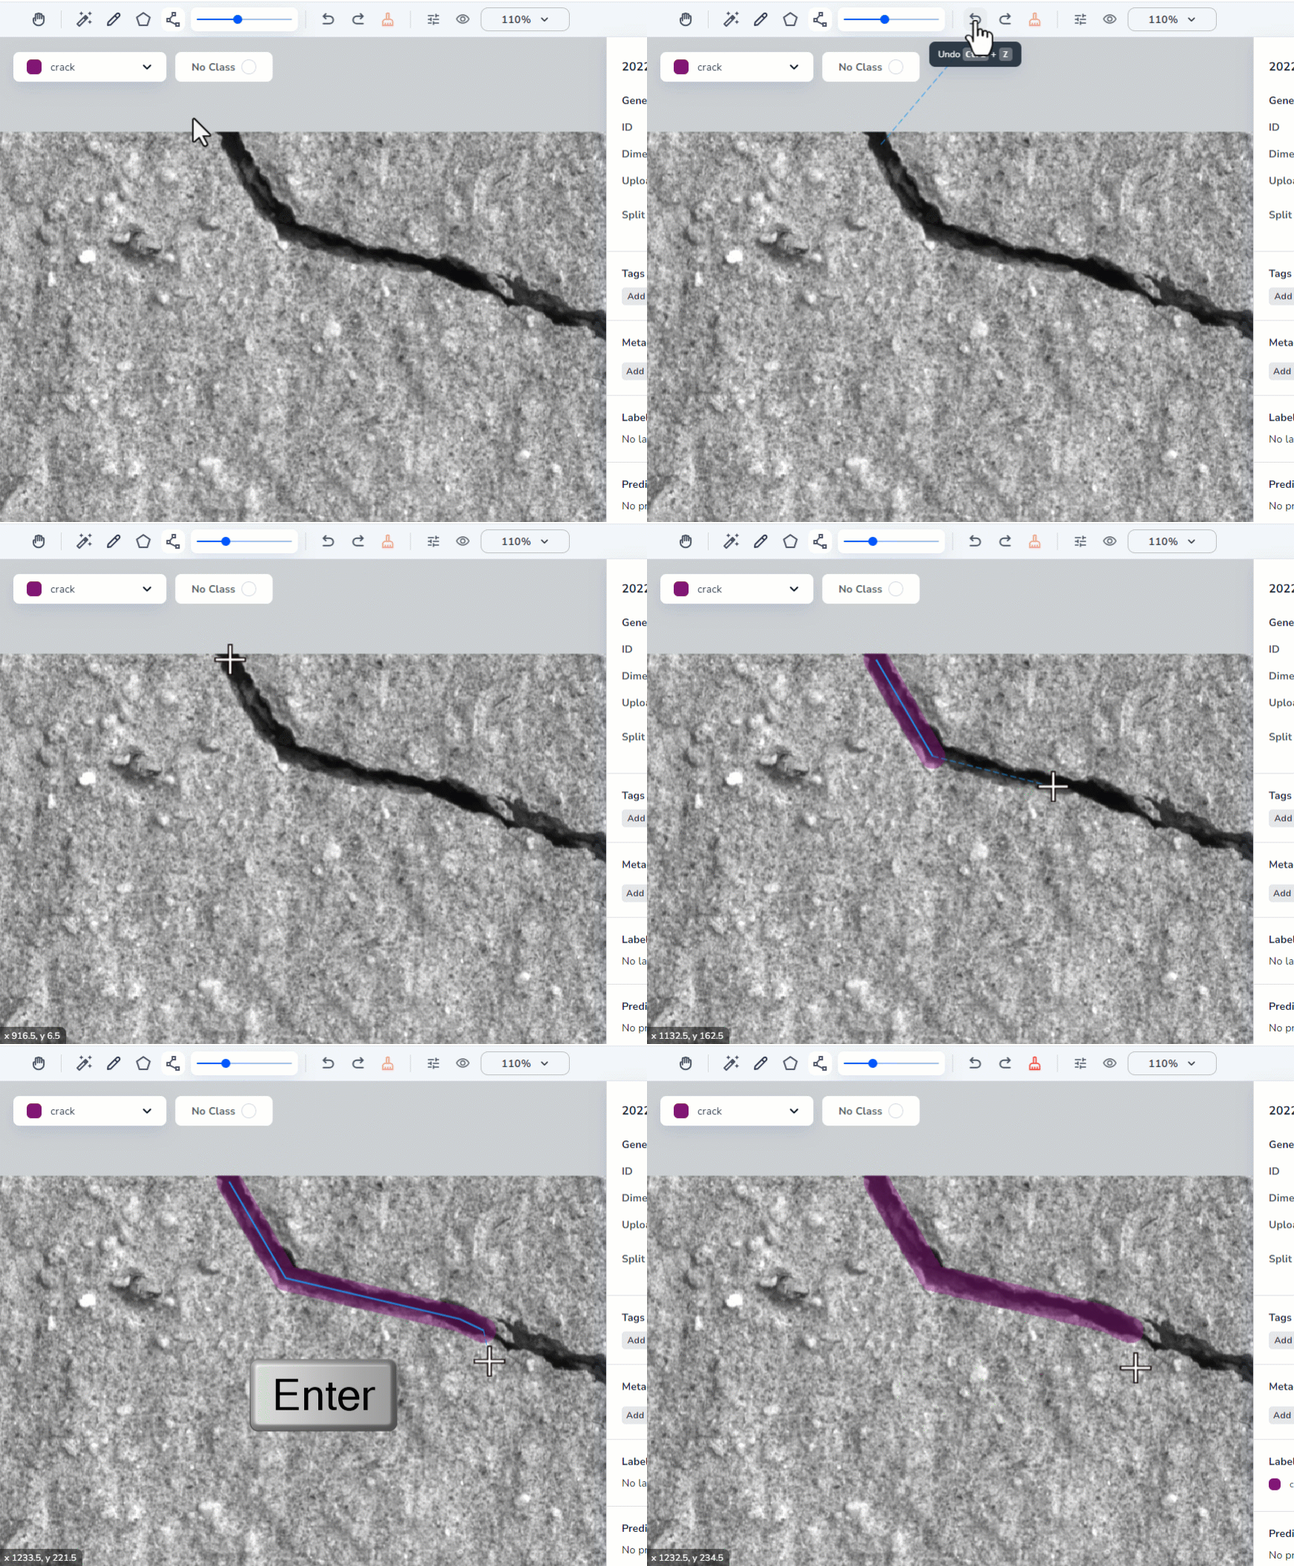
The **polyline** tool lets you create lines over the object of interest.
To label with polylines:
1. Open the Segmentation project you want to edit.
2. Open the image you want to label.
3. Click the **Polyline** icon. (You can also press **L** on your keyboard.)
4. Select the class you want to label from the drop-down menu.
5. Adjust the size of the line width accordingly.
6. Click where you want to start your line.
7. Click to change the direction of your line.
8. Press **Enter** on your keyboard to complete your edits.
 ## Labeling Tools for Segmentation
Segmentation offers the following tools to label objects. You can mix and match tools when labeling.
* [Smart Labeling](#label-an-object-with-smart-labeling): Click an area to auto-detect objects. {smartLabel} is not available in {llsf}.
* [Polygons](#label-with-polygons): Create a shape to fill the object you want to detect. You can also use this tool to "erase" labeled regions.
* [Brushes](#label-with-brushes): "Paint" over the object you want to detect. You can also use this tool to "erase" labeled regions.
* [Polylines](#label-with-polylines): Create lines over the object you want to detect.
## Label with Smart Labeling
{smartLabel} is a labeling tool powered by [SAM 2](https://ai.meta.com/research/sam2/), Meta's open-source Segment Anything Model, that helps you label objects in Segmentation projects faster than using traditional methods.
To use {smartLabel}, simply select the tool (or press Q), hover over and click the object you want to select. {smartLabel} automatically detects the shape of the object and adds a gray overlay to it. To confirm that {smartLabel} detected the correct object, press **Return** (Mac) or **Enter** (Windows) to confirm.
## Labeling Tools for Segmentation
Segmentation offers the following tools to label objects. You can mix and match tools when labeling.
* [Smart Labeling](#label-an-object-with-smart-labeling): Click an area to auto-detect objects. {smartLabel} is not available in {llsf}.
* [Polygons](#label-with-polygons): Create a shape to fill the object you want to detect. You can also use this tool to "erase" labeled regions.
* [Brushes](#label-with-brushes): "Paint" over the object you want to detect. You can also use this tool to "erase" labeled regions.
* [Polylines](#label-with-polylines): Create lines over the object you want to detect.
## Label with Smart Labeling
{smartLabel} is a labeling tool powered by [SAM 2](https://ai.meta.com/research/sam2/), Meta's open-source Segment Anything Model, that helps you label objects in Segmentation projects faster than using traditional methods.
To use {smartLabel}, simply select the tool (or press Q), hover over and click the object you want to select. {smartLabel} automatically detects the shape of the object and adds a gray overlay to it. To confirm that {smartLabel} detected the correct object, press **Return** (Mac) or **Enter** (Windows) to confirm.
 3. Hover over the object you want to select. Smart Labeling adds a gray overlay over the object it "thinks" you want to select.
 4. Click the object. {smartLabel} adds a green dot where you clicked. This, along with the gray overlay, help you track what regions you've selected. Clicking the object also adds a blue border to your frame, which indicates that you're using {smartLabel}.
 5. If you want to add another region to the same object, hover over that region. The cursor turns into a **+** (plus).
 6. Click the object. Smart Labeling adds a gray overlay to the object and adds a green dot where you clicked.
 7. You can continue to add regions using this method.
 8. Once you've labeled all regions of the object, either click **Save Labels (Return)**, or press **Return** (Mac) or **Enter** (Windows).
 9. Smart Labeling labels the object with the selected Class.
 ### Remove a Region from a Selection
Let's say a region gets accidentally added to your selection. While {smartLabel} is selected, you can hover over that region until the cursor turns into a **−** (minus). Then click that region. {smartLabel} removes the selection. When you're done, press **Return** (Mac) or **Enter** (Windows).
To remove a region from an object (assumes that {smartLabel} is enabled, and you just labeled an object):
1. Hover over and click the labeled region. Smart Labeling removes the overlay and adds a red dot where you clicked, which helps you track what regions you've removed.
### Remove a Region from a Selection
Let's say a region gets accidentally added to your selection. While {smartLabel} is selected, you can hover over that region until the cursor turns into a **−** (minus). Then click that region. {smartLabel} removes the selection. When you're done, press **Return** (Mac) or **Enter** (Windows).
To remove a region from an object (assumes that {smartLabel} is enabled, and you just labeled an object):
1. Hover over and click the labeled region. Smart Labeling removes the overlay and adds a red dot where you clicked, which helps you track what regions you've removed.
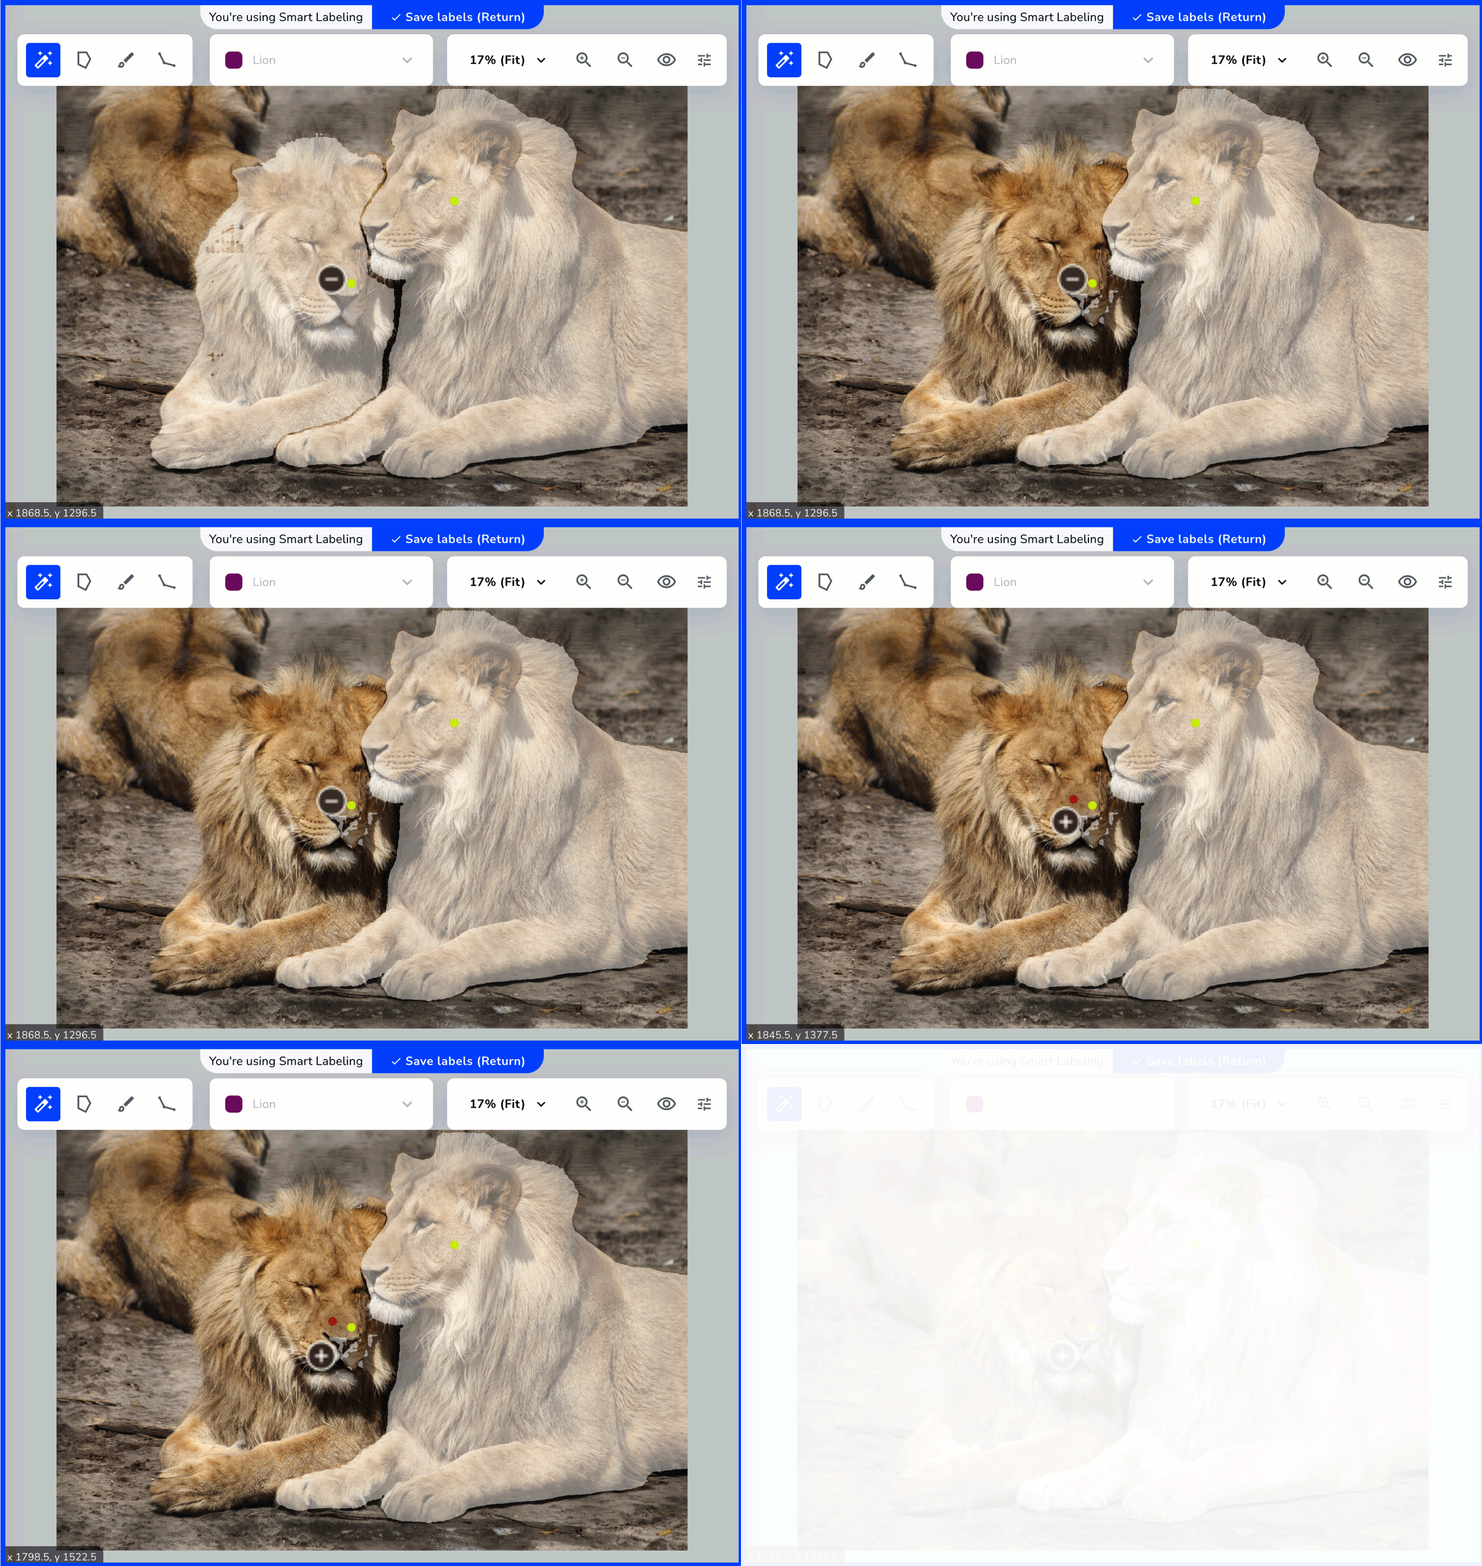 2. Continue to click selected regions until you've removed all the selections you want.
3. When you're done removing regions, press **Return** (Mac) or **Enter** (Windows).
### Tips for Labeling Multiple Objects in an Image
Let's say you're developing a model that detects tractors in construction sites. When using {smartLabel}, we recommend that you label each tractor one at a time, instead of labeling them all at once. In other words, label one tractor, and then press **Return** (Mac) or **Enter** (Windows). *Then* label the second tractor, and so on.
2. Continue to click selected regions until you've removed all the selections you want.
3. When you're done removing regions, press **Return** (Mac) or **Enter** (Windows).
### Tips for Labeling Multiple Objects in an Image
Let's say you're developing a model that detects tractors in construction sites. When using {smartLabel}, we recommend that you label each tractor one at a time, instead of labeling them all at once. In other words, label one tractor, and then press **Return** (Mac) or **Enter** (Windows). *Then* label the second tractor, and so on.
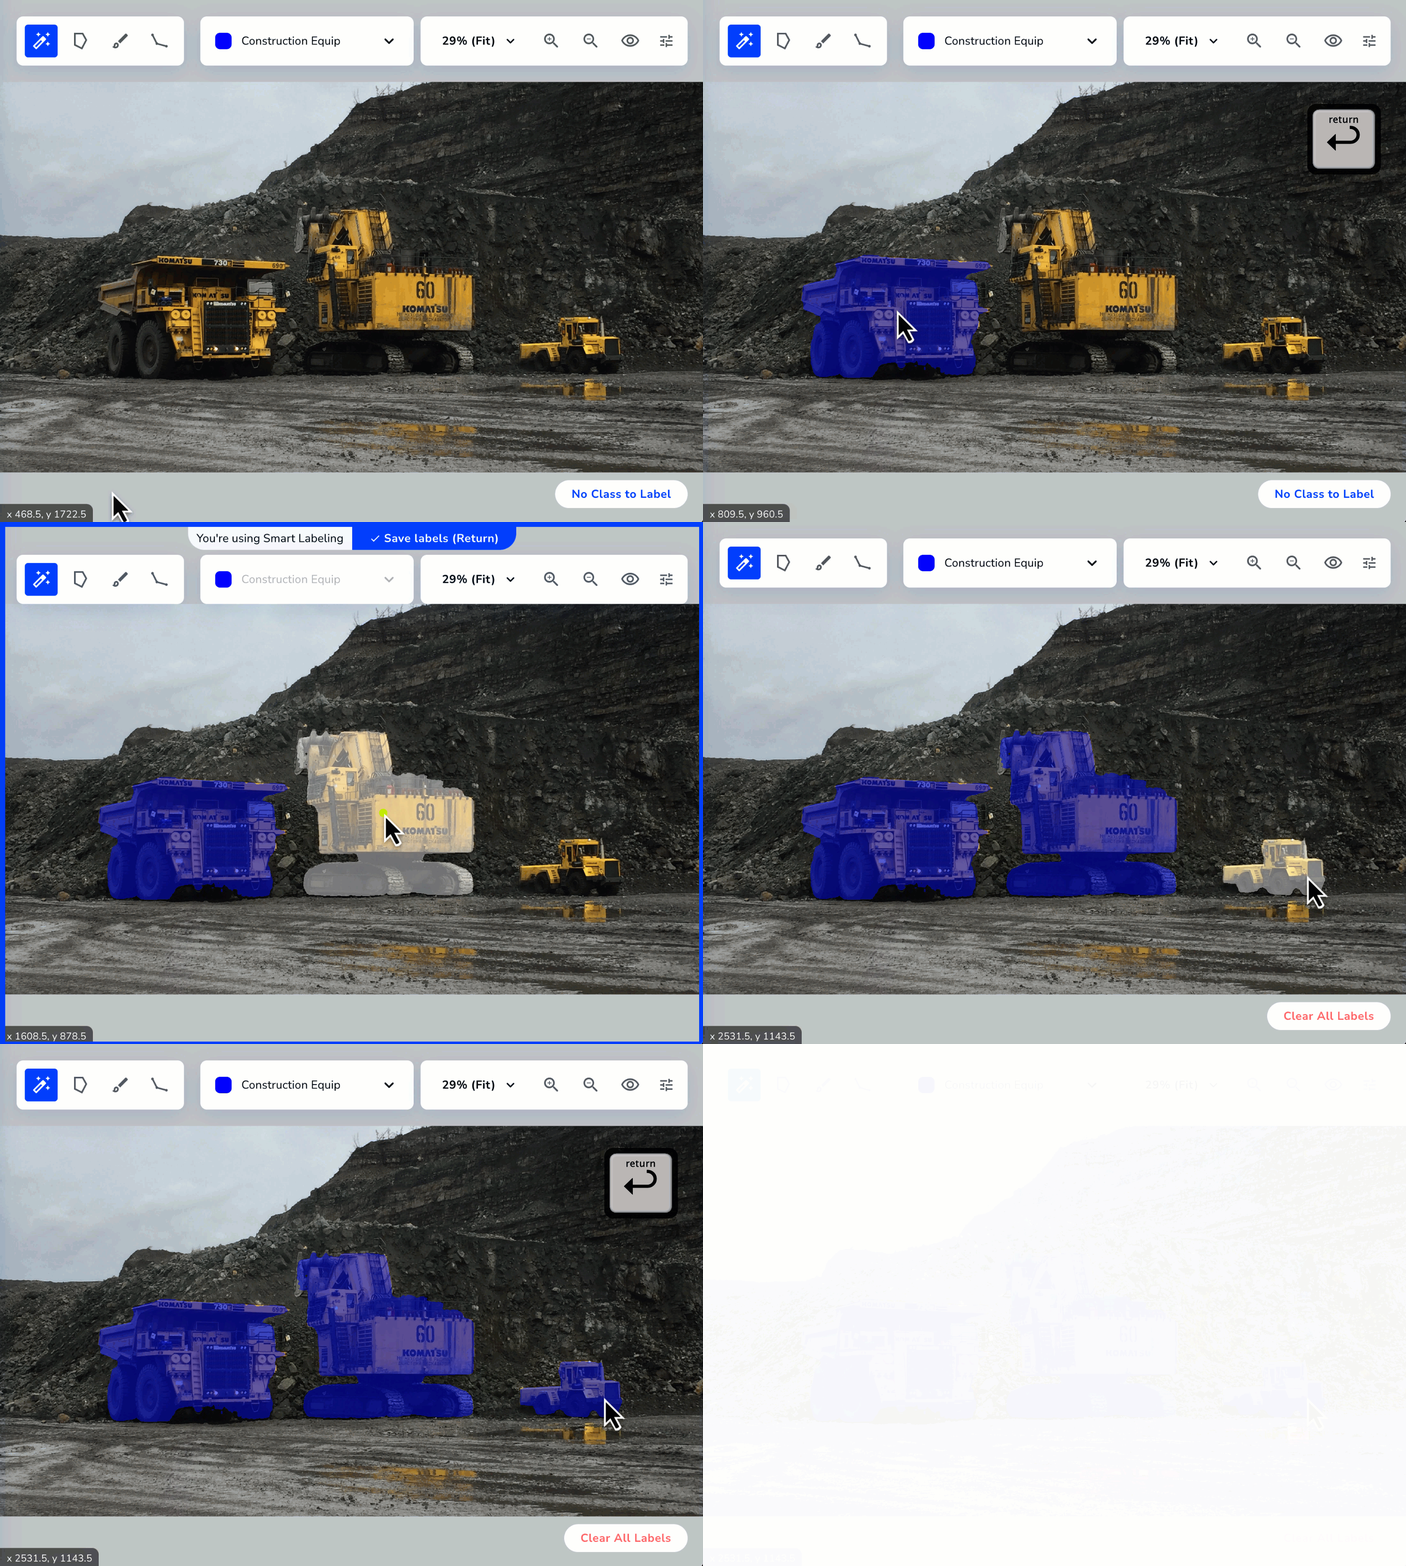 We don't recommend labeling all tractors at once, and then clicking **Enter**/**Return**. Doing that makes {smartLabel} think that these areas are the same object, and not the same *type* of object. If you do this, you might notice additional areas added to the object that aren't actually part of that object.
## Label with Polygons
The **polygon** tool lets you draw an outline of a shape. After the outline has been completed, the shape will be automatically filled. You can also use this tool to erase labeled regions.
To label with polygons:
1. Open the Segmentation project you want to edit.
2. Open the image you want to label.
3. Click the **Polygon** icon. (You can also press **W** on your keyboard.)
4. Select a class from the drop-down menu.
We don't recommend labeling all tractors at once, and then clicking **Enter**/**Return**. Doing that makes {smartLabel} think that these areas are the same object, and not the same *type* of object. If you do this, you might notice additional areas added to the object that aren't actually part of that object.
## Label with Polygons
The **polygon** tool lets you draw an outline of a shape. After the outline has been completed, the shape will be automatically filled. You can also use this tool to erase labeled regions.
To label with polygons:
1. Open the Segmentation project you want to edit.
2. Open the image you want to label.
3. Click the **Polygon** icon. (You can also press **W** on your keyboard.)
4. Select a class from the drop-down menu.
 5. Click where you want to start your shape. A blue circle displays, indicating the start of the shape.
6. Click to continue creating your shape.
7. Complete your shape by clicking the blue circle. The shape automatically fills with the color of the class.
5. Click where you want to start your shape. A blue circle displays, indicating the start of the shape.
6. Click to continue creating your shape.
7. Complete your shape by clicking the blue circle. The shape automatically fills with the color of the class.
 ## Label with Brushes
The **brush** tool lets you paint over the object of interest. You can also use this tool to erase labeled regions.
To label with brushes:
1. Open the Segmentation project you want to edit.
2. Open the image you want to label.
3. Click the **Brush** icon. (You can also press **B** on your keyboard.)
4. Select a class from the drop-down menu.
## Label with Brushes
The **brush** tool lets you paint over the object of interest. You can also use this tool to erase labeled regions.
To label with brushes:
1. Open the Segmentation project you want to edit.
2. Open the image you want to label.
3. Click the **Brush** icon. (You can also press **B** on your keyboard.)
4. Select a class from the drop-down menu.
 5. Adjust the size of the line width accordingly.
6. Click and drag your cursor to "paint" over the area you want to identify.
7. Release the mouse to complete your edits.
5. Adjust the size of the line width accordingly.
6. Click and drag your cursor to "paint" over the area you want to identify.
7. Release the mouse to complete your edits.
 ### Remove Excess Labels with Brushes
 5. Adjust the size of the eraser accordingly.
6. Click and drag your cursor over the area you want to remove.
7. Release the mouse to complete your edits.
5. Adjust the size of the eraser accordingly.
6. Click and drag your cursor over the area you want to remove.
7. Release the mouse to complete your edits.
 ## Label with Polylines
The **polyline** tool lets you create lines over the object of interest.
To label with polylines:
1. Open the Segmentation project you want to edit.
2. Open the image you want to label.
3. Click the **Polyline** icon. (You can also press **L** on your keyboard.)
4. Select the class you want to label from the drop-down menu.
## Label with Polylines
The **polyline** tool lets you create lines over the object of interest.
To label with polylines:
1. Open the Segmentation project you want to edit.
2. Open the image you want to label.
3. Click the **Polyline** icon. (You can also press **L** on your keyboard.)
4. Select the class you want to label from the drop-down menu.
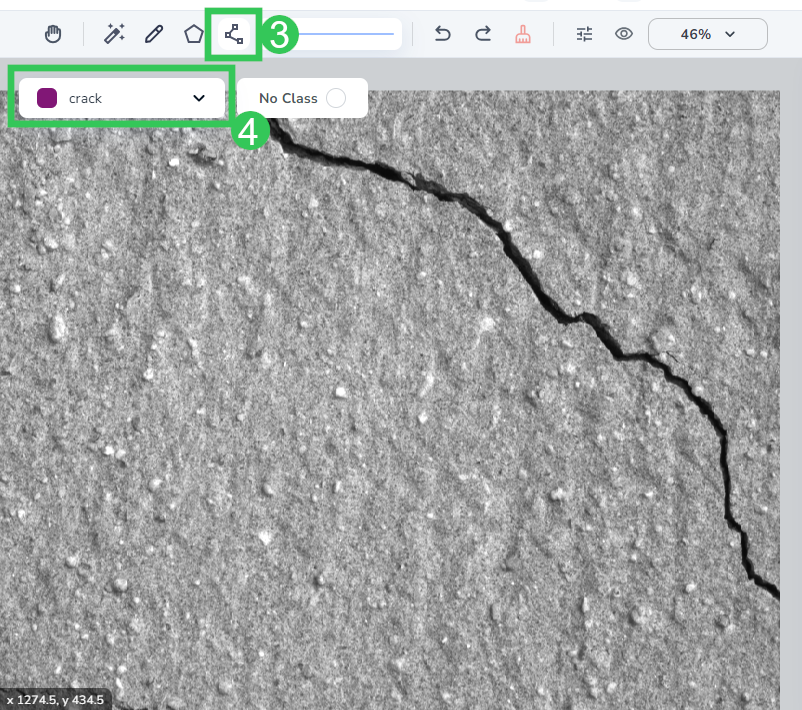 5. Adjust the size of the line width accordingly.
6. Click where you want to start your line.
7. Click to change the direction of your line.
8. Press **Enter** on your keyboard to complete your edits.
5. Adjust the size of the line width accordingly.
6. Click where you want to start your line.
7. Click to change the direction of your line.
8. Press **Enter** on your keyboard to complete your edits.