> ## Documentation Index
> Fetch the complete documentation index at: https://landinglens.docs.landing.ai/llms.txt
> Use this file to discover all available pages before exploring further.
# Public and Private Projects
export const vp = 'Visual Prompting';
export const smartLabel = 'Smart Labeling';
export const productLL = 'LandingLens';
export const mi = 'Mobile Inference';
export const llsf = 'LandingLens on Snowflake';
export const companyName = 'LandingAI';
*This article applies to these versions of LandingLens:*
LandingLens
LandingLens on Snowflake
✓
✓
When you create a project, it is public by default. This means that everyone in your LandingLens organization can access it. You can make the project private at any time, and invite only specific members to access the project.
Regardless of whether your project is public or private, no one outside of your LandingLens organization can access your project.
If you're using {llsf}, a "member" is considered to be a user that has logged in to your instance of {llsf}.
## Project Permissions
When you invite members to your project, you can choose how they can participate in your project. This is managed with Permissions. These are the types of Permissions:
* **Upload Data**: Users can upload images.
* **Train Model**: Users can train the model.
* **Deploy Model**: Users can deploy the model.
* **Direct Label**: Users can label images.
## Limit Project Access to Specific Members (Make Private)
1. Open the project.
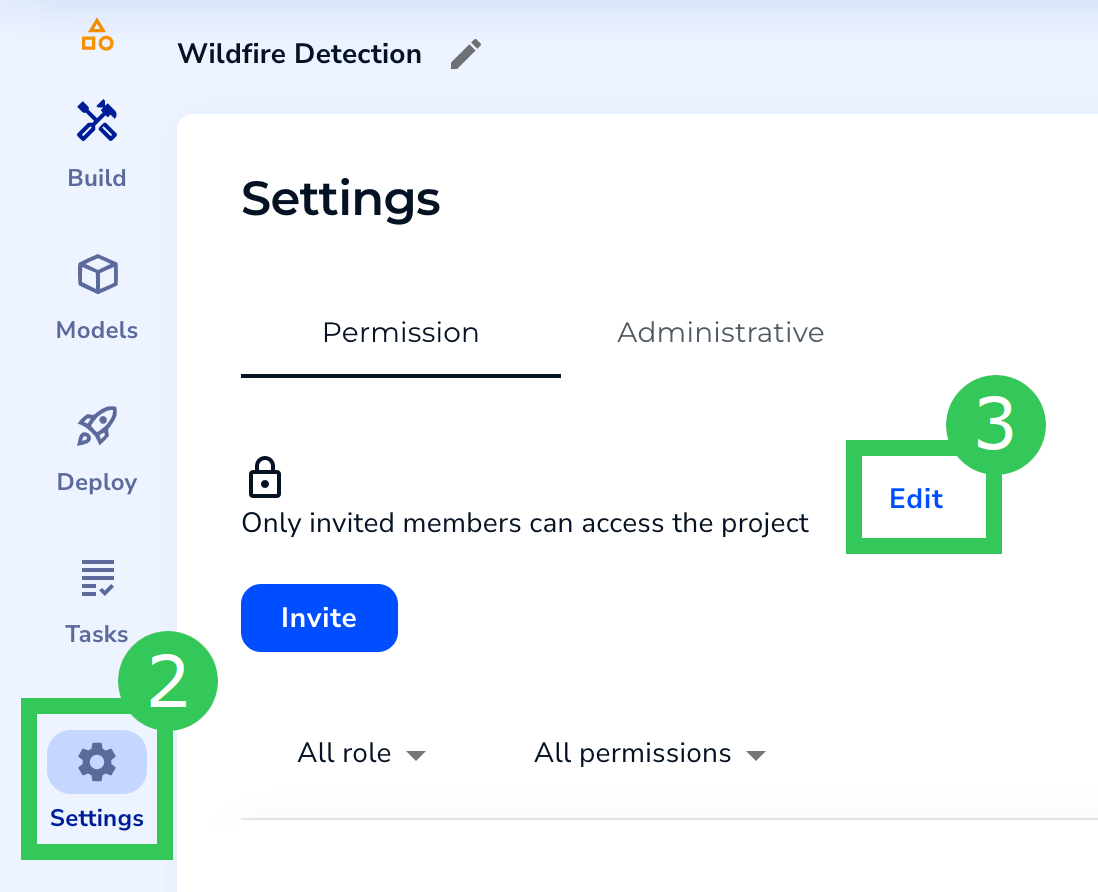
2. Click **Settings** in the left sidebar.
3. Click **Edit** on the **Permission** tab.
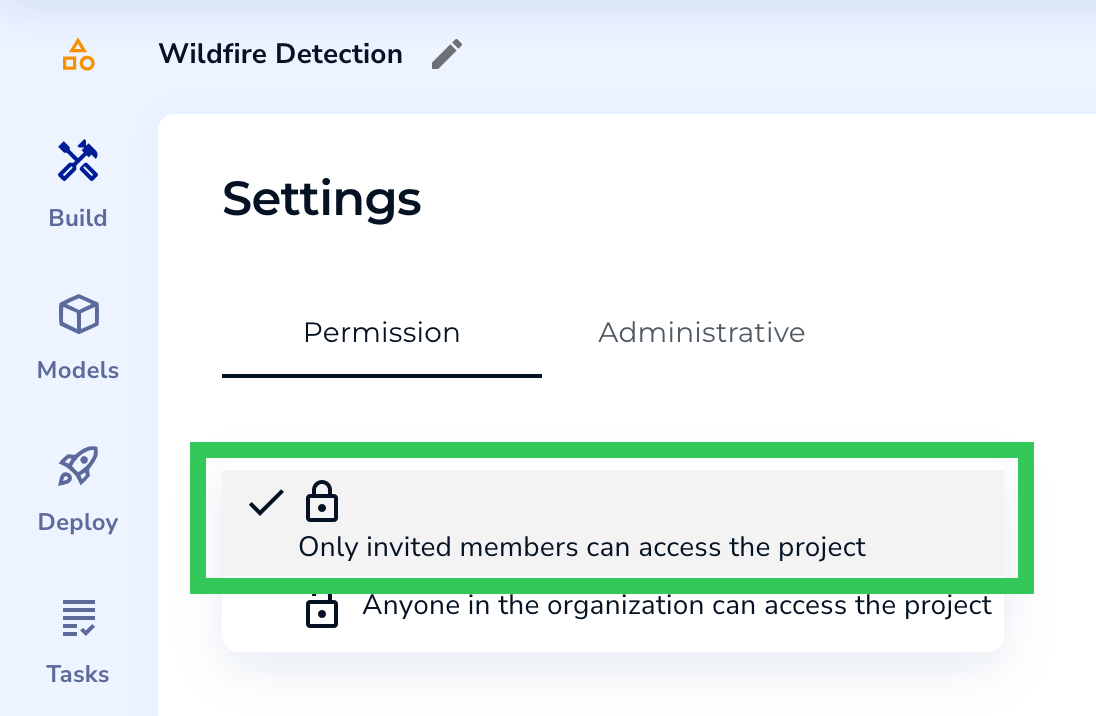
4. Select **Only invited members can access the project**.
5. Click **Invite**.
6. Search by name to narrow down the list of users.
7. Select the members you want to invite.
8. Select the [Project Permissions](#project-permissions) you want to give the member.
9. Click **Add Members to Projects**. An email is sent to the users, inviting them to your project.
### Member Actions on the Permission Tab
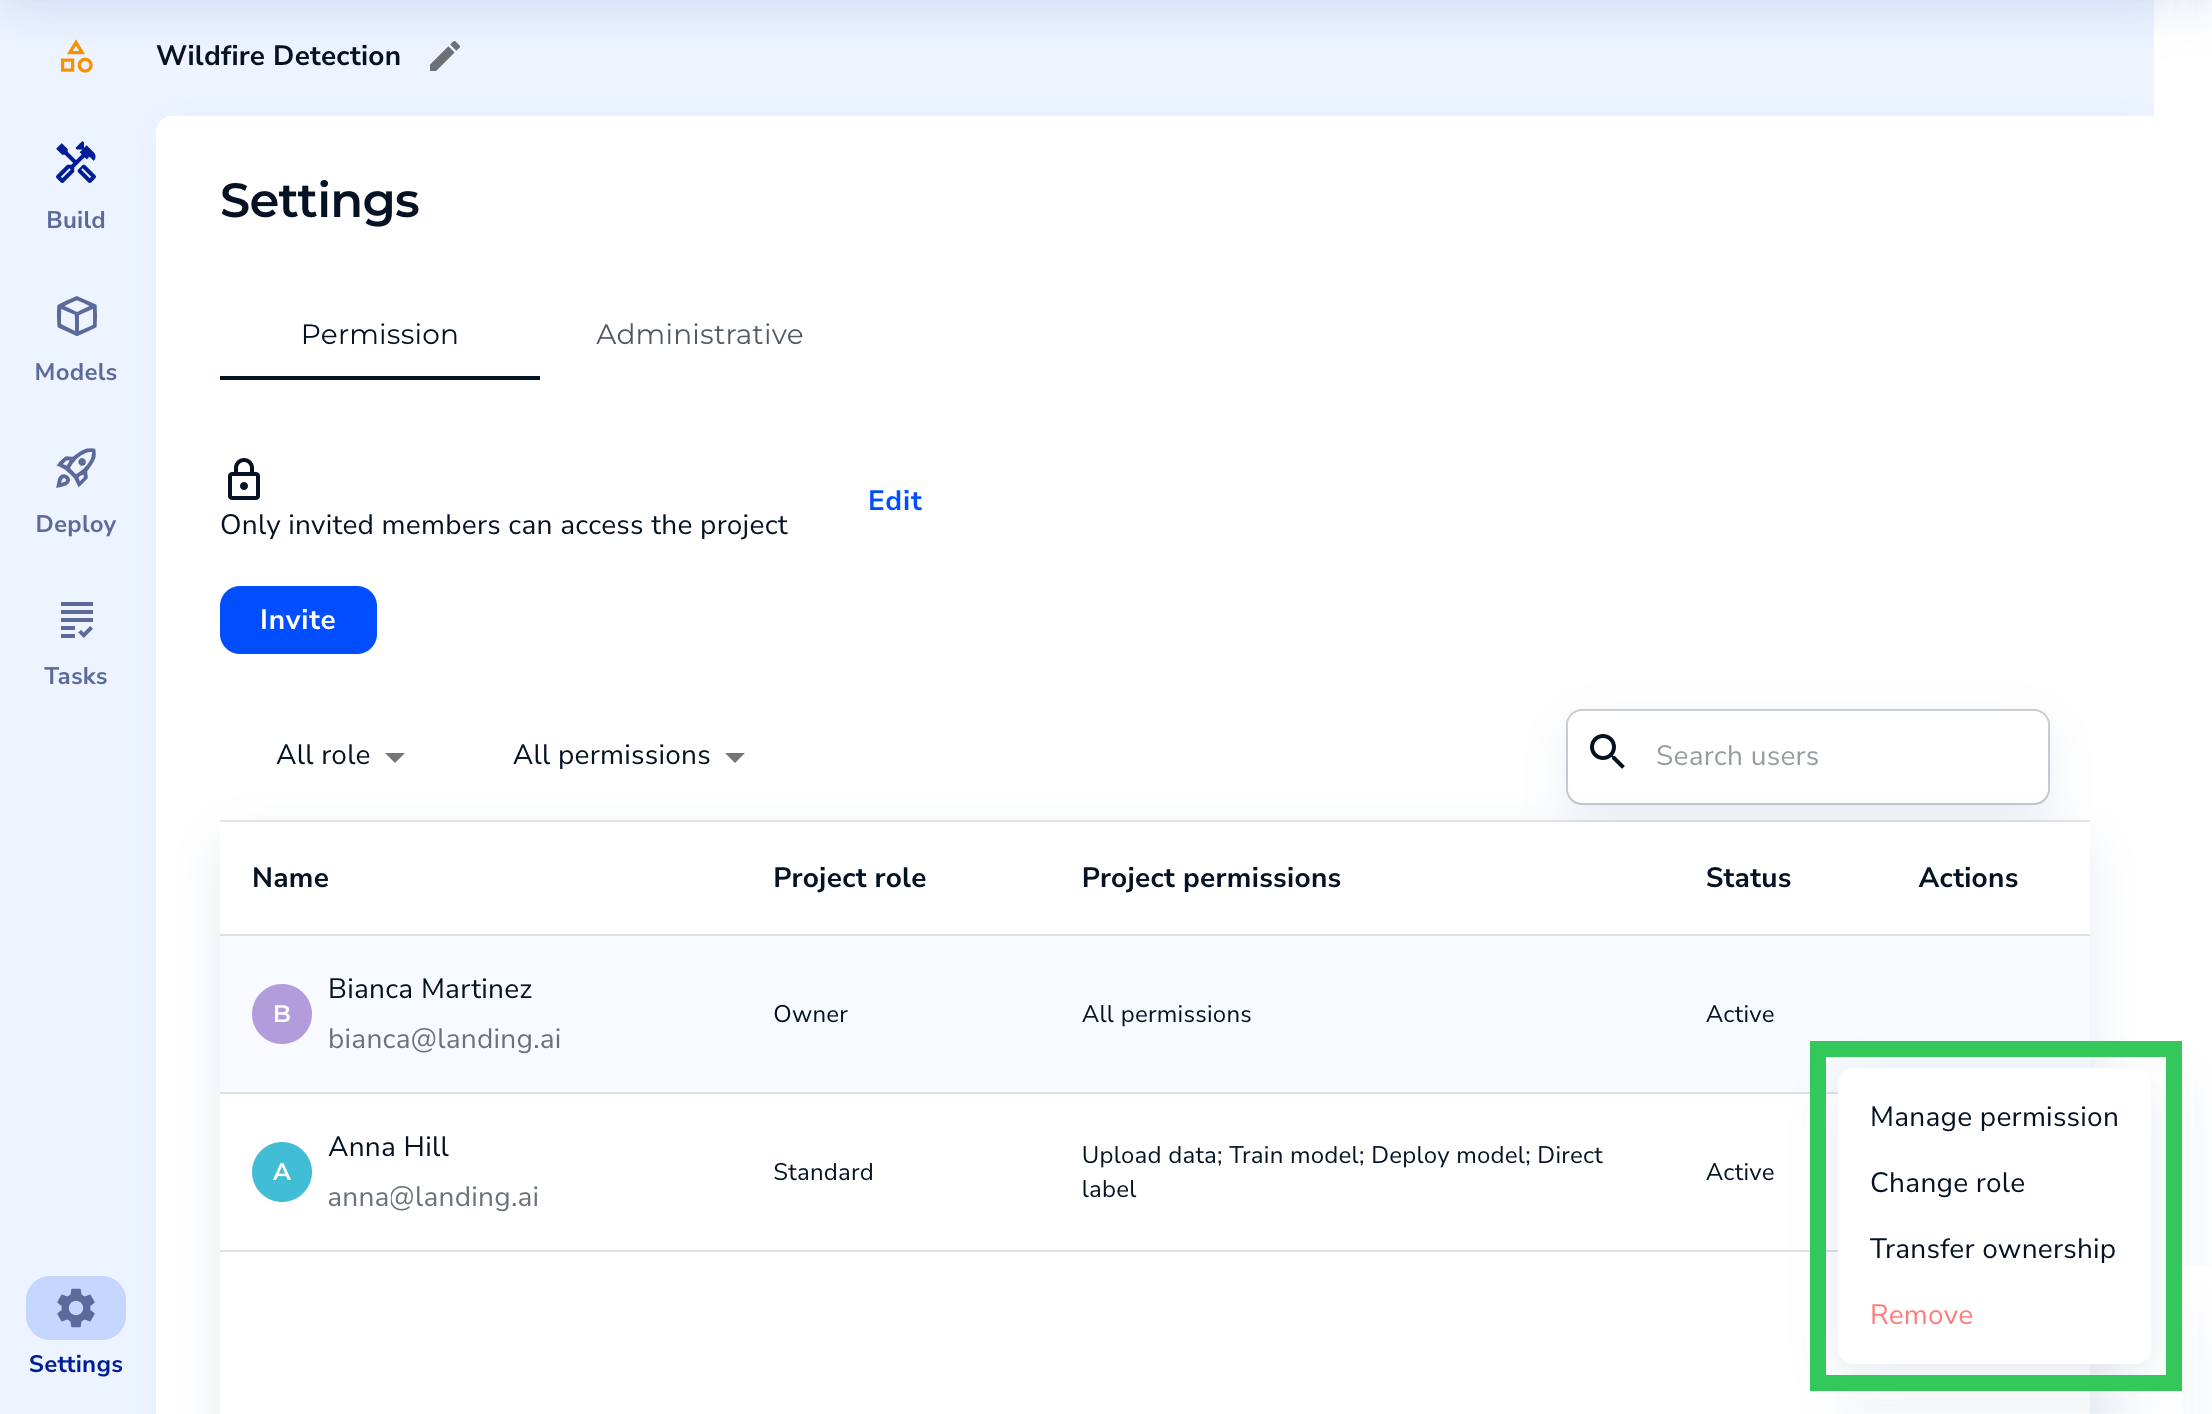
The Permission tab on the Settings page allows you to manage member access to projects. These are the actions you can perform:
* **Manage Permissions**: Edit the Permissions of the member. This option is only available for members that have the "Standard" role.
* **Change Role**: Projects have three types of Roles—Owner, Labeler, and Standard.
* **Owners** are generally the creators of projects. They can perform any action on the project.
* **Labelers** can only label images.
* **Standard** members can have a mix of access to a project. Their access is defined with [Permissions](#project-permissions).
* **Transfer Ownership**: Make the selected user Owner of the project.
* **Remove**: Remove the member from the project.
After making an edit, click **Done** to save your updates.
## Grant Project Access to All Members in Your Organization (Make Public)
If you've made a project private, you can make it public again. To do this:
1. Open the project.
2. Click **Settings** in the left sidebar.
3. Click **Edit** on the **Permission** tab.
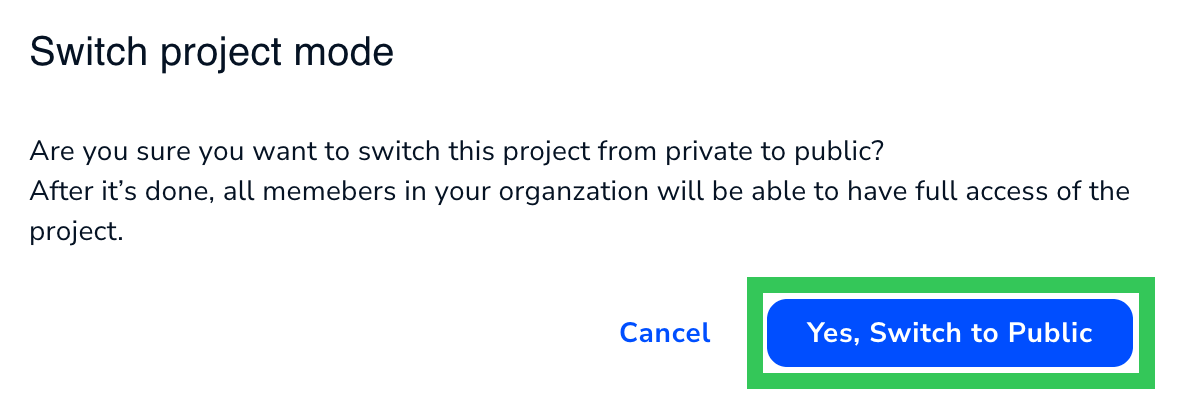
4. Select **Anyone in the organization can access the project**.
5. Confirm that you want to make the project public.
.png?fit=max&auto=format&n=TJ8p3AwYZ8yXbABY&q=85&s=c52f8674ea90bb1e1b84d8c3e0c8724a) 4. Select **Only invited members can access the project**.
4. Select **Only invited members can access the project**.
 5. Click **Invite**.
6. Search by name to narrow down the list of users.
7. Select the members you want to invite.
8. Select the [Project Permissions](#project-permissions) you want to give the member.
9. Click **Add Members to Projects**. An email is sent to the users, inviting them to your project.
5. Click **Invite**.
6. Search by name to narrow down the list of users.
7. Select the members you want to invite.
8. Select the [Project Permissions](#project-permissions) you want to give the member.
9. Click **Add Members to Projects**. An email is sent to the users, inviting them to your project.
.png?fit=max&auto=format&n=TJ8p3AwYZ8yXbABY&q=85&s=7ad2df9f38dbcf5a4ac09a1c69add02b) ### Member Actions on the Permission Tab
The Permission tab on the Settings page allows you to manage member access to projects. These are the actions you can perform:
* **Manage Permissions**: Edit the Permissions of the member. This option is only available for members that have the "Standard" role.
* **Change Role**: Projects have three types of Roles—Owner, Labeler, and Standard.
* **Owners** are generally the creators of projects. They can perform any action on the project.
* **Labelers** can only label images.
* **Standard** members can have a mix of access to a project. Their access is defined with [Permissions](#project-permissions).
* **Transfer Ownership**: Make the selected user Owner of the project.
* **Remove**: Remove the member from the project.
### Member Actions on the Permission Tab
The Permission tab on the Settings page allows you to manage member access to projects. These are the actions you can perform:
* **Manage Permissions**: Edit the Permissions of the member. This option is only available for members that have the "Standard" role.
* **Change Role**: Projects have three types of Roles—Owner, Labeler, and Standard.
* **Owners** are generally the creators of projects. They can perform any action on the project.
* **Labelers** can only label images.
* **Standard** members can have a mix of access to a project. Their access is defined with [Permissions](#project-permissions).
* **Transfer Ownership**: Make the selected user Owner of the project.
* **Remove**: Remove the member from the project.
 4. Select **Anyone in the organization can access the project**.
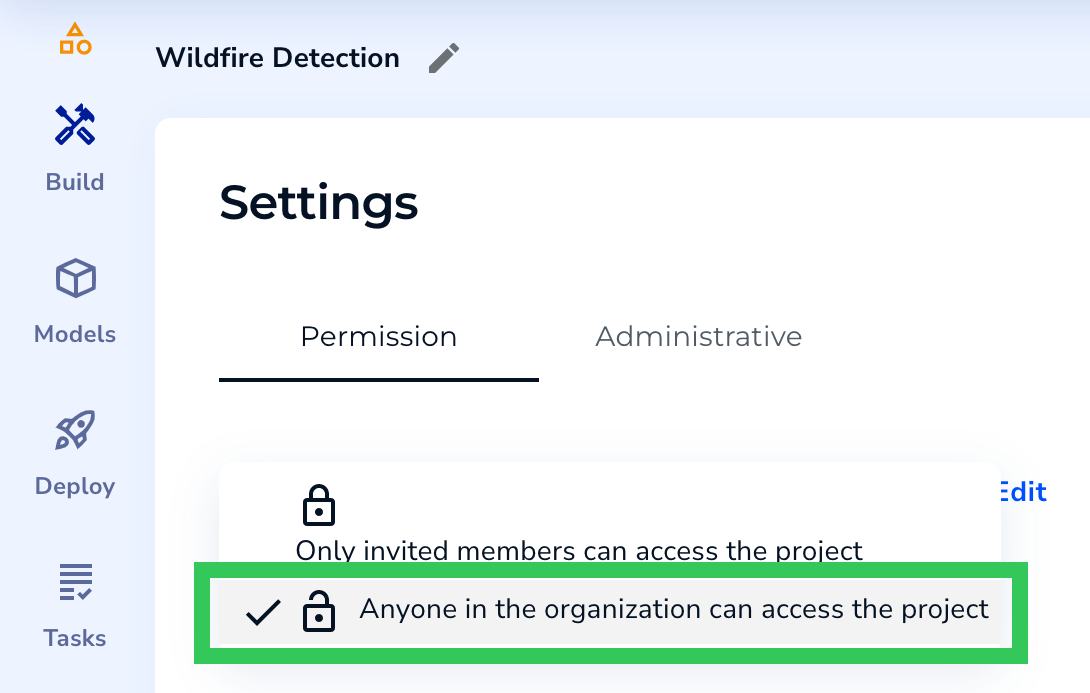 5. Confirm that you want to make the project public.