> ## Documentation Index
> Fetch the complete documentation index at: https://landinglens.docs.landing.ai/llms.txt
> Use this file to discover all available pages before exploring further.
# Load Images from Snowflake into LandingLens
export const vp = 'Visual Prompting';
export const smartLabel = 'Smart Labeling';
export const productLL = 'LandingLens';
export const mi = 'Mobile Inference';
export const llsf = 'LandingLens on Snowflake';
export const companyName = 'LandingAI';
*This article applies to these versions of LandingLens:*
LandingLens
LandingLens on Snowflake
✖
✓
You can [use several methods](./upload-images) to upload images into a LandingLens project. When using {llsf}, you can load images from a Snowflake stage into a LandingLens project using **Sync Snowflake Data**.
If you're in a Classification project, you can use this tool to [classify images at upload](./load-images-from-snowflake#classify-images-when-loading-from-a-snowflake-stage) (in other words, upload labeled images).
## Sync Snowflake Data Overview
When you use the **Sync Snowflake Data** workflow, you select a stage that you want to load images from. Images with [supported file types](./upload-images) in the selected Snowflake stage are loaded into the LandingLens project. If the stage has directories, images in those directories are also loaded into LandingLens.
The **Sync Snowflake Data** workflow can load up to 10,000 images. Images can be loaded from both internal and external stages.
The **Sync Snowflake Data** tool only transfers data into LandingLens; it doesn't load data from LandingLens into Snowflake.
Additionally, **Sync Snowflake Data** only loads data each time it's run. For example, if you run **Sync Snowflake Data** and later add more images to the stage, those images aren't automatically loaded into LandingLens. However, manually running **Sync Snowflake Data** again will load the new images (it will ignore any images that have already been added to LandingLens).
## Prerequisite: Grant LandingLens Access to a Stage
Before you can load images from a stage into a LandingLens project, you must first run SQL commands to grant LandingLens access to that stage. To do this, go to [Grant LandingLens Access to Stages](./grant-landinglens-access-to-stages).
The SQL commands will require the database, schema, stage, and LandingLens application name. If you're not sure if LandingLens has access to the stage or what the application name is, start setting up the sync in LandingLens. If you don't have access to the stage, the app will [give an error](./load-images-from-snowflake#troubleshooting-the-sync-process) and generate the SQL commands you need to run.
## Load Images with Sync Snowflake Data
After [granting LandingLens access](./grant-landinglens-access-to-stages) to the stage with the images you want to load into LandingLens, you can load those images into a LandingLens project.
1. Open the project you want to load images to.
2. Click **Sync Snowflake Data**.
3. Enter the **database**, **schema**, and **stage** that have the images you want to load into LandingLens. The drop-downs automatically populate based on the locations that you created or have access to.
4. Click the directory path (`⌄ /`) in the **Folder** box. Use this field to navigate to and select a directory on the Snowflake stage.
* If you select the root directory (or don't select any directory), supported images from the stage and its directories will be loaded into LandingLens.
* If you want to load images from only a specific directory, select that directory.
5. Click **Sync**.
6. Images from the stage (or the selected directories) are loaded to the LandingLens project in batches. The page refreshes every 10 seconds to display new images until all are loaded.
## Classify Images When Loading from a Snowflake Stage
If you're in a Classification project, you can automatically assign classes to images based on directory names when uploading data from a Snowflake stage. The approach is similar to how you classify images when uploading directories from your hard drive, as explained in [Classification](./classification).
You will need to first create directories and add images to them in the Snowflake stage. Then, you will select the directories when using the **Sync Snowflake Data** workflow.
The **Sync Snowflake Data** tool doesn't upload labels/classes for Object Detection and Segmentation projects.
### Set Up Directories in Snowflake
To classify images at upload, first organize the directories and images in a Snowflake stage:
1. Create a directory in a Snowflake stage. This will be your "root" directory.
**Example**: Create a directory named `data`.
2. Inside your root directory, create a sub-directory for each class you want to use. Name the sub-directories after the classes.
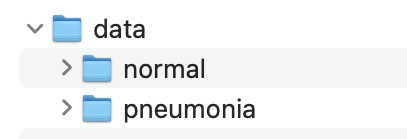
**Example**: Inside `data`, create directories named `normal` and `pneumonia`.
3. Add images to the sub-directories based on class name.
**Example**: If you want an image to be classified as `normal` in LandingLens, add it to the `normal`directory. The directory in your stage would look like this:
### Load and Classify Images from Directories
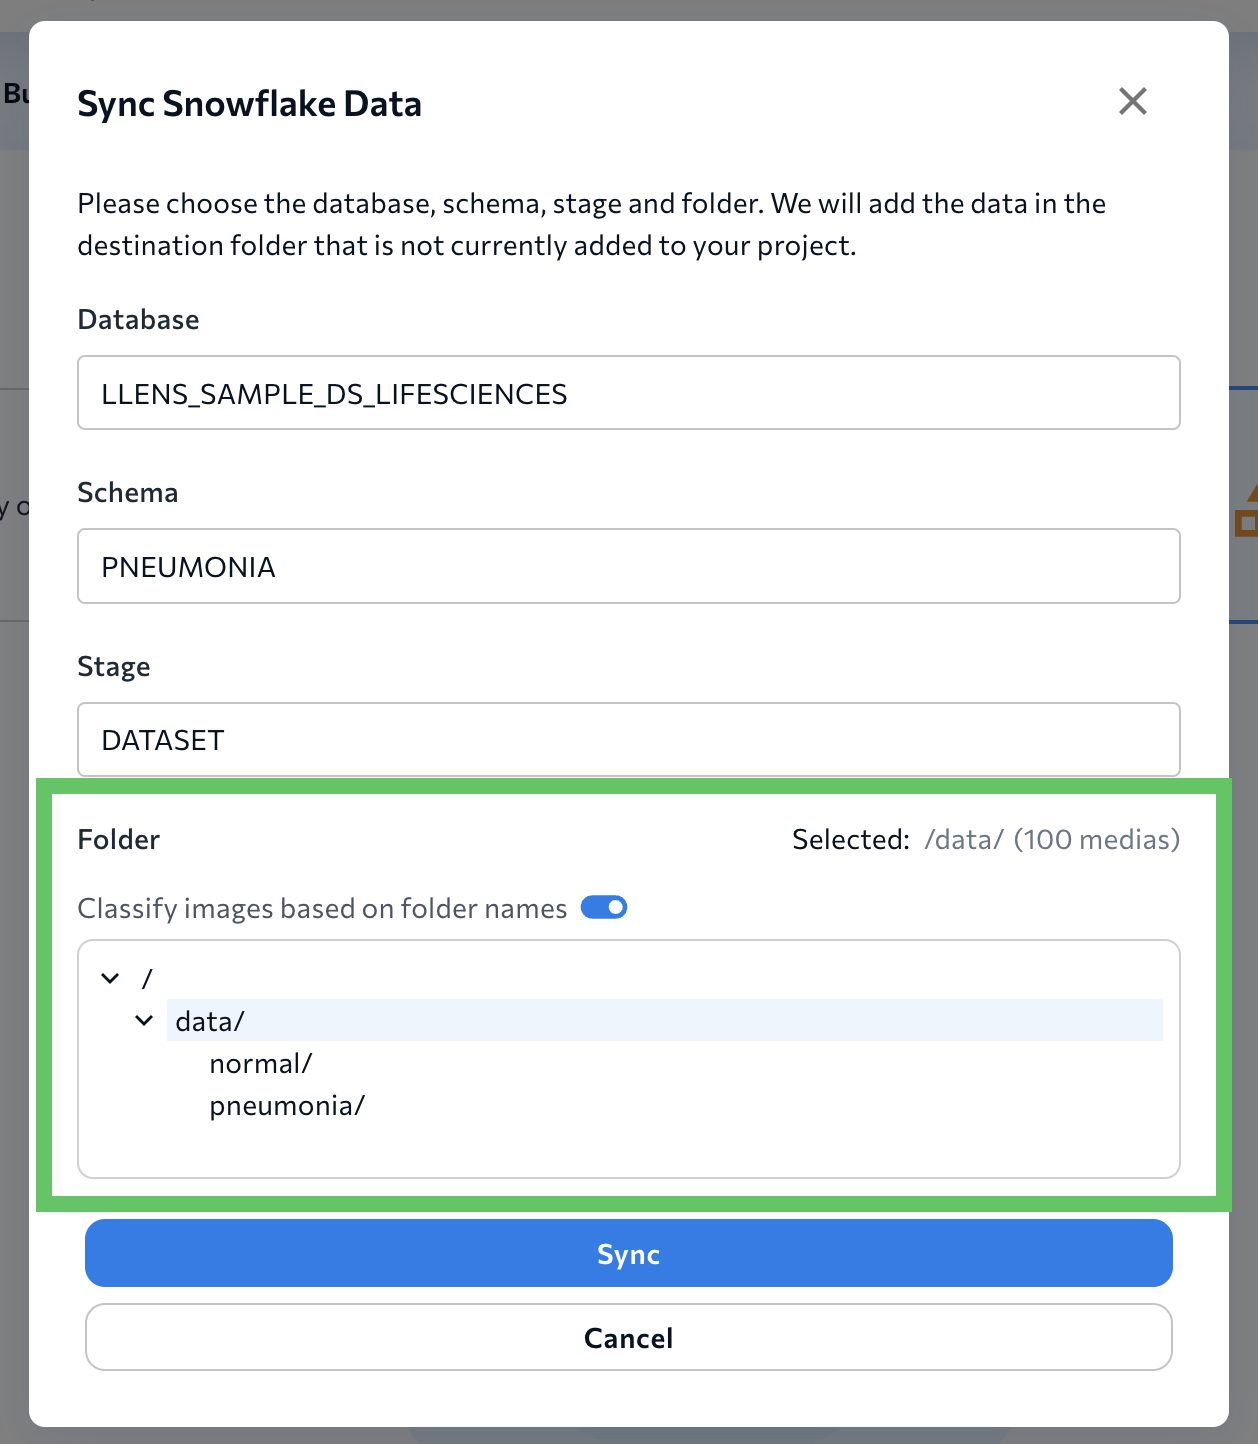
When you're ready to load images from the Snowflake stage, click **Sync Snowflake Data** and configure the settings:
1. Select the **Database**, **Schema**, and **Stage**.
2. Turn on **Classify images based on folder names**.
3. Click the directory path (`⌄ /`) in the **Folder** box.
4. Select the "root directory" that you created. For example, in the screenshot below, select **data**. Do NOT select the directory that actually contains the images.
5. After loading the data, you will see that:
* LandingLens created a class based on each sub-directory name (if the classes didn't exist yet).
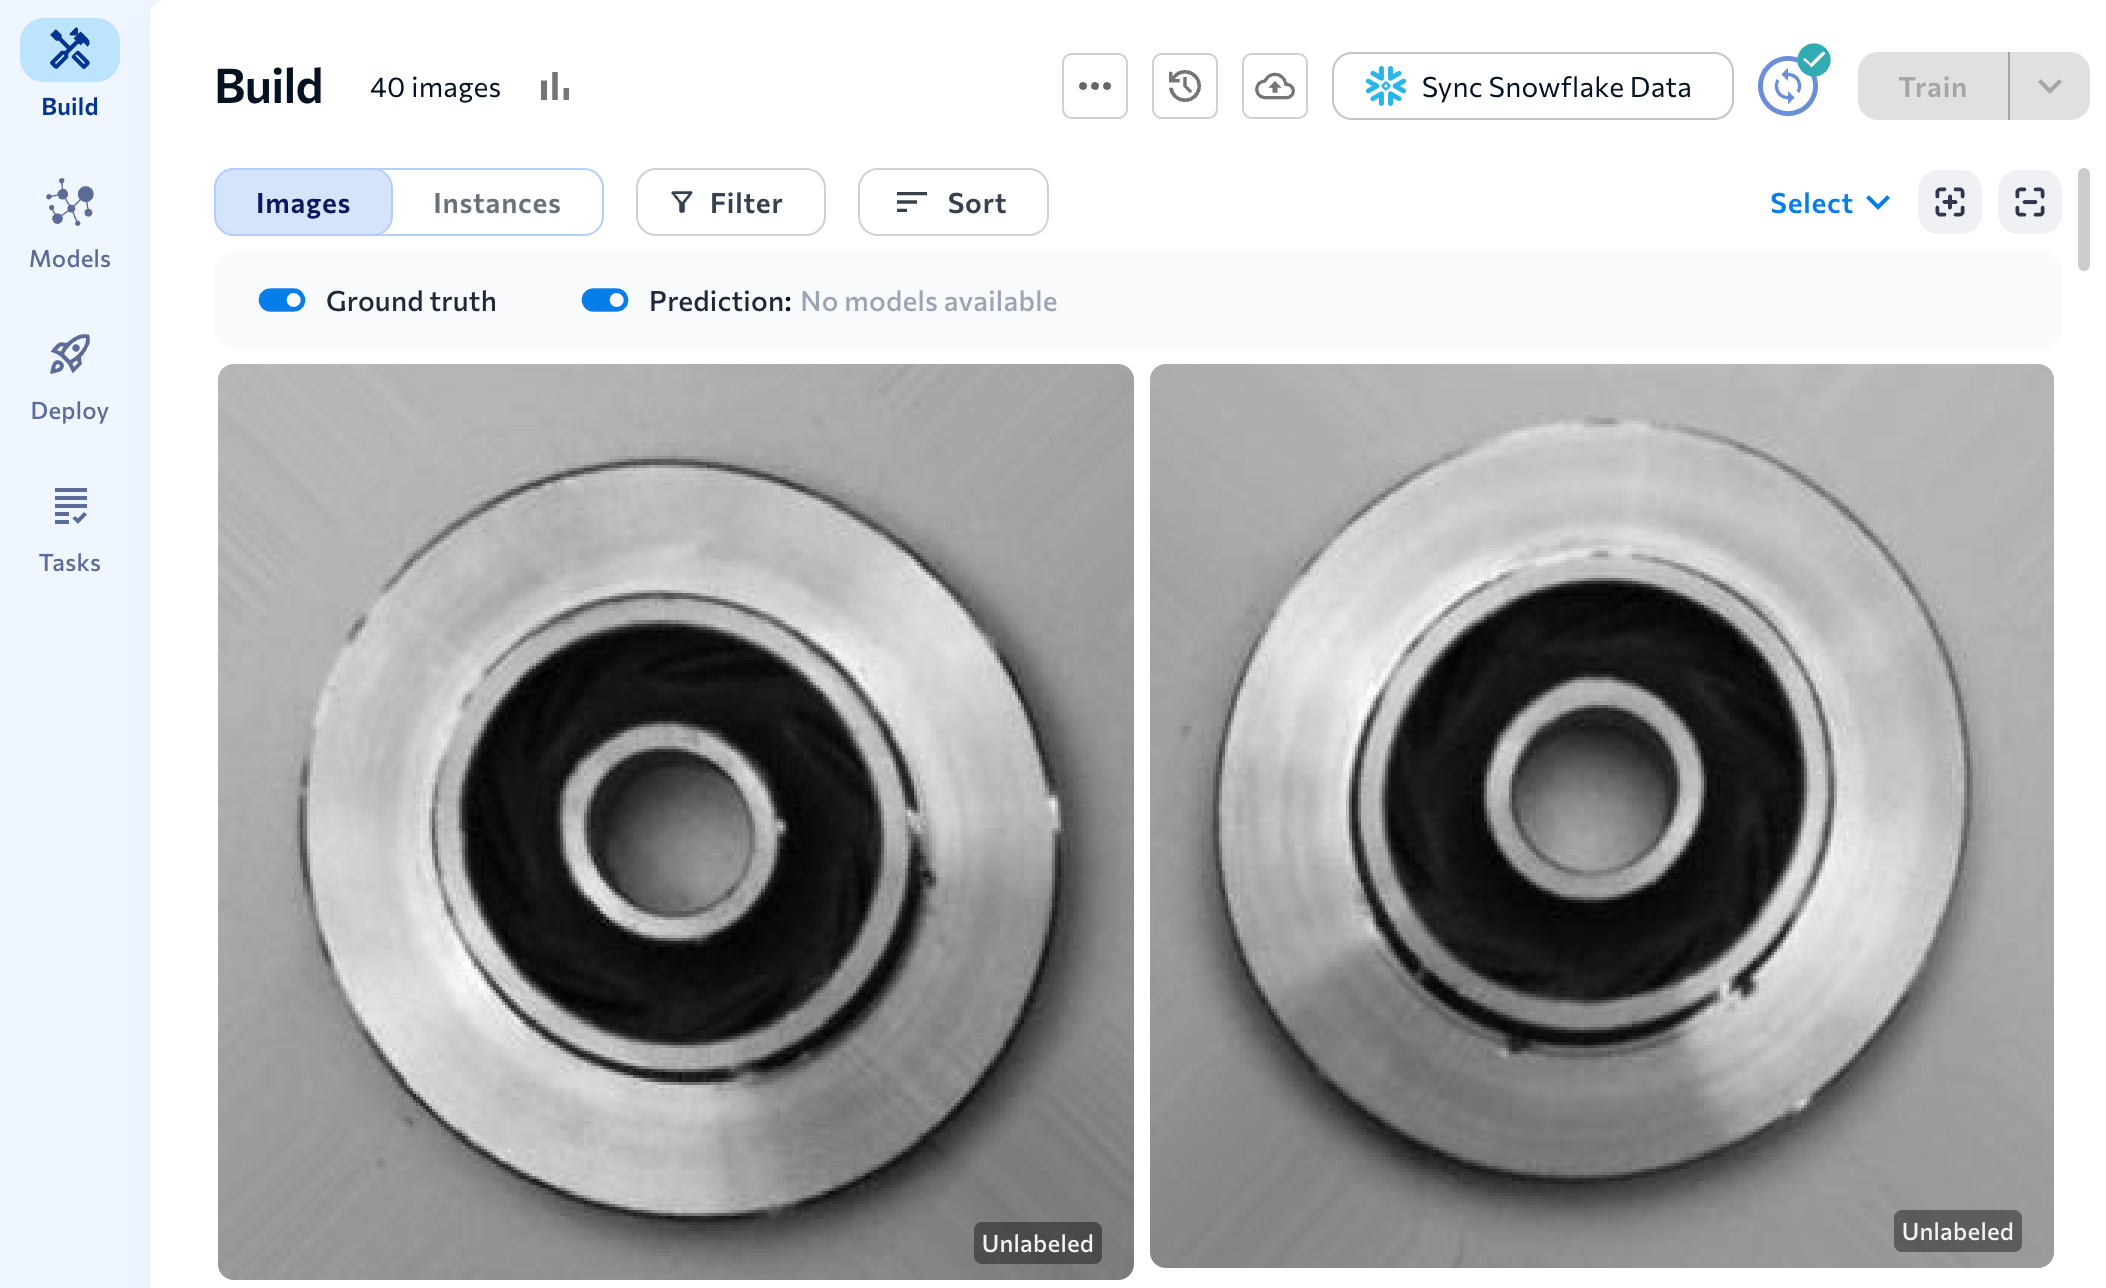
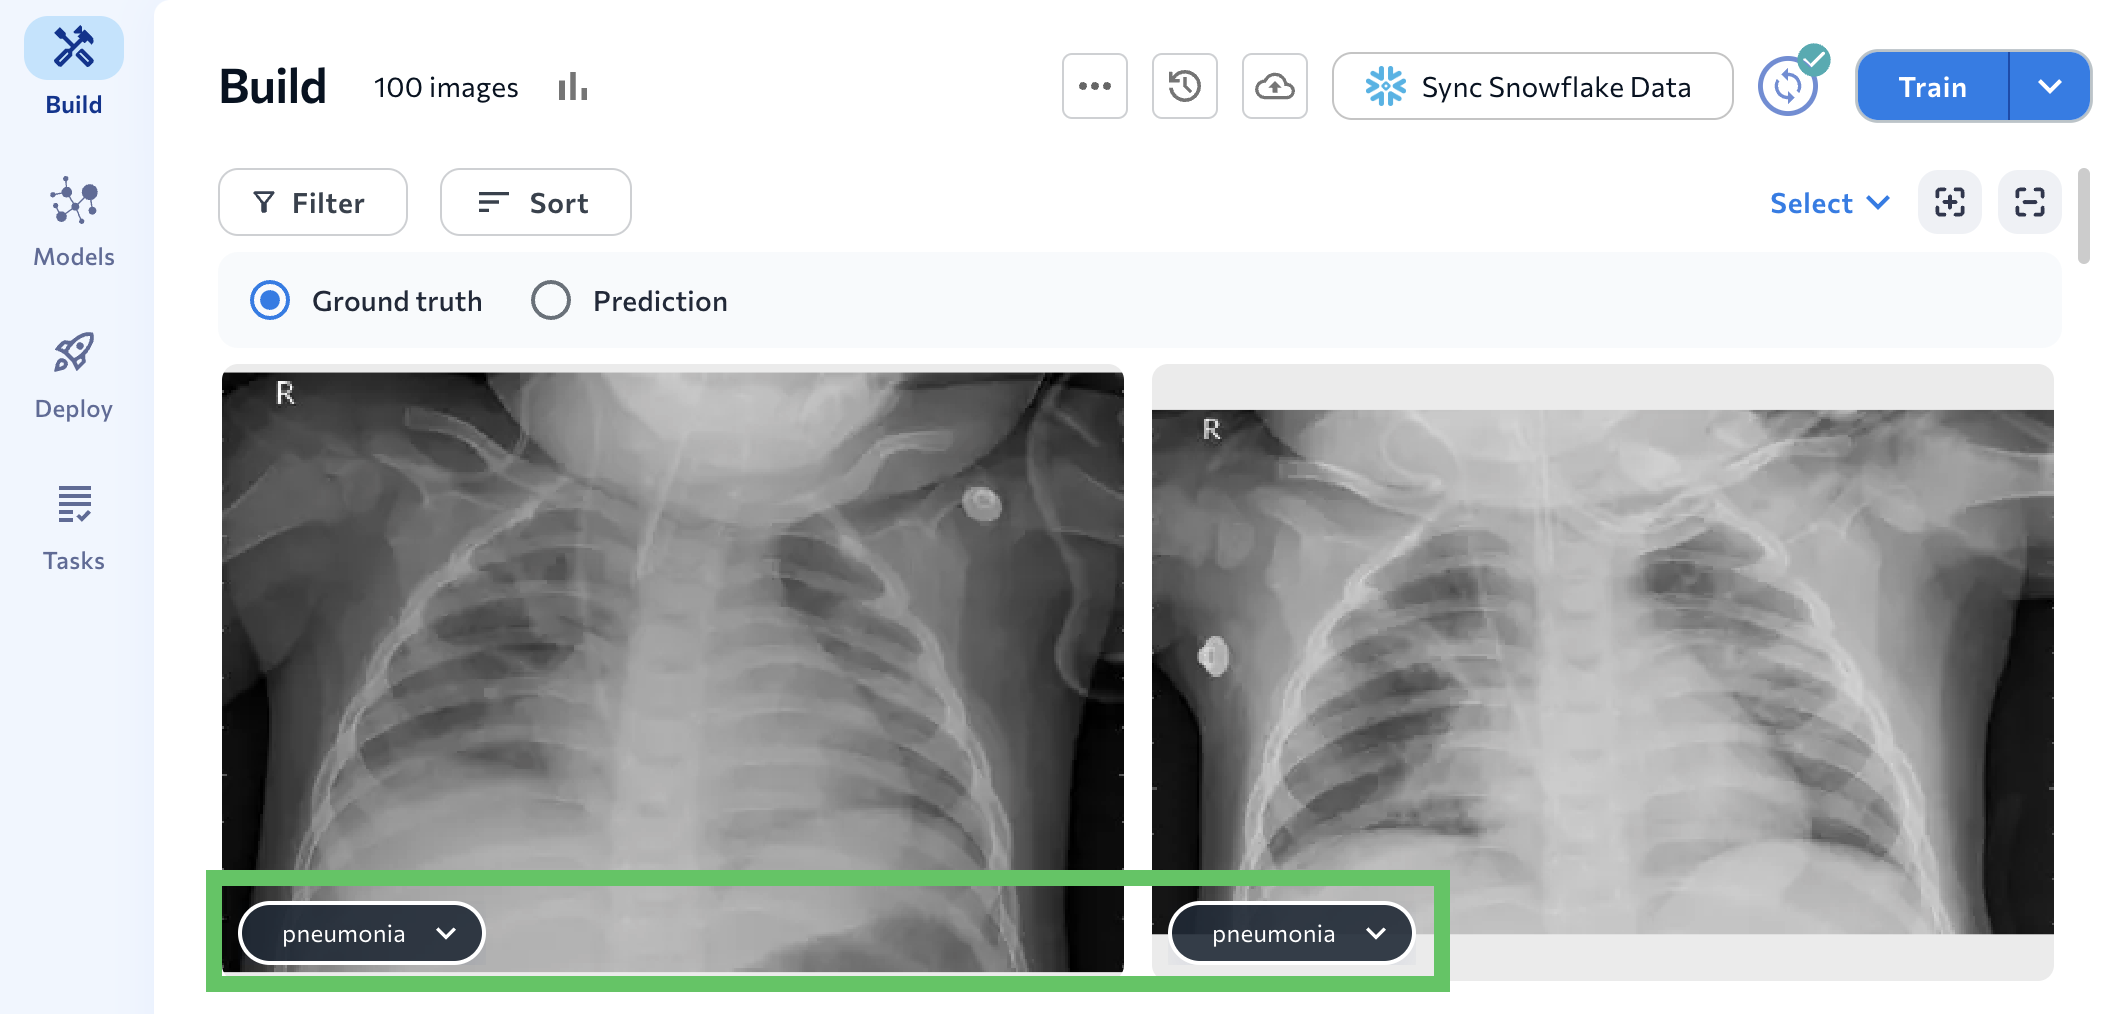
* Images in each sub-directory will be in LandingLens and will be classified with the name of their directory. For example, in the screenshot below, the "pneumonia" class is assigned to the images.
## Sample Datasets
LandingLens offers two sample datasets that you can use to practice loading and classifying images from Snowflake stages. These datasets are available as "apps" from the Snowflake Marketplace. Access the datasets here:
* [Sample Dataset for LandingLens: Manufacturing Metal Casting](https://app.snowflake.com/marketplace/listing/GZTYZ12K65C6/)
* [Sample Dataset for LandingLens: LifeSciences Pneumonia](https://app.snowflake.com/marketplace/listing/GZTYZ12K65CA/)
## Troubleshooting the Sync Process
When using **Sync Snowflake Data** tool, you might get this error:
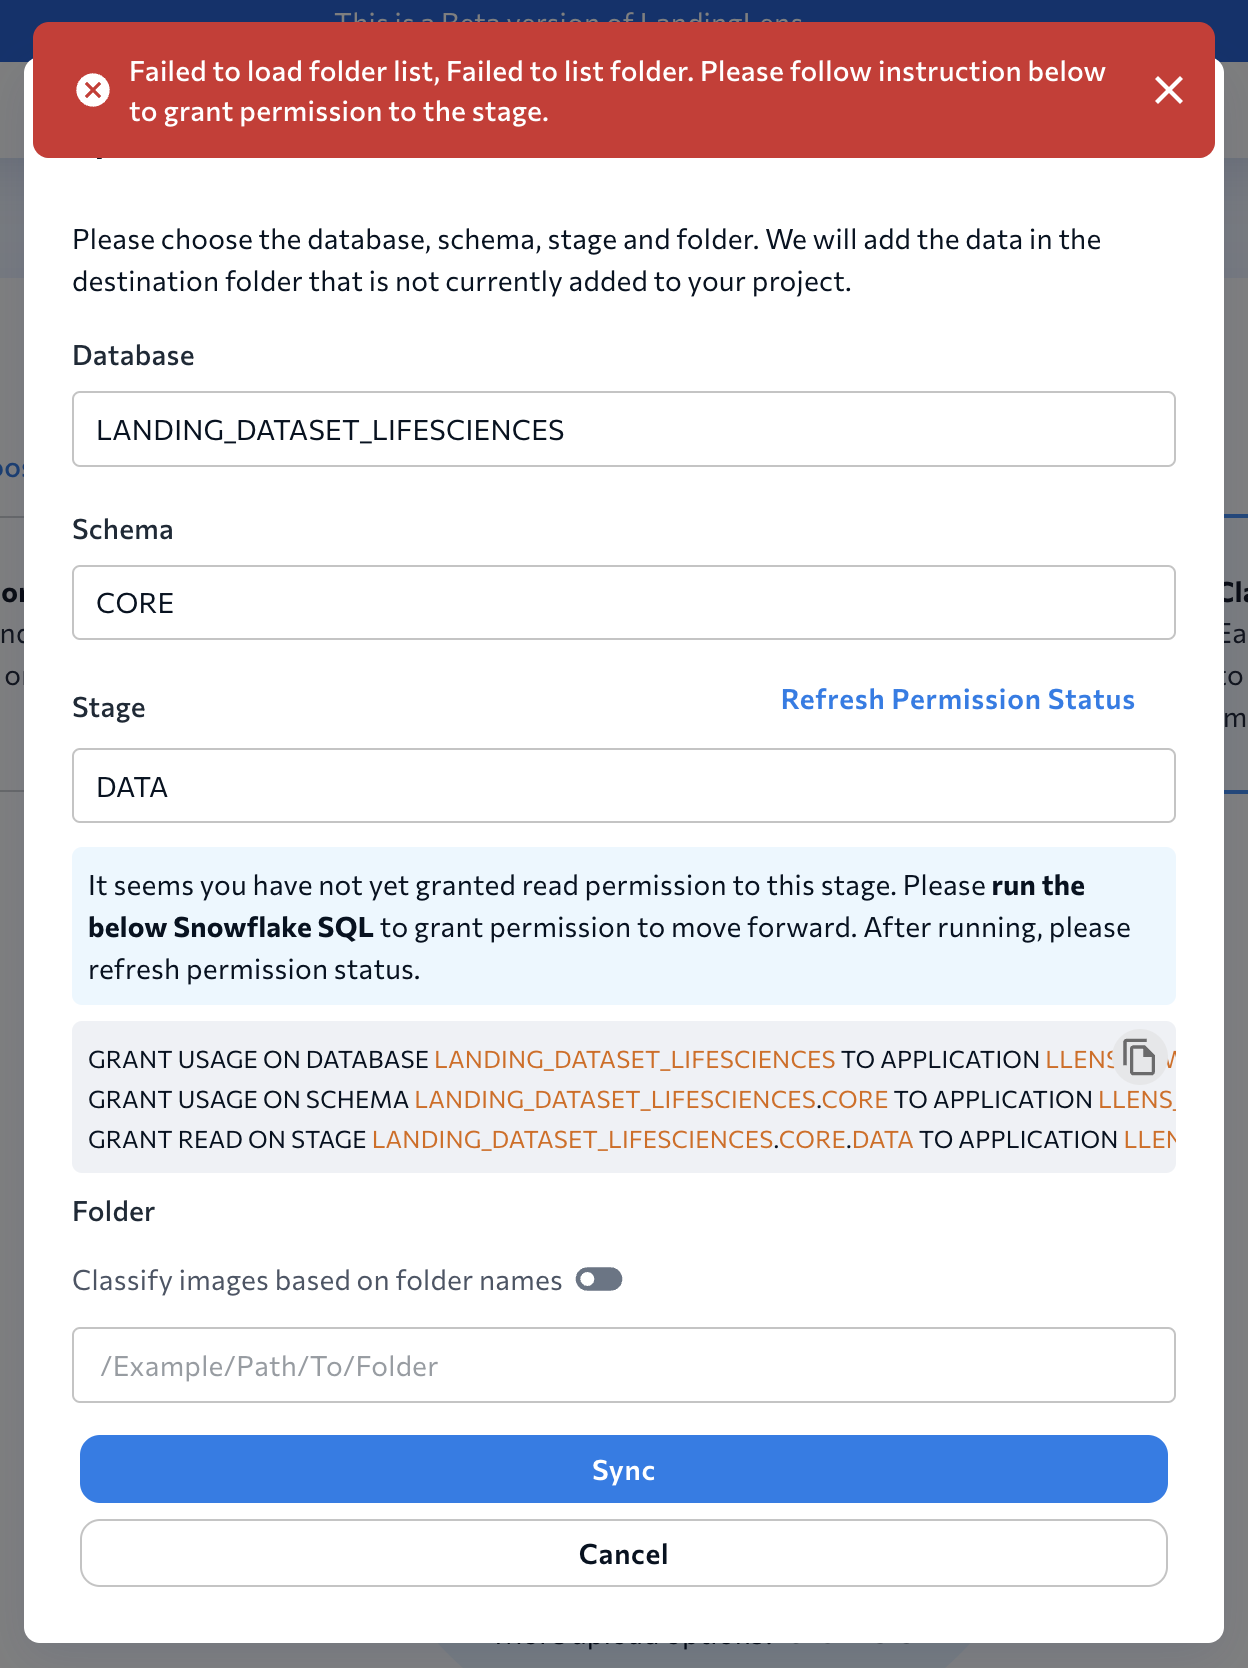
> Failed to load folder list, Failed to list folder. Please follow instruction below to grant permission to the stage.
This error means that you don't have permission to access the Database, Schema, or Stage you selected. To get permission, run the generated SQL commands that display on the pop-up.
## View Syncs from the Past Seven Days
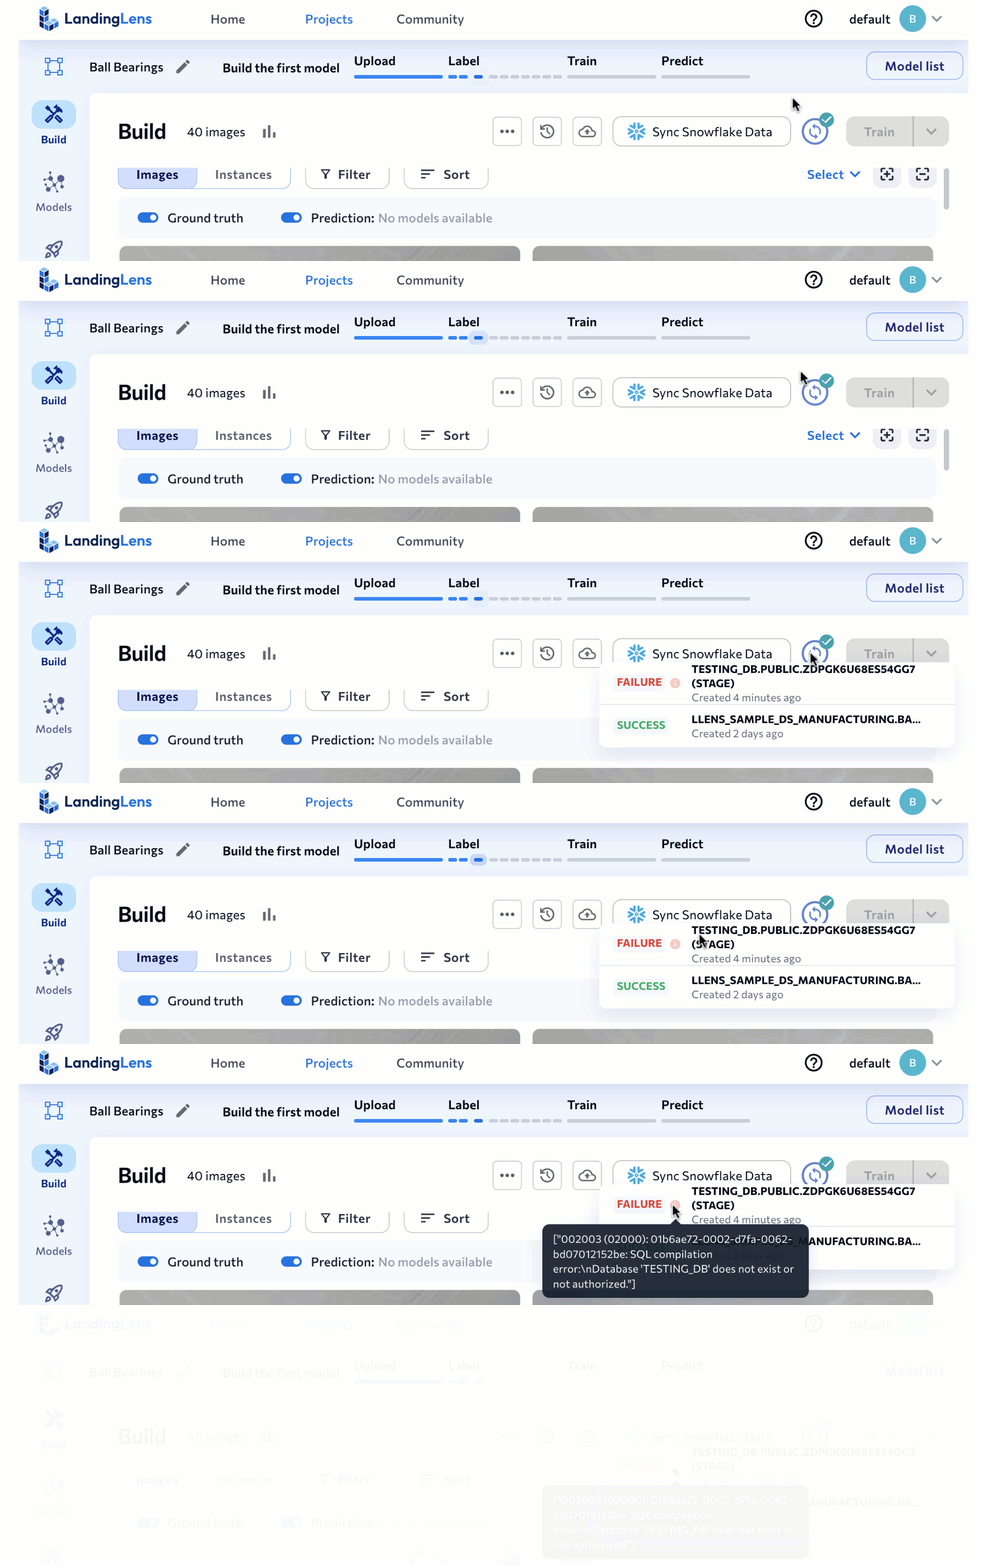
If you've run the **Sync Snowflake Data** tool in a project, you can see the status of all syncs from the past seven days. To do this, click the **Sync** icon near the top right corner LandingLens. A list of all syncs, the synced stages, and statuses display.
Hover over a stage to see the full path of the database, schema, and stage.
If a sync failed, hover over the **i** icon to see more details.
.png?fit=max&auto=format&n=PHcetUd-hiVs_otz&q=85&s=d348f7c9537d4561d846733c82944d18) 3. Enter the **database**, **schema**, and **stage** that have the images you want to load into LandingLens. The drop-downs automatically populate based on the locations that you created or have access to.
4. Click the directory path (`⌄ /`) in the **Folder** box. Use this field to navigate to and select a directory on the Snowflake stage.
* If you select the root directory (or don't select any directory), supported images from the stage and its directories will be loaded into LandingLens.
* If you want to load images from only a specific directory, select that directory.
5. Click **Sync**.
3. Enter the **database**, **schema**, and **stage** that have the images you want to load into LandingLens. The drop-downs automatically populate based on the locations that you created or have access to.
4. Click the directory path (`⌄ /`) in the **Folder** box. Use this field to navigate to and select a directory on the Snowflake stage.
* If you select the root directory (or don't select any directory), supported images from the stage and its directories will be loaded into LandingLens.
* If you want to load images from only a specific directory, select that directory.
5. Click **Sync**.
.png?fit=max&auto=format&n=PHcetUd-hiVs_otz&q=85&s=fcf13499d2d6fb9e2ee4182c0f54cb07) 6. Images from the stage (or the selected directories) are loaded to the LandingLens project in batches. The page refreshes every 10 seconds to display new images until all are loaded.
6. Images from the stage (or the selected directories) are loaded to the LandingLens project in batches. The page refreshes every 10 seconds to display new images until all are loaded.
 ## Classify Images When Loading from a Snowflake Stage
If you're in a Classification project, you can automatically assign classes to images based on directory names when uploading data from a Snowflake stage. The approach is similar to how you classify images when uploading directories from your hard drive, as explained in [Classification](./classification).
You will need to first create directories and add images to them in the Snowflake stage. Then, you will select the directories when using the **Sync Snowflake Data** workflow.
## Classify Images When Loading from a Snowflake Stage
If you're in a Classification project, you can automatically assign classes to images based on directory names when uploading data from a Snowflake stage. The approach is similar to how you classify images when uploading directories from your hard drive, as explained in [Classification](./classification).
You will need to first create directories and add images to them in the Snowflake stage. Then, you will select the directories when using the **Sync Snowflake Data** workflow.
 ### Load and Classify Images from Directories
When you're ready to load images from the Snowflake stage, click **Sync Snowflake Data** and configure the settings:
1. Select the **Database**, **Schema**, and **Stage**.
2. Turn on **Classify images based on folder names**.
3. Click the directory path (`⌄ /`) in the **Folder** box.
4. Select the "root directory" that you created. For example, in the screenshot below, select **data**. Do NOT select the directory that actually contains the images.
### Load and Classify Images from Directories
When you're ready to load images from the Snowflake stage, click **Sync Snowflake Data** and configure the settings:
1. Select the **Database**, **Schema**, and **Stage**.
2. Turn on **Classify images based on folder names**.
3. Click the directory path (`⌄ /`) in the **Folder** box.
4. Select the "root directory" that you created. For example, in the screenshot below, select **data**. Do NOT select the directory that actually contains the images.
 5. After loading the data, you will see that:
* LandingLens created a class based on each sub-directory name (if the classes didn't exist yet).
* Images in each sub-directory will be in LandingLens and will be classified with the name of their directory. For example, in the screenshot below, the "pneumonia" class is assigned to the images.
5. After loading the data, you will see that:
* LandingLens created a class based on each sub-directory name (if the classes didn't exist yet).
* Images in each sub-directory will be in LandingLens and will be classified with the name of their directory. For example, in the screenshot below, the "pneumonia" class is assigned to the images.
 ## Sample Datasets
LandingLens offers two sample datasets that you can use to practice loading and classifying images from Snowflake stages. These datasets are available as "apps" from the Snowflake Marketplace. Access the datasets here:
* [Sample Dataset for LandingLens: Manufacturing Metal Casting](https://app.snowflake.com/marketplace/listing/GZTYZ12K65C6/)
* [Sample Dataset for LandingLens: LifeSciences Pneumonia](https://app.snowflake.com/marketplace/listing/GZTYZ12K65CA/)
## Troubleshooting the Sync Process
When using **Sync Snowflake Data** tool, you might get this error:
> Failed to load folder list, Failed to list folder. Please follow instruction below to grant permission to the stage.
This error means that you don't have permission to access the Database, Schema, or Stage you selected. To get permission, run the generated SQL commands that display on the pop-up.
## Sample Datasets
LandingLens offers two sample datasets that you can use to practice loading and classifying images from Snowflake stages. These datasets are available as "apps" from the Snowflake Marketplace. Access the datasets here:
* [Sample Dataset for LandingLens: Manufacturing Metal Casting](https://app.snowflake.com/marketplace/listing/GZTYZ12K65C6/)
* [Sample Dataset for LandingLens: LifeSciences Pneumonia](https://app.snowflake.com/marketplace/listing/GZTYZ12K65CA/)
## Troubleshooting the Sync Process
When using **Sync Snowflake Data** tool, you might get this error:
> Failed to load folder list, Failed to list folder. Please follow instruction below to grant permission to the stage.
This error means that you don't have permission to access the Database, Schema, or Stage you selected. To get permission, run the generated SQL commands that display on the pop-up.
 ## View Syncs from the Past Seven Days
If you've run the **Sync Snowflake Data** tool in a project, you can see the status of all syncs from the past seven days. To do this, click the **Sync** icon near the top right corner LandingLens. A list of all syncs, the synced stages, and statuses display.
Hover over a stage to see the full path of the database, schema, and stage.
If a sync failed, hover over the **i** icon to see more details.
## View Syncs from the Past Seven Days
If you've run the **Sync Snowflake Data** tool in a project, you can see the status of all syncs from the past seven days. To do this, click the **Sync** icon near the top right corner LandingLens. A list of all syncs, the synced stages, and statuses display.
Hover over a stage to see the full path of the database, schema, and stage.
If a sync failed, hover over the **i** icon to see more details.