> ## Documentation Index
> Fetch the complete documentation index at: https://landinglens.docs.landing.ai/llms.txt
> Use this file to discover all available pages before exploring further.
# LandingLens Release Notes
export const vp = 'Visual Prompting';
export const smartLabel = 'Smart Labeling';
export const productLL = 'LandingLens';
export const mi = 'Mobile Inference';
export const llsf = 'LandingLens on Snowflake';
export const companyName = 'LandingAI';
*This article applies to these versions of LandingLens:*
LandingLens
LandingLens on Snowflake
✓
✖
## Smart Labeling Now Uses SAM 2
The {smartLabel} tool has been updated to use [SAM 2](https://ai.meta.com/research/sam2/), the latest version of Meta's open-source Segment Anything Model. This update improves segmentation accuracy, so Smart Labeling detects object boundaries more precisely.
For more information, go to [Label with Smart Labeling](/segmentation#label-with-smart-labeling).
## LandingLens and LandingEdge Documentation Has Moved
Documentation for LandingLens and LandingEdge has moved to this site, [landinglens.docs.landing.ai](https://landinglens.docs.landing.ai/).
Existing links to docs.landing.ai/landinglens and docs.landing.ai/landingedge will automatically redirect to this new site.
## Organize Projects with Folders
You can now create folders to organize your projects within your organization. Use folders to build a hierarchical structure that suits your workflow.
With folders, you can:
* Create nested folders to organize projects
* Move projects between folders
* Search within a specific folder or across all projects
* Navigate through folders using breadcrumb navigation
All organization members can view folders. Collaborators can move their own projects into folders. Admins and Owners can create, move, rename, and delete folders.
To learn more about managing projects and folders, go to [Manage Projects](./create-projects).
## LandingEdge & Docker Deployment v2.11.81 Are Final Versions to Support Classic Flow Models
We are announcing that the last version of LandingEdge and Docker deployment that supports Classic Flow models is v2.11.81. Future versions will not support Classic Flow models.
For detailed information, go to [Classic Flow](./classic-flow).
## More Granular Project Access Management
We’ve made two important updates to project access management for organizations on the **Enterprise** plan:
* **New Project Access Page**: Owners can now view and manage access to all projects—public and private—through a new Project Access page. This gives Owners greater visibility and control, which is especially useful when reassigning private projects if a project Owner leaves the organization. To get the details, go to [Manage Project Access](./override-project-access).
* **More Owners Per Organization**: Previously, organizations could only have 3 Owners. We've removed that maximum, so you can now have multiple Owners. This gives your organization greater flexibility to manage access.
## Embed-Optimized Models
LandingLens now supports building and deploying **embed-optimized models**, which are lightweight, efficient computer vision models designed to run directly on embedded devices.
To create an embed-optimized model, choose one of the following model architectures when running [Custom Training](./custom-training):
* **For Object Detection**: ODEmbedded-\[23M]
* **For Classification**: ConvNextEmbedded-\[16M]
Using these architecture types generates a TensorFlow Lite (TFLite) model ready for embedded deployment. After downloading an embed-optimized model from LandingLens, you can interact with it using TFLite libraries and APIs.
For detailed information and a quickstart guide, go to [Embed-Optimized Models](./edge-ai).
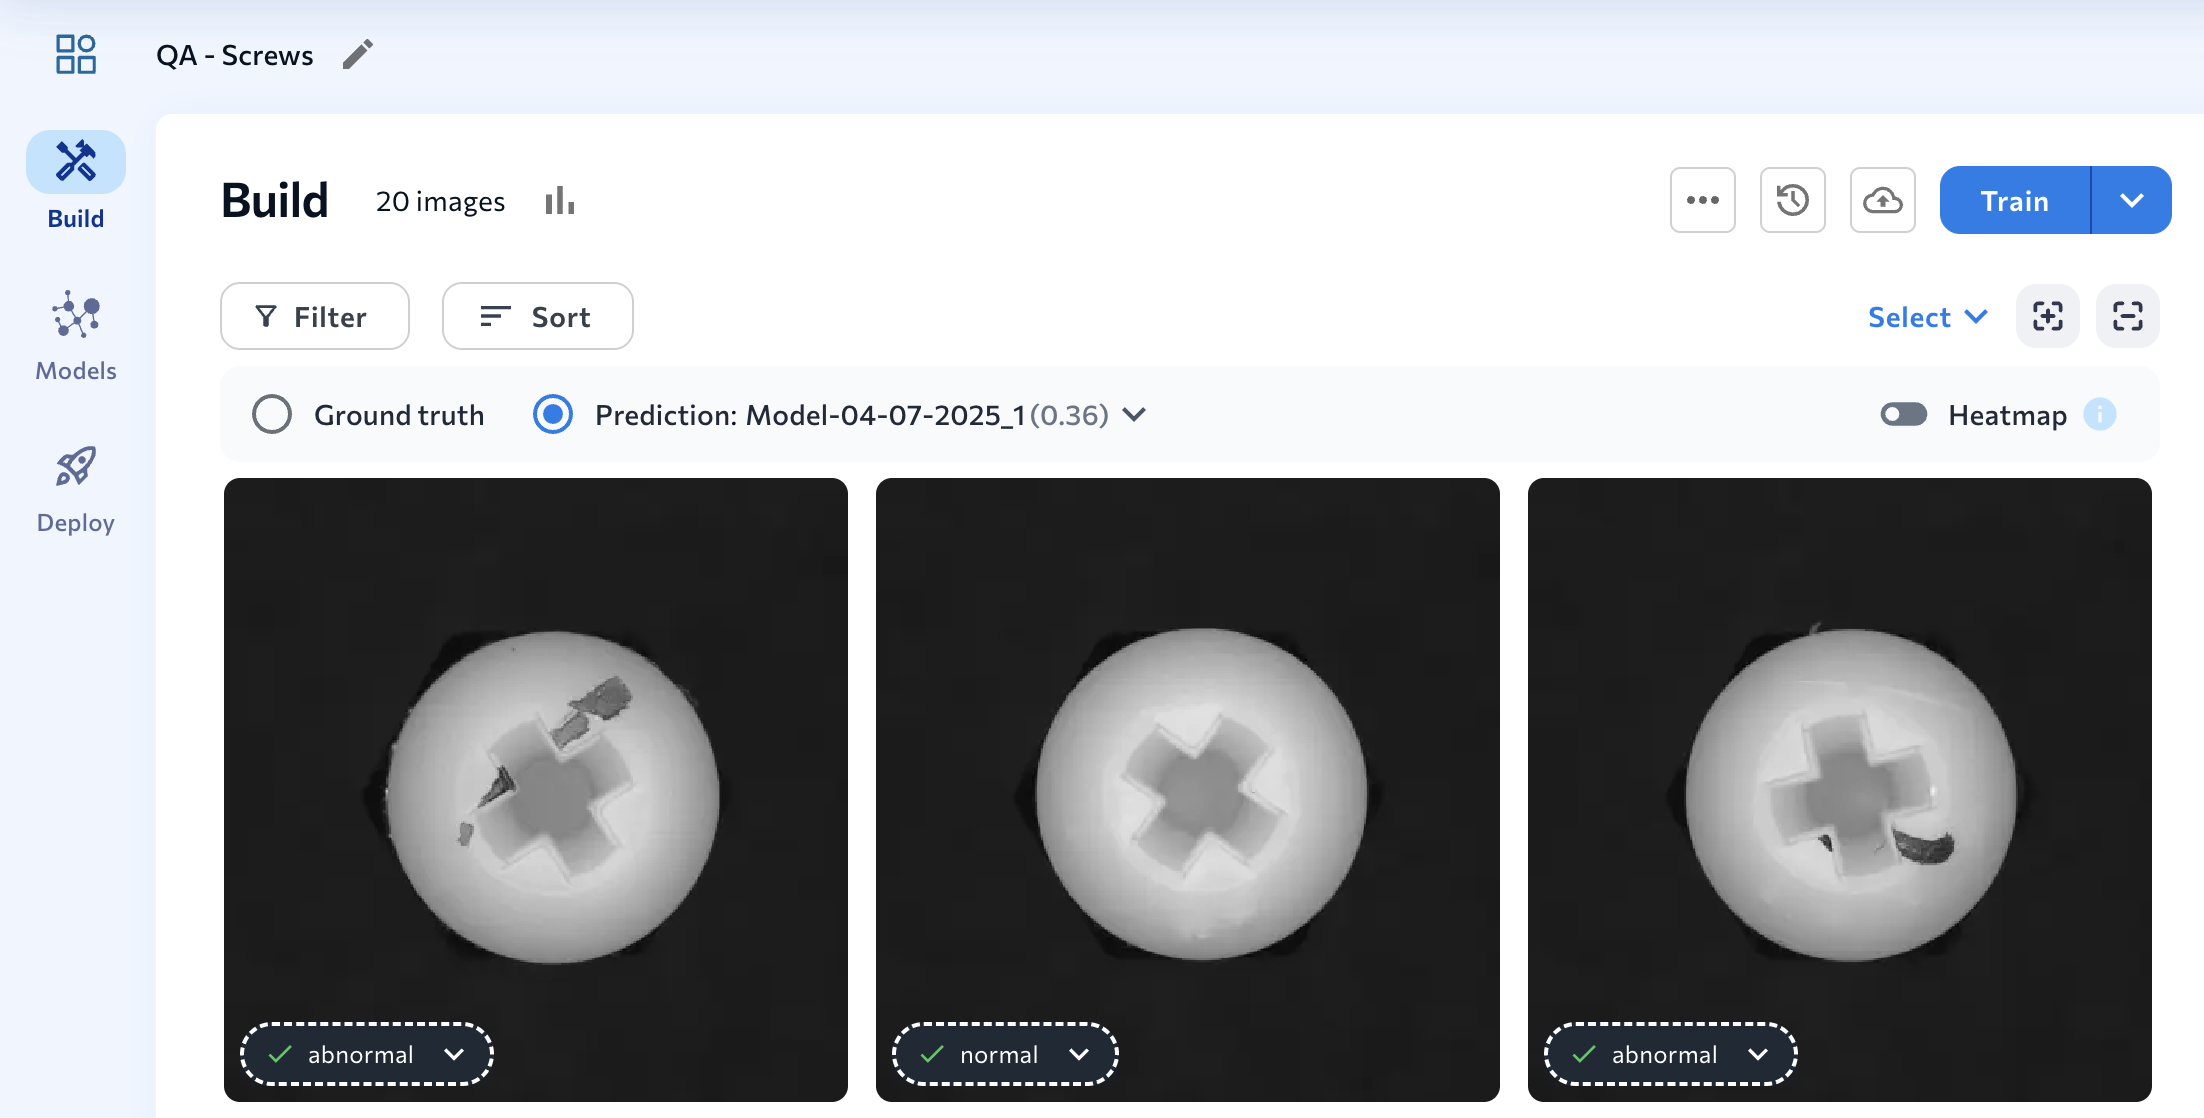
## Anomaly Detection
We are excited to announce a new project type in LandingLens—**Anomaly Detection**!
The Anomaly Detection project type is used to identify deviations from the norm, especially when you have few images of "abnormal" cases. These projects have two built-in classes: **Normal** and **Abnormal**, which you assign to images.
Anomaly Detection models train on Normal images to learn their patterns. The model then flags any deviations as potential anomalies.
To learn more, go to [Anomaly Detection](./anomaly-detection).
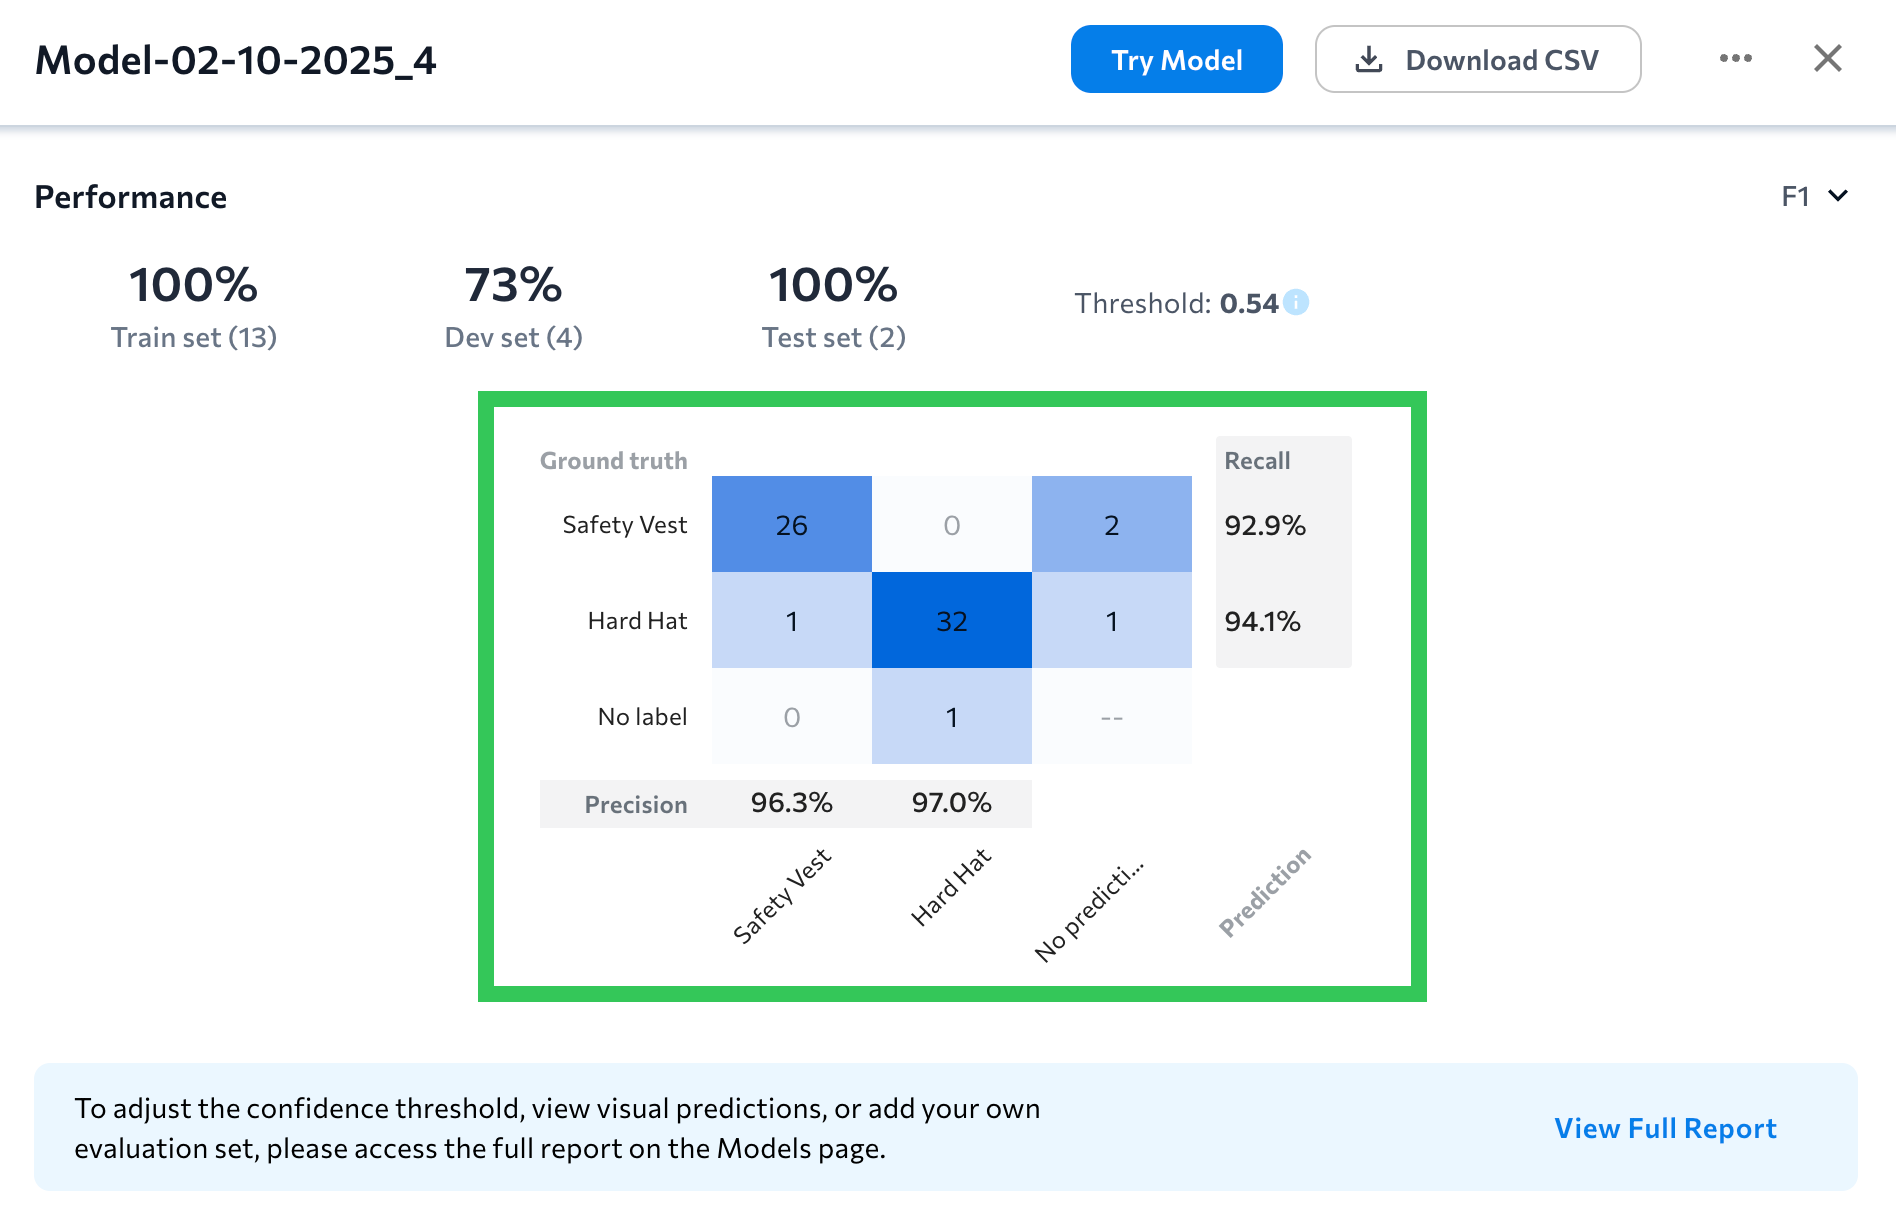
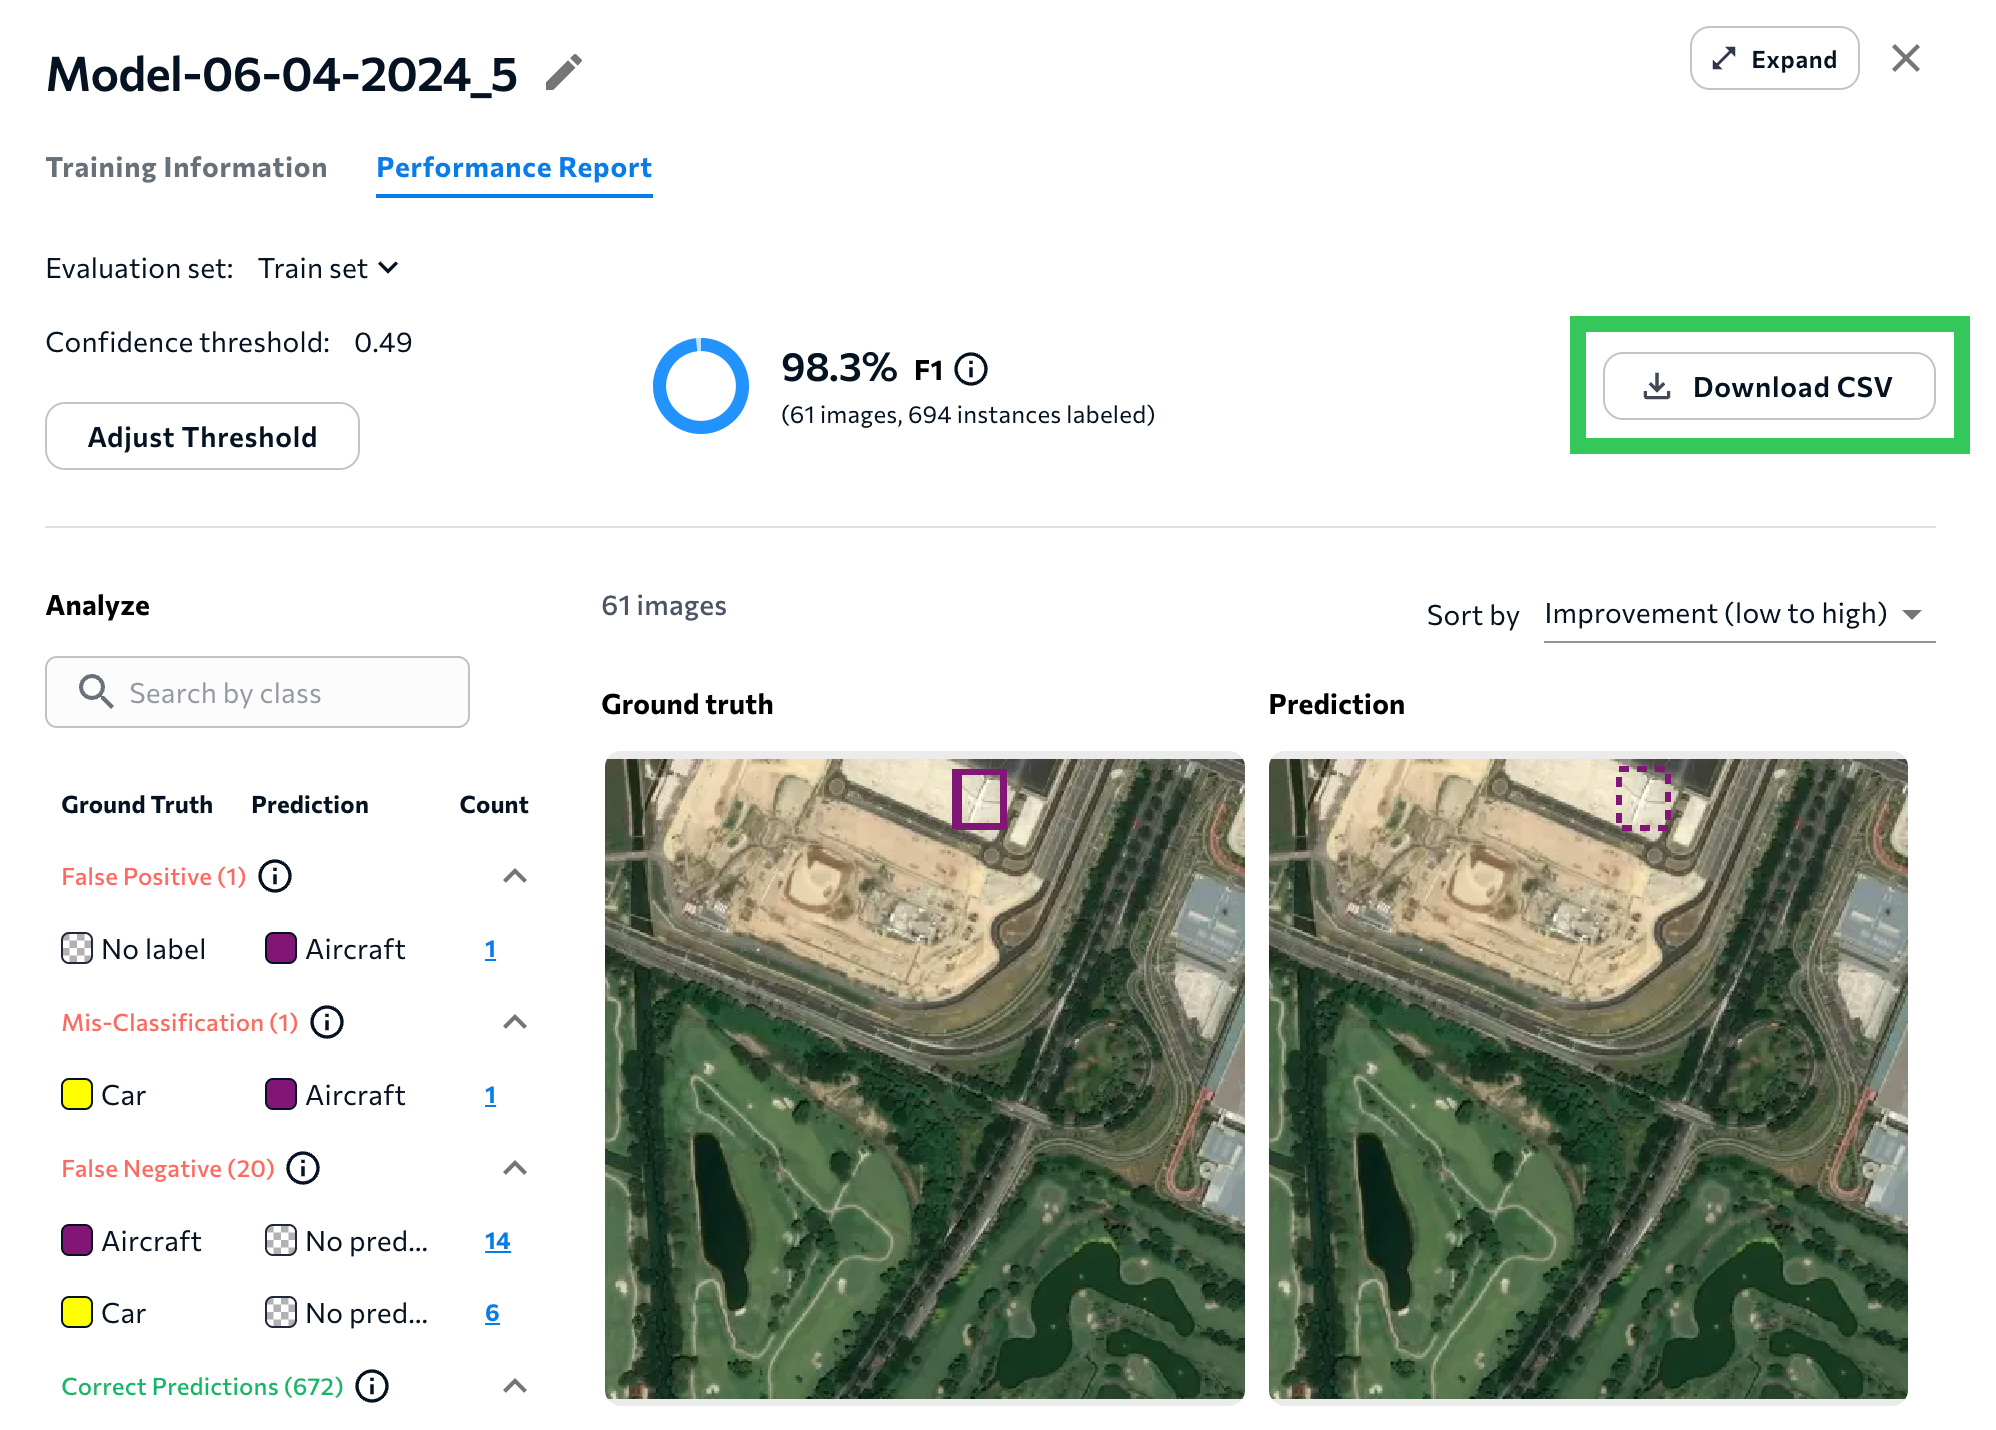
## Updated Confusion Matrix
The newest version of LandingLens features a redesigned confusion matrix! The new confusion matrix is a table that shows ground truth labels versus model predictions. This new table format empowers you to quickly see what classes the model is predicting correctly, and which ones it might have trouble identifying.
Each cell shows the count of instances that correspond to particular ground truth class-predicted class pair. For example, in the image below, the model correctly predicted the class "Hard Hat" 32 times and misclassified it 2 times.
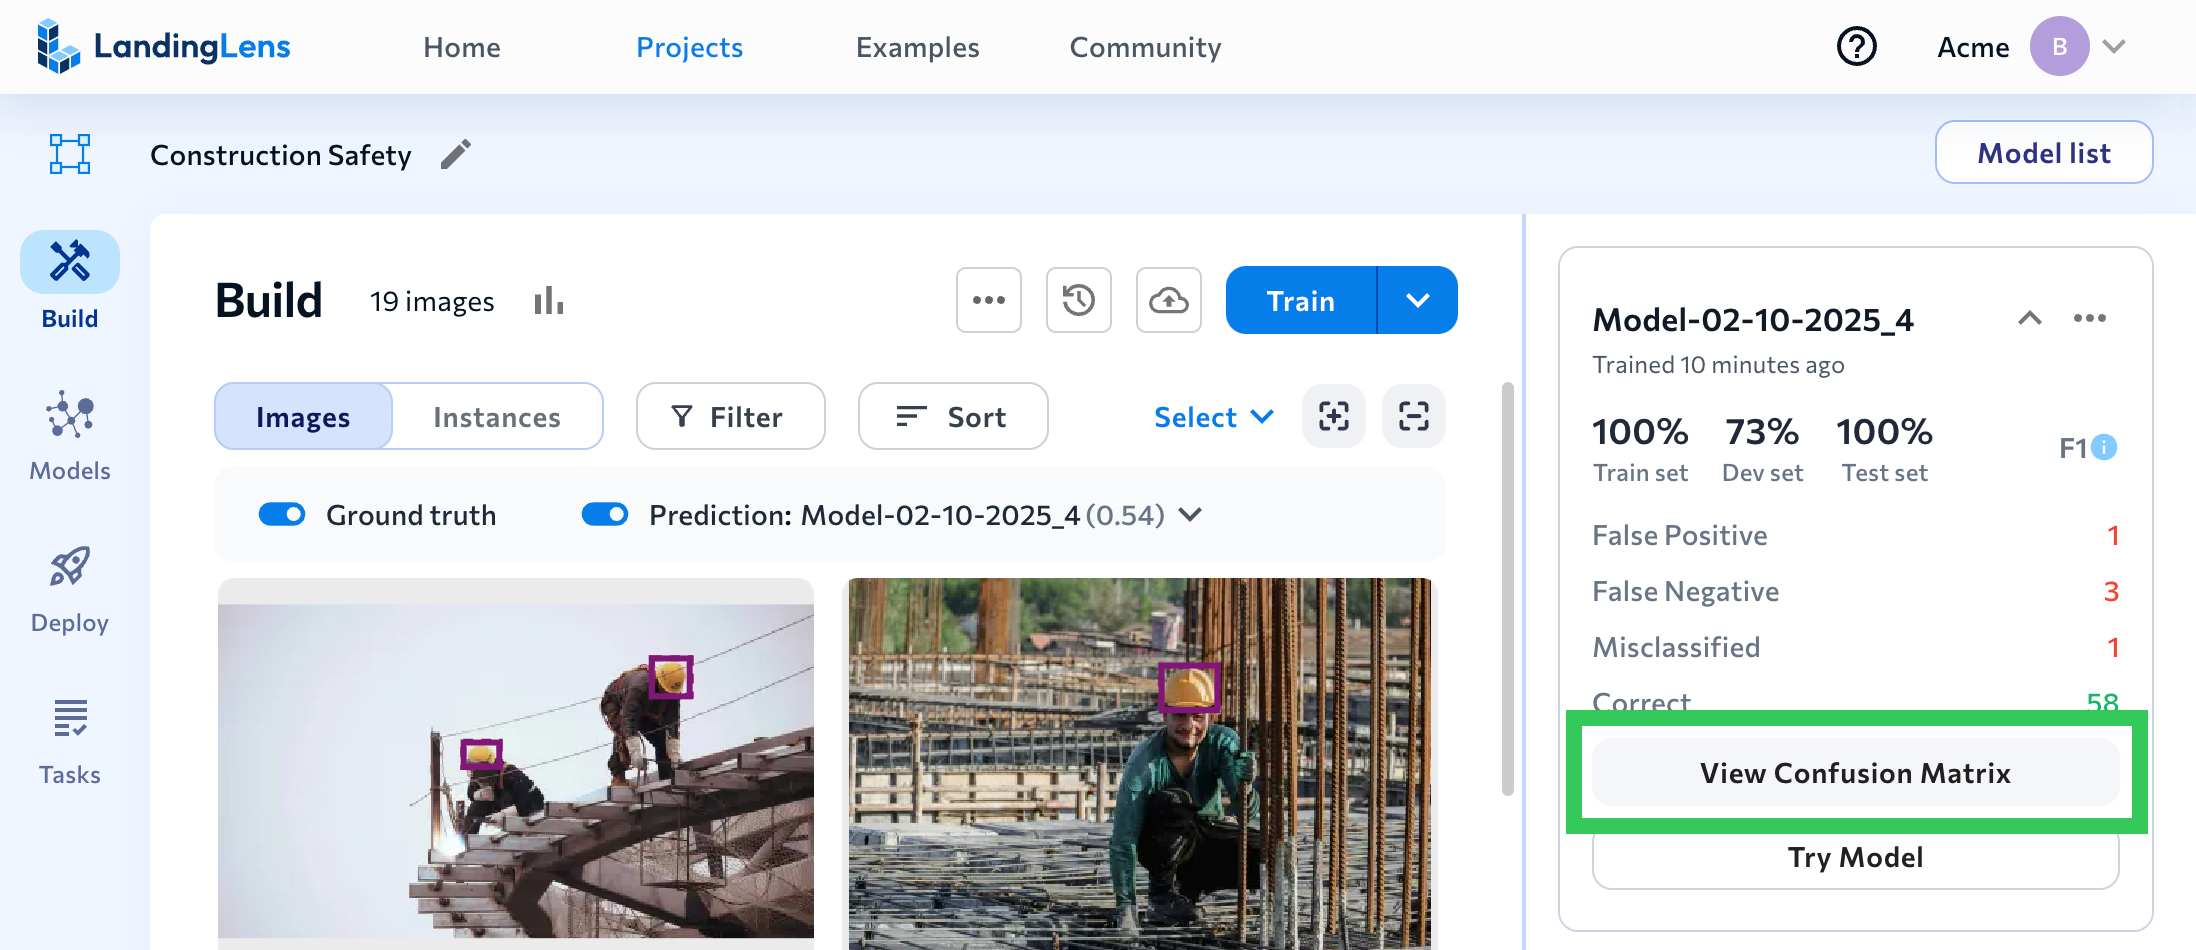
### Where can I see these changes?
All areas that show model performance now include the updated confusion matrix, including:
* [Build tab](./model-settings): Click **View Confusion Matrix**on a model tile to see the confusion matrix for the dataset that the model was trained on.
* The [Performance Report](./performance-report) shows a confusion matrix for the selected evaluation set.
* The [Compare Models](./compare-models) tool shows side-by-side confusion matrices to show how each model performed on the selected evaluation set.
### Learn How to Analyze Models
Watch the following video to learn how to use the updated confusion matrix and other tools to analyze model performance.
## End Model Training, TIFF Support, and More
We're excited to release these updates to LandingLens:
* [Improved workflow for ending model training early](./landinglens-release-notes#changes-to-ending-model-training)
* [TIF/TIFF upload support](./landinglens-release-notes#upload-tiftiff-files-to-projects)
* [Dataset snapshot CSVs now include tags](./landinglens-release-notes#dataset-snapshot-csvs-now-have-image-tags)
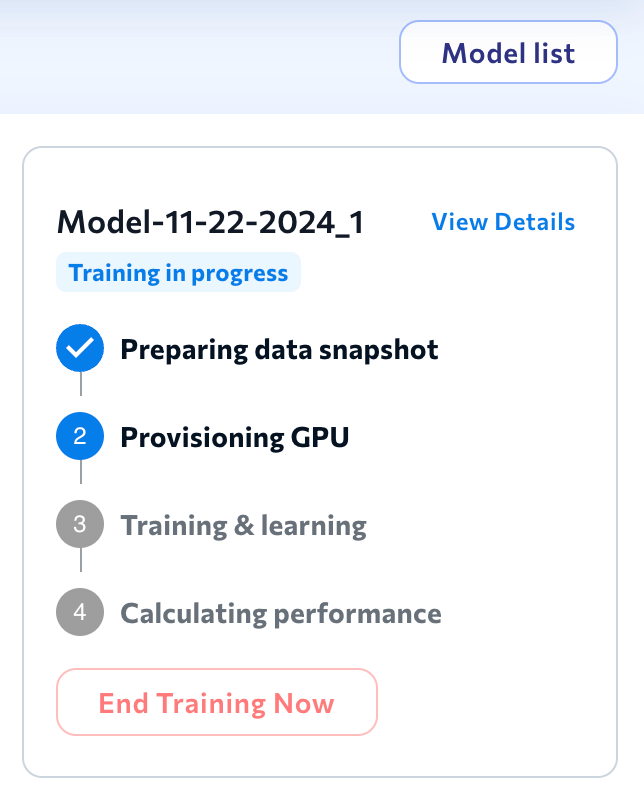
### Changes to Ending Model Training
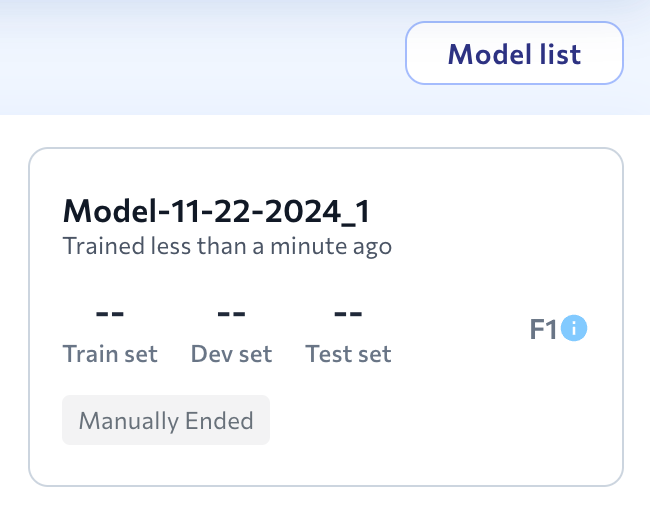
We've made it easier to end model training early. Previously, model training could only be stopped during the **Training & learning** step, and LandingLens would evaluate the images in your dataset with the model it had generated up to that point.
Now, you can end model training at any point. The model tiles for these training jobs display the text **Manually Ended** so that there is a record that model training started, but wasn't completed. To prevent users from accidentally using incomplete models, LandingLens no longer generates models when training is manually ended.
To learn more about training models, go to [Train Models](./train-models).
### Upload TIF/TIFF Files to Projects
TIF/TIFF files can now be uploaded to LandingLens projects. However, LandingLens models cannot run inference on TIF/TIFF files.
To learn more about image support, including supported image files and maximum image size, go to [Upload Images](./upload-images).
### Dataset Snapshot CSVs Now Have Image Tags
When you download a CSV for a [dataset snapshot](./dataset-snapshots), the CSV now lists any tags applied to the images.
To learn more about dataset snapshots, go to [Dataset Snapshots](./dataset-snapshots).
## Download CSV of Model Performance
We just released a new version of LandingLens with these features:
* [Download a CSV of model performance for select images](./landinglens-release-notes#download-csv-of-model-performance-for-select-images)
* [Hide LandingEdge and Docker deployment options](./landinglens-release-notes#hide-landingedge-and-docker-deployment-options)
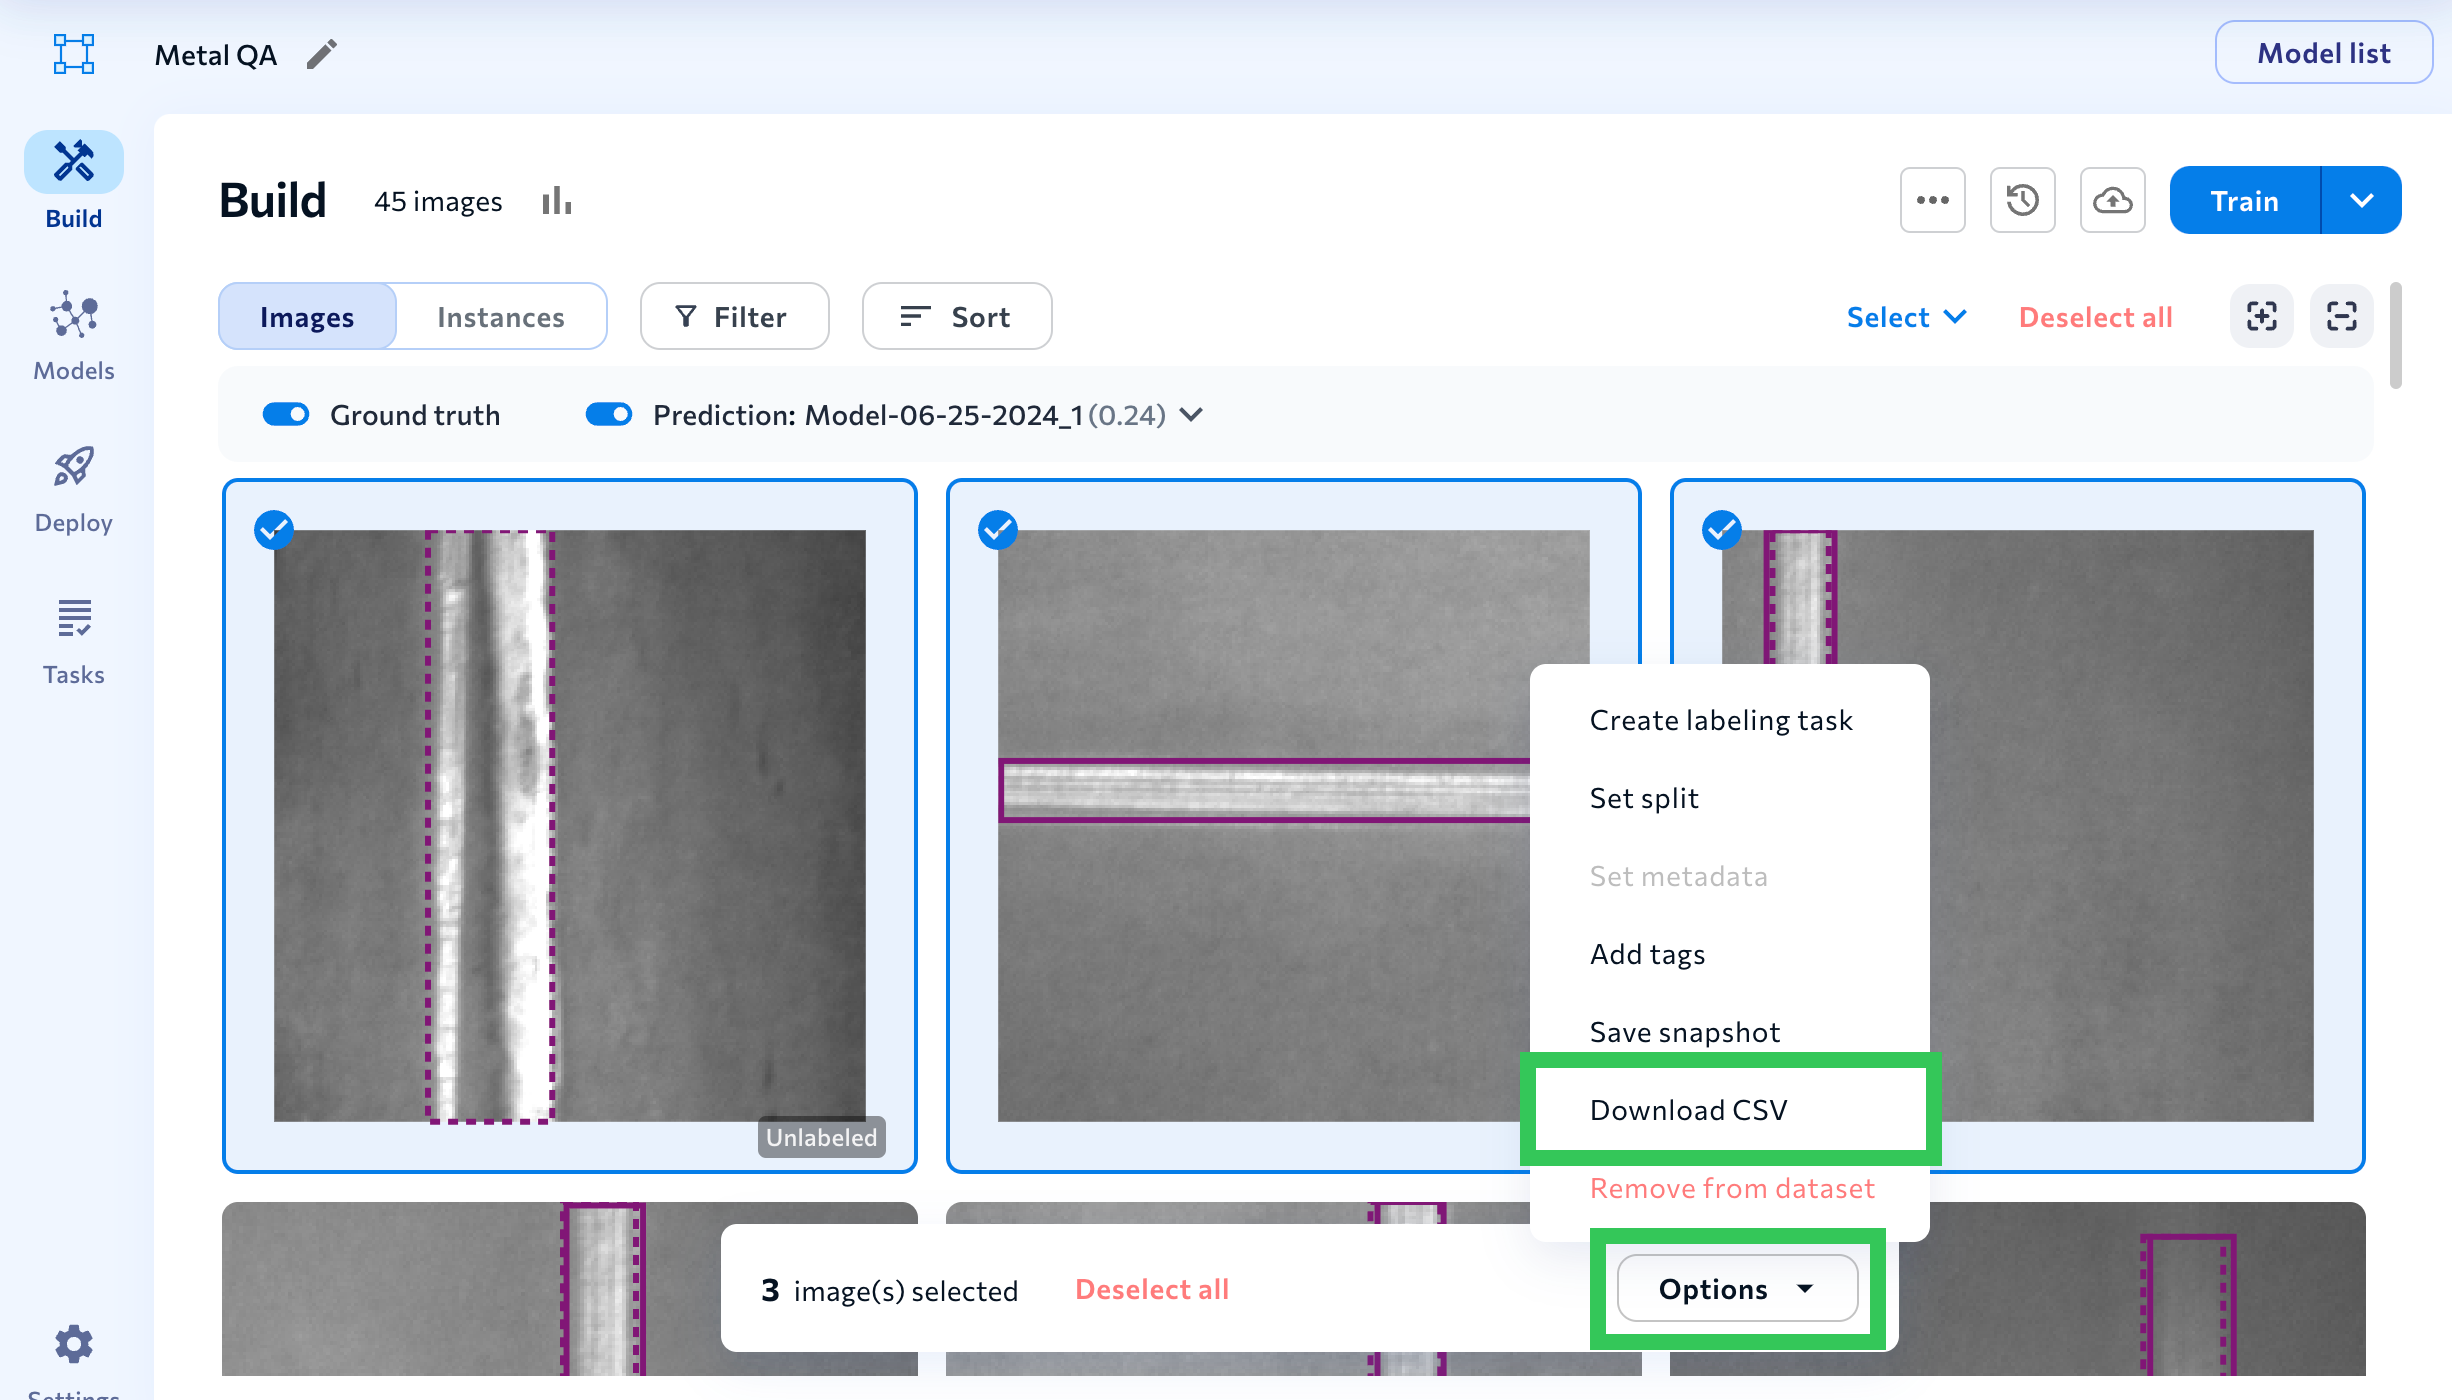
### Download CSV of Model Performance for Select Images
You can now download a CSV of model performance for select images in your Object Detection or Classification dataset. The prediction data in the CSV will be based on the selected model and confidence threshold (if you manually change the threshold, that threshold is used in the CSV).
For detailed instruction on how to download the CSV, go to [Model Reports](./model-settings#download-csv-model-predictions-for-select-images).
### Hide LandingEdge and Docker Deployment Options
For Enterprise users, {companyName} can now hide the LandingEdge and LandingAI deployment options if you don't want your organization to deploy using these methods. To have these disabled, contact [support@landing.ai](mailto:support@landing.ai).
## New Model Analysis Interface & Training APIs
We've streamlined the experience for viewing and analyzing model performance right after training a model! We've moved around a few elements on the **Build** page and surfaced key model performance metrics. The goal of these updates is to quickly give you the data you need to decide if you need to finetune your model before deploying it.
Here's an overview of the updated model performance tools on the Build page. Want a deeper dive on these features? Check out [View Predictions](./view-predictions) and [Model Reports](./model-settings)!
| # | Description |
| - | -------------------------------------------------------------------------------------------------------------------------------------------------------------------------------------------------------------------------------------------------------------------------------------------------------------------------------------------------------------------- |
| 1 | Turn on and manage Predictions all in one place!
When you turn on **Predictions**, you can now select the model and confidence threshold you want to see predictions for. Get more details in [View Predictions](./view-predictions). |
| 2 | Click **Try Model** to see how the model performs on new images. This is the same as the "Predict" button in previous versions of LandingLens. |
| 3 | Key model performance data now displays on **model tiles**. You can now see a few model tiles at a time, so that you can compare model performance at a glance.
The model tile shows the model's F1 or IoU score for each data split (Train, Dev, and Test) and the number of Correct, False Positive, False Negative, and Misclassification predictions. |
| 4 | Clicking a model tile opens a window with detailed performance data and a confusion matrix. You can toggle between the F1 or IoU, Precision, and Recall scores. Get more details in [Model Reports](./model-settings). |
### LandingLens APIs
You can now retrieve a model's training metrics and confusion matrix using the [LandingLens API](https://landing-ai.github.io/public-rest-api/fastapi/#/). To learn more about how to use these training APIs, see this [Training Metrics tutorial](https://landing-ai.github.io/public-rest-api/tutorial/training/metrics/).
#### Model Training Metrics
The training metrics include the Performance, Recall, and Precision scores for the model. Use this endpoint to get a model's training metrics:
`/v1/projects/{project_id}/train/{training_id}/results/metrics`
Get more information about this API in [Get Metrics Summary](https://landing-ai.github.io/public-rest-api/fastapi/#/operations/get_metrics_summary_v1_projects__project_id__train__training_id__results_metrics_get).
#### Model Confusion Matrix
The confusion matrix lists the number of correct predictions, false negatives, false positives, and misclassifications. Use this endpoint to get a model's confusion matrix:
`v1/projects/{project_id}/train/{training_id}/results/confusion-matrix`
Get more information about this API in [Get Confusion Matrix For All Splits](https://landing-ai.github.io/public-rest-api/fastapi/#/operations/get_confusion_matrix_for_all_splits_v1_projects__project_id__train__training_id__results_confusion_matrix_get).
## Use Label Assist to Improve Model Performance
We just released a new version of LandingLens that includes these two exciting features:
* [Label Assist](./landinglens-release-notes#label-assist)
* [Download CSVs from Evaluation Sets](./landinglens-release-notes#download-csvs-from-evaluation-sets)
### Label Assist
We've introduced a new tool called **Label Assist** that suggests new labels or improvements to labels! Use Label Assist to speed up the labeling process and help make your labels ("ground truth" annotations) more accurate, so that the next model will have better performance.
Label Assist can spot missing labels and suggest label improvements. For example, if there's a large space between an object and the original bounding box, Label Assist might suggest a tighter label.
Label Assist shows you its suggestions on the image details page as dashed bounding boxes. Click a suggestion to accept it, or click **Accept All** to accept all suggestions for an image. After reviewing and accepting suggestions, train the model again to include the newest labels in a model. For detailed information, check out the full article here: [Label Assist](./label-assist).
Label Assist replaces another tool called Check Label Quality. That feature has been deprecated.
### Download CSVs from Evaluation Sets
When looking at an evaluation set's [Performance Report](./compare-models), you can now download a CSV of information about the images in that evaluation set. The CSV includes several data points for each image, including the labels ("ground truth") and model's predictions. The CSV download is available for Object Detection and Classification projects.
For more information, go to [Download CSV of Evaluation Set](./performance-report#download-csv-of-evaluation-set).
## LandingLens API
We now offer a [LandingLens API](https://landing-ai.github.io/public-rest-api/fastapi/#/)! The LandingLens API is a RESTful API that allows you to use LandingLens programmatically. You can use the LandingLens API to perform many tasks, including:
* Create projects
* Upload images to projects
* Create classes
* Train models
* Deploy models to cloud-endpoints hosted by {companyName} (cloud deployment).
Access the LandingLens API [here](https://landing-ai.github.io/public-rest-api/fastapi/#/).
## Simplified Pricing Plans, Model Downloads, and More!
We’re simplifying our LandingLens plans to offer more capabilities and an easy-to-understand pricing structure! You can check out all the details on our [Pricing](https://landing.ai/pricing) page, but the most game-changing updates are that all users can now:
* Use [LandingEdge](./landingedge/landingedge-overview), our edge deployment solution.
* Use [Docker Deployment](./landingedge/docker-deploy), which empowers you to run model inference programmatically.
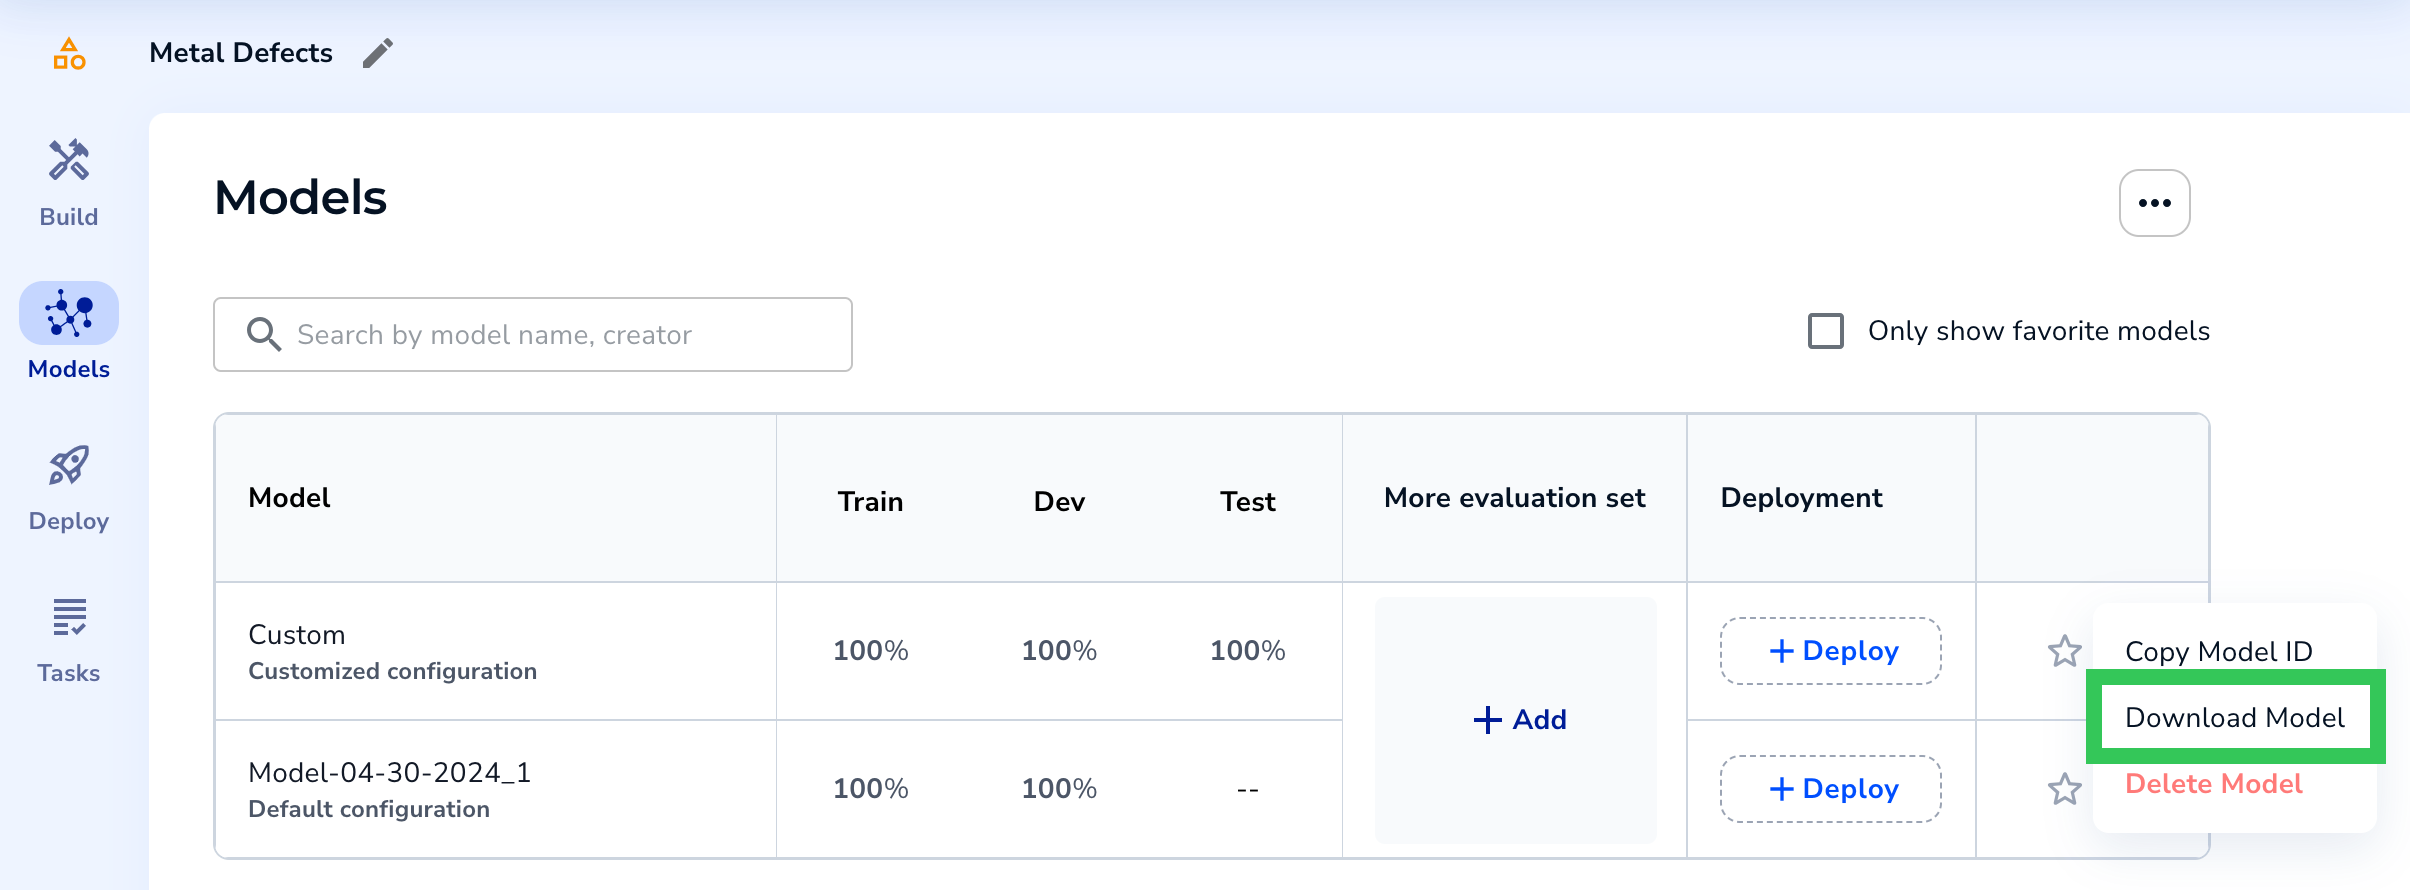
* [Download models](./download-models) from LandingLens! You can load the models to LandingEdge or Docker to deploy offline, or you can use the ONNX file to deploy the model via your own app.
Keep reading and watch the video below to get more details about these updates and how you can leverage them.
### Use LandingEdge & Docker Deployment Today—No Licenses Needed!
In an effort to make it as easy as possible to deploy your LandingLens model, [LandingEdge](./landingedge/landingedge-overview) and [Docker Deployment](./landingedge/docker-deploy) are now available to users on all pricing plans.
Plus, we’ve removed the requirement to have a license to run LandingEdge and Docker Deployment. You can now download and run these tools without getting a license from {companyName}.
If you have an older version of LandingEdge and Docker Deployment, download the latest versions to leverage the “no-license” benefit.
### Download Models
You can now download your computer vision model from LandingLens! The model is downloaded as a ZIP file that you can load directly into LandingEdge and Docker Deployment if you want to deploy offline.
The downloaded model also includes the ONNX file for the model. ONNX (Open Neural Network Exchange) is an open source format for AI models, so you can use your model in your own custom applications.
Only Enterprise users can use downloaded models for commercial purposes. Models downloaded from the Free and Visionary plans can only be used for noncommercial use.
### Workflow for Downloading Models
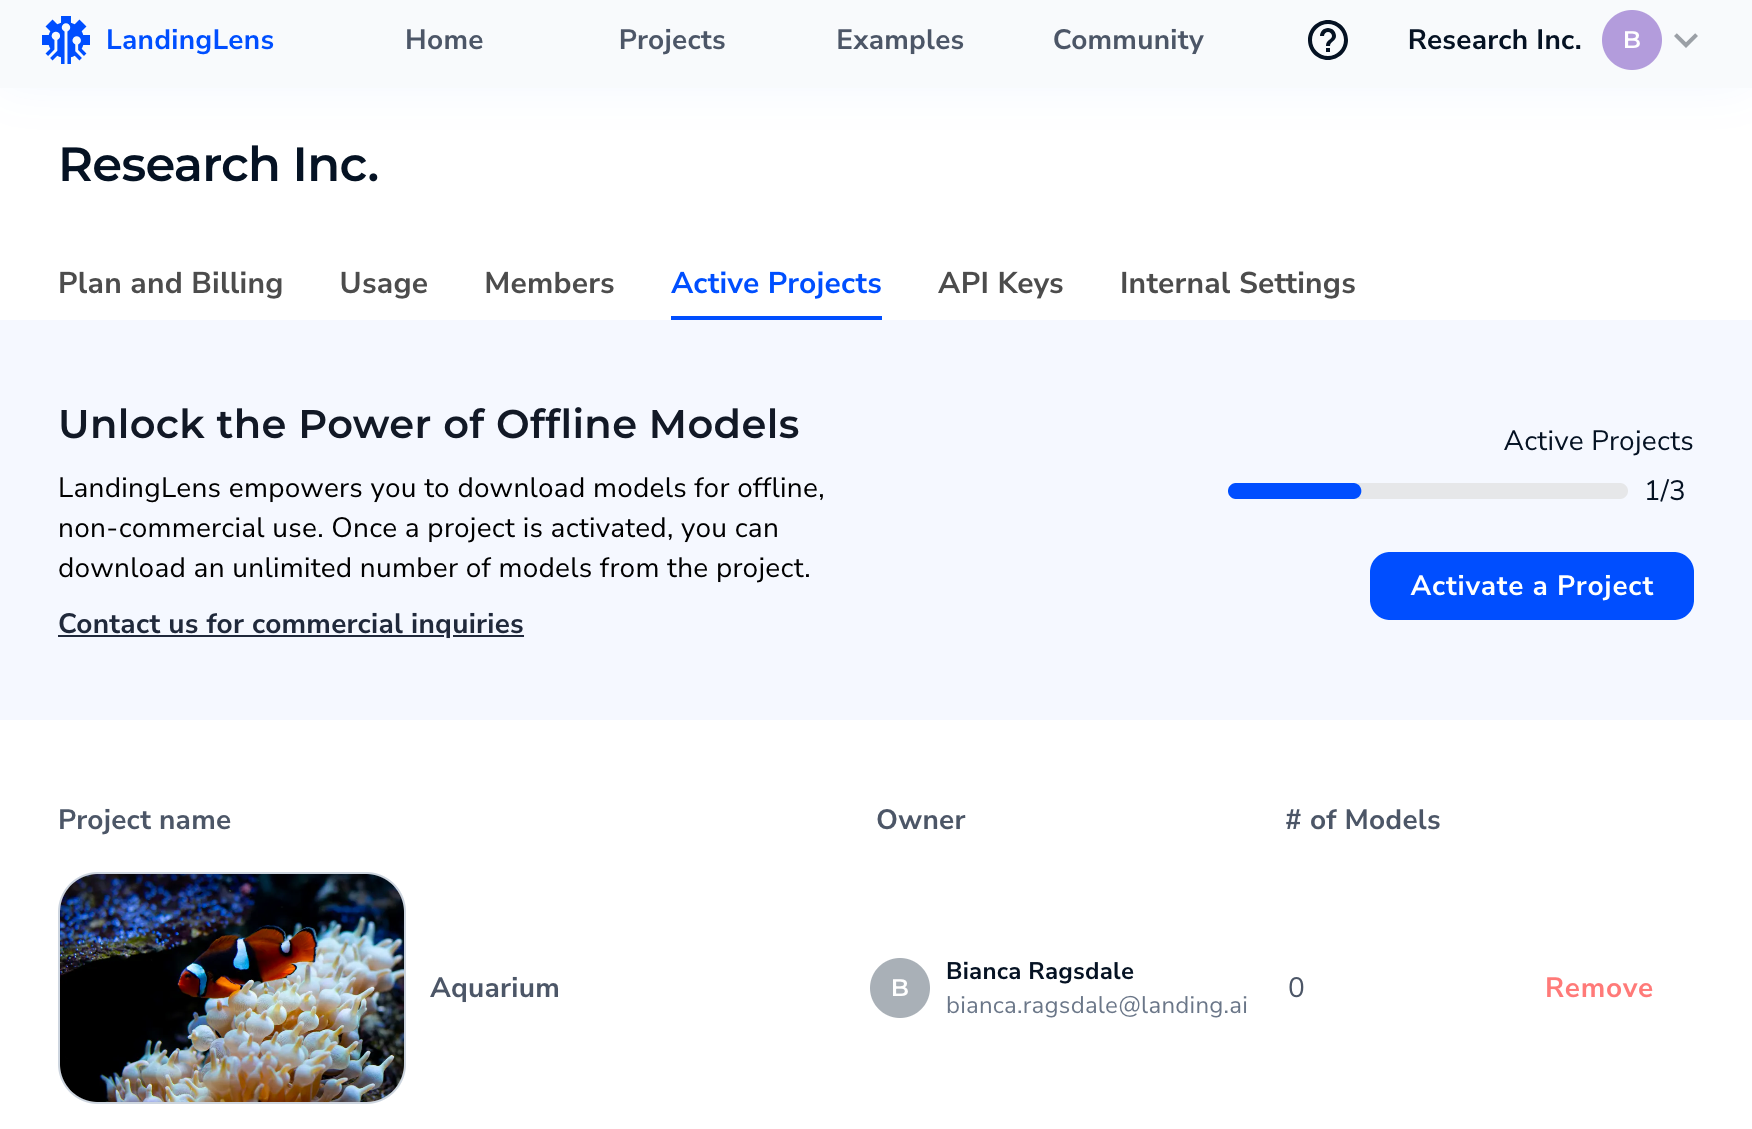
This new version of LandingLens introduces the concept of “[activated projects](./activate-projects)”. You must activate a project before you can [download models](./download-models) from it or deploy models from it using LandingEdge or Docker Deployment. Each pricing plan has a maximum number of projects that can be active at the same time:
* **Free**: 1 project
* **Visionary**: 3 projects
* **Enterprise**: Starts at 5 projects
Projects are activated in a new page called **Active Projects**. For detailed instructions about how to activate and deactivate projects, go to [Activate Projects](./activate-projects).
After you activate a project, you can download as many models from the project as you like. Models are downloaded from the **Models** tab.
### New Credit Calculation for Custom Training
In addition to changing the LandingLens pricing plans, we’re also changing how credits are charged for [Custom Training](./custom-training). Each LandingLens plan includes a set of credits, which are like a form of currency in LandingLens. You spend credits to train models and run inferences.
Until now, training one image cost 1 credit, and running inference on one image cost 1 credit. As of today (May 6, 2024), the credit cost for Custom Training is now calculated differently. The credit cost is now based on the project type and custom training settings selected. In general, increasing any of the settings (like increasing the Epoch) increases the cost to train and run inference.
With Custom Training, the cost to train the model and run inference on that model might be more or less than 1 credit.
After you configure your settings—and before you train the model—LandingLens shows you the exact credit cost it will take to train the model and run inference on it.
There are no changes to how credits are calculated for Fast Training (the default training method). Training an image and running inference on an image will continue to cost 1 credit each.
### Each Model Can Have a Different Inference Cost
If you run Custom Training multiple times in the same project, each resulting model can have a different cost for running inference. This is because each round of Custom Training can have multiple different settings, each of which impact the cost.
For example, you could have three models with the following inference costs in the same project:
| Model | Training Type | Credit Cost for Inference |
| ------- | --------------------------------------- | ------------------------- |
| Model A | Fast Training (default training method) | 1 credit / image |
| Model B | Custom Training | 1.62 credits / image |
| Model C | Custom Training | 0.35 credits / image |
## April 18, 2024
Computer vision models are trained based on sets of labeled images called *splits*. The three splits are the Train set, Dev set, and Test set. During the model training process, the model uses the splits to learn patterns, validate its predictions, and test its accuracy. Images in each split must be labeled in order for the model to learn what data is and isn’t relevant to each class.
LandingLens offers many ways to assign splits to images, including assigning splits when uploading images. Before this release, splits could be assigned at upload even if some images weren’t labeled. Now, to help you manage splits more accurately, a split can only be assigned at upload if those images are labeled. To learn all about splits in LandingLens, go to [Splits](./splits).
## April 2, 2024
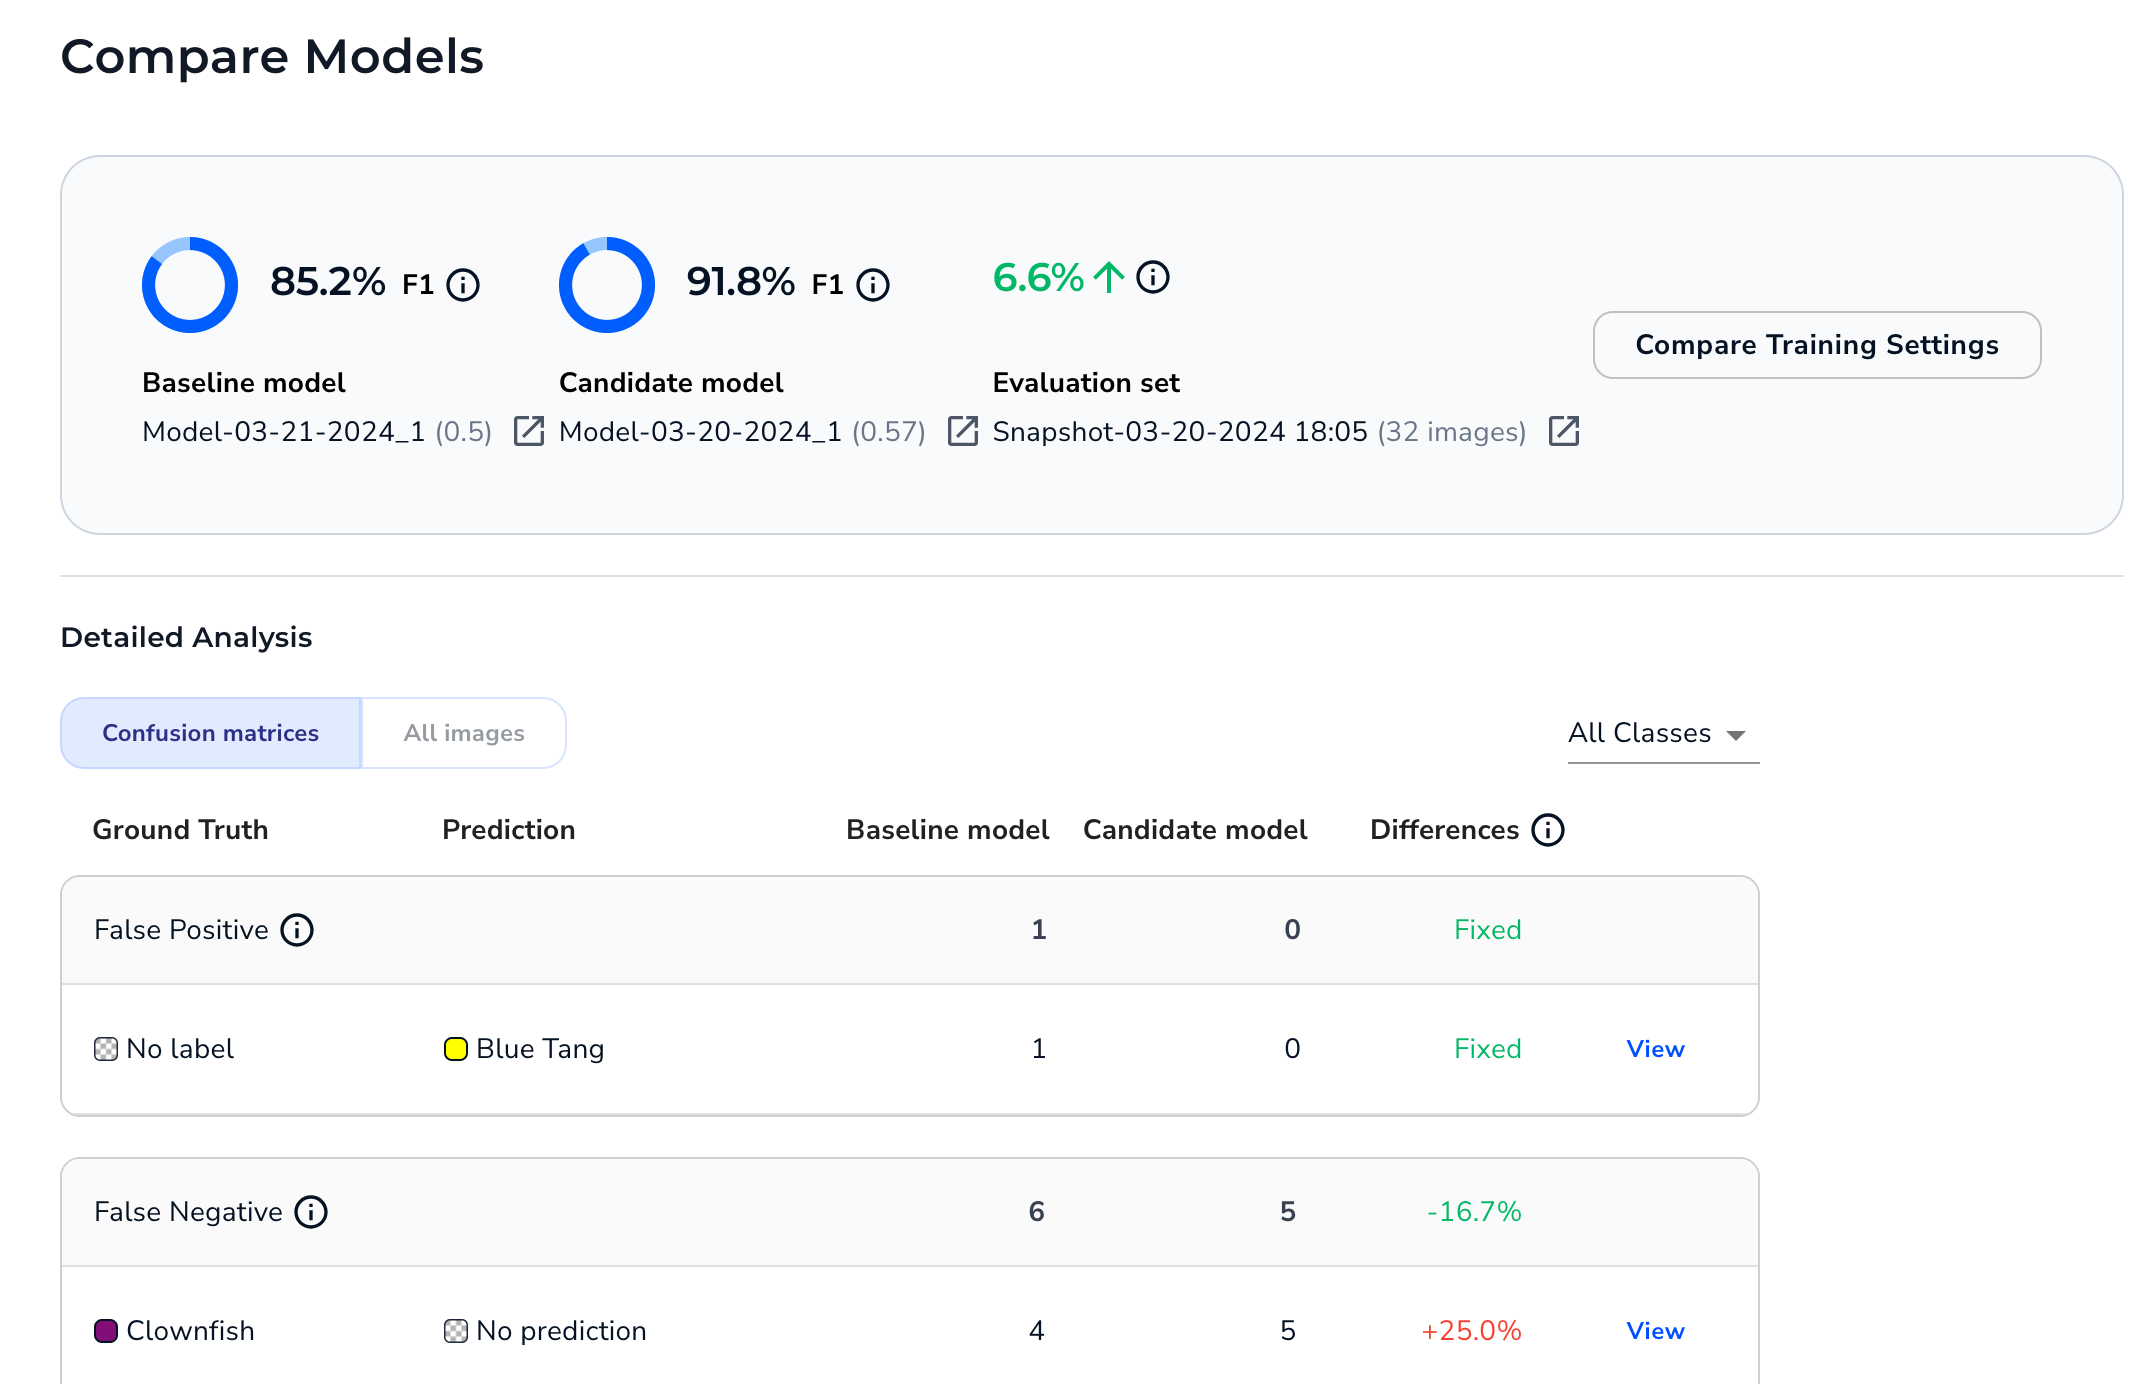
We just released a new version of LandingLens that features a new tool: [Compare Models](./compare-models)! The Compare Models tool is a great way to evaluate performance on multiple iterations of the model. It can help you identify if you need to improve your labels, datasets, and hyperparameters.
When you run the Compare Models tool, you set a **baseline** model and a **candidate** model. LandingLens then shows you if the candidate model performed better or worse for each prediction outcome (False Positive, False Negative, Correct, etc). You can even see a side-by-side comparison of how the baseline and candidate models performed on each image in the dataset. To get the full details about how to use the Compare Models tool, go to [Compare Models](./compare-models).
## March 18, 2024
A new version of LandingLens is now available! This version includes some small (but mighty!) enhancements that can streamline your workflow. These improvements include:
* You can now train up to 10 models at once.
* We’ve added a safeguard to Custom Training that ensures that crops are only applied after resizes or rescales. For more information about cropping during Custom Training, go [here](./custom-training).
* Model names can now include special characters.
### Bug Fixes
This release of LandingLens includes the following bug fixes:
* When using the Auto Split tool, the lines for each class align with the percentages on the right side of the page. Previously, the alignment was off.
* The Deploy page for Classification projects no longer shows a Confidence Score. LandingLens only uses a Confidence Score for Object Detection and Segmentation projects.
## March 12, 2024
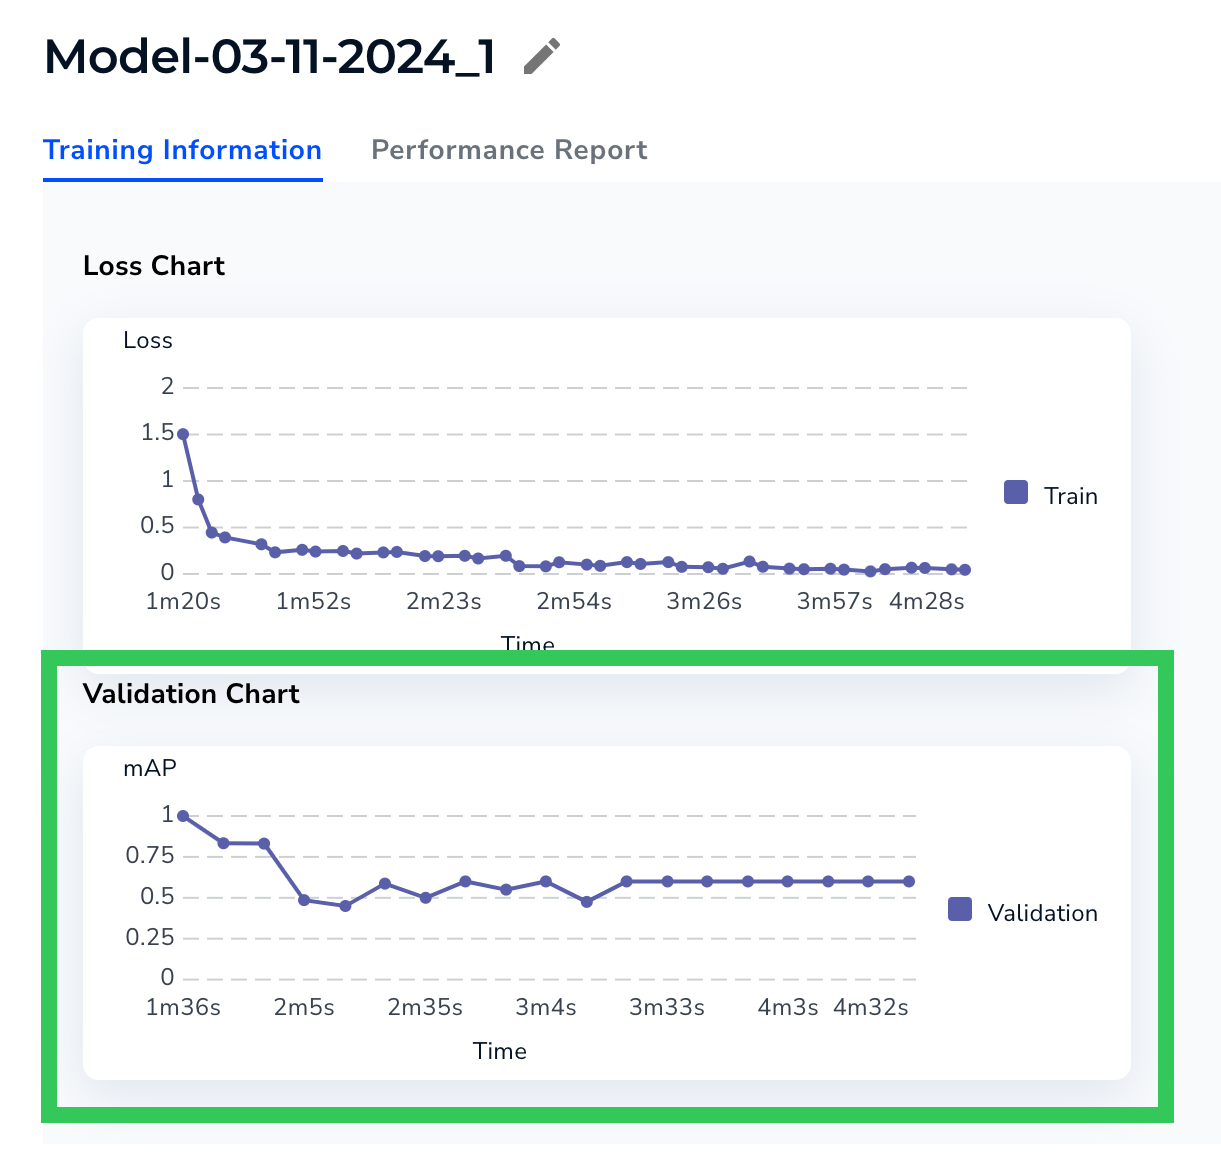
In the new release of LandingLens, a **Validation Chart** now displays on the **Training Information** tab for a model.
The Validation chart is calculated on the Dev split. This chart displays when the model was trained using [Custom Training](./custom-training) and the Dev split has at least 6 images.
If the model improves during the validation process, the line goes up over time. The line will look slightly different for each project type because each uses a different validation metric:
* **Object Detection**: mAP (Mean Average Precision)
* **Segmentation**: mIoU (mean Intersection over Union)
* **Classification**: F1 score
For more information about a model's Training Information, go to [Analyze and Compare Models](./compare-models).
## February 29, 2024
The newest version of LandingLens introduces more Model Size options for Custom Training. The Model Size refers to the architecture and number of parameters used to train the model.
We’ve added a third model size option to Object Detection projects: **RtmDet-\[9M]**. This option leads to the fastest training and inference times, when compared to the other two model sizes. This model size uses the [RTMDet](https://arxiv.org/abs/2212.07784) architecture and 9 million parameters.
For detailed information about creating custom-trained models in LandingLens, go to [Custom Training](./custom-training).
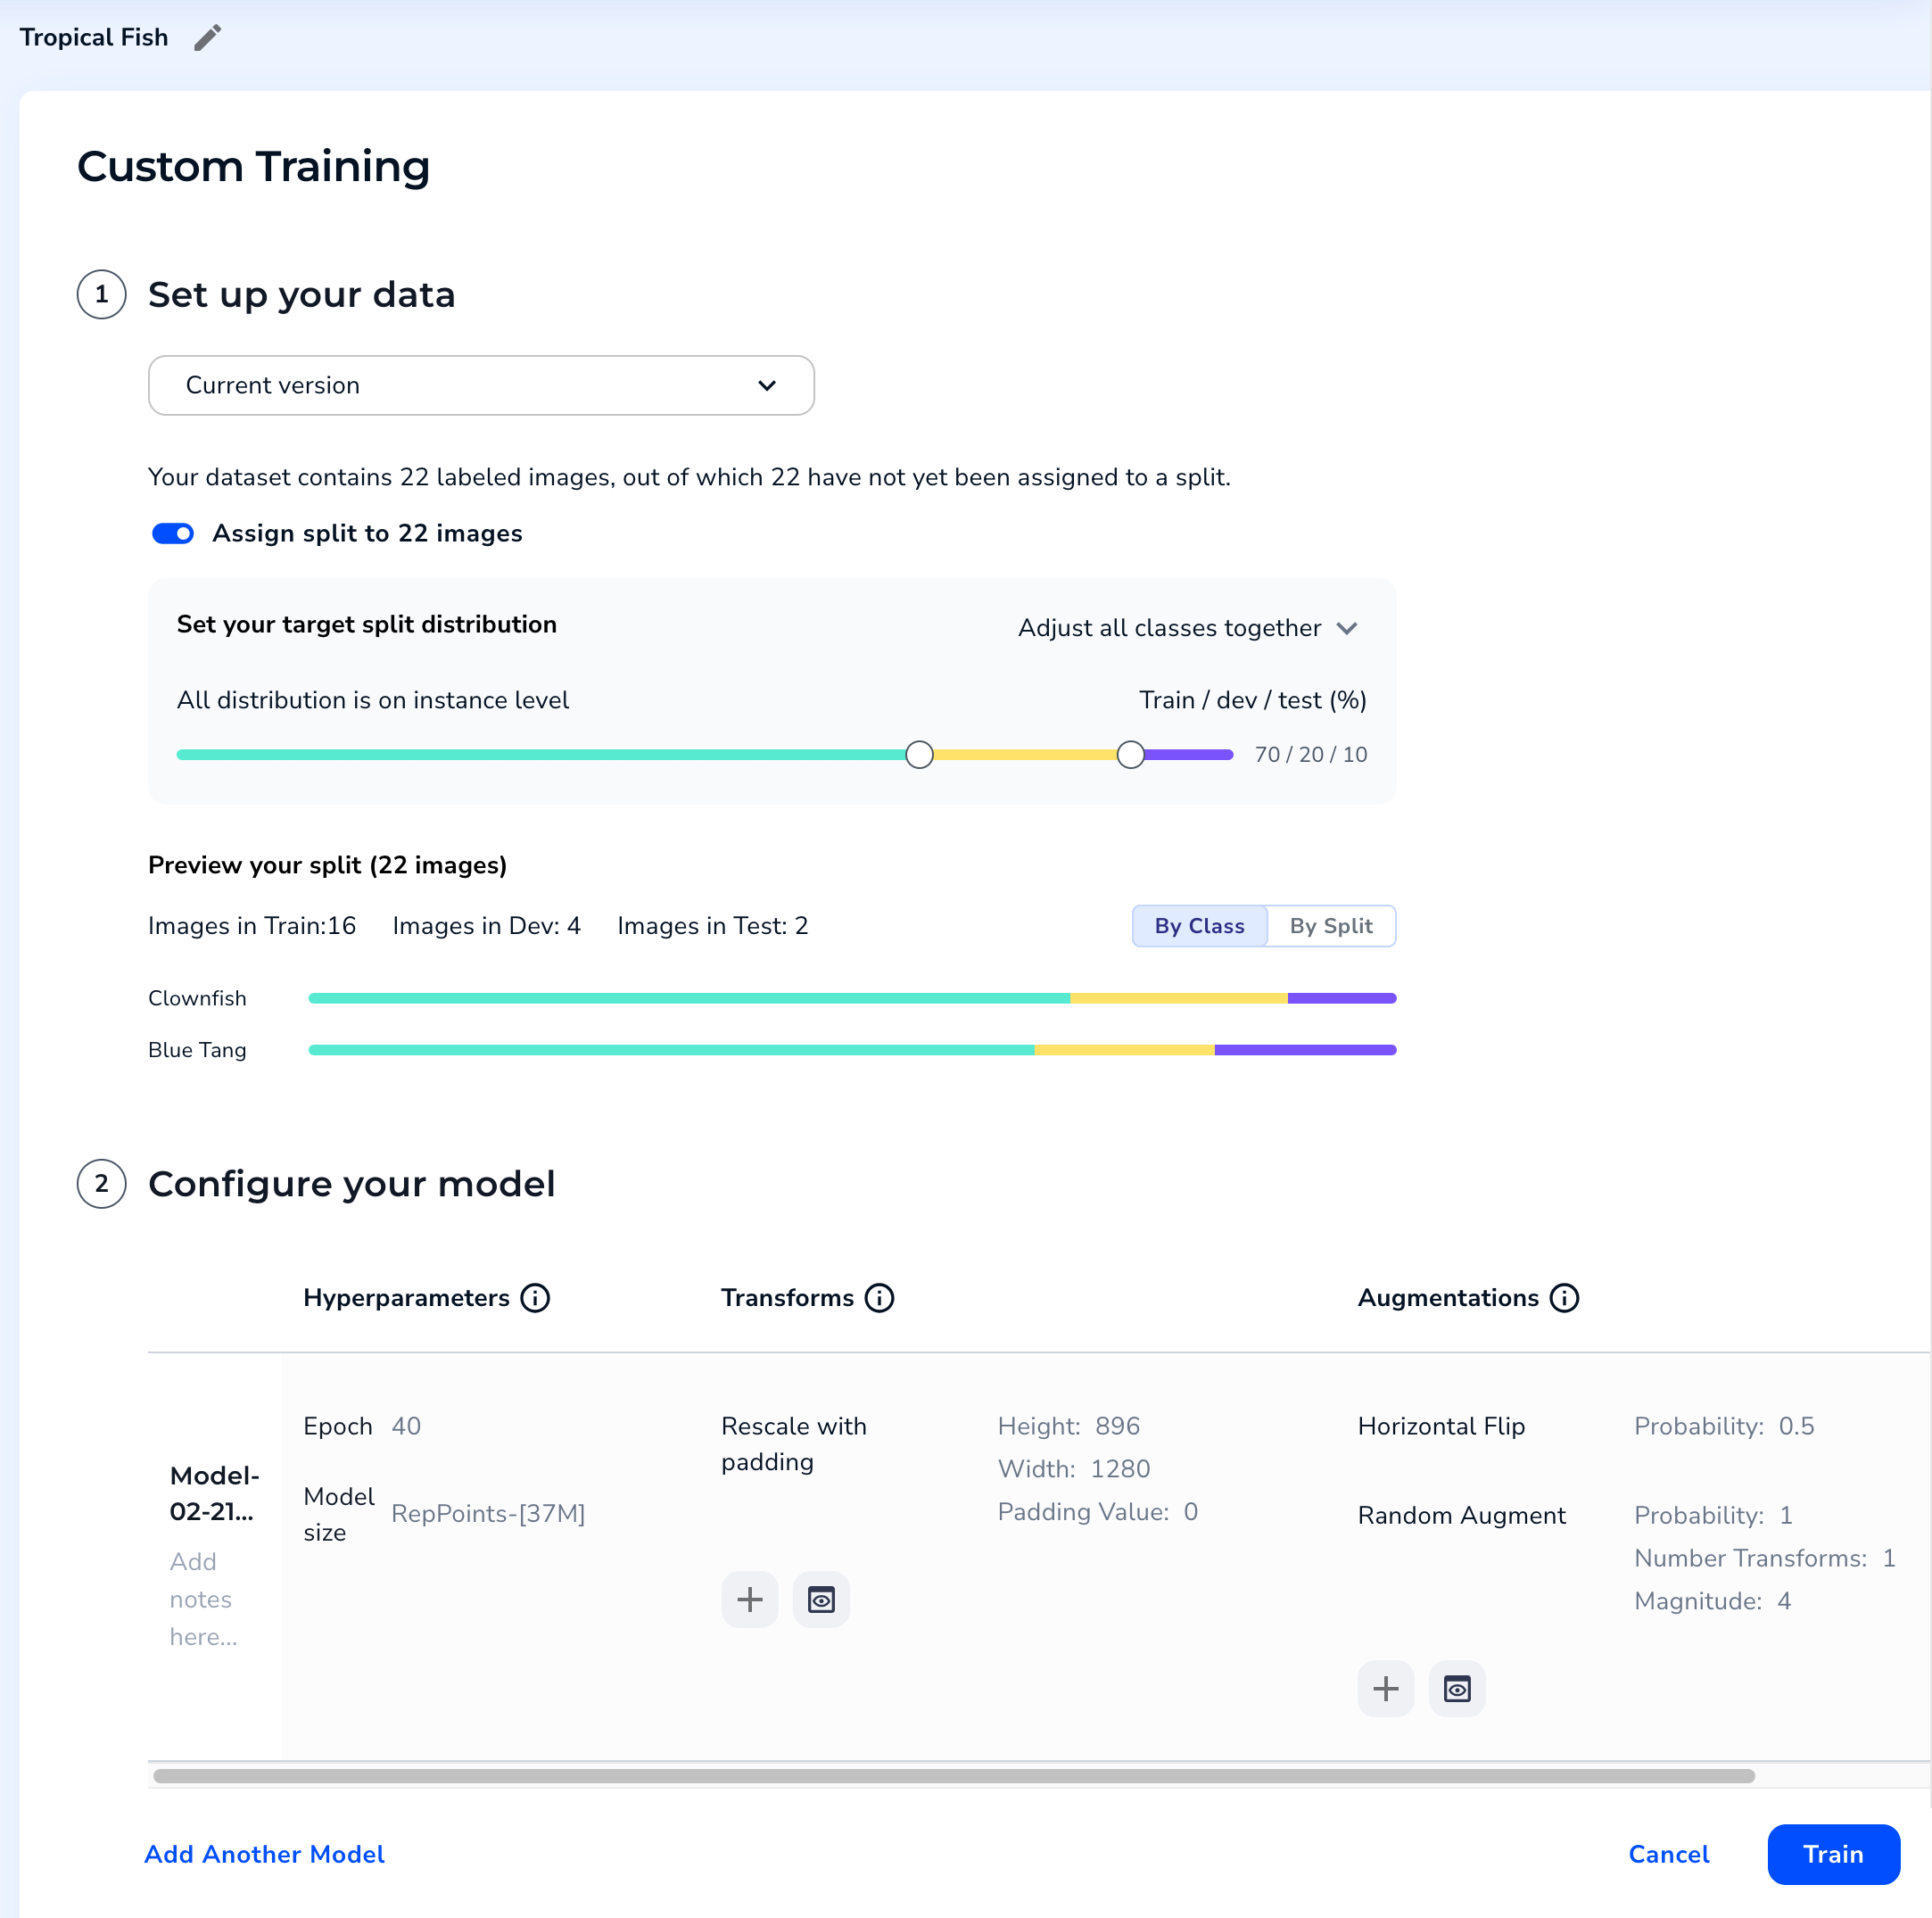
## February 21, 2024
The latest version of LandingLens features a redesigned process for Custom Training! You now have greater control over the dataset and splits used during the training process. Additionally, the user interface now guides you more clearly through configuring the training settings.
All of the transforms and augmentations from the previous design are still available. Additionally, the new process does not impact any models you’ve already developed.
The following sections highlight some new key points in Custom Training. To learn all the details, go to [Custom Training](./custom-training).
### Select a Dataset
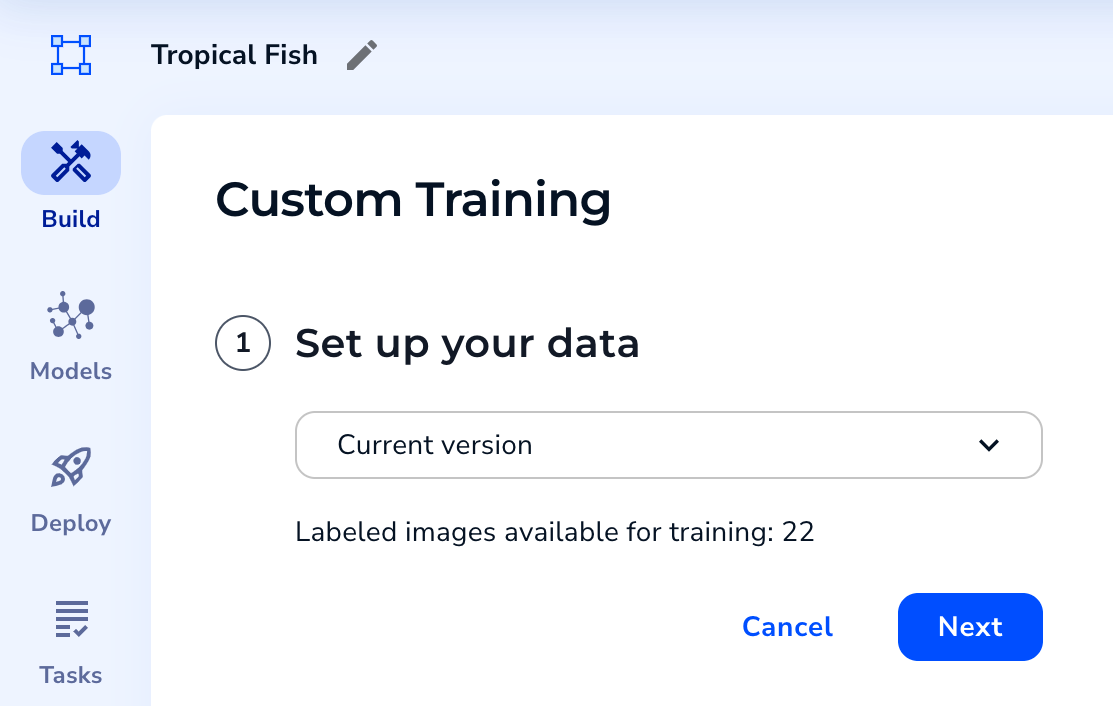
In previous versions of LandingLens, the Custom Training process would automatically apply to the dataset currently in the **Build** tab. Or, you could go to the Dataset Snapshots module, select a dataset, and then start Custom Training.
When you click **Custom Training** in the new process, you’re now first prompted to select a dataset. This speeds up the process and shows you all of your options in one place.
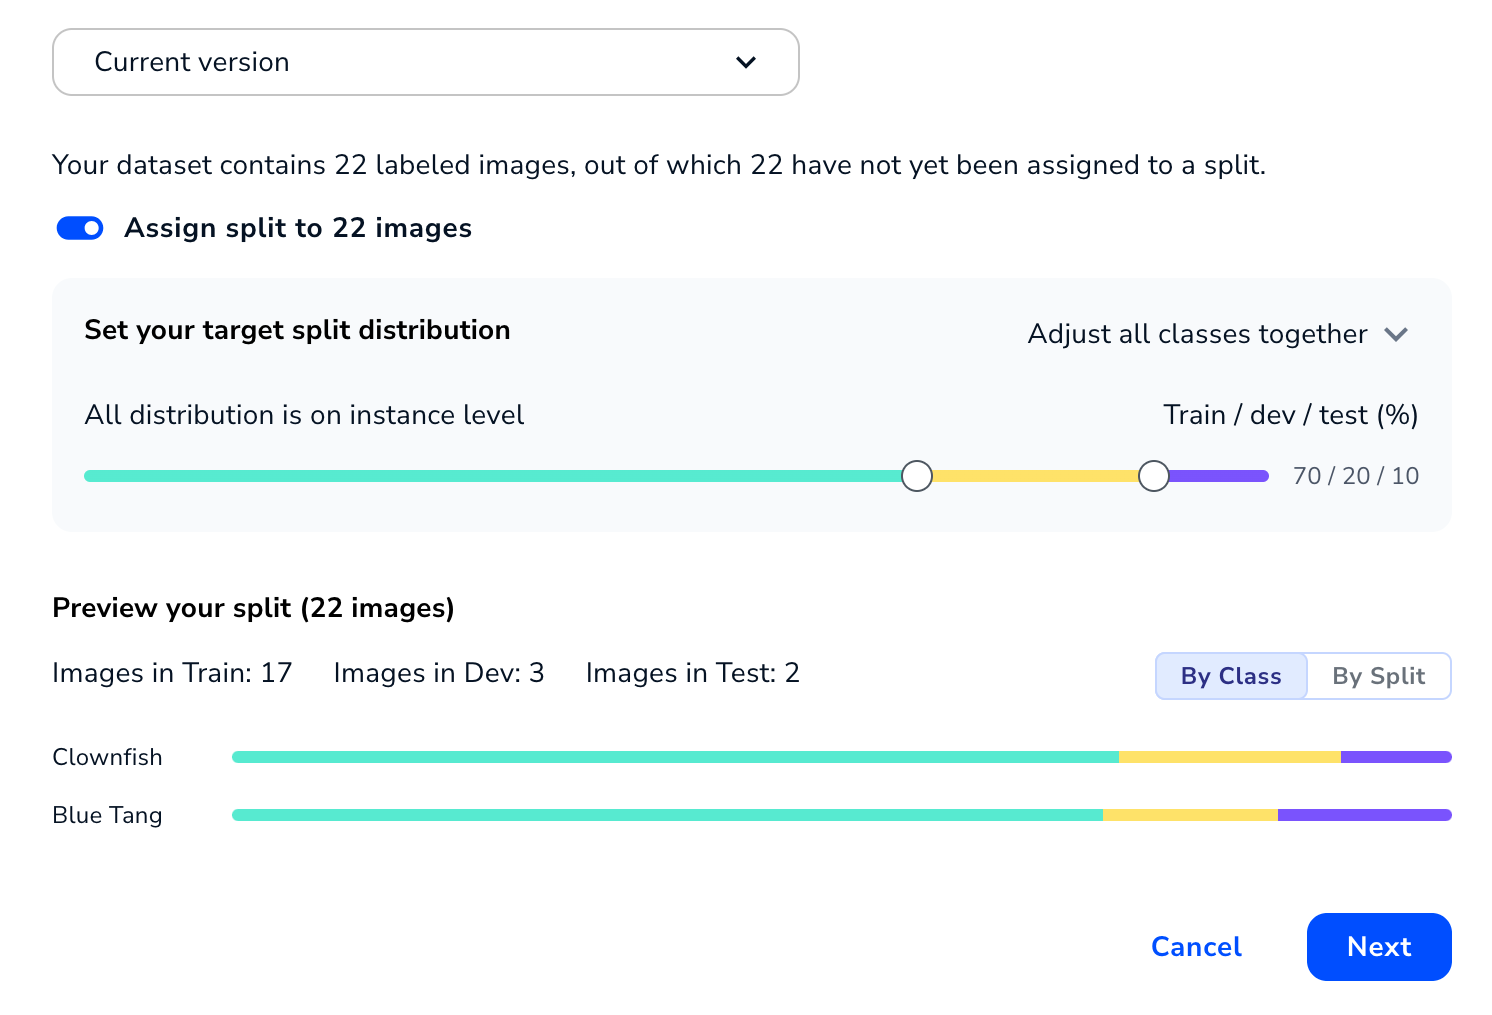
### Set Up Splits
If you choose to run Custom Training on the dataset currently in the Build tab, and those labeled images don’t have splits assigned to them yet, you can assign splits during Custom Training.
You can assign splits based on all images in the dataset or based on each class.
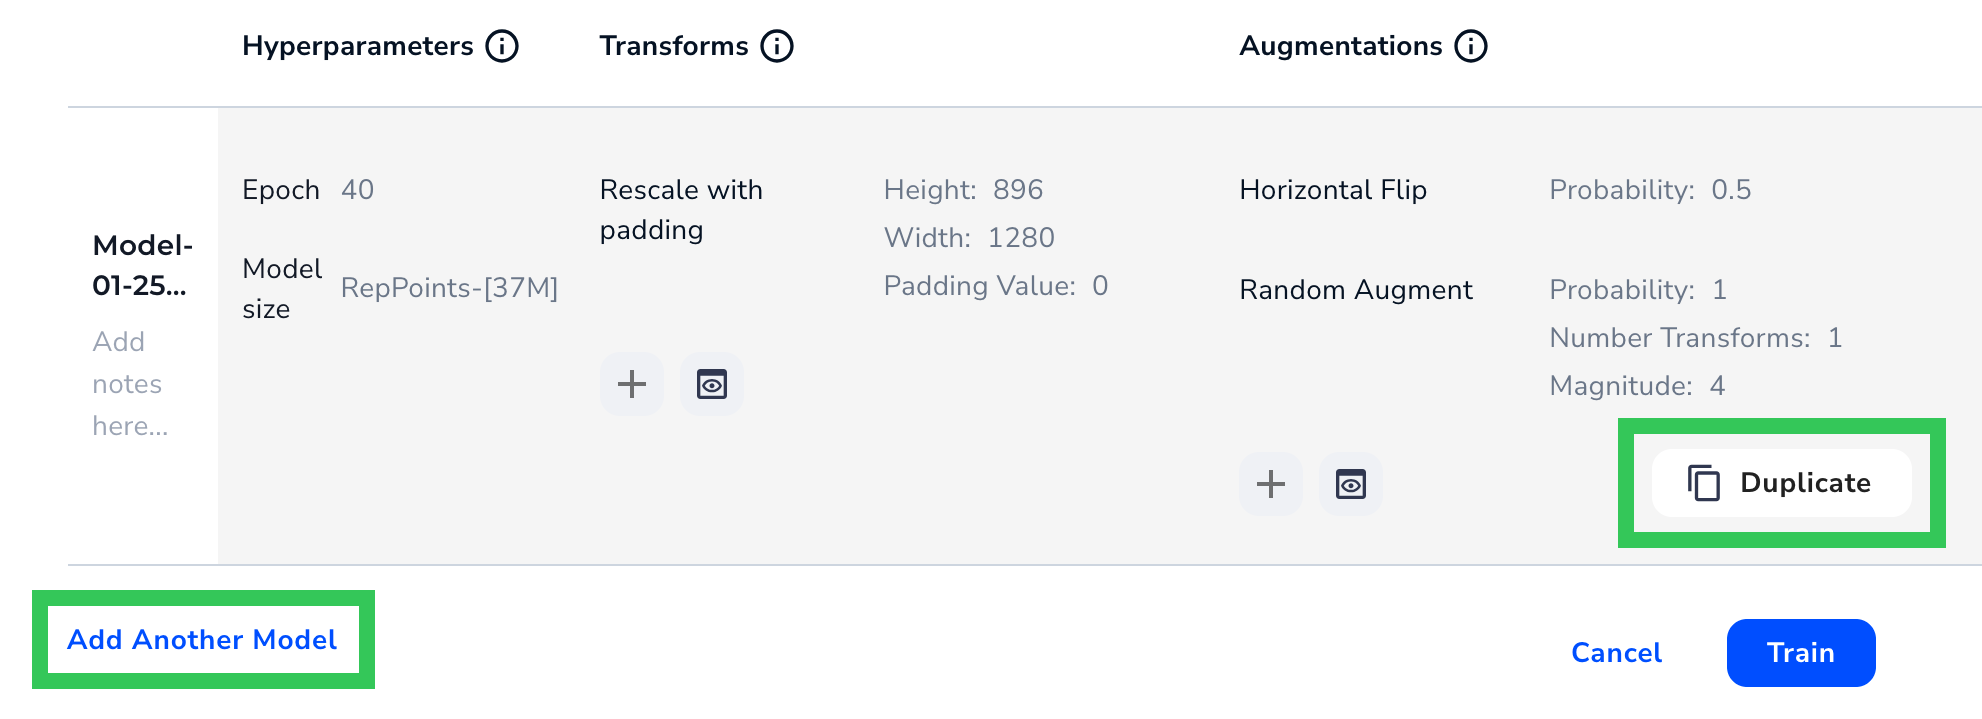
### Train Multiple Models for the Same Dataset at Once
You can now configure multiple sets of training parameters for the same dataset at once. This is helpful when you want to see how changing a parameter–like the number of epochs–will affect the model. By setting up all training parameters at once, you don’t need to go through the Custom Training process multiple times.
To add another set of training parameters, click **Add Another Model** or **Duplicate**.
## January 30, 2024
In this release, we’ve introduced three significant updates to streamline your computer vision model creation process.
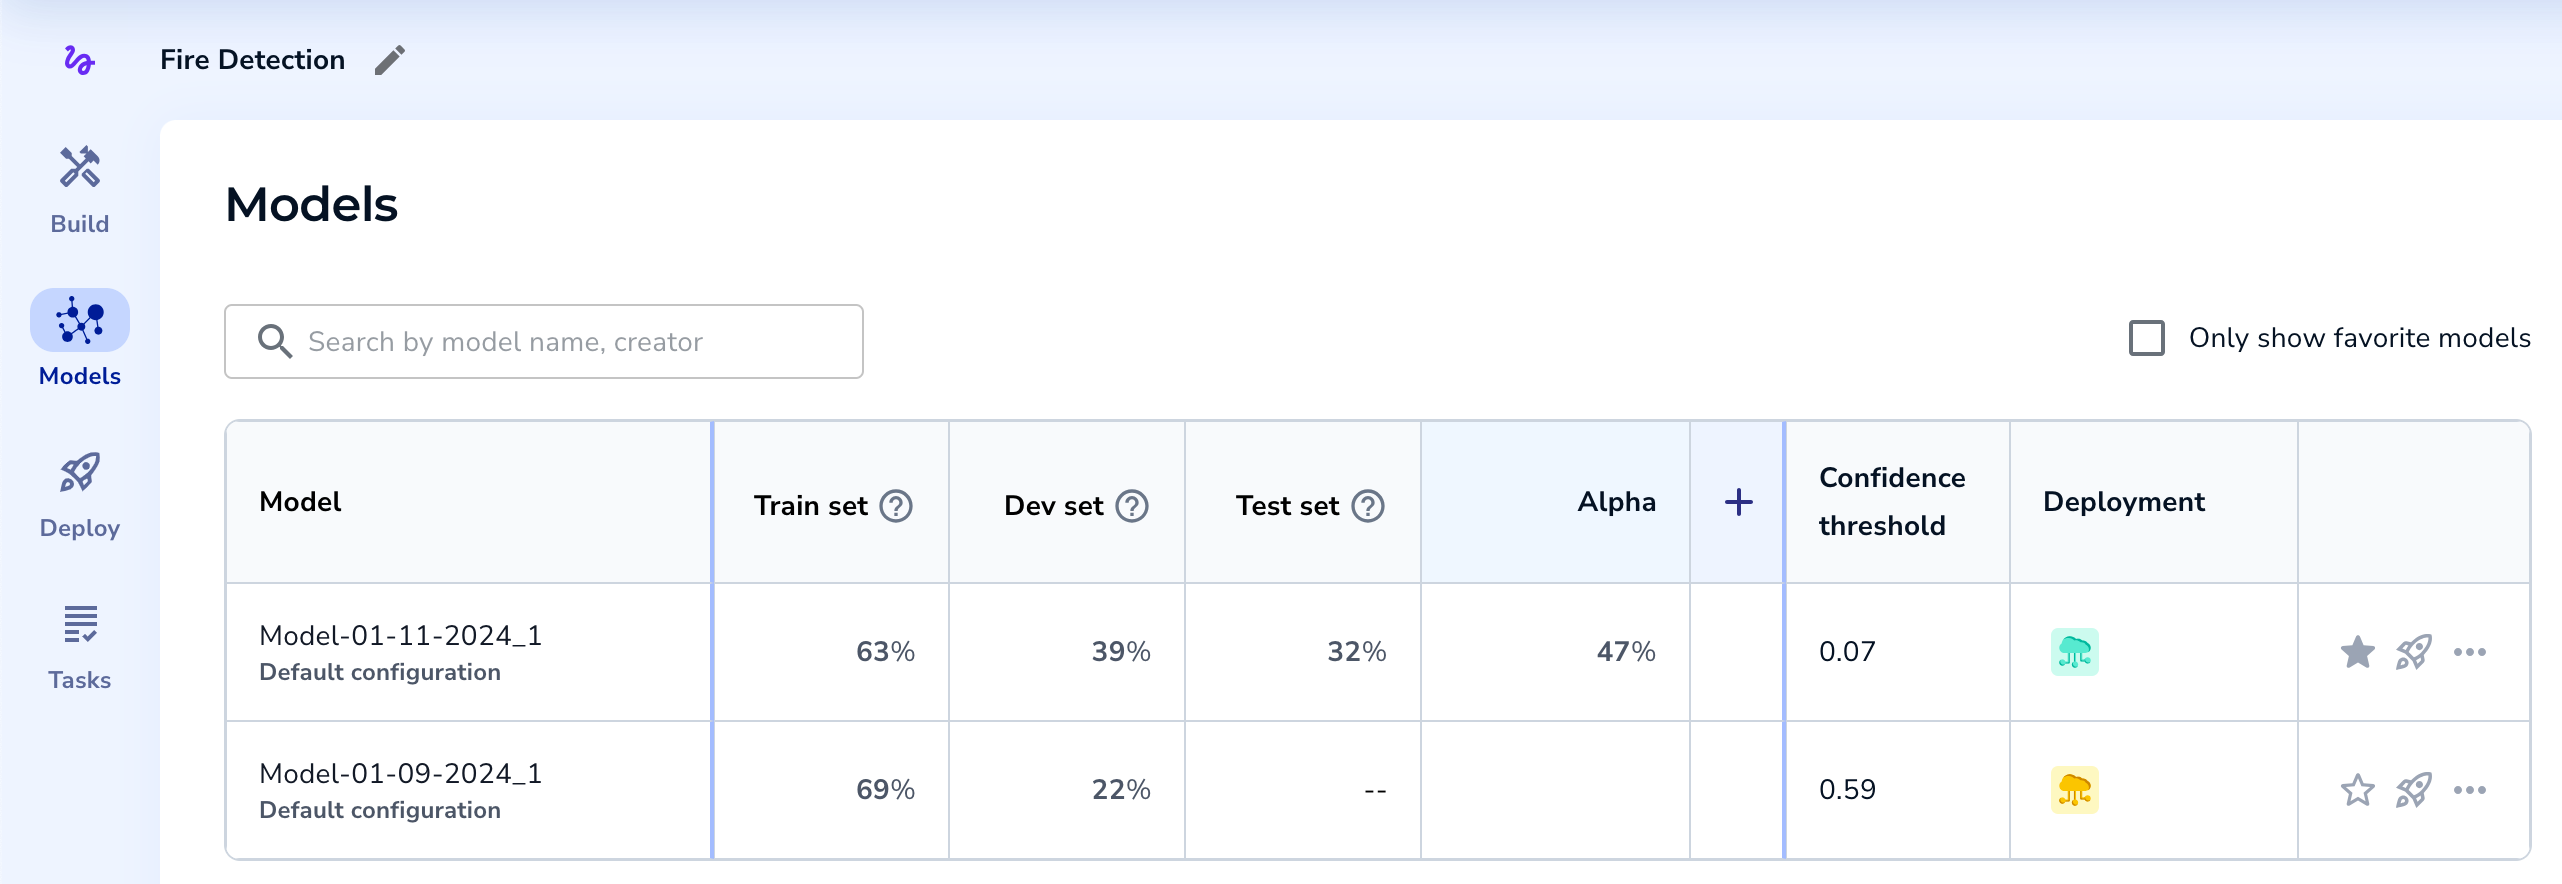
First, we’ve made it much easier to [compare and analyze model performance](./landinglens-release-notes#compare-models). All models for a project are now centralized on a new page called Models, which allows you to compare model performance across different datasets.
Second, we’ve [updated Segmentation projects](./landinglens-release-notes#updated-segmentation-projects) to offer more flexibility and faster inference speeds.
And finally, we’ve [redesigned the labeling experience](./landinglens-release-notes#redesigned-labeling-experience) for Object Detection, Segmentation, and Classification projects.
Keep reading to get more details about these updates!
### Compare Models
You can now quickly and easily compare model performance across multiple datasets in a single project.
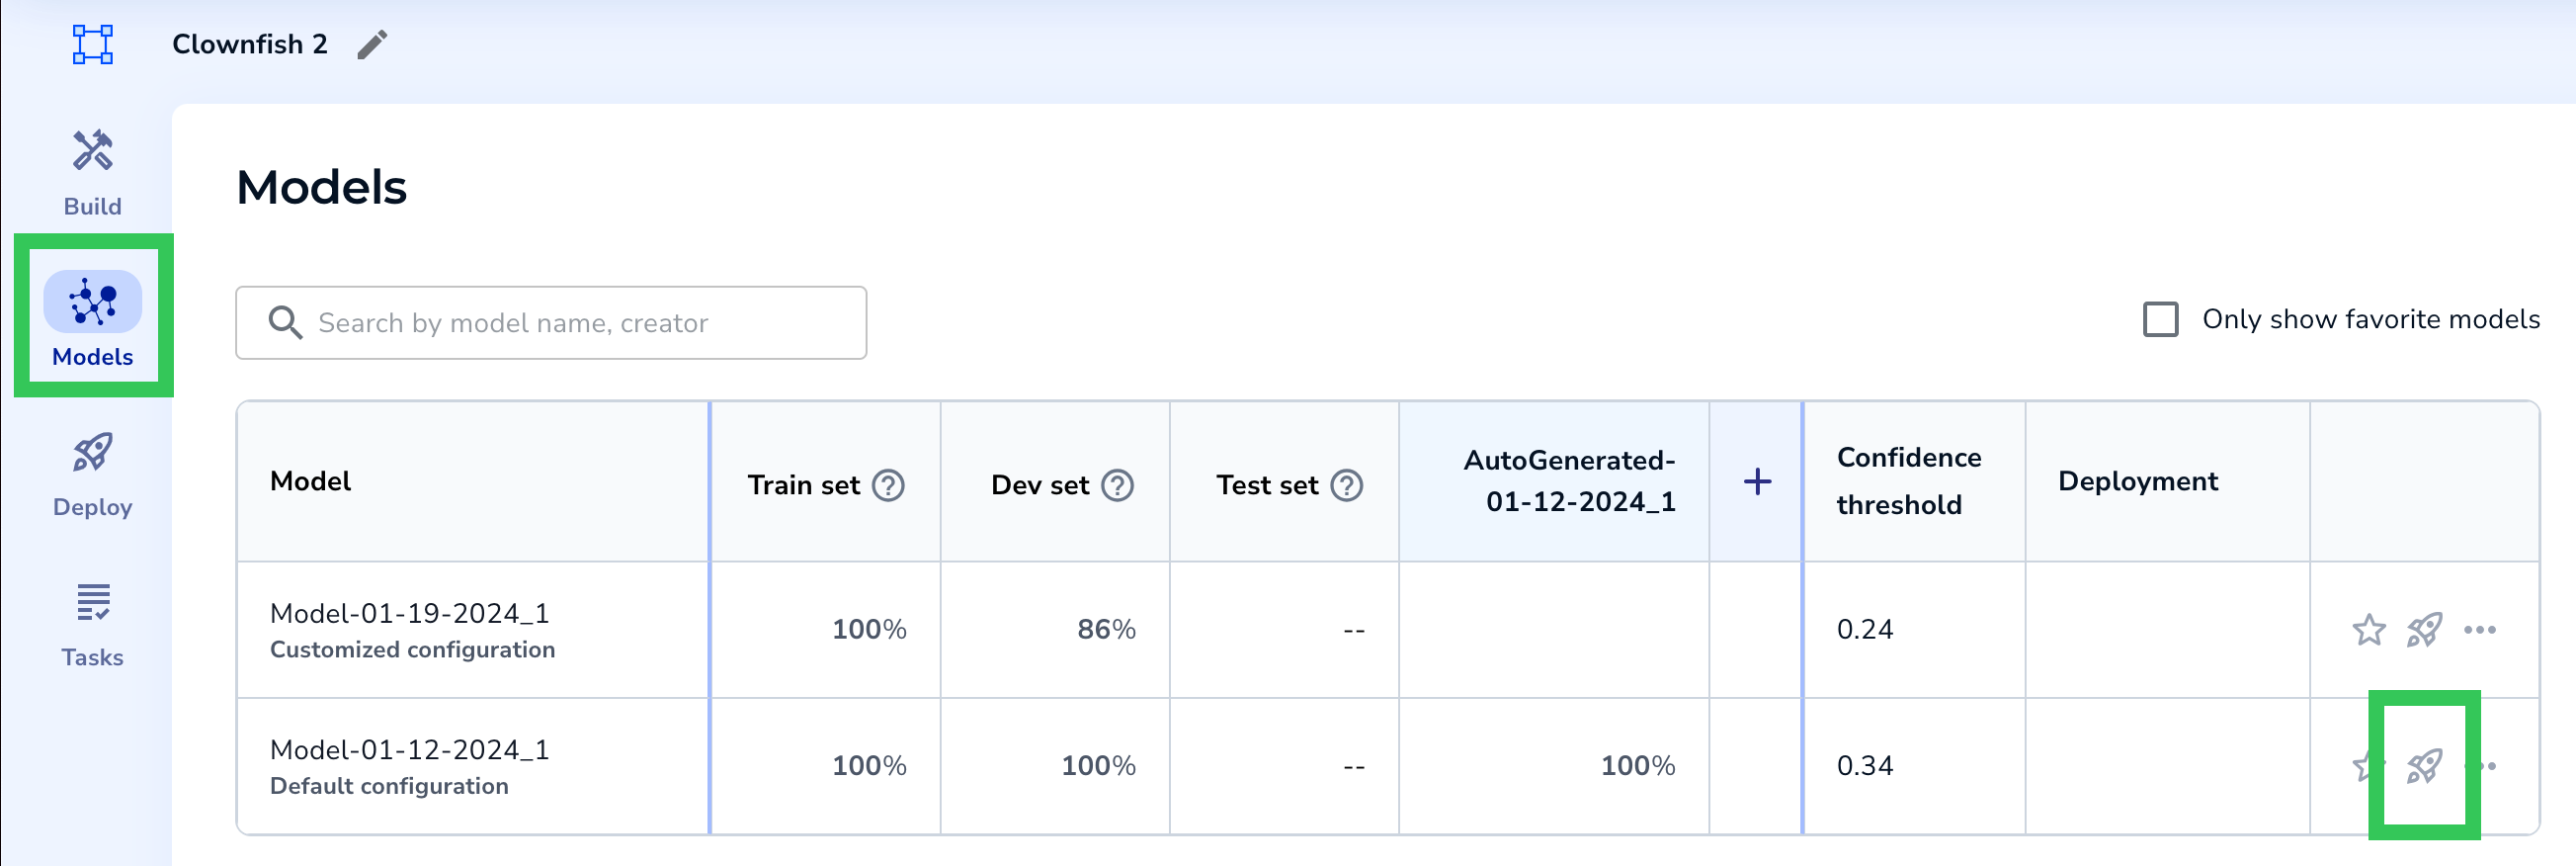
All trained models for a project now appear in a table on a new tab called **Models**. By default, you can see how each model performed on its Train, Dev, and Test sets. You can also add existing dataset snapshots—or filtered versions of them—to the table. This matrix empowers you to quickly compare model performance on a variety of datasets. From here, you can also deploy models.
Comparing model performance on the **Models** tab isn't a required step in LandingLens, but it's a useful technique for identifying your most accurate models. For full details, go to [Compare Models](./compare-models).
Due to the unique nature of [Visual Prompting](./visual-prompting), the Models tab is not available for Visual Prompting projects.
#### Impacts to Cloud Deployment
We anticipate that most users will want to compare mode performance in the **Models** tab before choosing which model to deploy. Because of this, the Cloud Deployment process now starts from the **Models** tab. After comparing the models in the table, simply click the **Rocket** (deploy) icon for the model you want to deploy. The rest of the deployment process is the same as before.
We’ve made two additional changes to Cloud Deployment to ensure more consistent comparisons between endpoints:
* Once a model is deployed to an endpoint, that model can’t be swapped for another.
* The Confidence Threshold of a deployed model can’t be changed.
### Updated Segmentation Projects
As part of this release, the Segmentation projects in your LandingLens organization have new capabilities, including:
* You can upload up to 10,000 images to a Segmentation project.
* When using Custom Training for Segmentation projects, you can now resize images to be up to 1024x1024px.
* Running inference on models trained via Custom Training will now be faster.
* Updated Model Size options in Custom Training. Keep reading for more information.
#### Updated Model Sizes in Custom Training
When using Custom Training, you can now choose from these two model sizes:
* **FastViT-\[14M]**: Train and run inferences faster. Uses the [FastViT](https://arxiv.org/abs/2303.14189) transformer architecture and 14 million parameters.
* **SegFormer-\[14M]**: Capture more complex patterns in the training data. Training and running inferences will take longer. Uses the [SegFormer](https://arxiv.org/abs/2105.15203) semantic segmentation framework and 14 million parameters.
### Redesigned Labeling Experience
In this release, the label view now has a brand-new look, offering a more modern and intuitive interface while maintaining all existing tools and functionalities for Object Detection, Segmentation, and Classification. For more information, go to [Labeling](./labeling).
Here’s what you can expect the label view page to look like for each project type:
**Object Detection**
**Segmentation**
**Classification**
## Train Multiple Models at Once
When one model is training, you can now start training another model! This is helpful if you want to compare performance between multiple datasets or model training settings. Training multiple models at once is sometimes called "parallel training".
Parallel training is available for both the [Fast Training](./train-models) and [Custom Training](./custom-training) methods.
Let’s say you want to build two models for the same dataset using Custom Training. You want one model to use 30 epochs and the other to use 40 epochs. You can start training the second model without waiting for the first one to complete. This capability empowers you to run experiments faster.
To see the status of a model, click the **Models** drop-down menu. Models that are still training have the status **In Progress**.
### Bug Fixes
In previous versions of LandingLens, training a [Visual Prompting](./visual-prompting) model sometimes led to inaccurate predictions and this error message:
“Model training failed. Please try training a new model.”
This bug has been fixed, and Visual Prompting models now train correctly.
## December 4, 2023
We have great news for our LandingEdge and Docker users! As of today, you no longer need to deploy a model via [Cloud Deployment](./cloud-deployment) (or by generating a deployable version of a model) to use that model in LandingEdge and Docker.
All models trained starting today will automatically be deployable via LandingEdge and Docker! Each model has its best Confidence Score. To see all models that can be deployed from a project, go to **Deploy** and click **Deployable Models**.
If you want to use a different Confidence Score for a model, or if you don't see your model in the Deployable Models table, you can either deploy it via [Cloud Deployment](./cloud-deployment) or use the following procedure to generate a deployable model:
1. Open the project with the model you want to deploy.
2. Click **Models** to open the Models panel.
3. Select the model you want to deploy from the **Model** drop-down menu.
4. Use the **Confidence Threshold** slider to select the Confidence Score you want the model to have.
5. Click **Deploy**.
6. Select **Self-Hosted Deployments**.
7. Click **Generate Deployable Model**.
LandingLens creates a deployable model and opens to the **Deployable Models** table on the **Deploy** page.
Models from [Visual Prompting](./visual-prompting) and the [Classic Flow](./classic-flow) use a separate deployment workflow and don’t display in the Deployable Models table.
## November 21, 2023
In this newest release of LandingLens, we’ve added more ways to manage your datasets. Here are the highlights:
* You can now save “snapshots” of all or some images in a project, and train models based on those groups of images. You can have multiple snapshots in each project!
* You can add tags (keywords) to images.
* LandingLens automatically saves all models during model training.
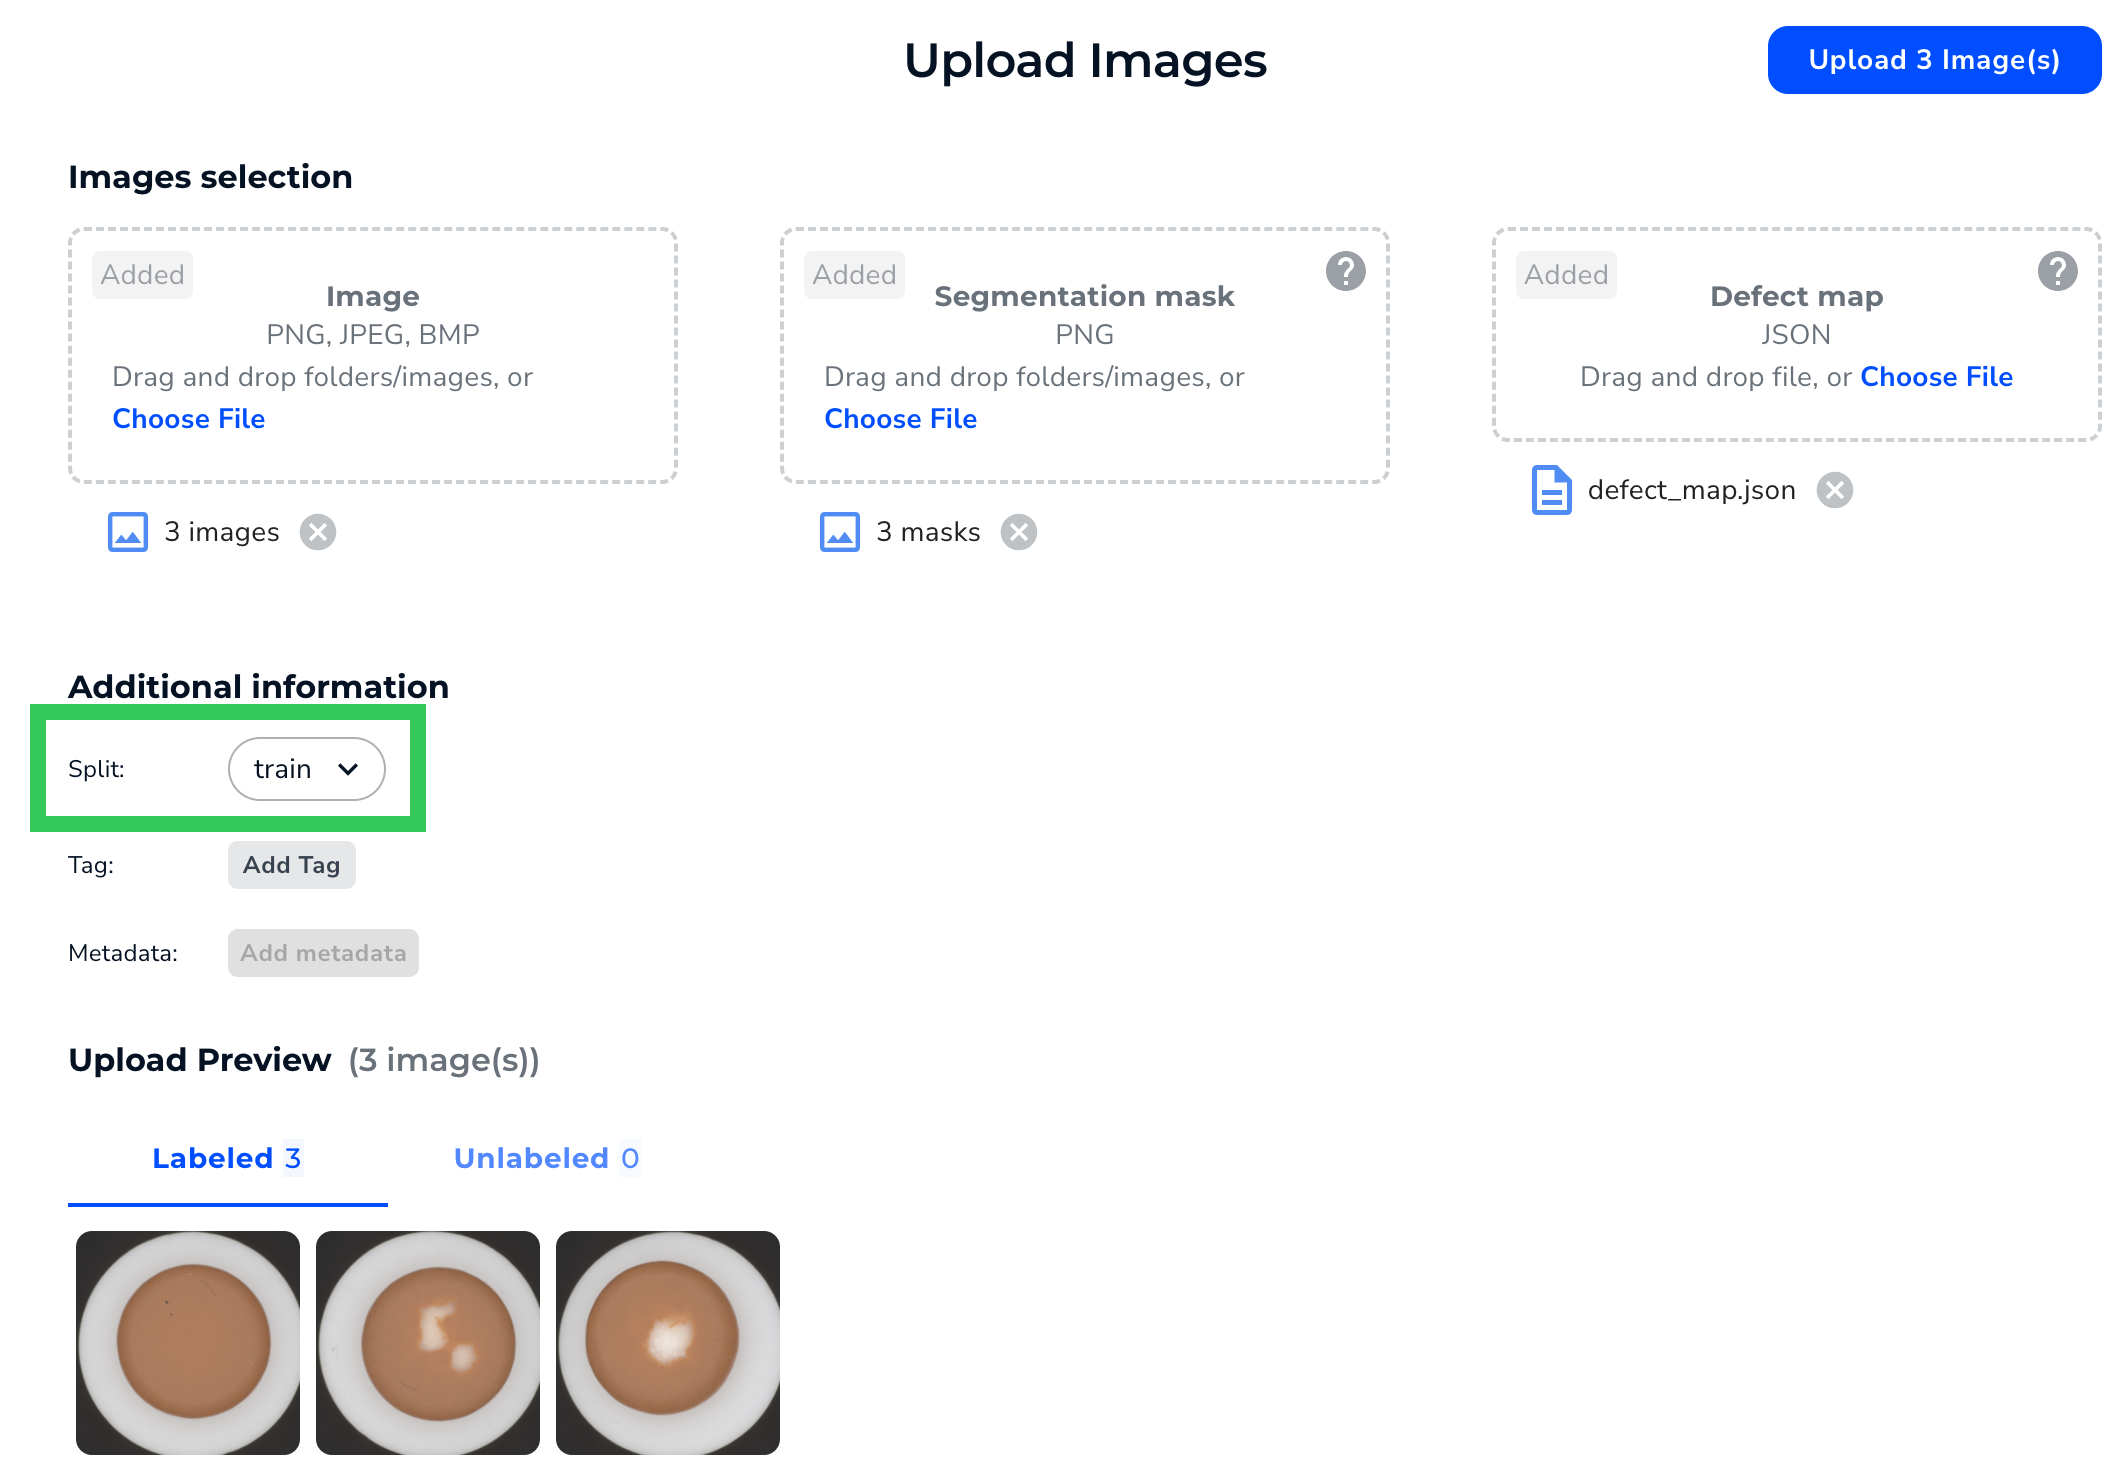
* You can now apply split, metadata, and tag information when uploading images to any project type.
To learn more about these features, keep reading!
### Changes to Dataset Versioning: Introducing Dataset Snapshots
In recent LandingLens releases, training a model and saving it created a “snapshot” of all the data in that model, including the images, labels, and predictions. You could create a new project from a dataset and even revert back to one. However, datasets were only saved for models, and you couldn’t train based on those datasets.
In this release, we’ve made the dataset versions more flexible, and we’re now calling them “dataset snapshots”, or “snapshots” just for short. Here are some of the things you can now do:
* Create a snapshot at any time! You no longer have to train a model to create a snapshot.
* Create a snapshot based on all the images in your project OR on the specific ones you’ve selected.
* Train a model using only the snapshot.
* Download the Pascal VOC files and class map for a snapshot. This gives you the ability to re-upload the labeled images to LandingLens in the future, if needed.
Plus, you still have the ability to create new projects from snapshots, revert your project to a snapshot, and download a CSV with snapshot information.
For detailed information, go to [Dataset Snapshots](./dataset-snapshots) and watch the following tutorial:
### Tag Images
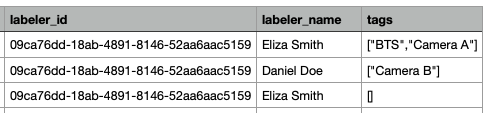
You can now add tags (keywords) to images in your dataset! Using tags helps you organize and filter the images in your dataset.
For example, let's say that you have images from Camera A and Camera B. You can create a tag for each camera and apply the tags to the corresponding images. Then, after you train a model, you can filter by all Camera A images, and see how the model performed on those. You can then do the same for Camera B images.
Tags are project-specific; creating a tag in one project doesn't add it to other projects. You can apply multiple tags to each image.
For detailed information, go to [Tags](./tags) and watch the following tutorial:
### All Trained Models Are Now Automatically Saved
When you train a model, LandingLens now automatically saves and names it. This ensures that you can access all versions of your data in the [snapshots dashboard](./dataset-snapshots) and prevents models from being accidentally overwritten.
The default model naming convention is **Model-mm-dd-yyyy\_n**, where **n** is the number of models in the project trained that day. For example, let’s say you train six models in a project on December 10, 2023. The default name of the sixth model will be **Model-12-10-2023\_6**. You can [rename a model](./model-settings) at any time.
### Consistent Upload Experience
You can now apply split, metadata, and tag information when uploading images to any project type. Previously, you could only apply splits when uploading information to Segmentation projects. The updated upload page provides a more consistent experience and allows you to apply important information at upload.
## October 30, 2023
We've had many requests for this specific feature, and the long wait is finally over—you can now create a new project by copying an existing dataset version! This creates a new project with the selected dataset.
When you copy a dataset, you can even include the existing labels and metadata.
For more information, check out the tutorial video below.
## October 10, 2023
This newest version of LandingLens gives you more flexibility across the board. In this release, we've added:
* A new way to upload images to your projects—via your smart phone!
* Support for an additional file type—MPO
* A new member type—Owner
* The ability to change a user’s member type
* More transparency for the credits used in deleted projects
For detailed info on each of these updates, keep reading!
### Upload Images from Your Phone Directly into a LandingLens Project
You can now upload images from your phone directly into a project in LandingLens. To do this, click the **Upload** icon, then click **Upload from Your Phone**.
Generate and scan the QR code, and then take photos or select existing ones. All images are then uploaded into your project. To learn more, go to [Upload Images from Your Phone](./upload-images-phone).
### LandingLens Now Supports MPO Files
You can now upload **MPO** (Multi-Picture Object) files to LandingLens. An MPO file contains two JPG files that create a stereoscopic image when overlaid. When you upload an MPO file to LandingLens, LandingLens selects one of the two JPG files.
For more information about supported file types, go to [Upload Images](./upload-images).
### Owners and Changing Role Types
Before this new version, LandingLens offered two member types: **Collaborators** and **Admins**. Once you assigned a member type to a user, you couldn't change their role.
This new version of LandingLens now offers a new role called **Owner**. Owners have all the permissions as Admins, plus the ability to change a member's role! For example, if Anna was originally added as a Collaborator, but now she needs access to the API Key page, an Owner can "upgrade" Anna to be an Admin.
An organization can have up to three Owners. To learn more information, go to [Member Roles](./members).
### Track Credits for Deleted Projects
If you delete a project, the credits used on that project are now easier to track on the **Usage** dashboard.
Previously, if you deleted a project, the **Top Projects: By Credits** and **Top Project: By Images** sections would show “(private project)” instead of the project name. Now, if you delete a project, the project name displays, making it easier to understand how credits were used.
The **Usage Log** continues to show “-” instead of the names of deleted projects, because LandingLens pulls this data from a different place.
For example, let’s say you deleted a project called “Quality Control”. The following screenshot shows how the **Usage** page would look after deleting the project.
The following table summarizes the changes:
| Section | Before | After |
| ------------------------ | ----------------- | ------------ |
| Top Projects: By Credits | (private project) | Project Name |
| Top Projects: By Images | (private project) | Project Name |
| Usage Log | - | - |
### Bug Fixes
For users on the [Classic Flow](./classic-flow) version of LandingLens: The **Job** hyperlinks on the **Models** tab now work correctly.
## September 19, 2023
Welcome to the latest release of LandingLens! This update streamlines your project management experience.
Now, when navigating the Projects page, you can effortlessly filter your search results by project type, providing you with even more refined control over your workflow. You can also now rename, delete, and invite users to projects directly from the Projects page.
Additionally, the ability to delete classes can now be enabled upon request for the [Classic Flow](./classic-flow) version of LandingLens.
For more information, read the full release notes below.
### New Features and Improvements
#### Filter by Project Type
When searching for a specific project on the Projects page, you can now filter by project type. To do this, enter your search term in the search bar and click the project type you want to search for.
For more information on searching for projects, go to [Search for Projects](./view-projects).
#### More Ways to Manage Projects
You can now perform these actions directly from a project card on the Projects page:
* Rename the project
* Invite users to the project (only applicable to private projects)
* Delete the project
To access these options, click the **Actions** icon on the project card. For more information on managing projects from the Projects page, go to [Search for Projects](./view-projects).
#### Classic Flow Supports Ability to Delete Classes
If you are using the [Classic Flow](./classic-flow) version of LandingLens, the ability to delete classes can now be enabled. To request this feature, contact your {companyName} representative.
For more information about deleting classes, go to [Delete Classes](./delete-classes).
### Bug Fixes
* You no longer need to refresh the page to update how long ago a model was trained. Now, the time is updated automatically.
* If you delete a label or “discard” the name of a class before you create it in a Visual Prompting project, those changes are now saved. Previously, the label or class would still appear.
* We improved the transition from training a Visual Prompting model to seeing the results. Now, the predictions and model information load faster.
## August 10, 2023
### More Details Now Display on Project Cards
Project cards now display the total number of images in your dataset and trained models. You can hover over the icons to view more information, like the number of labeled images.### New Login Page Design
We've introduced a fresh look for the LandingLens login page.### Revamped the Model Sidebar
When you don't have any trained models, the Model sidebar displays a tooltip to help you effortlessly progress through the platform.### The Polygon Shortcut Changed from "P" to "W"
LandingLens is equipped with several keyboard shortcuts. For Segmentation projects, the shortcut for the Polygon tool changed from "P" to "W".
### Bug Fixes
* Changed the file naming convention for downloaded CSV files of dataset snapshots. These files are now be named after the model and the date the file was downloaded.
* A few "behind-the-scenes" bugs were fixed.
## July 28, 2023
This newest version of LandingLens includes features to make it easier to manage your dataset and deploy your model!
### Dataset Snapshots: More Control and Visibility into Your Dataset
With this release, we’re introducing the concept of dataset “snapshots”. Now, whenever you train a model, LandingLens saves your dataset—and the model’s predictions—as a “snapshot” that you can continue to access in your Project. With dataset snapshots, you can:
* [Revert to an earlier dataset](./landinglens-release-notes#revert-to-an-earlier-dataset)
* [Download a CSV of information about the dataset](./landinglens-release-notes#download-a-csv-of-dataset-information)
* [See when the dataset information is gathered during the training process](./landinglens-release-notes#changes-to-the-model-training-process)
We’ve also [redesigned](./landinglens-release-notes#changes-to-the-model-information-popup-window) the model pop-up window to make it easier to navigate all the model information and reports.
#### Revert to an Earlier Dataset
You can now revert your Project to use an earlier dataset. For example, let's say that you trained a model, and later added more images and labels. After training the model a second time, you see that the first model performed better, so you want to go back to that dataset. You can do this by reverting the dataset.
#### Download a CSV of Dataset Information
In Object Detection and Classification projects, you can now download a CSV of information about the dataset. The CSV includes several columns of data, including Project Name, Image Name, Split.
#### Changes to the Model Training Process
When you click **Train**, the first step in the model training process is now to gather and save the images and data currently in your Project. This information is part of the “dataset snapshot” that you can later revert to.
This step displays as **Taking a snapshot of your data** in the Model panel.
For more information about the model training process, go to [Train Models](./train-models).
#### Changes to the Model Information Pop-Up Window
We’ve redesigned the Model pop-up window to make it easier to navigate. The pop-up is now organized into multiple tabs.
### Mobile Inference Support in Segmentation and Visual Prompting
You can now use Mobile Inference on Segmentation and Visual Prompting Projects. Previously, it was only available for Object Detection and Classification Projects.
### Streamlined Deployment Workflow from Build Page
We’ve streamlined the workflow for deploying a model from the Build page. When you click Deploy, you can now simply enter the model name and select your endpoint.
### Downloadable Pascal VOC Files Now Available for Classification Projects
Before, downloadable Pascal VOC files were only available for Object Detection and Segmentation projects. Now, we've made this feature available for Classification projects.
### Bug Fixes
* Selected images moved to a different split will no longer remain selected.
* You no longer need to refresh the browser to save a model.
* Users in classic flow can resume deploying from the Models page.
* Fixed multiple issues related to deleting classes.
* Fixed multiple issues related to creating an endpoint with a name that already exists in that project.
* Changed the copy of the "Defect" filter to "Class".
* Fixed the login process for SSO.
## July 5, 2023
### {smartLabel}
We are thrilled to announce {smartLabel}, a new tool that helps you label objects in Segmentation Projects faster and with more accuracy.
When {smartLabel} is enabled, simply hover over the object you want to detect, click, and press enter. {smartLabel} automatically detects the shapes you want to select and applies your selected Class!
To learn more, check out [Label with Smart Labeling](./segmentation#label-with-smart-labeling).
### New API Key System
Up until this release, LandingLens required both an API Key and API Secret to be used to run inference. After evaluating our user experience and current industry standards, we decided to eliminate the use of the API Secret. As of this release, LandingLens generates and requires only an API Key!
All existing API Key and API Secret pairs will continue to be valid, and all applications using those credentials will continue to work.
You can create multiple API Keys. This gives you more flexibility and control over who can run inference with your deployed Models. Additionally, you can revoke and delete API Keys.
For more details, check out [API Keys](./api-key).
### New Way to View the API Command for Deployment
We now offer a new way to get the API call on the Deploy page. Now you can click the **Actions** icon and select **View API Command**.
### Bug Fixes
* If you delete a Class, you can now create a new Class with the same name as the deleted Class.
* When using the QR code for [Mobile Inference](./mobile-inference), some users got this error: “Missing user record with apikey or user id: -1”. The issue that caused this error has been fixed.
* If a Class was deleted in a Classification Project, the model metrics were also deleted for that Project. The issue that caused this error has been fixed.
## June 22, 2023
### Improvements
We've added these improvements to help you manage your credits and pricing plan:
* If you reach your Project maximum, LandingLens now alerts you with a new tile. The Project maximum applies to the current number of Projects, so you can delete an existing Project to create another one. Or, if you want an unlimited number of Projects, upgrade to a Visionary or Enterprise [plan](https://landing.ai/pricing/).
* If training a Model or running inference will put you above your credit maximum, LandingLens now alerts you with a pop-up that guides you through the next steps.
### Bug Fixes
If you have a long Model name, it’s now shortened when it displays in the user interface. Hover over the name to see the full name. Previously, long Model names would attempt to wrap to a second line, but the top of the text would get cut off.
## June 14, 2023
We're thrilled to unveil the latest release of LandingLens! This version empowers you with more ways to run inference on the computer vision Models you create in LandingLens. You can now use your smartphone to capture images and immediately see your Model’s predictions. Additionally, all users can now download a 14 day free trial of LandingEdge!
We’ve also streamlined the process to develop Models by expanding our Workflow Assistant to new Project Types and making it easier to end the Model training process.
Learn more about these updates below!
### Use Your Model on a Smartphone with Mobile Inference
{companyName} is excited to share that we’ve developed a new feature—**{mi}**! This feature empowers you with an additional way to use your LandingLens Model in the real-world. For detailed information, go to [Mobile Inference](./mobile-inference).
After you develop your Model and deploy it to an endpoint, you can then generate a QR code by clicking the **QR** code icon.
Scanning the QR code with your phone opens the LandingLens app in your browser.
From there, you can take a photo or select an image from your phone. The app sends the photo to your deployed Model, and your Model runs inference on it. The Model’s predictions then display immediately on your phone!
The images and predictions are also saved back to LandingLens, so that you can review all results in a centralized location. You can also share the QR code with your colleagues, so that you can all collaborate on running inference.
### Clearly-Defined Deployment Options
We’ve added more visual guides to the Deploy page to help you choose the right deployment method for your use case.
For example, when you first click Deploy, you’ll see two options for how to use your model.
* **Cloud Deployment**: Click to create an endpoint, which is a virtual location that hosts your Model. You can then send images to the Model via API requests, or use a new feature called Mobile Inference to run your Model on your smartphone (more info on that [below](./landinglens-release-notes#use-your-model-on-a-smartphone-with-mobile-inference)).
* **Edge Deployment**: Click to deploy your Model via LandingEdge, the {companyName} application that connects to your edge devices.
### Download a Free Trial of LandingEdge
You can now download a free trial of LandingEdge directly from LandingLens!
If you haven't deploy a Model yet, open a Project to the Deploy page and click **Download LandingEdge**. Then follow the on-screen prompts to complete the download. For detailed information, go to [LandingEdge Overview](./landingedge/landingedge-overview).
If you’ve already deployed a Model via Cloud Deployment, click **LandingEdge**.
### Workflow Assistant
We added the **Workflow Assistant** to Segmentation and Classification Projects. The Workflow Assistant includes a progress bar at the top of your Project that guides you through all the steps of developing a computer vision Model, from uploading images to your dataset to using your Model to make predictions.
When you hover over the Workflow Assistant, it nudges you in the right direction by “shaking” the buttons you need to click to move to the next step. For example, after you’ve labeled at least 10 images, the Train button shakes, letting you know that you have enough data to create your first Model.
### End Training Early
We’ve provided you with more on-screen guidance about what happens if you end the Model training process before it’s completed.
Model training can only be ended at **Step 3: Training & Learning**, which is when the model training process actually begins. The **Stop Training** button is now **End Training Now**.
If you end Model training early, LandingLens completes its current round (epoch) of training and evaluates the images in your dataset with the Model it had generated up to that point. The Model may not be as accurate as it would be if training had completed. For detailed information, go to [Train Models](./train-models).
### Large Image Support
When using Custom Training in LandingLens Enterprise, you can now resize images in Object Detection and Segmentation Projects to be up to 36MP. For detailed information, go to [Custom Training](./custom-training).
### Bug Fixes
We fixed a bug in [Agreement-Based Labeling](./agreement-based-labeling) that allowed you to filter by users who weren’t assigned any tasks. Now, you can only filter by users who have been assigned tasks.
## June 5, 2023
### What’s New
To make it easier to understand some of the features, we updated some of the user interface text throughout LandingLens.
### Bug Fixes
* We fixed an issue that caused [Labeling Tasks](./agreement-based-labeling) to show that a negative number of images needed review. Now, the number of images under review is calculated correctly.
* We fixed a bug that caused the Class colors in Predictions to be different from the actual colors assigned to those Classes.
## May 24, 2023
### What's New
* When you delete a Class, LandingLens now shows you a pop-up that lists the impacts of deleting a Class. This empowers you to make an informed decision and helps prevent accidentally deleting Classes. For more information, go to [Delete Classes](./delete-classes).
* You can now delete a Class when labeling images. For more information, go to [Delete Classes](./delete-classes#delete-classes-when-labeling).
* We improved the experience with labeling images in Classification Projects. Previously, if you selected a label for an image on the Build tab, LandingLens would have to refresh the page to save the change. Now when you select a label, LandingLens saves the change without refreshing the page.
* We made it easier to upload sample images in our Example projects. Previously, you had to click the sample images to upload them. Now you can also drag and drop them.
* We updated the process for creating a new organization in LandingLens. You’ll now be prompted to name your organization and select your use case: Work, Academic, or Personal.
### Bug Fixes
* LandingLens now prevents you from creating two Classes with the same name. Previously, it was possible to reuse the same name but with different capitalization (for example, “Scratch” and “scratch”).
* When you hover over the **Train** button, a tooltip shows you how many credits the training process will cost. It costs 1 credit to train each image. LandingLens trains a model based on all images in your Project, not just the images that are filtered to display. Previously, the tooltip calculated the cost based on only the filtered images. How, the tooltip now correctly calculates the cost to include all images.For example, the Project in the image below has 13 images. A filter is applied which causes only 3 images to display. However, the tooltip correctly states that training the Model cost 13 credits.
## May 16, 2023
The ability to delete Classes has been re-enabled. It was temporary disabled due to some reported issues. The {companyName} team has resolved these issues.
When you delete a Class, all labels on images for that Class are also removed. If you delete a Class after training your Model, train it again. For more information about how to delete Classes, go to [Delete Classes](./delete-classes).
Deleting Classes is not supported in [Classic Flow](./classic-flow).
## May 15, 2023
The Check Label Quality feature has been re-enabled. It was temporary disabled due to some reported issues. The {companyName} team has resolved these issues.
## May 4, 2023
### What's New
* We added a keyboard shortcut for the Eraser tool in [Visual Prompting](./visual-prompting). You can now press **E** to select the Eraser tool.
* Members that are Collaborators can now access other Organizations that they are members of in LandingLens. Users can only access Organizations that they are Admins or Collaborators of. For more information about accessing Organizations in LandingLens, go to [Switch Organizations](./organizations#switch-organizations).
### Bug Fixes
* The **Load Sample Data** pop-up window was briefly too narrow, which caused the text to overlap. This pop-up window has now been resized to fit all the text correctly.
* If you add labels to an image in [Visual Processing](./visual-prompting), your changes are now saved if you select another image before clicking **Run**.
* The keyboard shortcuts for changing the **Brush size** and **Eraser** **size** in Visual Processing now work correctly.
### Other Updates
The Check Label Quality feature is temporary disabled due to some reported issues with this tool. We will notify you in the Release Notes once these issues have been fixed and the feature re-enabled.
## April 25, 2023
{companyName} is thrilled to announce the Beta release of an innovative, new capability in LandingLens: **{vp}**.
{vp} is a paradigm shift in the field of computer vision. You label only a few small areas of an object in a few images, and the Model almost immediately detects the whole object in all of your images.
### {vp} Workflow
{vp} has a highly iterative—and yet fast—workflow. After you upload images to your Project, start labeling one. Use the Brush “paint” a small area of the first object you want to detect. When prompted, enter a name for the object. This is your first Class.
Then, use the Brush to paint a small area of another object you want to detect. This is your second Class. If you only want to detect one object type, that’s okay—simply name your second Class “Background” or something similar. You can have multiple Classes, but create at least two to get started.
Then click **Run**! The Model shows you its Predictions in just a moment, in both the image you labeled and the other images in your dataset. In most cases, the Predictions won’t be perfect at first. Not only is that okay, that’s expected. You can now fine-tune your labels.
### Get Started with {vp}
You can create a {vp} Model in seconds and deploy in minutes. You don’t even need a background in computer vision, machine learning, or any type of AI!
To learn more details, check out our full support article on [Visual Prompting](./visual-prompting). Start using {vp} today by signing up for a [LandingLens free trial](https://app.landing.ai/signup)!
Visual Prompting is in Beta. It might not function as well as our other production-ready features.
## April 21, 2023
Today’s release of LandingLens includes a few behind-the-scenes bug fixes.
We also included a workflow improvement that will keep your Projects running smoothly. In the past, it was possible to create a Project, create a Class, and then change the Project Type (for example, from Object Detection to Segmentation). That would confuse the backend, because the label infrastructure for each Project Type is very different.
The newest version of LandingLens prevents you from changing the Project Type after creating Classes. If you want to use a different Project Type, simply delete the Project and create a new one.
## April 5, 2023
[Labeling Tasks](./agreement-based-labeling) in Segmentation Projects are now assigned to users in batches of five images. For example, if you create a Labeling Task with 10 images and assign it to a user, that user will get two batches of five images each.
## March 30, 2023
* Previously, the “internal” names for Models displayed in certain areas of the user interface. This included the Historical Data section in LandingLens, and the Model drop-down menu in LandingEdge. Now, the Model name and your selected Confidence Threshold display, so that you can easily choose which Model you want to use. The following images show how the Model names look before and after this update.
* We’ve made it easier to upload images to new Projects! Now you can click anywhere below the Project Types to open the Upload pop-up window. Previously, only clicking the Drop to Upload icon would open this pop-up.
* We’ve changed how Model training runs in the LandingLens backend. This change isn’t visible in the user interface, and doesn’t impact the speed or accuracy of your Model.
## March 22, 2023
We updated a few things in the background to optimize the LandingLens experience. We are continuing to work on adding new features, and we can't wait to share them with you soon!
Additionally, we updated a few articles:
* [Cloud Deployment](./cloud-deployment)
* [LandingEdge Specifications Sheet](./landingedge/landingedge-specifications-sheet)
* [How many images do I need to upload for model training?](./curate-high-quality-datasets)
## March 16, 2023
### What's New
* You can now include Chinese, Japanese, and Korean characters in your Project name.
* If you rescale images for custom Model training, LandingLens now provides text to ensure that your image fits within the minimum and maximum area constraints.
### Bug Fixes
* Previously, if you selected a Model on the Deploy page and then opened the Build page, that same Model would be selected. Now, selecting a Model on the Deploy page doesn’t change the Model shown elsewhere.
* Previously, if you added Data Augmentation to custom Model training and then deleted those settings, the Data Augmentation would still be applied. This issue has been fixed. If Data Augmentation is deleted, it won’t impact training.
* We fixed a bug that occurred when trying to upload images from a WebCam to some Classification Projects.
## March 10, 2023
We discovered that naming a Class “Ok” could cause issues when training a Model in Object Detection and Segmentation Projects. To ensure that your Model is trained correctly, LandingLens no longer accepts “Ok” (or any variation of its capitalization) as a Class name for these Project Types. You can continue to use “Ok” as a Class in Classification Projects.
## February 22, 2023
### Announcements
* We now offer multiple pricing plans for LandingLens! There is something for teams of all sizes. Whether you’re an AI hobbyist or a manufacturer that needs an AI solution to provide QA on your production line, we have a plan for you. Check out these new plans on our [Pricing](https://landing.ai/pricing/) page.
* We’ve launched [LandingPad](https://community.landing.ai/), a community for {companyName} users. Looking for tips or insights about using LandingLens? Interested in learning more about specific use cases? Then check out [LandingPad](https://community.landing.ai/)!
### What’s New
* You can now upgrade your pricing plan directly in LandingLens! Not sure what you need or want to discuss your use case? You can still contact our [Sales](https://landing.ai/contact-sales/) team at any time.To change your plan, click the **User Menu** in the top right corner, and select **Plan and Billing**. Then click **Change Plan**.
* You can now track credit usage metrics in the new **Usage** dashboard. To view the dashboard, click the **User Menu** in the top right corner, and select **Usage**.
* You can now upload sample images to a Project directly from LandingLens. To do this, create a new Project and click **Load Sample Data**.
### Bug Fixes
* You can now see the total number of filtered images.
* We fixed a bug that hid images when switching from Instance View to Image View.
## February 12, 2023
**We've Got a New Look**
Today we released several new features and changes to the look and feel of LandingLens.
* **Login page**: You may have noticed we spruced up the login page with a new design.
* **Home page**: The new home page will be the new core page, where we will provide you with organization information, important updates, and access to your most recent projects.
* **Pre-trained examples**: We have included some examples of how LandingLens can be used. Go to **Examples**, and check out some of our pre-trained models!
**Deployment Page**
We've got a new look and experience for the **Deploy** page. We have improved the flow and experience of the Deploy page by adding easier navigation across your various devices (now called "endpoints") and access to the historical data associated with each endpoint. For more information, go to [Cloud Deployment](./cloud-deployment).
Here are some highlights:
* **Endpoints** (previously known as Devices) can be found under **Cloud Deployment** in the navigation bar on the left. You can deploy each endpoint with a trained Model and fixed Confidence Threshold. You can update your Model and Confidence Threshold by selecting **Update Deployment**.
* The **Predict** tool allows you to quickly drag and drop an image to run inference and test your Model.
* Images sent to the endpoint through the API integration will show up under **Historical Data**, just like before.
* You can find your **API Key** and **API Secret** conveniently located in the navigation bar on the left.
## January 20, 2023
### What's New
We've upgraded how [default training](./train-models) works for Classification models to improve the performance of these models.
### Bug Fixes
Previously, when a model training job failed, an error would display, and users could not retrain the model. We fixed this so users can retrain models.
## January 17, 2023
### Announcement
The Support Center URL changed from [https://support-landingai.document360.io/](https://support-landingai.document360.io/) to [https://support.landing.ai/](https://support.landing.ai/).
### What's New
* LandingLens now displays a workflow assistant to guide you through creating your first Object Detection Project. Hover over the workflow assistant to read more information about your current step.
* LandingLens introduces a new feature called "Predict". Predict allows you to quickly upload new images to your Model so that the Model can make predictions on those images. Predict streamlines the Run Live feature so you can deploy Models faster.
"Predict" is currently only available for trained Object Detection Models.
### Bug Fixes
Fixed: Users can resume exporting training datasets.
 ### Where can I see these changes?
All areas that show model performance now include the updated confusion matrix, including:
* [Build tab](./model-settings): Click **View Confusion Matrix**on a model tile to see the confusion matrix for the dataset that the model was trained on.
### Where can I see these changes?
All areas that show model performance now include the updated confusion matrix, including:
* [Build tab](./model-settings): Click **View Confusion Matrix**on a model tile to see the confusion matrix for the dataset that the model was trained on.
 * The [Performance Report](./performance-report) shows a confusion matrix for the selected evaluation set.
* The [Compare Models](./compare-models) tool shows side-by-side confusion matrices to show how each model performed on the selected evaluation set.
### Learn How to Analyze Models
Watch the following video to learn how to use the updated confusion matrix and other tools to analyze model performance.
* The [Performance Report](./performance-report) shows a confusion matrix for the selected evaluation set.
* The [Compare Models](./compare-models) tool shows side-by-side confusion matrices to show how each model performed on the selected evaluation set.
### Learn How to Analyze Models
Watch the following video to learn how to use the updated confusion matrix and other tools to analyze model performance.
 ### Upload TIF/TIFF Files to Projects
TIF/TIFF files can now be uploaded to LandingLens projects. However, LandingLens models cannot run inference on TIF/TIFF files.
To learn more about image support, including supported image files and maximum image size, go to [Upload Images](./upload-images).
### Dataset Snapshot CSVs Now Have Image Tags
When you download a CSV for a [dataset snapshot](./dataset-snapshots), the CSV now lists any tags applied to the images.
To learn more about dataset snapshots, go to [Dataset Snapshots](./dataset-snapshots).
### Upload TIF/TIFF Files to Projects
TIF/TIFF files can now be uploaded to LandingLens projects. However, LandingLens models cannot run inference on TIF/TIFF files.
To learn more about image support, including supported image files and maximum image size, go to [Upload Images](./upload-images).
### Dataset Snapshot CSVs Now Have Image Tags
When you download a CSV for a [dataset snapshot](./dataset-snapshots), the CSV now lists any tags applied to the images.
To learn more about dataset snapshots, go to [Dataset Snapshots](./dataset-snapshots).
 ### Hide LandingEdge and Docker Deployment Options
For Enterprise users, {companyName} can now hide the LandingEdge and LandingAI deployment options if you don't want your organization to deploy using these methods. To have these disabled, contact [support@landing.ai](mailto:support@landing.ai).
### Hide LandingEdge and Docker Deployment Options
For Enterprise users, {companyName} can now hide the LandingEdge and LandingAI deployment options if you don't want your organization to deploy using these methods. To have these disabled, contact [support@landing.ai](mailto:support@landing.ai).

 After you activate a project, you can download as many models from the project as you like. Models are downloaded from the **Models** tab.
 ### New Credit Calculation for Custom Training
In addition to changing the LandingLens pricing plans, we’re also changing how credits are charged for [Custom Training](./custom-training). Each LandingLens plan includes a set of credits, which are like a form of currency in LandingLens. You spend credits to train models and run inferences.
Until now, training one image cost 1 credit, and running inference on one image cost 1 credit. As of today (May 6, 2024), the credit cost for Custom Training is now calculated differently. The credit cost is now based on the project type and custom training settings selected. In general, increasing any of the settings (like increasing the Epoch) increases the cost to train and run inference.
With Custom Training, the cost to train the model and run inference on that model might be more or less than 1 credit.
After you configure your settings—and before you train the model—LandingLens shows you the exact credit cost it will take to train the model and run inference on it.
### New Credit Calculation for Custom Training
In addition to changing the LandingLens pricing plans, we’re also changing how credits are charged for [Custom Training](./custom-training). Each LandingLens plan includes a set of credits, which are like a form of currency in LandingLens. You spend credits to train models and run inferences.
Until now, training one image cost 1 credit, and running inference on one image cost 1 credit. As of today (May 6, 2024), the credit cost for Custom Training is now calculated differently. The credit cost is now based on the project type and custom training settings selected. In general, increasing any of the settings (like increasing the Epoch) increases the cost to train and run inference.
With Custom Training, the cost to train the model and run inference on that model might be more or less than 1 credit.
After you configure your settings—and before you train the model—LandingLens shows you the exact credit cost it will take to train the model and run inference on it.
.png?fit=max&auto=format&n=AkXgdAcL19zbnV5n&q=85&s=1ded4609d051e0fad9dda1b20d0fa9da)
 * The Deploy page for Classification projects no longer shows a Confidence Score. LandingLens only uses a Confidence Score for Object Detection and Segmentation projects.
 The Validation chart is calculated on the Dev split. This chart displays when the model was trained using [Custom Training](./custom-training) and the Dev split has at least 6 images.
If the model improves during the validation process, the line goes up over time. The line will look slightly different for each project type because each uses a different validation metric:
* **Object Detection**: mAP (Mean Average Precision)
* **Segmentation**: mIoU (mean Intersection over Union)
* **Classification**: F1 score
For more information about a model's Training Information, go to [Analyze and Compare Models](./compare-models).
The Validation chart is calculated on the Dev split. This chart displays when the model was trained using [Custom Training](./custom-training) and the Dev split has at least 6 images.
If the model improves during the validation process, the line goes up over time. The line will look slightly different for each project type because each uses a different validation metric:
* **Object Detection**: mAP (Mean Average Precision)
* **Segmentation**: mIoU (mean Intersection over Union)
* **Classification**: F1 score
For more information about a model's Training Information, go to [Analyze and Compare Models](./compare-models).
 ### Select a Dataset
In previous versions of LandingLens, the Custom Training process would automatically apply to the dataset currently in the **Build** tab. Or, you could go to the Dataset Snapshots module, select a dataset, and then start Custom Training.
When you click **Custom Training** in the new process, you’re now first prompted to select a dataset. This speeds up the process and shows you all of your options in one place.
### Select a Dataset
In previous versions of LandingLens, the Custom Training process would automatically apply to the dataset currently in the **Build** tab. Or, you could go to the Dataset Snapshots module, select a dataset, and then start Custom Training.
When you click **Custom Training** in the new process, you’re now first prompted to select a dataset. This speeds up the process and shows you all of your options in one place.
 ### Set Up Splits
If you choose to run Custom Training on the dataset currently in the Build tab, and those labeled images don’t have splits assigned to them yet, you can assign splits during Custom Training.
You can assign splits based on all images in the dataset or based on each class.
### Set Up Splits
If you choose to run Custom Training on the dataset currently in the Build tab, and those labeled images don’t have splits assigned to them yet, you can assign splits during Custom Training.
You can assign splits based on all images in the dataset or based on each class.
 ### Train Multiple Models for the Same Dataset at Once
You can now configure multiple sets of training parameters for the same dataset at once. This is helpful when you want to see how changing a parameter–like the number of epochs–will affect the model. By setting up all training parameters at once, you don’t need to go through the Custom Training process multiple times.
To add another set of training parameters, click **Add Another Model** or **Duplicate**.
### Train Multiple Models for the Same Dataset at Once
You can now configure multiple sets of training parameters for the same dataset at once. This is helpful when you want to see how changing a parameter–like the number of epochs–will affect the model. By setting up all training parameters at once, you don’t need to go through the Custom Training process multiple times.
To add another set of training parameters, click **Add Another Model** or **Duplicate**.
 We’ve made two additional changes to Cloud Deployment to ensure more consistent comparisons between endpoints:
* Once a model is deployed to an endpoint, that model can’t be swapped for another.
* The Confidence Threshold of a deployed model can’t be changed.
### Updated Segmentation Projects
As part of this release, the Segmentation projects in your LandingLens organization have new capabilities, including:
* You can upload up to 10,000 images to a Segmentation project.
* When using Custom Training for Segmentation projects, you can now resize images to be up to 1024x1024px.
* Running inference on models trained via Custom Training will now be faster.
* Updated Model Size options in Custom Training. Keep reading for more information.
#### Updated Model Sizes in Custom Training
When using Custom Training, you can now choose from these two model sizes:
* **FastViT-\[14M]**: Train and run inferences faster. Uses the [FastViT](https://arxiv.org/abs/2303.14189) transformer architecture and 14 million parameters.
* **SegFormer-\[14M]**: Capture more complex patterns in the training data. Training and running inferences will take longer. Uses the [SegFormer](https://arxiv.org/abs/2105.15203) semantic segmentation framework and 14 million parameters.
We’ve made two additional changes to Cloud Deployment to ensure more consistent comparisons between endpoints:
* Once a model is deployed to an endpoint, that model can’t be swapped for another.
* The Confidence Threshold of a deployed model can’t be changed.
### Updated Segmentation Projects
As part of this release, the Segmentation projects in your LandingLens organization have new capabilities, including:
* You can upload up to 10,000 images to a Segmentation project.
* When using Custom Training for Segmentation projects, you can now resize images to be up to 1024x1024px.
* Running inference on models trained via Custom Training will now be faster.
* Updated Model Size options in Custom Training. Keep reading for more information.
#### Updated Model Sizes in Custom Training
When using Custom Training, you can now choose from these two model sizes:
* **FastViT-\[14M]**: Train and run inferences faster. Uses the [FastViT](https://arxiv.org/abs/2303.14189) transformer architecture and 14 million parameters.
* **SegFormer-\[14M]**: Capture more complex patterns in the training data. Training and running inferences will take longer. Uses the [SegFormer](https://arxiv.org/abs/2105.15203) semantic segmentation framework and 14 million parameters.
 ### Redesigned Labeling Experience
In this release, the label view now has a brand-new look, offering a more modern and intuitive interface while maintaining all existing tools and functionalities for Object Detection, Segmentation, and Classification. For more information, go to [Labeling](./labeling).
Here’s what you can expect the label view page to look like for each project type:
**Object Detection**
### Redesigned Labeling Experience
In this release, the label view now has a brand-new look, offering a more modern and intuitive interface while maintaining all existing tools and functionalities for Object Detection, Segmentation, and Classification. For more information, go to [Labeling](./labeling).
Here’s what you can expect the label view page to look like for each project type:
**Object Detection**
 **Segmentation**
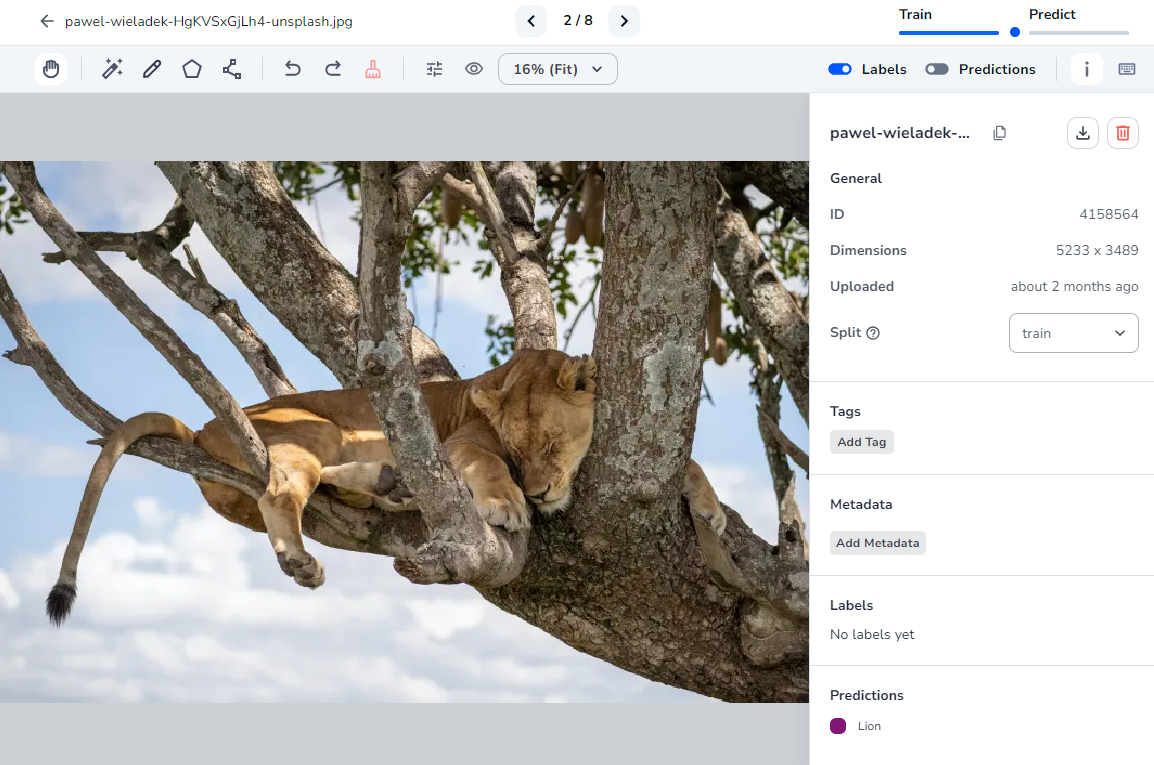 **Classification**
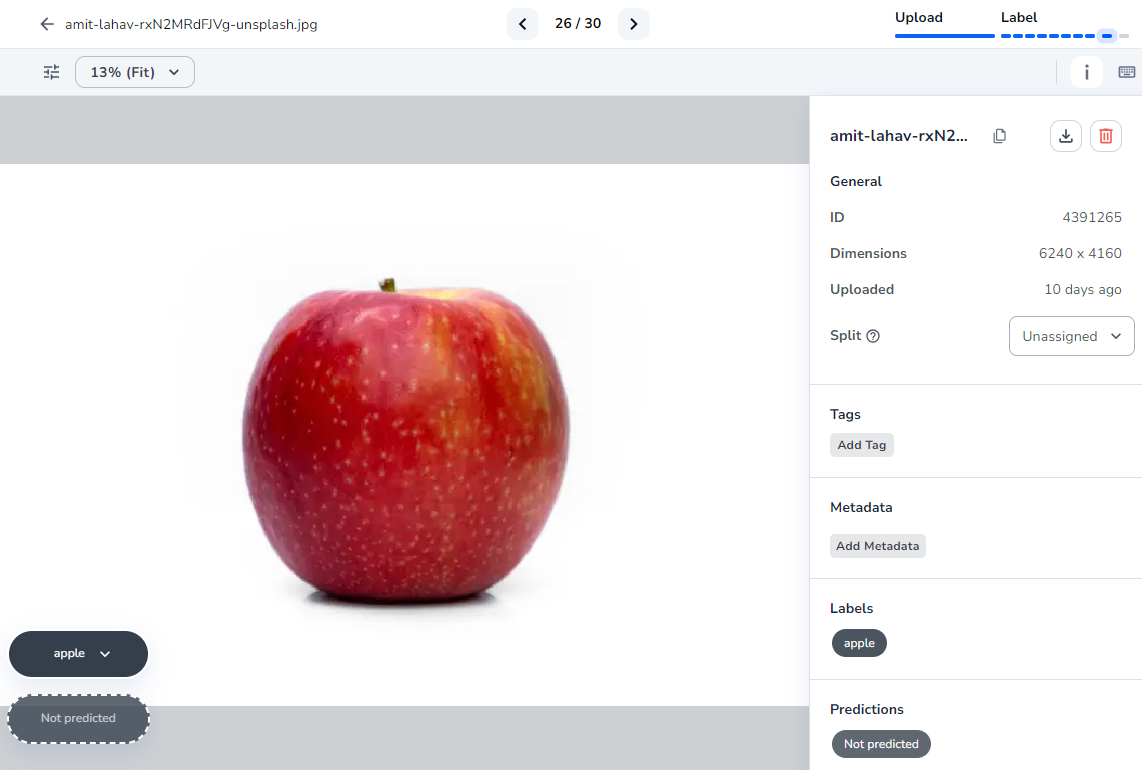
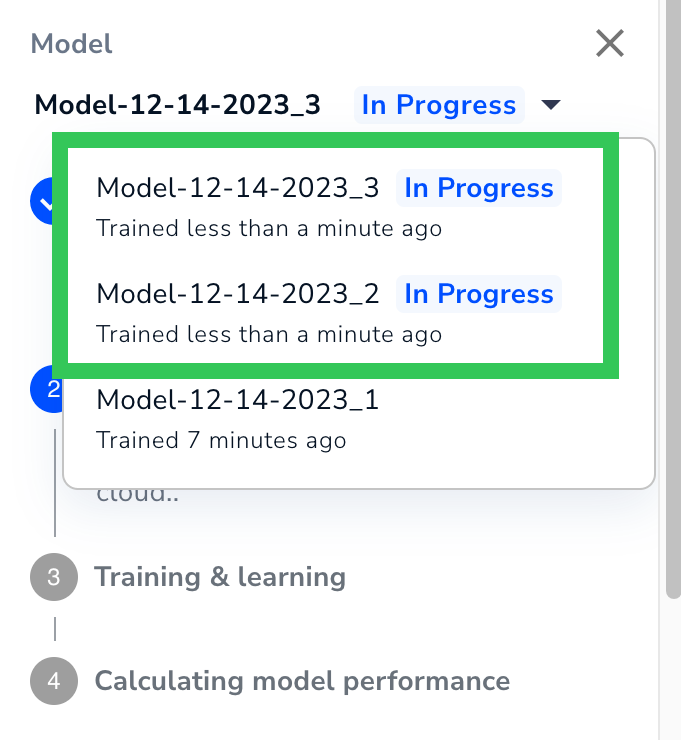 ### Bug Fixes
In previous versions of LandingLens, training a [Visual Prompting](./visual-prompting) model sometimes led to inaccurate predictions and this error message:
“Model training failed. Please try training a new model.”
This bug has been fixed, and Visual Prompting models now train correctly.
### Bug Fixes
In previous versions of LandingLens, training a [Visual Prompting](./visual-prompting) model sometimes led to inaccurate predictions and this error message:
“Model training failed. Please try training a new model.”
This bug has been fixed, and Visual Prompting models now train correctly.
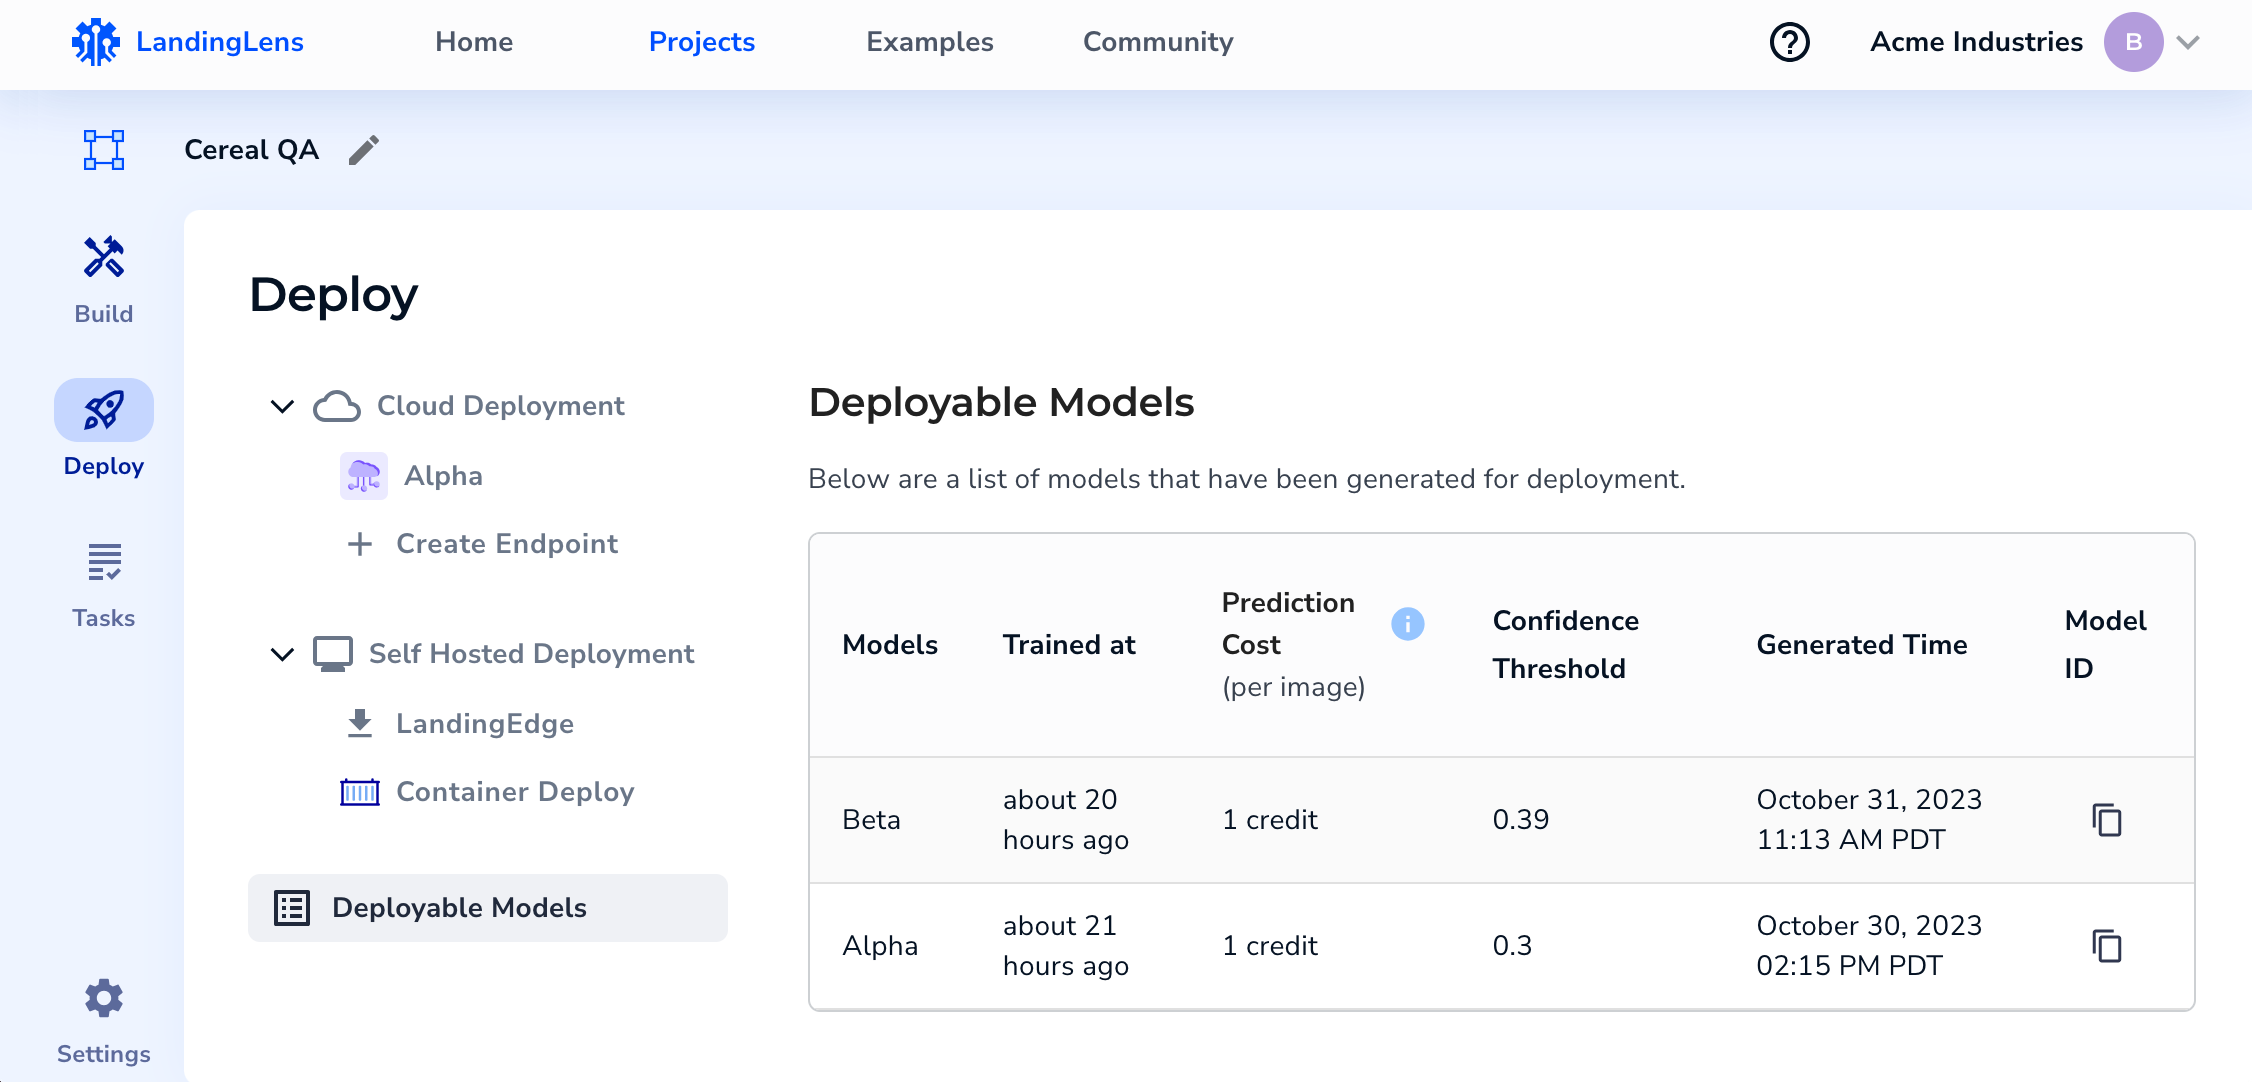 If you want to use a different Confidence Score for a model, or if you don't see your model in the Deployable Models table, you can either deploy it via [Cloud Deployment](./cloud-deployment) or use the following procedure to generate a deployable model:
1. Open the project with the model you want to deploy.
2. Click **Models** to open the Models panel.
If you want to use a different Confidence Score for a model, or if you don't see your model in the Deployable Models table, you can either deploy it via [Cloud Deployment](./cloud-deployment) or use the following procedure to generate a deployable model:
1. Open the project with the model you want to deploy.
2. Click **Models** to open the Models panel.
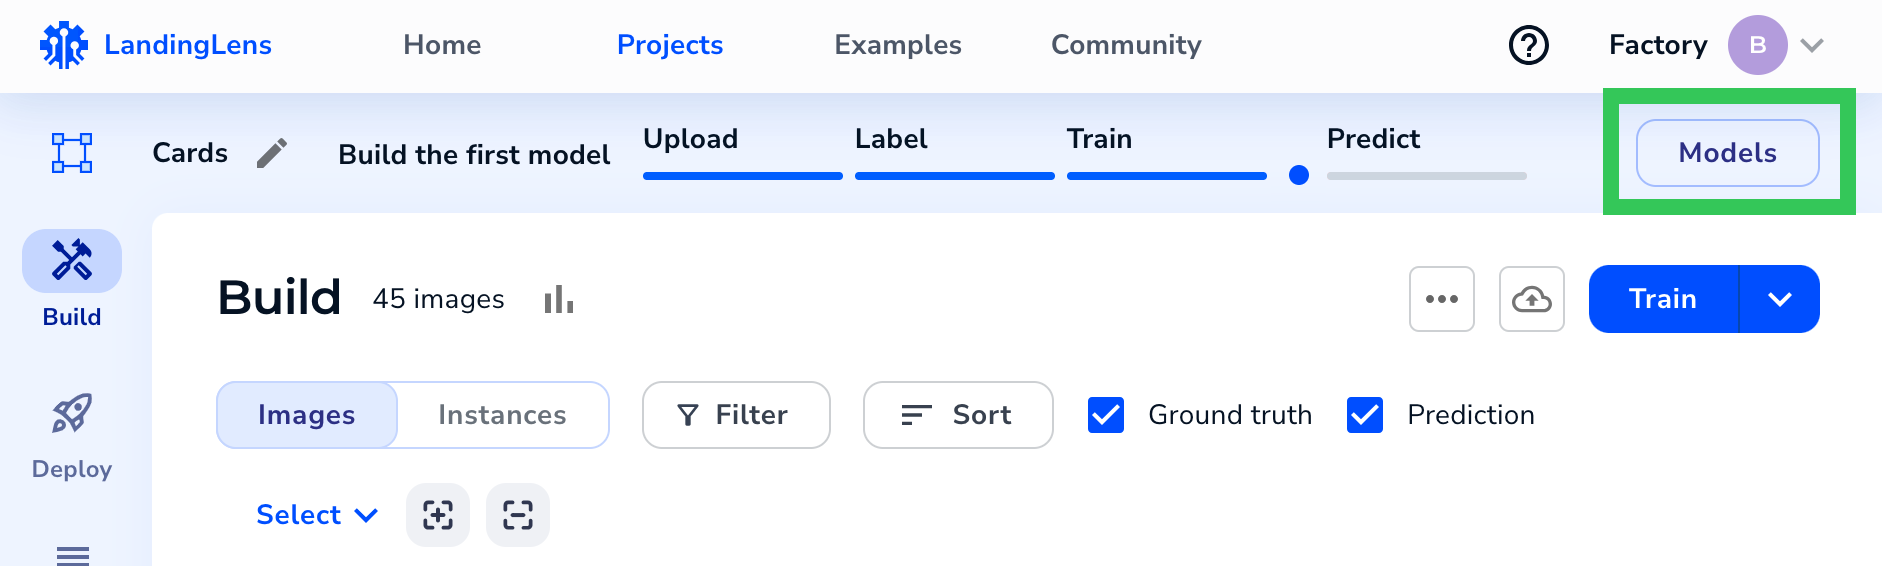 3. Select the model you want to deploy from the **Model** drop-down menu.
4. Use the **Confidence Threshold** slider to select the Confidence Score you want the model to have.
5. Click **Deploy**.
3. Select the model you want to deploy from the **Model** drop-down menu.
4. Use the **Confidence Threshold** slider to select the Confidence Score you want the model to have.
5. Click **Deploy**.
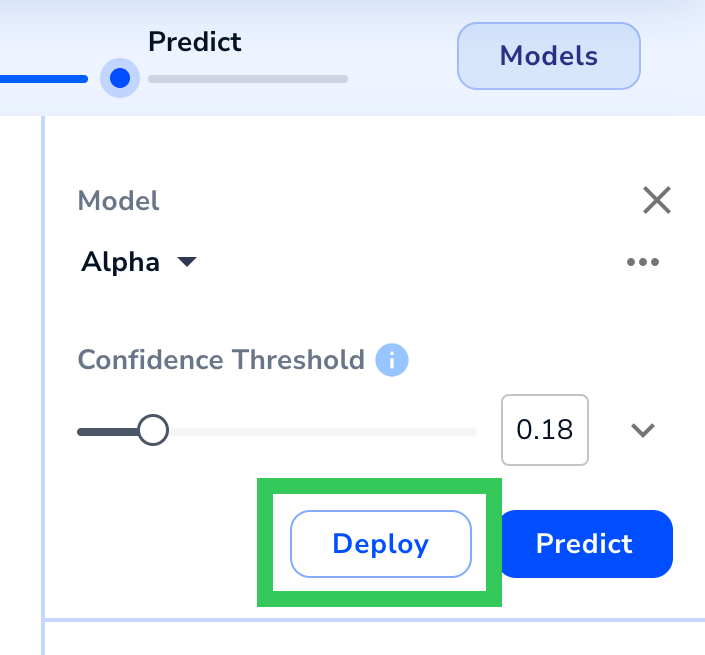 6. Select **Self-Hosted Deployments**.
7. Click **Generate Deployable Model**.
6. Select **Self-Hosted Deployments**.
7. Click **Generate Deployable Model**.
.png?fit=max&auto=format&n=AkXgdAcL19zbnV5n&q=85&s=2788788ce76ec1f6c060178db17a3068) LandingLens creates a deployable model and opens to the **Deployable Models** table on the **Deploy** page.
LandingLens creates a deployable model and opens to the **Deployable Models** table on the **Deploy** page.
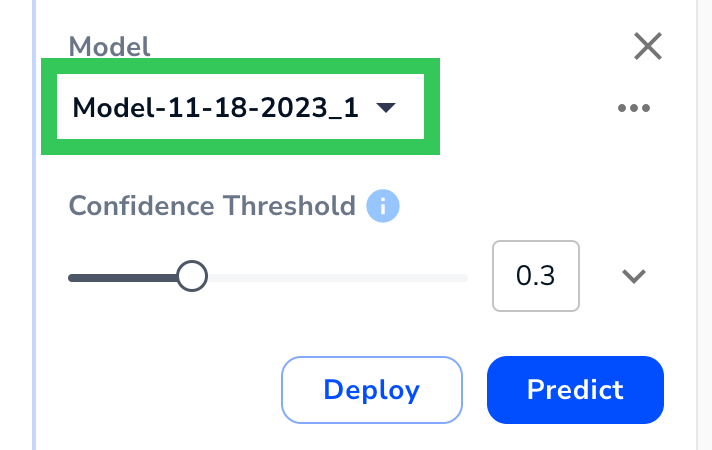 ### Consistent Upload Experience
You can now apply split, metadata, and tag information when uploading images to any project type. Previously, you could only apply splits when uploading information to Segmentation projects. The updated upload page provides a more consistent experience and allows you to apply important information at upload.
### Consistent Upload Experience
You can now apply split, metadata, and tag information when uploading images to any project type. Previously, you could only apply splits when uploading information to Segmentation projects. The updated upload page provides a more consistent experience and allows you to apply important information at upload.
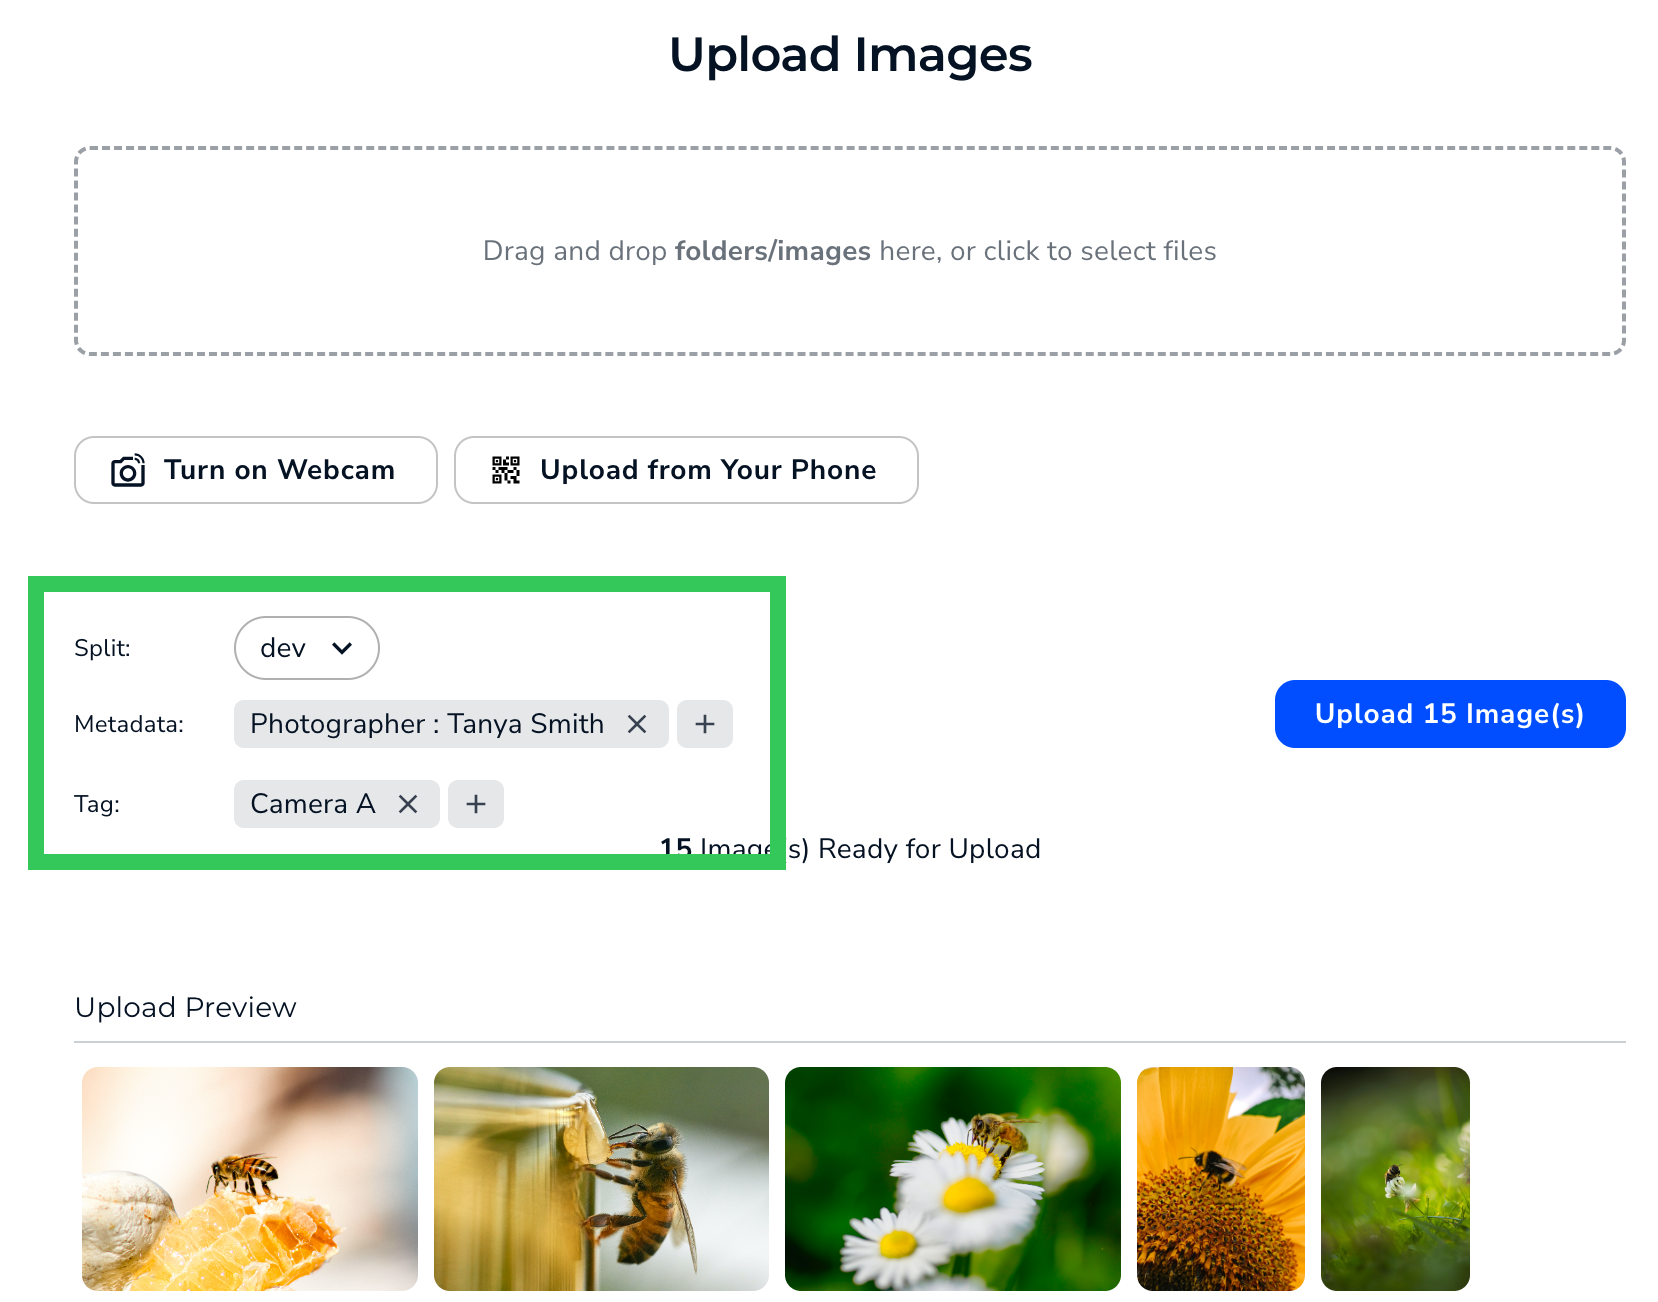
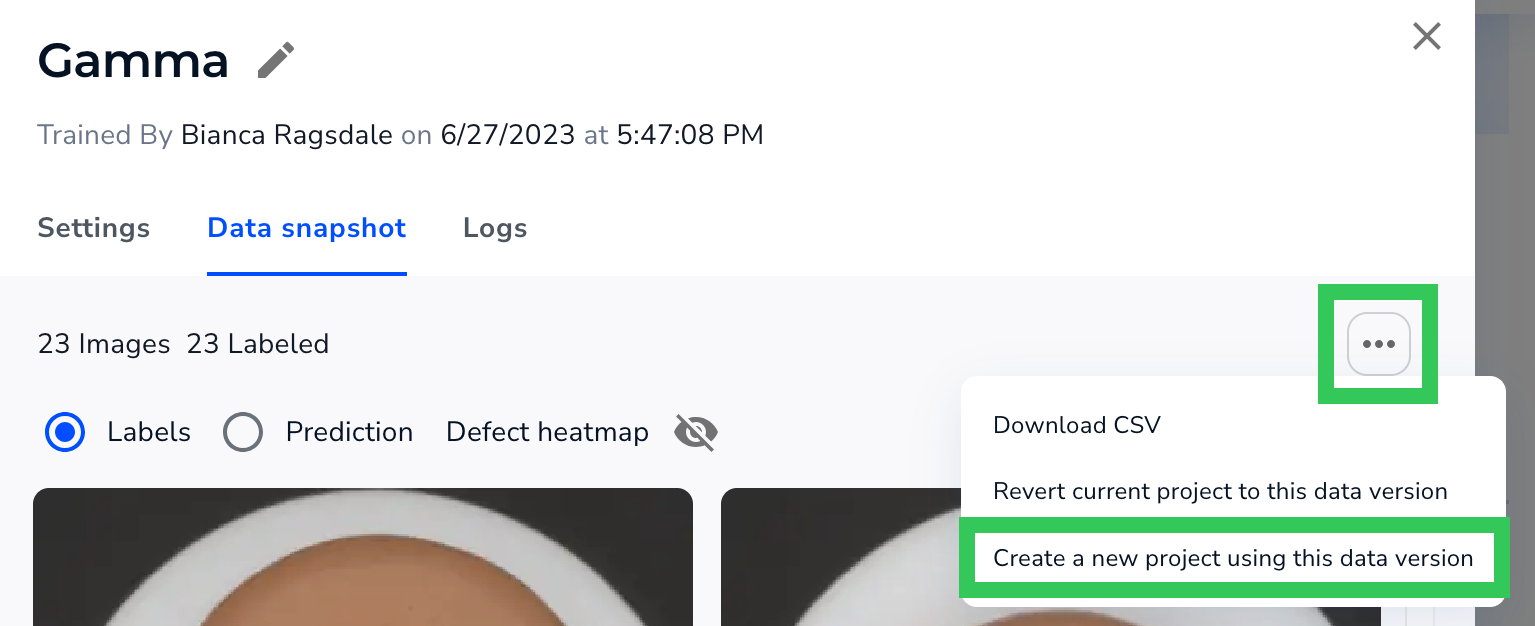 For more information, check out the tutorial video below.
 ### LandingLens Now Supports MPO Files
You can now upload **MPO** (Multi-Picture Object) files to LandingLens. An MPO file contains two JPG files that create a stereoscopic image when overlaid. When you upload an MPO file to LandingLens, LandingLens selects one of the two JPG files.
For more information about supported file types, go to [Upload Images](./upload-images).
### Owners and Changing Role Types
Before this new version, LandingLens offered two member types: **Collaborators** and **Admins**. Once you assigned a member type to a user, you couldn't change their role.
This new version of LandingLens now offers a new role called **Owner**. Owners have all the permissions as Admins, plus the ability to change a member's role! For example, if Anna was originally added as a Collaborator, but now she needs access to the API Key page, an Owner can "upgrade" Anna to be an Admin.
An organization can have up to three Owners. To learn more information, go to [Member Roles](./members).
### LandingLens Now Supports MPO Files
You can now upload **MPO** (Multi-Picture Object) files to LandingLens. An MPO file contains two JPG files that create a stereoscopic image when overlaid. When you upload an MPO file to LandingLens, LandingLens selects one of the two JPG files.
For more information about supported file types, go to [Upload Images](./upload-images).
### Owners and Changing Role Types
Before this new version, LandingLens offered two member types: **Collaborators** and **Admins**. Once you assigned a member type to a user, you couldn't change their role.
This new version of LandingLens now offers a new role called **Owner**. Owners have all the permissions as Admins, plus the ability to change a member's role! For example, if Anna was originally added as a Collaborator, but now she needs access to the API Key page, an Owner can "upgrade" Anna to be an Admin.
An organization can have up to three Owners. To learn more information, go to [Member Roles](./members).
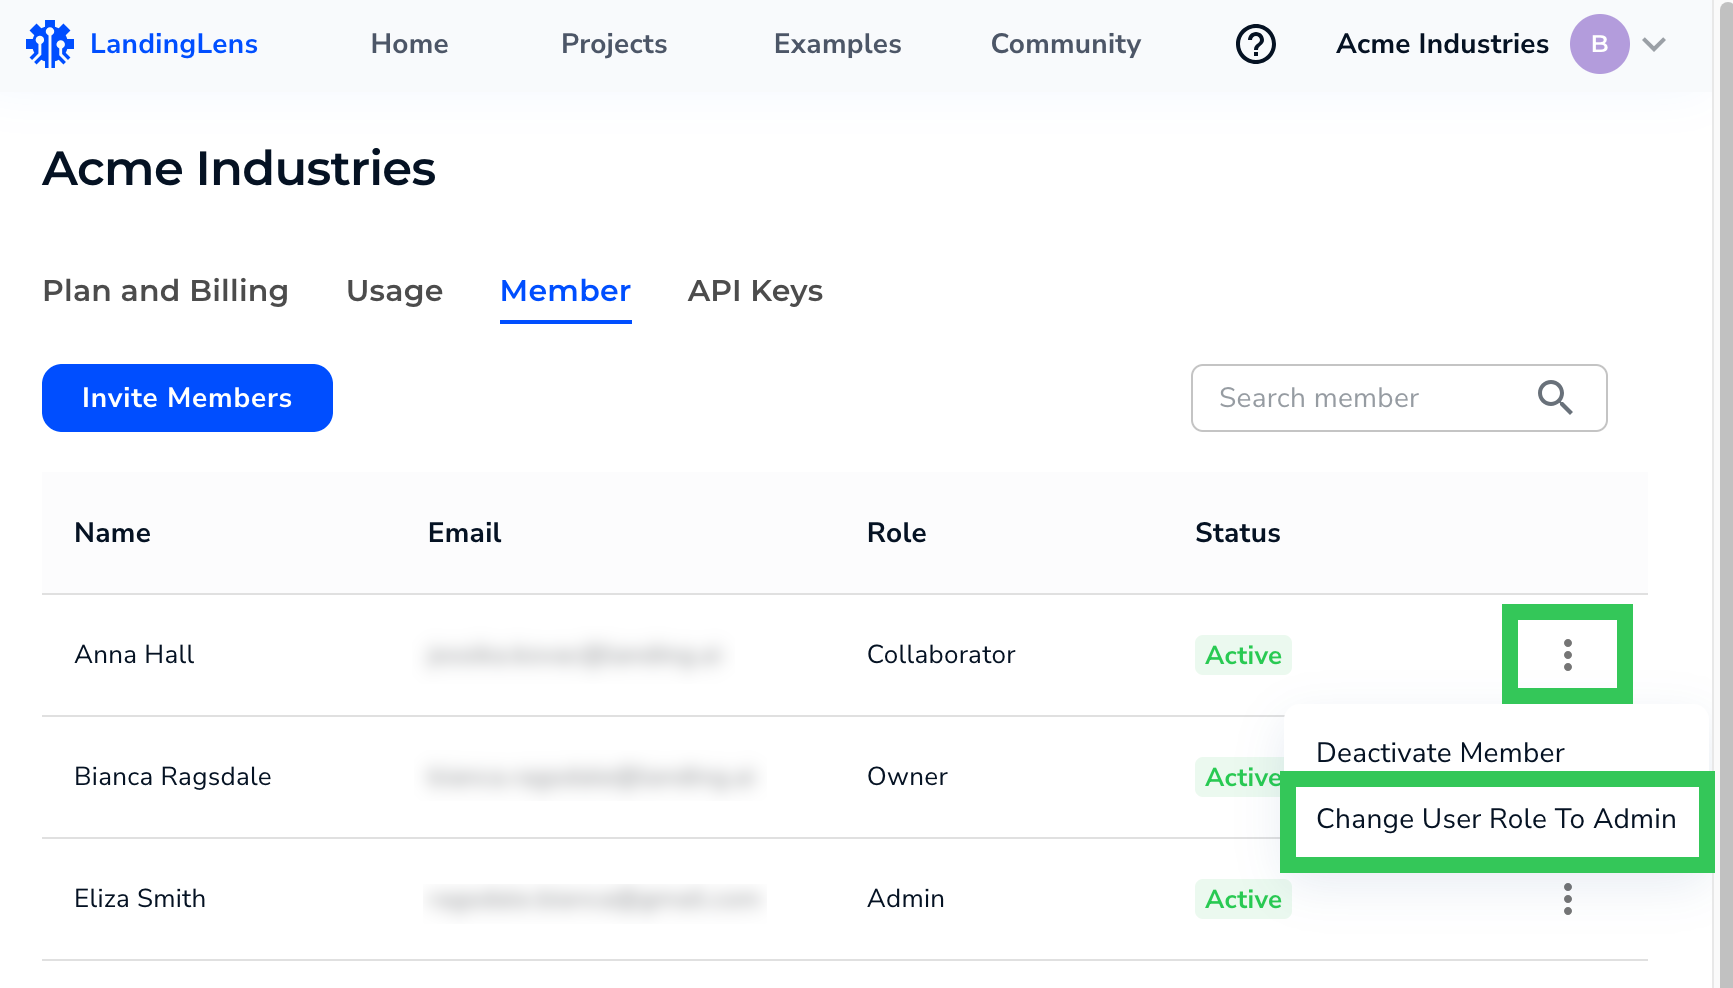 ### Track Credits for Deleted Projects
If you delete a project, the credits used on that project are now easier to track on the **Usage** dashboard.
Previously, if you deleted a project, the **Top Projects: By Credits** and **Top Project: By Images** sections would show “(private project)” instead of the project name. Now, if you delete a project, the project name displays, making it easier to understand how credits were used.
The **Usage Log** continues to show “-” instead of the names of deleted projects, because LandingLens pulls this data from a different place.
For example, let’s say you deleted a project called “Quality Control”. The following screenshot shows how the **Usage** page would look after deleting the project.
### Track Credits for Deleted Projects
If you delete a project, the credits used on that project are now easier to track on the **Usage** dashboard.
Previously, if you deleted a project, the **Top Projects: By Credits** and **Top Project: By Images** sections would show “(private project)” instead of the project name. Now, if you delete a project, the project name displays, making it easier to understand how credits were used.
The **Usage Log** continues to show “-” instead of the names of deleted projects, because LandingLens pulls this data from a different place.
For example, let’s say you deleted a project called “Quality Control”. The following screenshot shows how the **Usage** page would look after deleting the project.
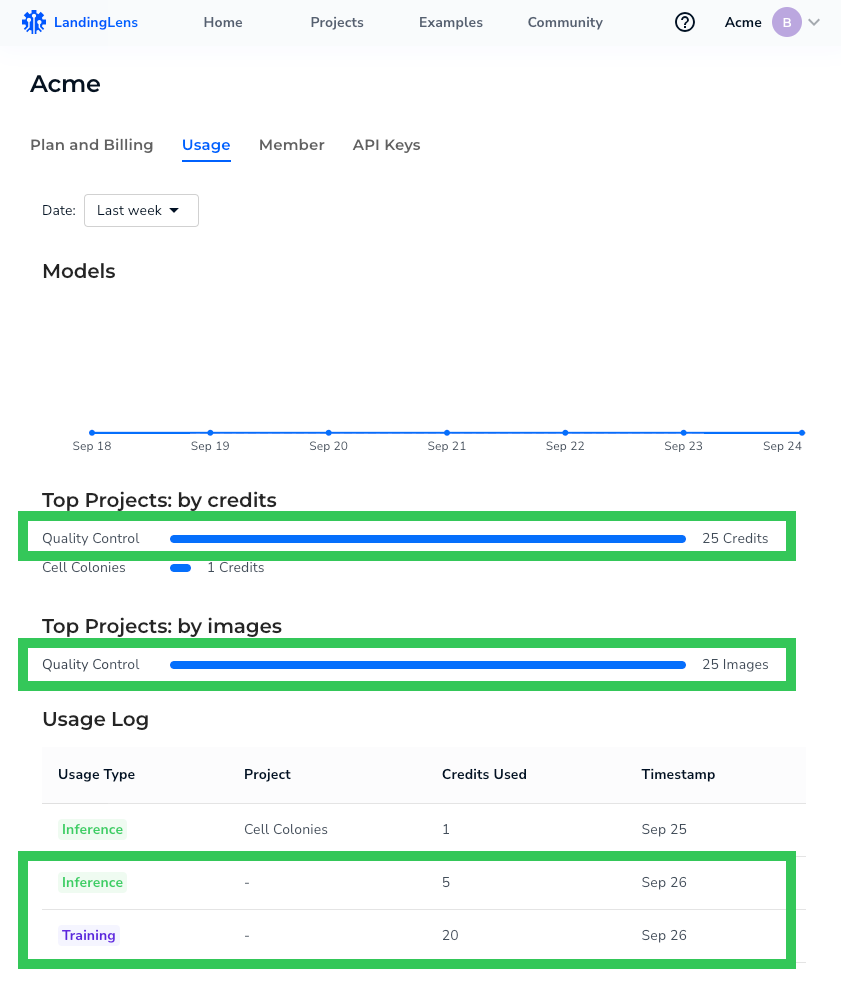 The following table summarizes the changes:
| Section | Before | After |
| ------------------------ | ----------------- | ------------ |
| Top Projects: By Credits | (private project) | Project Name |
| Top Projects: By Images | (private project) | Project Name |
| Usage Log | - | - |
### Bug Fixes
For users on the [Classic Flow](./classic-flow) version of LandingLens: The **Job** hyperlinks on the **Models** tab now work correctly.
The following table summarizes the changes:
| Section | Before | After |
| ------------------------ | ----------------- | ------------ |
| Top Projects: By Credits | (private project) | Project Name |
| Top Projects: By Images | (private project) | Project Name |
| Usage Log | - | - |
### Bug Fixes
For users on the [Classic Flow](./classic-flow) version of LandingLens: The **Job** hyperlinks on the **Models** tab now work correctly.
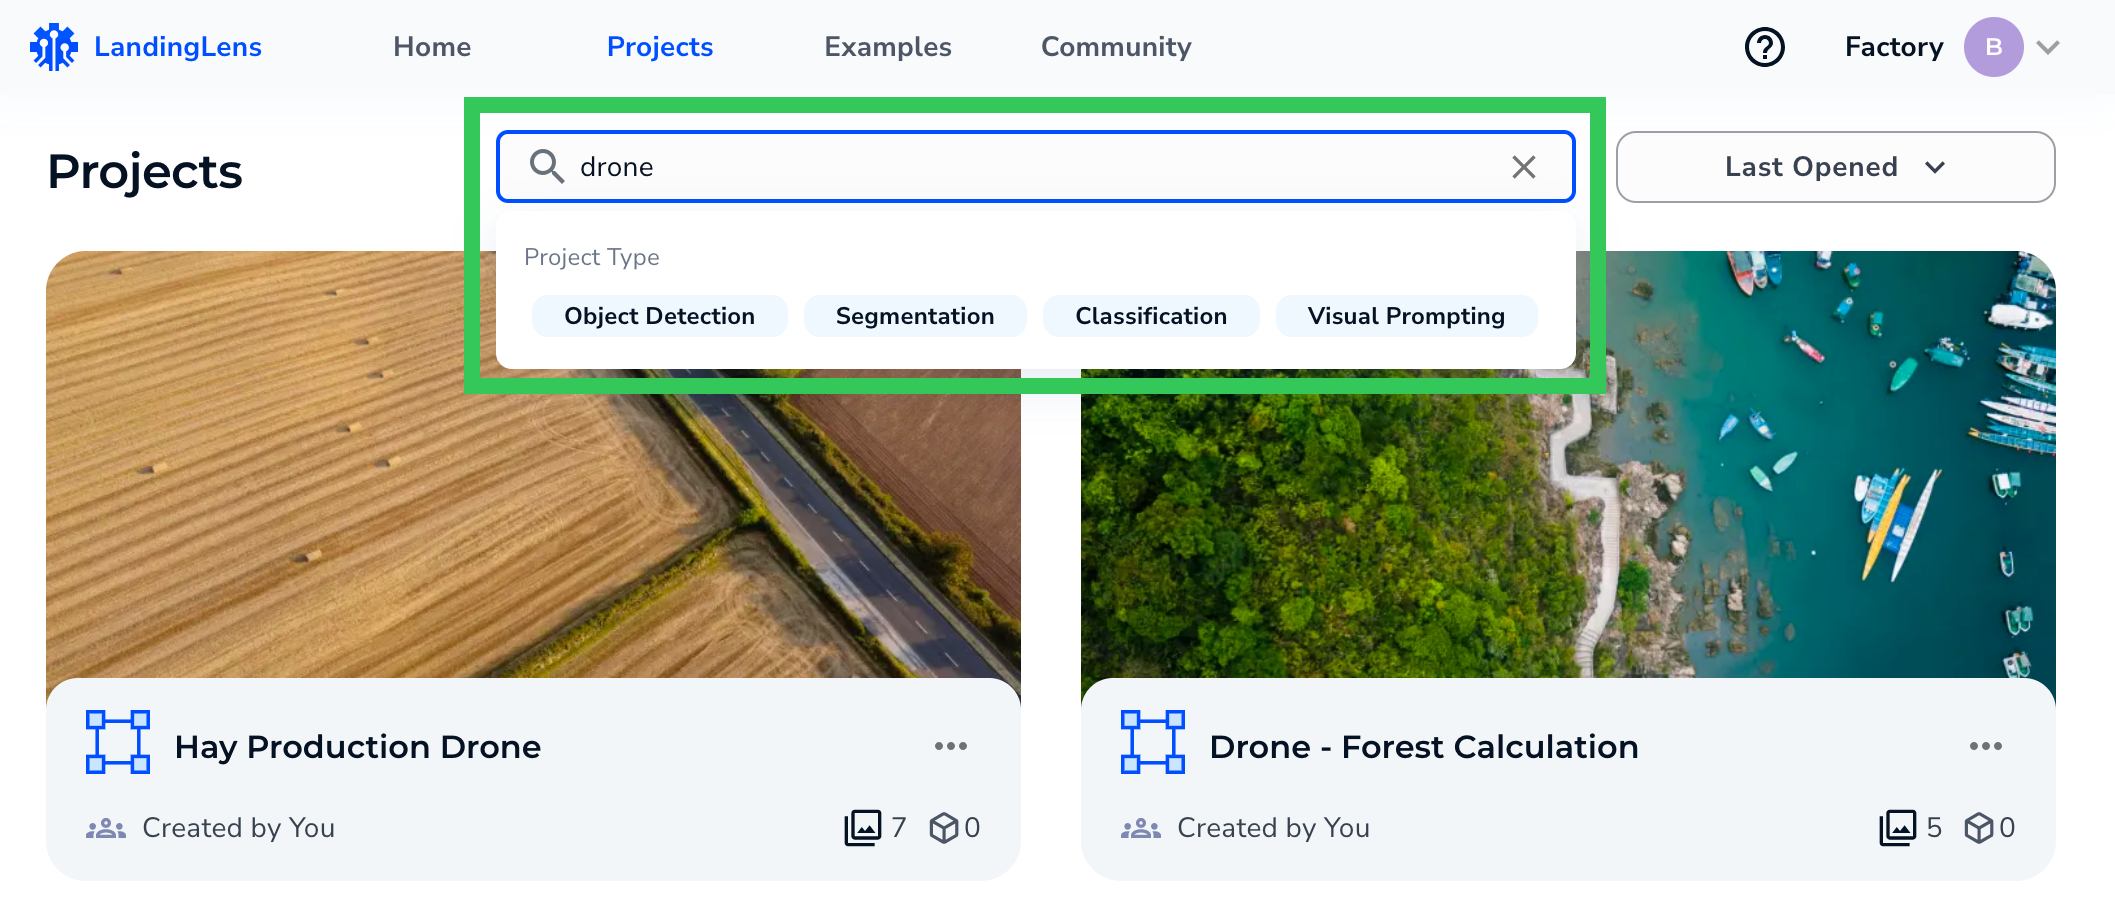 #### More Ways to Manage Projects
You can now perform these actions directly from a project card on the Projects page:
* Rename the project
* Invite users to the project (only applicable to private projects)
* Delete the project
To access these options, click the **Actions** icon on the project card. For more information on managing projects from the Projects page, go to [Search for Projects](./view-projects).
#### More Ways to Manage Projects
You can now perform these actions directly from a project card on the Projects page:
* Rename the project
* Invite users to the project (only applicable to private projects)
* Delete the project
To access these options, click the **Actions** icon on the project card. For more information on managing projects from the Projects page, go to [Search for Projects](./view-projects).
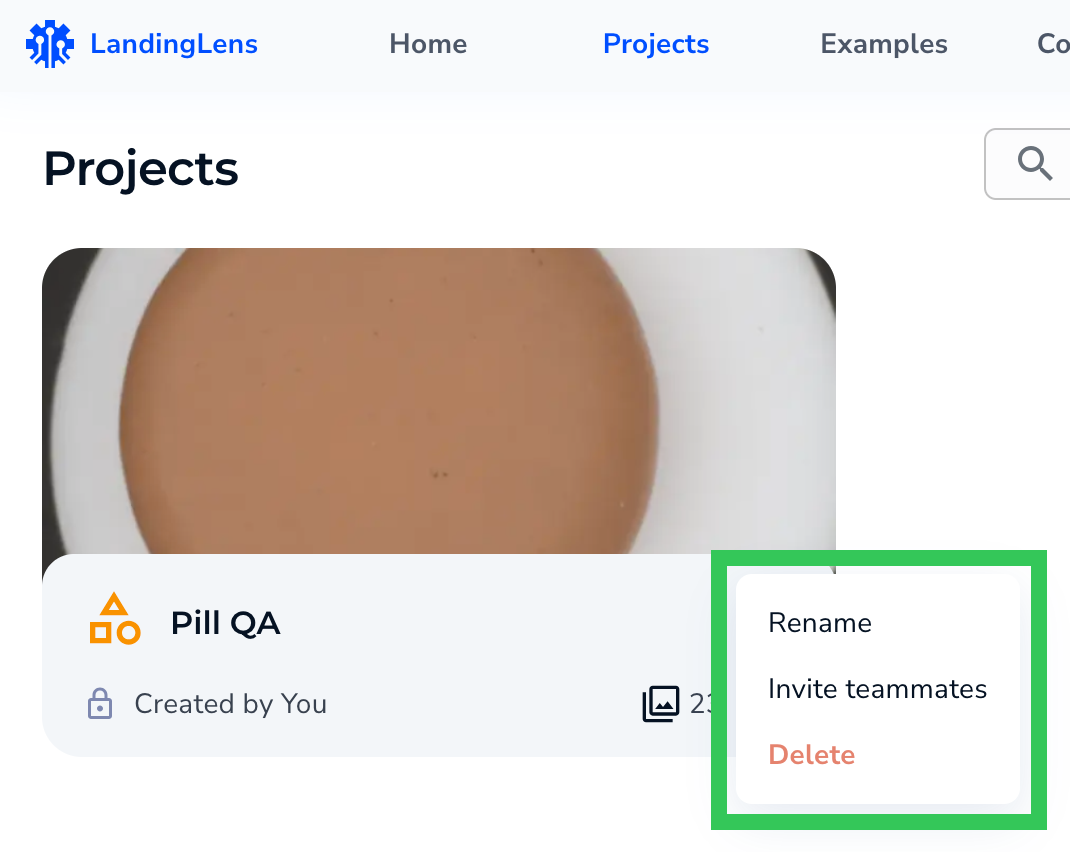 #### Classic Flow Supports Ability to Delete Classes
If you are using the [Classic Flow](./classic-flow) version of LandingLens, the ability to delete classes can now be enabled. To request this feature, contact your {companyName} representative.
For more information about deleting classes, go to [Delete Classes](./delete-classes).
### Bug Fixes
* You no longer need to refresh the page to update how long ago a model was trained. Now, the time is updated automatically.
* If you delete a label or “discard” the name of a class before you create it in a Visual Prompting project, those changes are now saved. Previously, the label or class would still appear.
* We improved the transition from training a Visual Prompting model to seeing the results. Now, the predictions and model information load faster.
#### Classic Flow Supports Ability to Delete Classes
If you are using the [Classic Flow](./classic-flow) version of LandingLens, the ability to delete classes can now be enabled. To request this feature, contact your {companyName} representative.
For more information about deleting classes, go to [Delete Classes](./delete-classes).
### Bug Fixes
* You no longer need to refresh the page to update how long ago a model was trained. Now, the time is updated automatically.
* If you delete a label or “discard” the name of a class before you create it in a Visual Prompting project, those changes are now saved. Previously, the label or class would still appear.
* We improved the transition from training a Visual Prompting model to seeing the results. Now, the predictions and model information load faster.
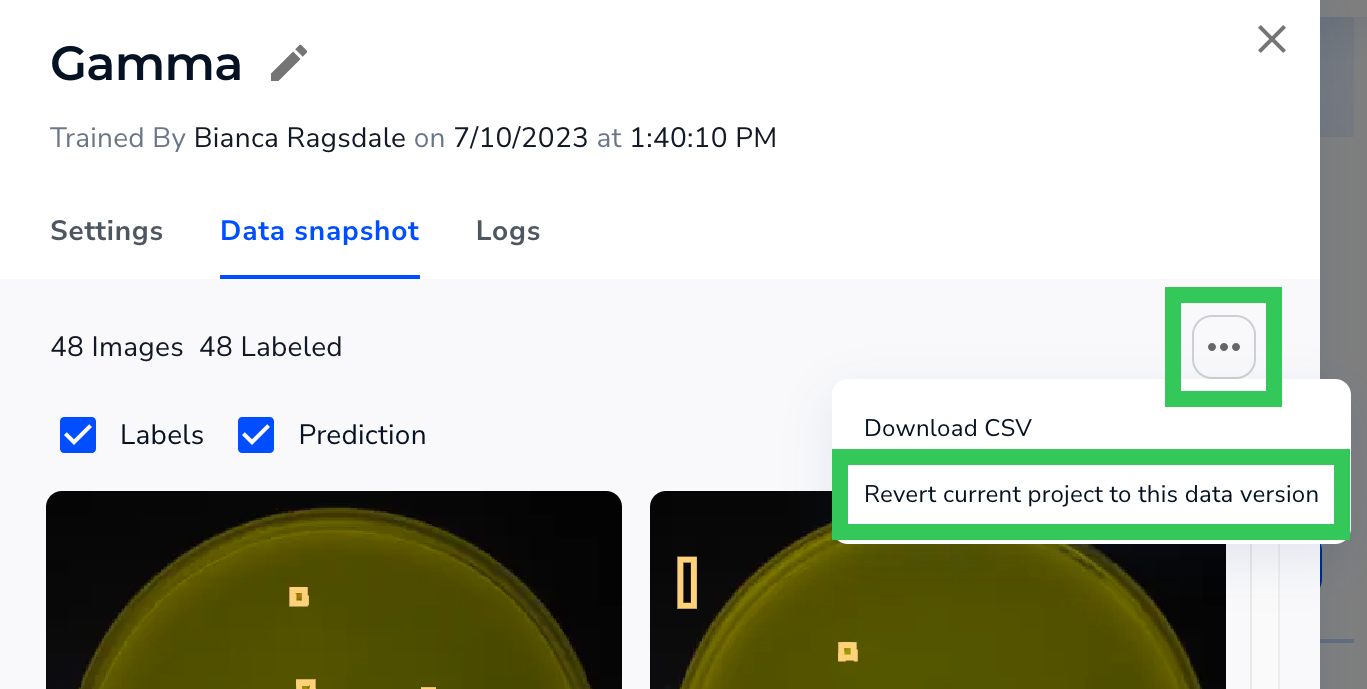 #### Download a CSV of Dataset Information
In Object Detection and Classification projects, you can now download a CSV of information about the dataset. The CSV includes several columns of data, including Project Name, Image Name, Split.
#### Download a CSV of Dataset Information
In Object Detection and Classification projects, you can now download a CSV of information about the dataset. The CSV includes several columns of data, including Project Name, Image Name, Split.
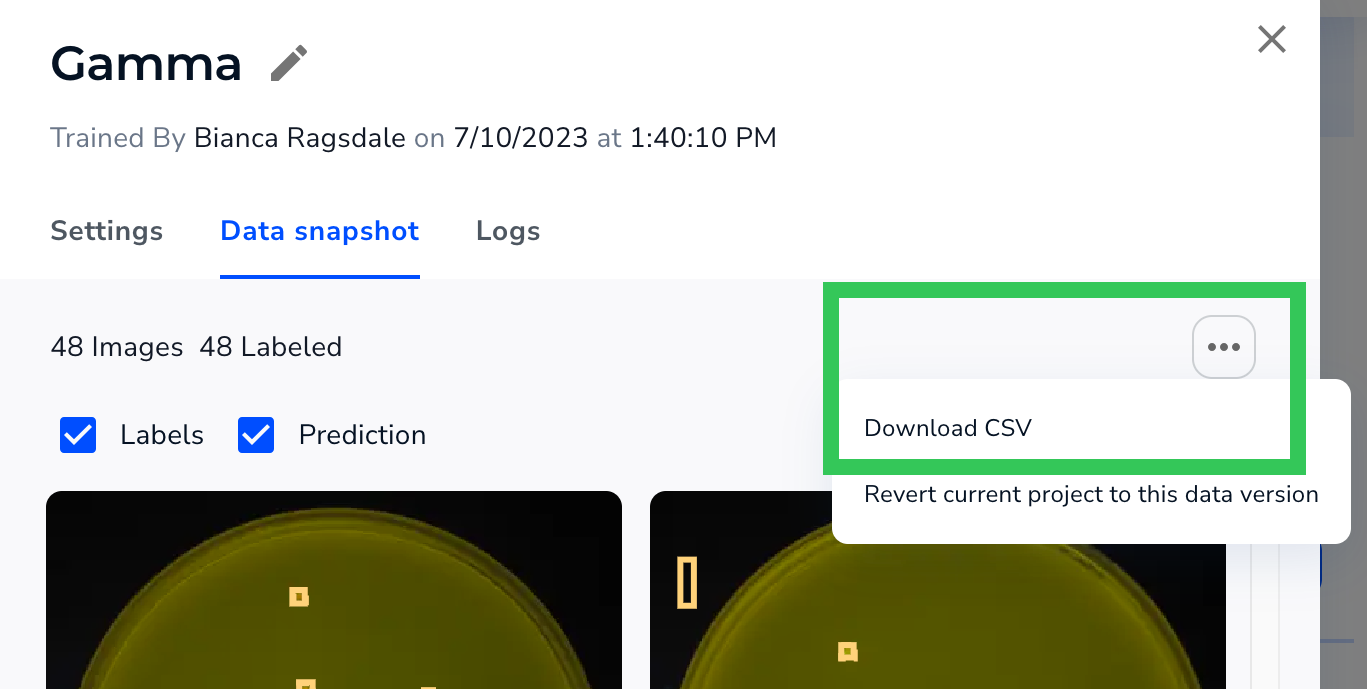 #### Changes to the Model Training Process
When you click **Train**, the first step in the model training process is now to gather and save the images and data currently in your Project. This information is part of the “dataset snapshot” that you can later revert to.
This step displays as **Taking a snapshot of your data** in the Model panel.
#### Changes to the Model Training Process
When you click **Train**, the first step in the model training process is now to gather and save the images and data currently in your Project. This information is part of the “dataset snapshot” that you can later revert to.
This step displays as **Taking a snapshot of your data** in the Model panel.
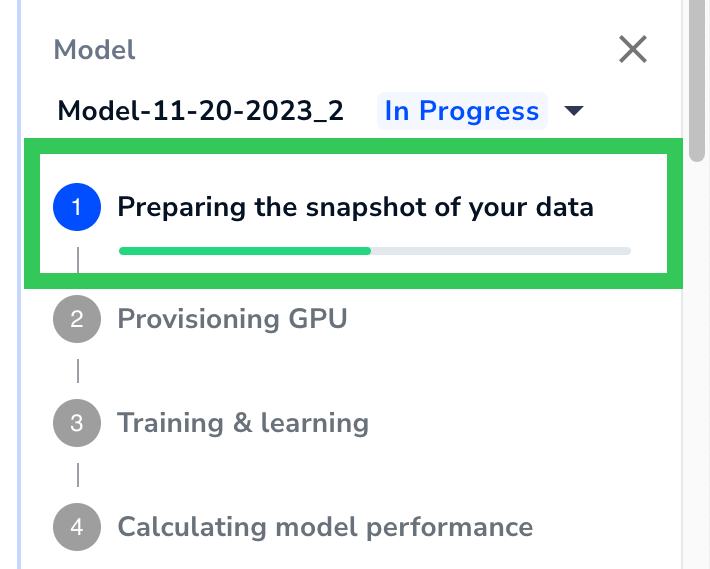 For more information about the model training process, go to [Train Models](./train-models).
#### Changes to the Model Information Pop-Up Window
We’ve redesigned the Model pop-up window to make it easier to navigate. The pop-up is now organized into multiple tabs.
For more information about the model training process, go to [Train Models](./train-models).
#### Changes to the Model Information Pop-Up Window
We’ve redesigned the Model pop-up window to make it easier to navigate. The pop-up is now organized into multiple tabs.
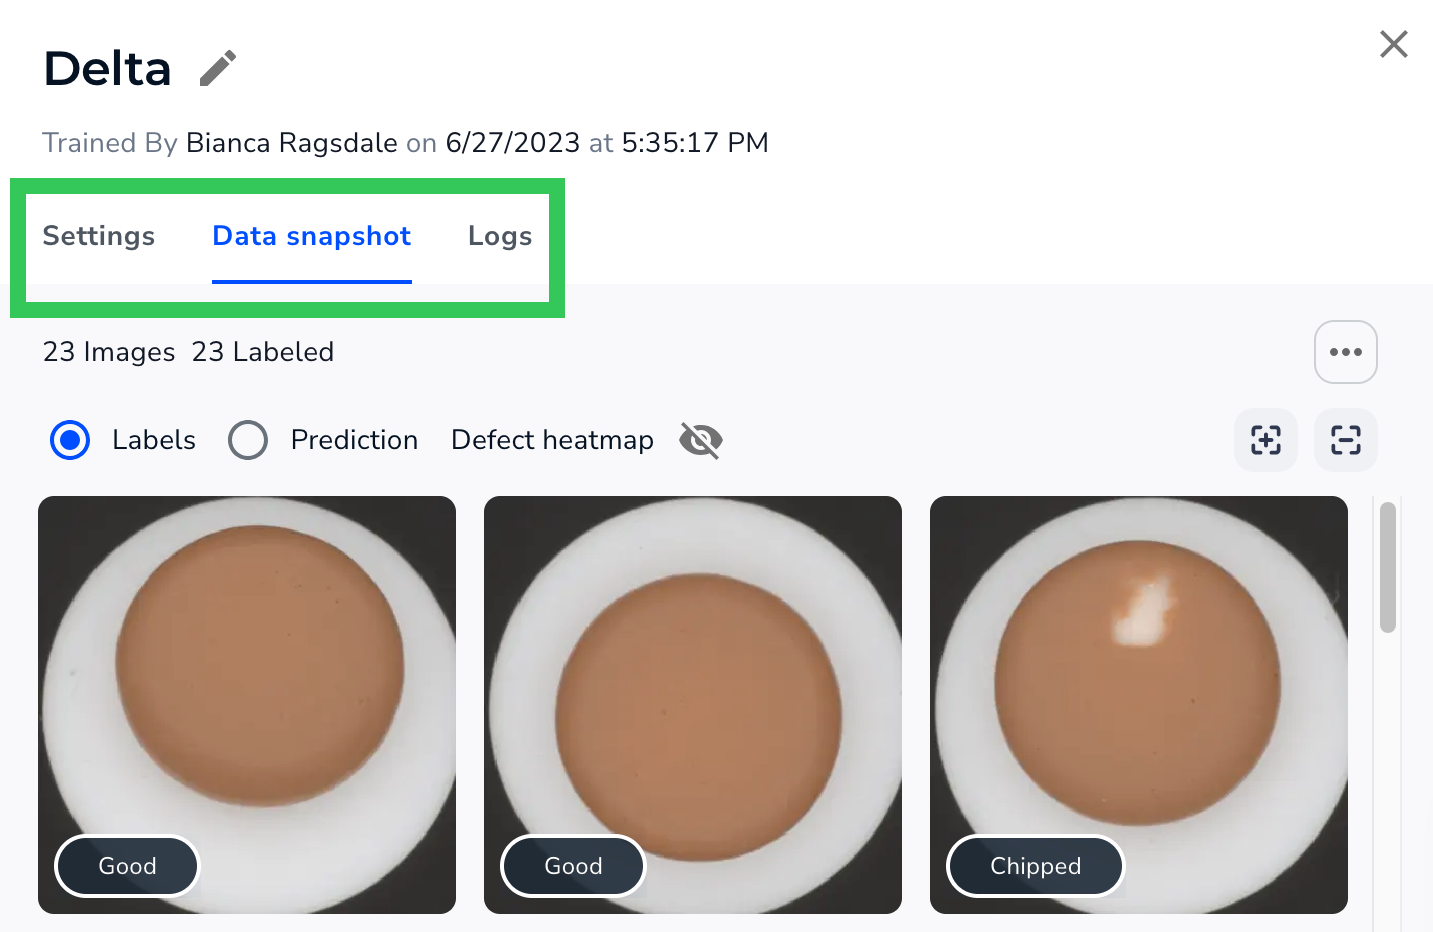 ### Mobile Inference Support in Segmentation and Visual Prompting
You can now use Mobile Inference on Segmentation and Visual Prompting Projects. Previously, it was only available for Object Detection and Classification Projects.
### Streamlined Deployment Workflow from Build Page
We’ve streamlined the workflow for deploying a model from the Build page. When you click Deploy, you can now simply enter the model name and select your endpoint.
### Mobile Inference Support in Segmentation and Visual Prompting
You can now use Mobile Inference on Segmentation and Visual Prompting Projects. Previously, it was only available for Object Detection and Classification Projects.
### Streamlined Deployment Workflow from Build Page
We’ve streamlined the workflow for deploying a model from the Build page. When you click Deploy, you can now simply enter the model name and select your endpoint.
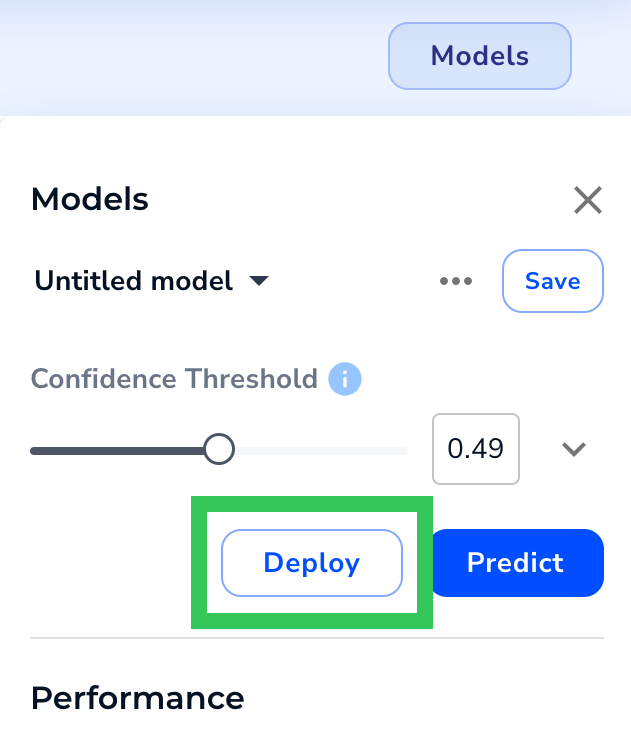
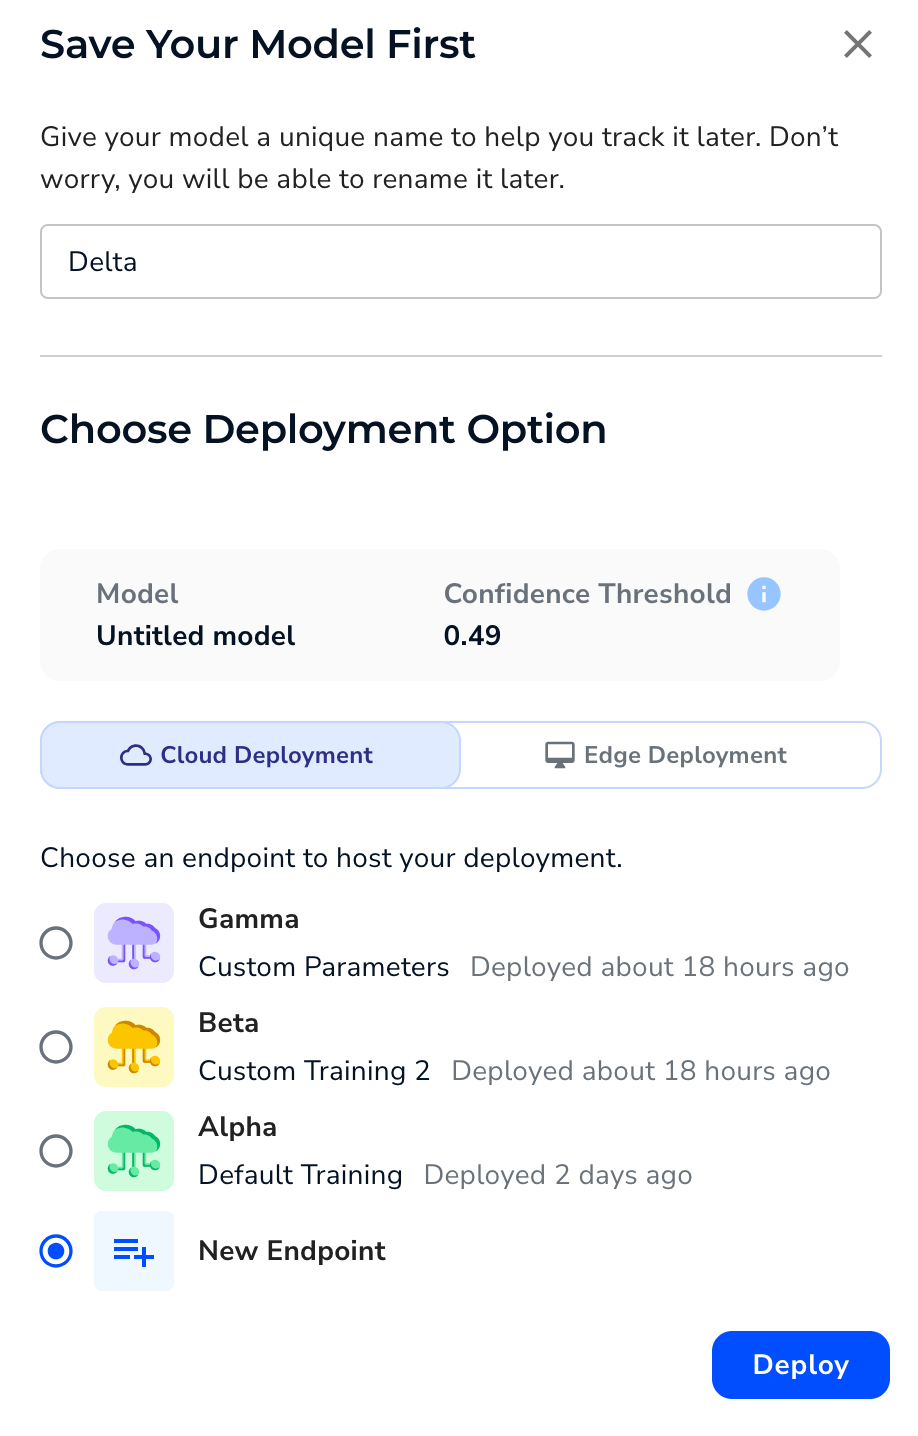 ### Downloadable Pascal VOC Files Now Available for Classification Projects
Before, downloadable Pascal VOC files were only available for Object Detection and Segmentation projects. Now, we've made this feature available for Classification projects.
### Bug Fixes
* Selected images moved to a different split will no longer remain selected.
* You no longer need to refresh the browser to save a model.
* Users in classic flow can resume deploying from the Models page.
* Fixed multiple issues related to deleting classes.
* Fixed multiple issues related to creating an endpoint with a name that already exists in that project.
* Changed the copy of the "Defect" filter to "Class".
* Fixed the login process for SSO.
### Downloadable Pascal VOC Files Now Available for Classification Projects
Before, downloadable Pascal VOC files were only available for Object Detection and Segmentation projects. Now, we've made this feature available for Classification projects.
### Bug Fixes
* Selected images moved to a different split will no longer remain selected.
* You no longer need to refresh the browser to save a model.
* Users in classic flow can resume deploying from the Models page.
* Fixed multiple issues related to deleting classes.
* Fixed multiple issues related to creating an endpoint with a name that already exists in that project.
* Changed the copy of the "Defect" filter to "Class".
* Fixed the login process for SSO.
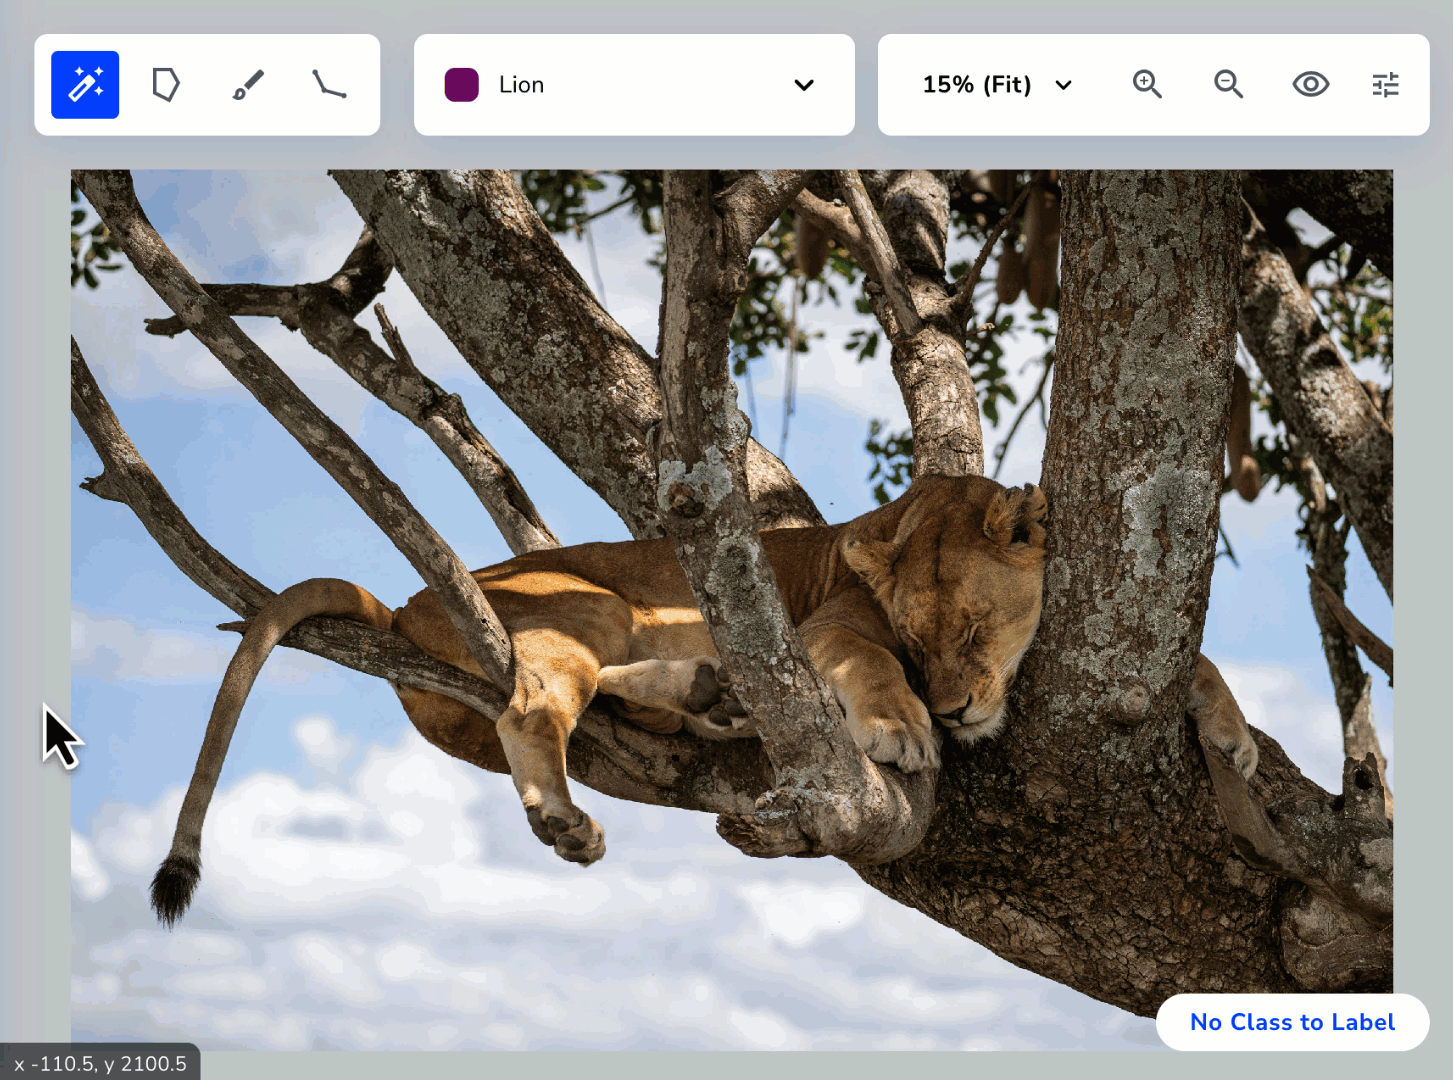 ### New API Key System
Up until this release, LandingLens required both an API Key and API Secret to be used to run inference. After evaluating our user experience and current industry standards, we decided to eliminate the use of the API Secret. As of this release, LandingLens generates and requires only an API Key!
All existing API Key and API Secret pairs will continue to be valid, and all applications using those credentials will continue to work.
You can create multiple API Keys. This gives you more flexibility and control over who can run inference with your deployed Models. Additionally, you can revoke and delete API Keys.
For more details, check out [API Keys](./api-key).
### New API Key System
Up until this release, LandingLens required both an API Key and API Secret to be used to run inference. After evaluating our user experience and current industry standards, we decided to eliminate the use of the API Secret. As of this release, LandingLens generates and requires only an API Key!
All existing API Key and API Secret pairs will continue to be valid, and all applications using those credentials will continue to work.
You can create multiple API Keys. This gives you more flexibility and control over who can run inference with your deployed Models. Additionally, you can revoke and delete API Keys.
For more details, check out [API Keys](./api-key).
.png?fit=max&auto=format&n=lfi7C6xislw6Nqbm&q=85&s=9f1890a73a7d4899d3fd381345d37558) ### New Way to View the API Command for Deployment
We now offer a new way to get the API call on the Deploy page. Now you can click the **Actions** icon and select **View API Command**.
### New Way to View the API Command for Deployment
We now offer a new way to get the API call on the Deploy page. Now you can click the **Actions** icon and select **View API Command**.
.png?fit=max&auto=format&n=B8kQNOJyTnzsc2HR&q=85&s=10476070397381eb644aaa0ca2717e85) ### Bug Fixes
* If you delete a Class, you can now create a new Class with the same name as the deleted Class.
* When using the QR code for [Mobile Inference](./mobile-inference), some users got this error: “Missing user record with apikey or user id: -1”. The issue that caused this error has been fixed.
* If a Class was deleted in a Classification Project, the model metrics were also deleted for that Project. The issue that caused this error has been fixed.
### Bug Fixes
* If you delete a Class, you can now create a new Class with the same name as the deleted Class.
* When using the QR code for [Mobile Inference](./mobile-inference), some users got this error: “Missing user record with apikey or user id: -1”. The issue that caused this error has been fixed.
* If a Class was deleted in a Classification Project, the model metrics were also deleted for that Project. The issue that caused this error has been fixed.
 * If training a Model or running inference will put you above your credit maximum, LandingLens now alerts you with a pop-up that guides you through the next steps.
 ### Bug Fixes
If you have a long Model name, it’s now shortened when it displays in the user interface. Hover over the name to see the full name. Previously, long Model names would attempt to wrap to a second line, but the top of the text would get cut off.
### Bug Fixes
If you have a long Model name, it’s now shortened when it displays in the user interface. Hover over the name to see the full name. Previously, long Model names would attempt to wrap to a second line, but the top of the text would get cut off.
 Scanning the QR code with your phone opens the LandingLens app in your browser.
.png?fit=max&auto=format&n=e3dn6upV4NR85srT&q=85&s=5d0f40ce1942eb97768bc9fb93424275) From there, you can take a photo or select an image from your phone. The app sends the photo to your deployed Model, and your Model runs inference on it. The Model’s predictions then display immediately on your phone!
From there, you can take a photo or select an image from your phone. The app sends the photo to your deployed Model, and your Model runs inference on it. The Model’s predictions then display immediately on your phone!
 The images and predictions are also saved back to LandingLens, so that you can review all results in a centralized location. You can also share the QR code with your colleagues, so that you can all collaborate on running inference.
.png?fit=max&auto=format&n=e3dn6upV4NR85srT&q=85&s=71c8ec61ed66791466da06b5f861b7fc) ### Clearly-Defined Deployment Options
We’ve added more visual guides to the Deploy page to help you choose the right deployment method for your use case.
For example, when you first click Deploy, you’ll see two options for how to use your model.
* **Cloud Deployment**: Click to create an endpoint, which is a virtual location that hosts your Model. You can then send images to the Model via API requests, or use a new feature called Mobile Inference to run your Model on your smartphone (more info on that [below](./landinglens-release-notes#use-your-model-on-a-smartphone-with-mobile-inference)).
* **Edge Deployment**: Click to deploy your Model via LandingEdge, the {companyName} application that connects to your edge devices.
### Clearly-Defined Deployment Options
We’ve added more visual guides to the Deploy page to help you choose the right deployment method for your use case.
For example, when you first click Deploy, you’ll see two options for how to use your model.
* **Cloud Deployment**: Click to create an endpoint, which is a virtual location that hosts your Model. You can then send images to the Model via API requests, or use a new feature called Mobile Inference to run your Model on your smartphone (more info on that [below](./landinglens-release-notes#use-your-model-on-a-smartphone-with-mobile-inference)).
* **Edge Deployment**: Click to deploy your Model via LandingEdge, the {companyName} application that connects to your edge devices. ### Download a Free Trial of LandingEdge
You can now download a free trial of LandingEdge directly from LandingLens!
If you haven't deploy a Model yet, open a Project to the Deploy page and click **Download LandingEdge**. Then follow the on-screen prompts to complete the download. For detailed information, go to [LandingEdge Overview](./landingedge/landingedge-overview).
### Download a Free Trial of LandingEdge
You can now download a free trial of LandingEdge directly from LandingLens!
If you haven't deploy a Model yet, open a Project to the Deploy page and click **Download LandingEdge**. Then follow the on-screen prompts to complete the download. For detailed information, go to [LandingEdge Overview](./landingedge/landingedge-overview).
 If you’ve already deployed a Model via Cloud Deployment, click **LandingEdge**.
### Workflow Assistant
We added the **Workflow Assistant** to Segmentation and Classification Projects. The Workflow Assistant includes a progress bar at the top of your Project that guides you through all the steps of developing a computer vision Model, from uploading images to your dataset to using your Model to make predictions.
If you’ve already deployed a Model via Cloud Deployment, click **LandingEdge**.
### Workflow Assistant
We added the **Workflow Assistant** to Segmentation and Classification Projects. The Workflow Assistant includes a progress bar at the top of your Project that guides you through all the steps of developing a computer vision Model, from uploading images to your dataset to using your Model to make predictions.
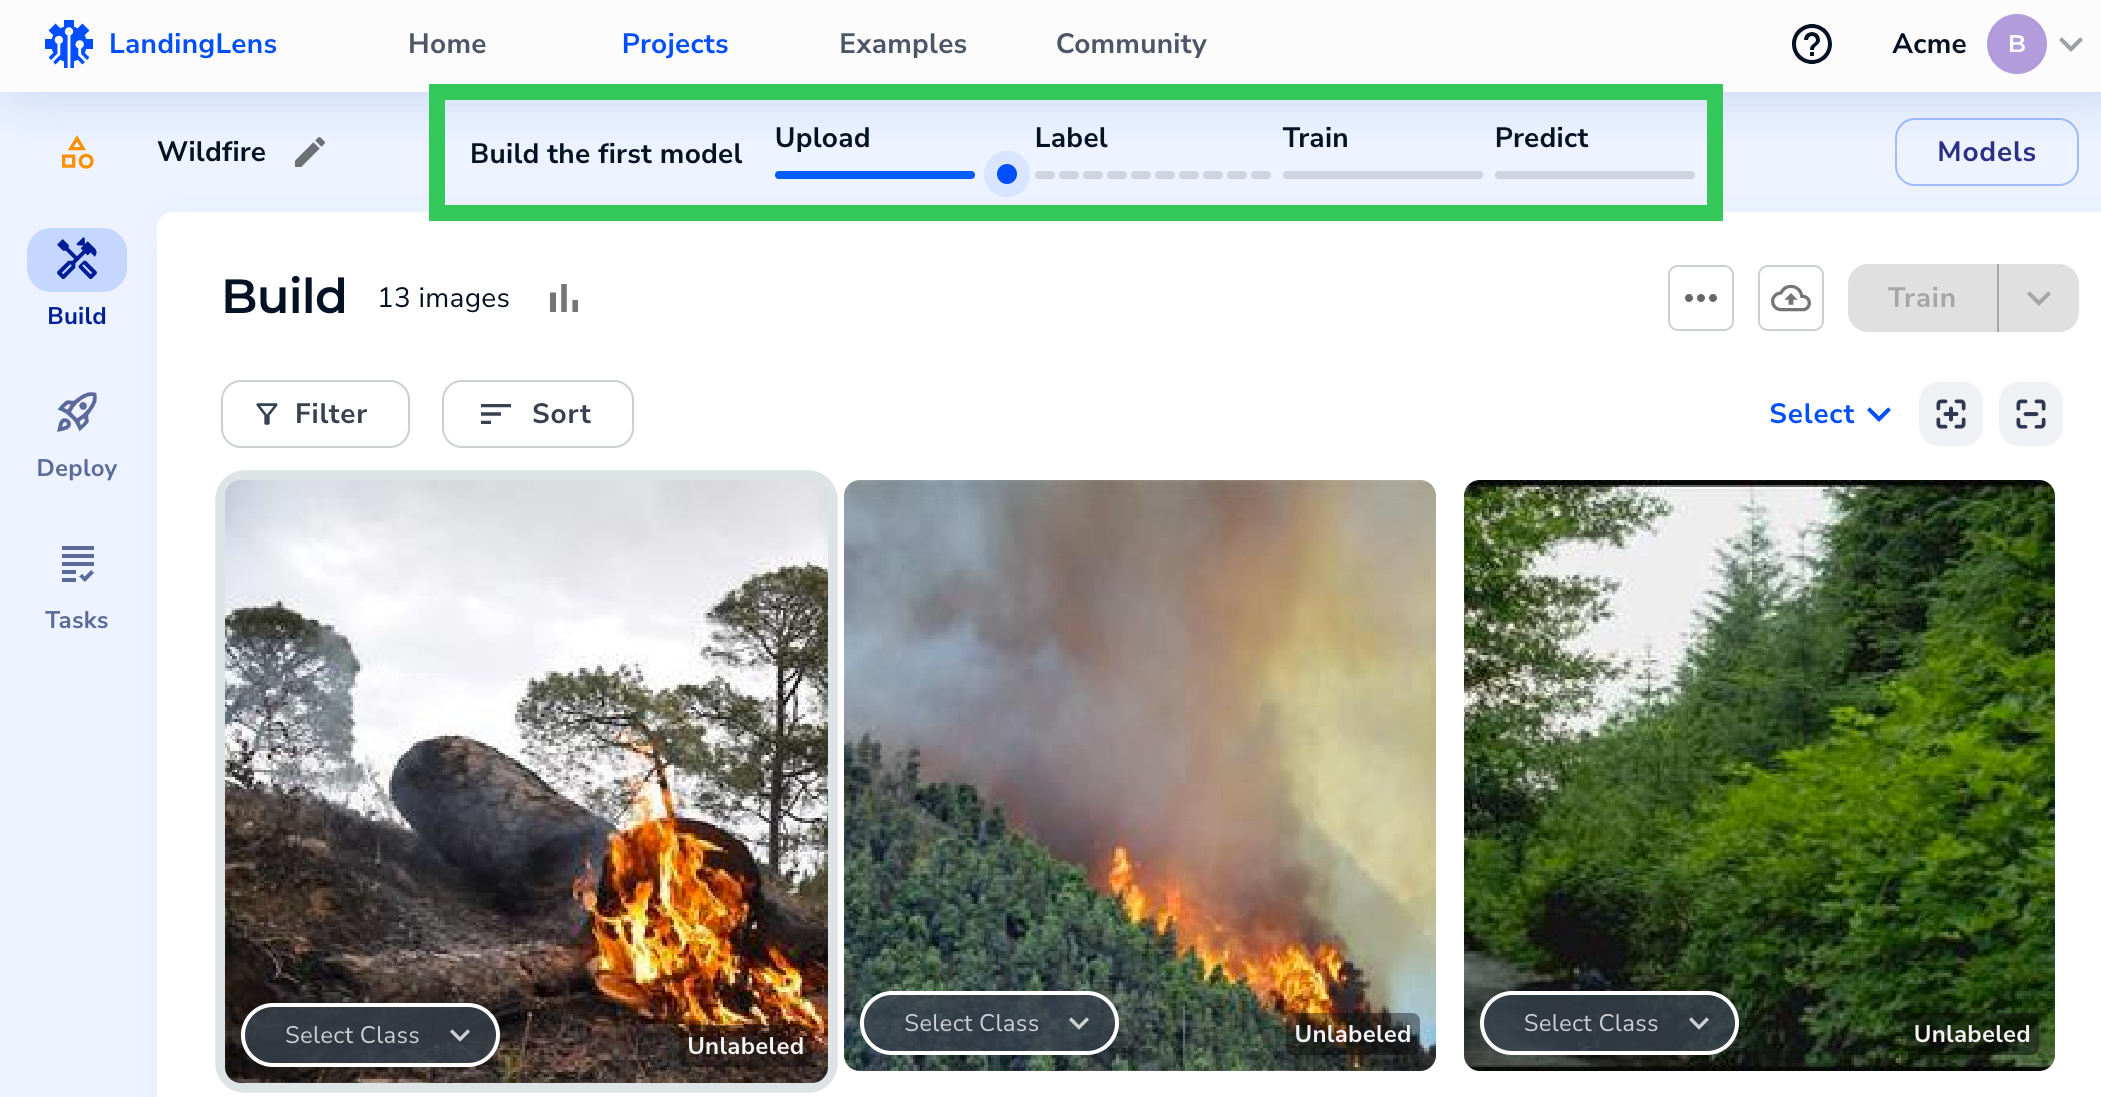 When you hover over the Workflow Assistant, it nudges you in the right direction by “shaking” the buttons you need to click to move to the next step. For example, after you’ve labeled at least 10 images, the Train button shakes, letting you know that you have enough data to create your first Model.
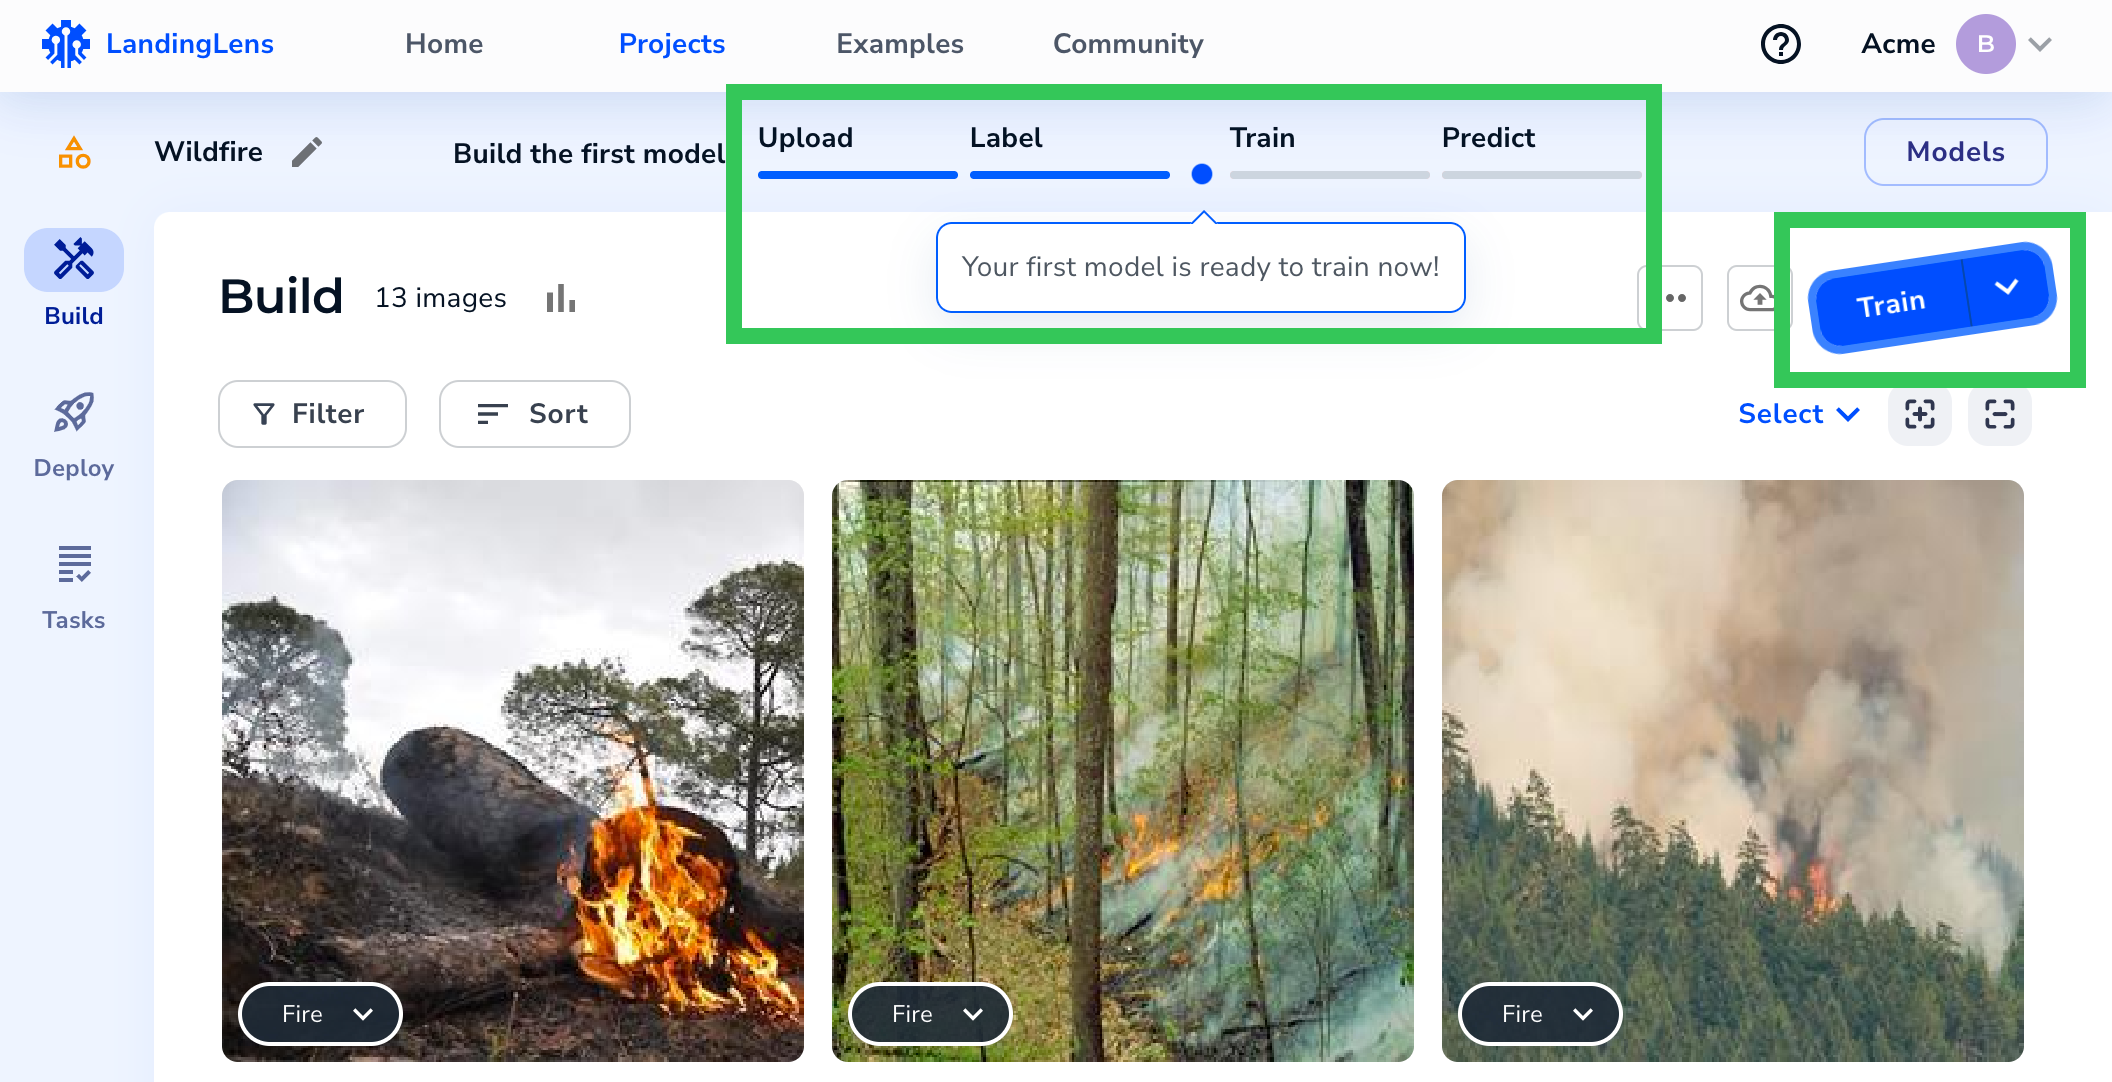 ### End Training Early
We’ve provided you with more on-screen guidance about what happens if you end the Model training process before it’s completed.
Model training can only be ended at **Step 3: Training & Learning**, which is when the model training process actually begins. The **Stop Training** button is now **End Training Now**.
### End Training Early
We’ve provided you with more on-screen guidance about what happens if you end the Model training process before it’s completed.
Model training can only be ended at **Step 3: Training & Learning**, which is when the model training process actually begins. The **Stop Training** button is now **End Training Now**.
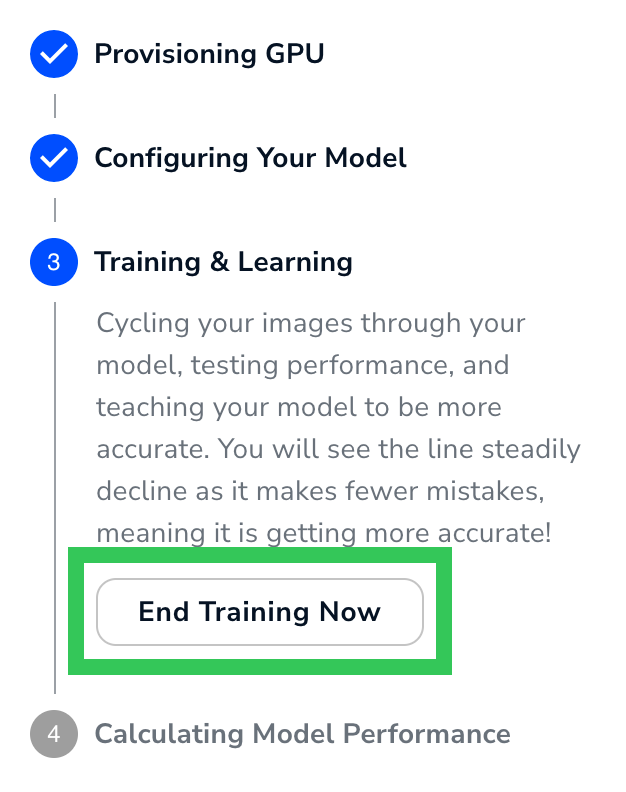 If you end Model training early, LandingLens completes its current round (epoch) of training and evaluates the images in your dataset with the Model it had generated up to that point. The Model may not be as accurate as it would be if training had completed. For detailed information, go to [Train Models](./train-models).
### Large Image Support
When using Custom Training in LandingLens Enterprise, you can now resize images in Object Detection and Segmentation Projects to be up to 36MP. For detailed information, go to [Custom Training](./custom-training).
### Bug Fixes
We fixed a bug in [Agreement-Based Labeling](./agreement-based-labeling) that allowed you to filter by users who weren’t assigned any tasks. Now, you can only filter by users who have been assigned tasks.
If you end Model training early, LandingLens completes its current round (epoch) of training and evaluates the images in your dataset with the Model it had generated up to that point. The Model may not be as accurate as it would be if training had completed. For detailed information, go to [Train Models](./train-models).
### Large Image Support
When using Custom Training in LandingLens Enterprise, you can now resize images in Object Detection and Segmentation Projects to be up to 36MP. For detailed information, go to [Custom Training](./custom-training).
### Bug Fixes
We fixed a bug in [Agreement-Based Labeling](./agreement-based-labeling) that allowed you to filter by users who weren’t assigned any tasks. Now, you can only filter by users who have been assigned tasks.
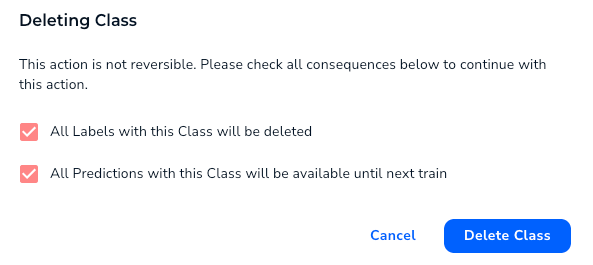 * You can now delete a Class when labeling images. For more information, go to [Delete Classes](./delete-classes#delete-classes-when-labeling).
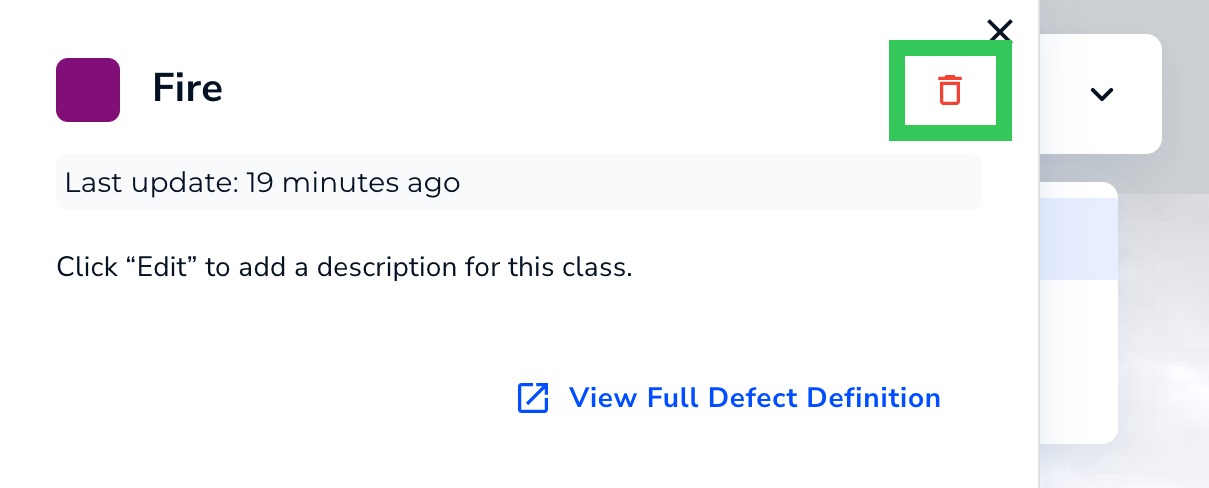 * We improved the experience with labeling images in Classification Projects. Previously, if you selected a label for an image on the Build tab, LandingLens would have to refresh the page to save the change. Now when you select a label, LandingLens saves the change without refreshing the page.
* We made it easier to upload sample images in our Example projects. Previously, you had to click the sample images to upload them. Now you can also drag and drop them.
* We improved the experience with labeling images in Classification Projects. Previously, if you selected a label for an image on the Build tab, LandingLens would have to refresh the page to save the change. Now when you select a label, LandingLens saves the change without refreshing the page.
* We made it easier to upload sample images in our Example projects. Previously, you had to click the sample images to upload them. Now you can also drag and drop them.
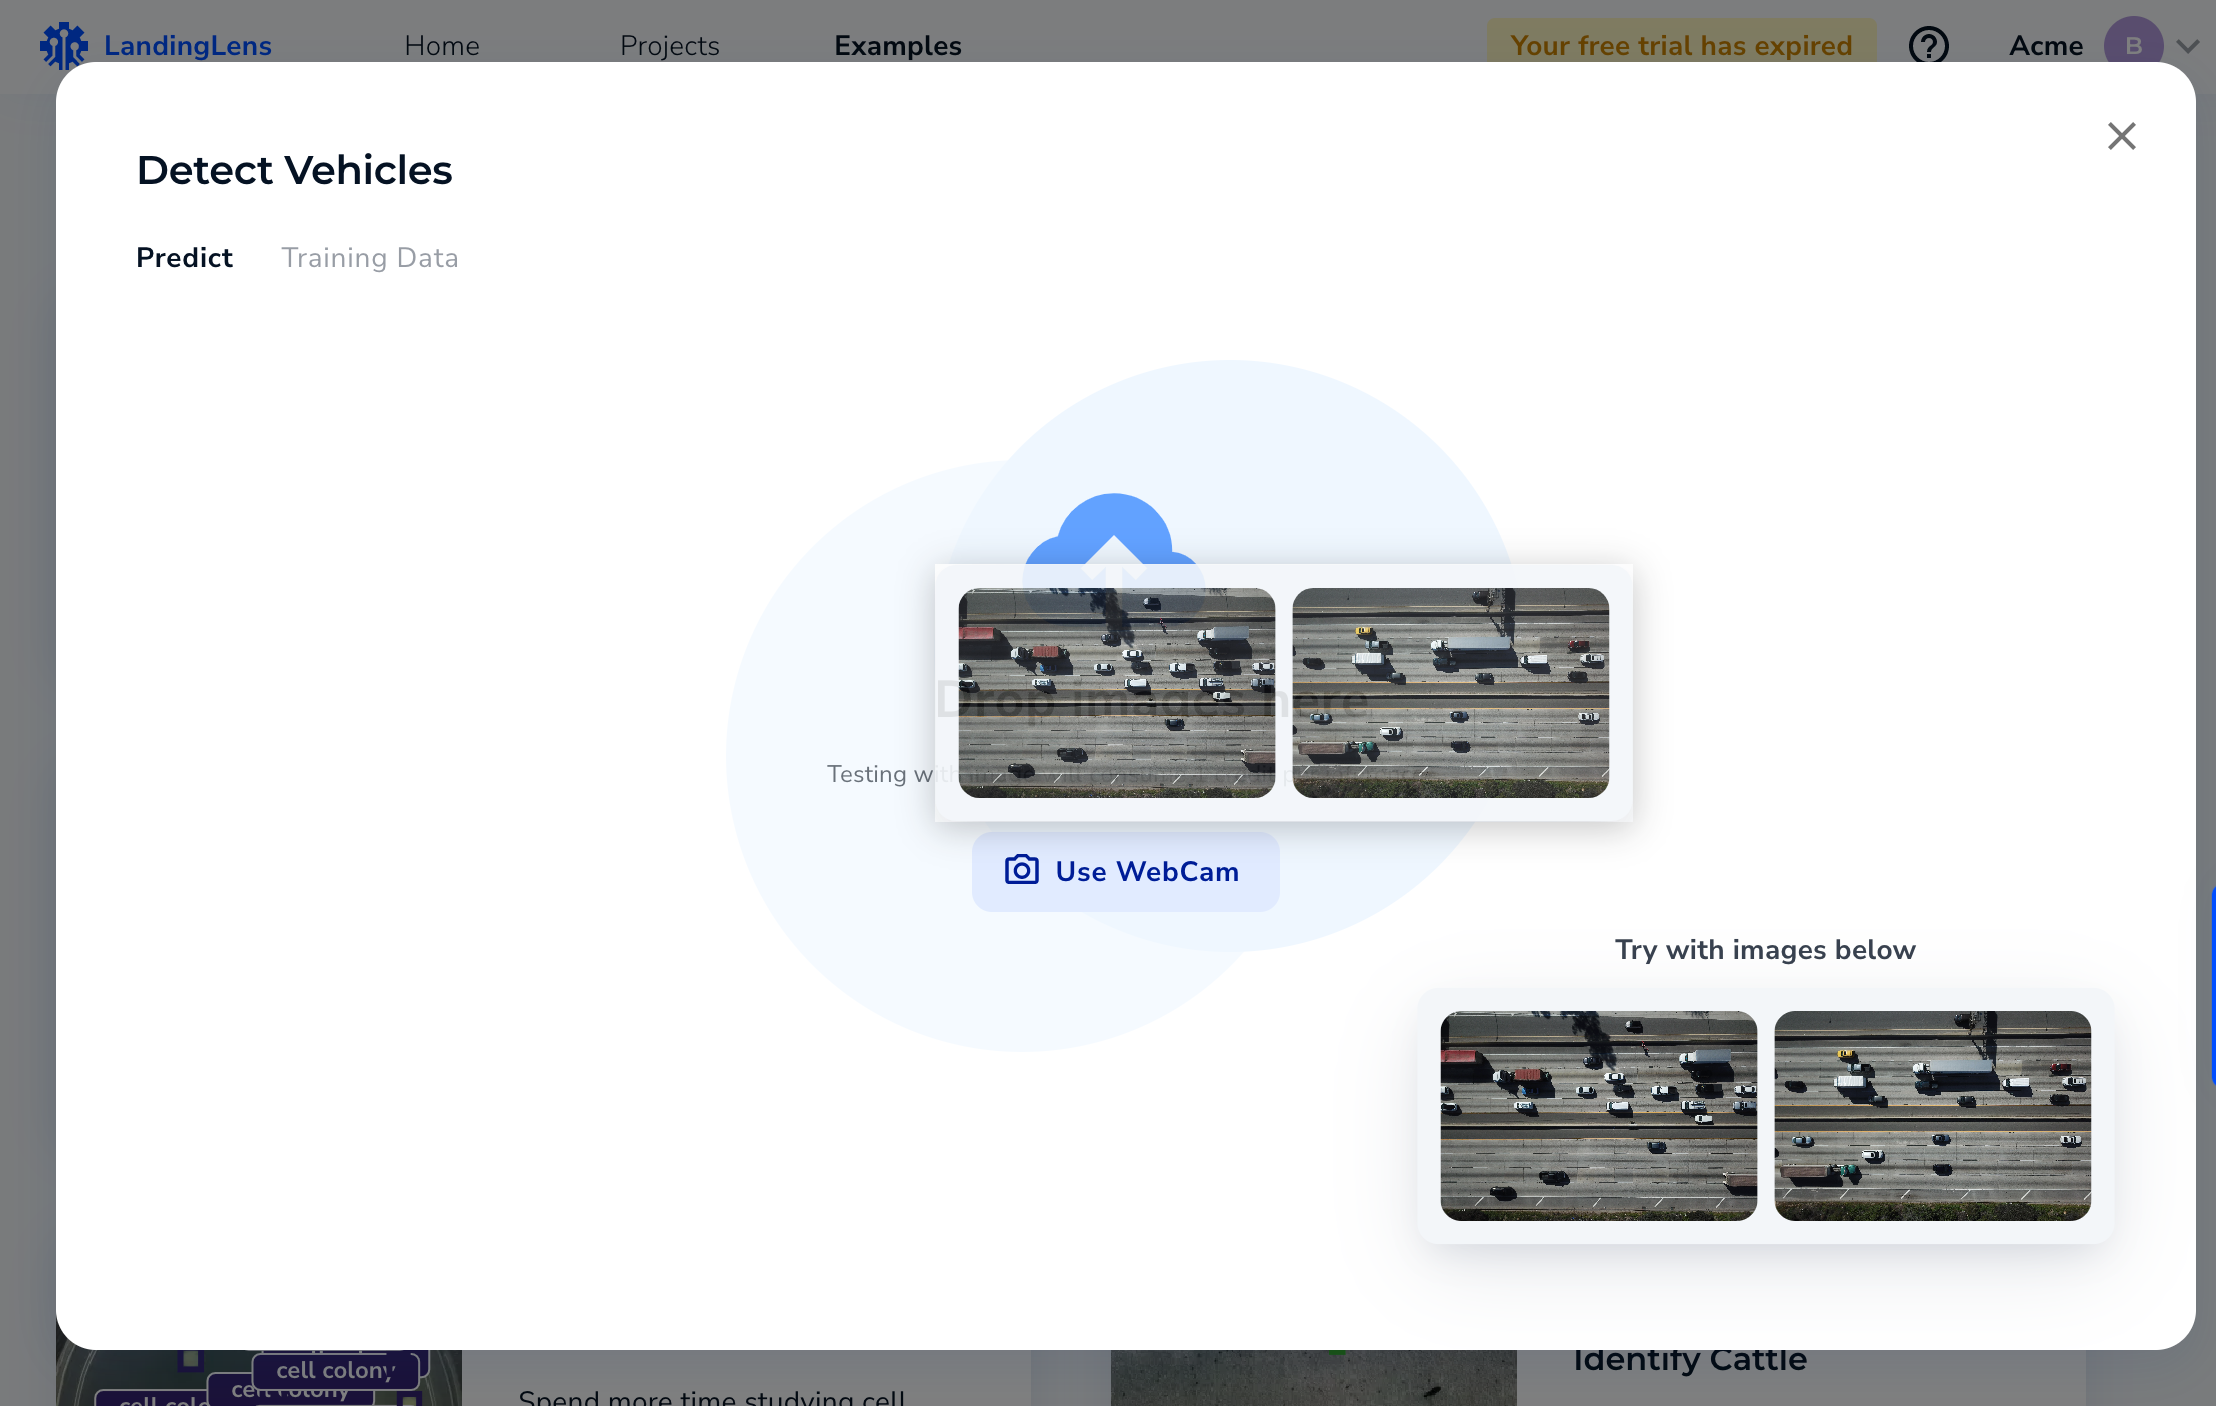 * We updated the process for creating a new organization in LandingLens. You’ll now be prompted to name your organization and select your use case: Work, Academic, or Personal.
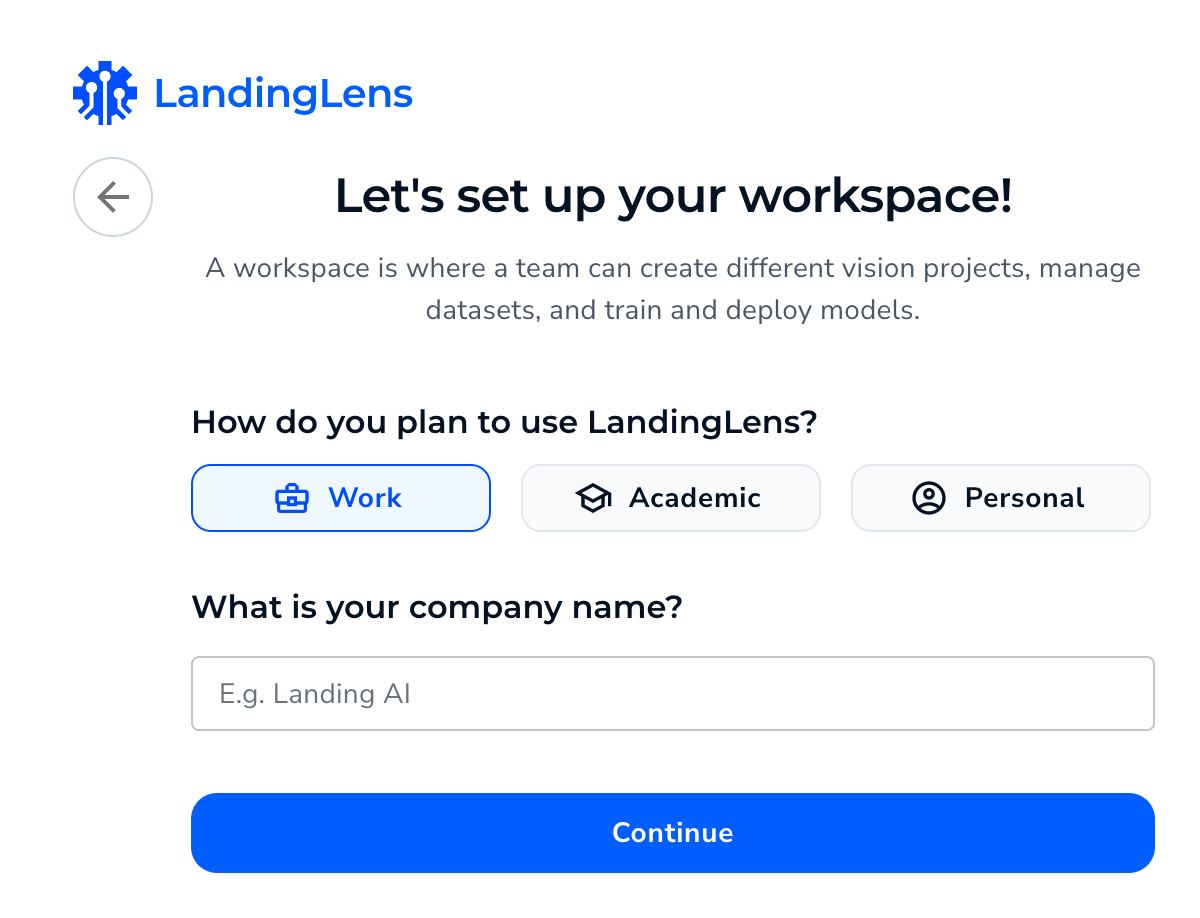 ### Bug Fixes
* LandingLens now prevents you from creating two Classes with the same name. Previously, it was possible to reuse the same name but with different capitalization (for example, “Scratch” and “scratch”).
* When you hover over the **Train** button, a tooltip shows you how many credits the training process will cost. It costs 1 credit to train each image. LandingLens trains a model based on all images in your Project, not just the images that are filtered to display. Previously, the tooltip calculated the cost based on only the filtered images. How, the tooltip now correctly calculates the cost to include all images.For example, the Project in the image below has 13 images. A filter is applied which causes only 3 images to display. However, the tooltip correctly states that training the Model cost 13 credits.
### Bug Fixes
* LandingLens now prevents you from creating two Classes with the same name. Previously, it was possible to reuse the same name but with different capitalization (for example, “Scratch” and “scratch”).
* When you hover over the **Train** button, a tooltip shows you how many credits the training process will cost. It costs 1 credit to train each image. LandingLens trains a model based on all images in your Project, not just the images that are filtered to display. Previously, the tooltip calculated the cost based on only the filtered images. How, the tooltip now correctly calculates the cost to include all images.For example, the Project in the image below has 13 images. A filter is applied which causes only 3 images to display. However, the tooltip correctly states that training the Model cost 13 credits.
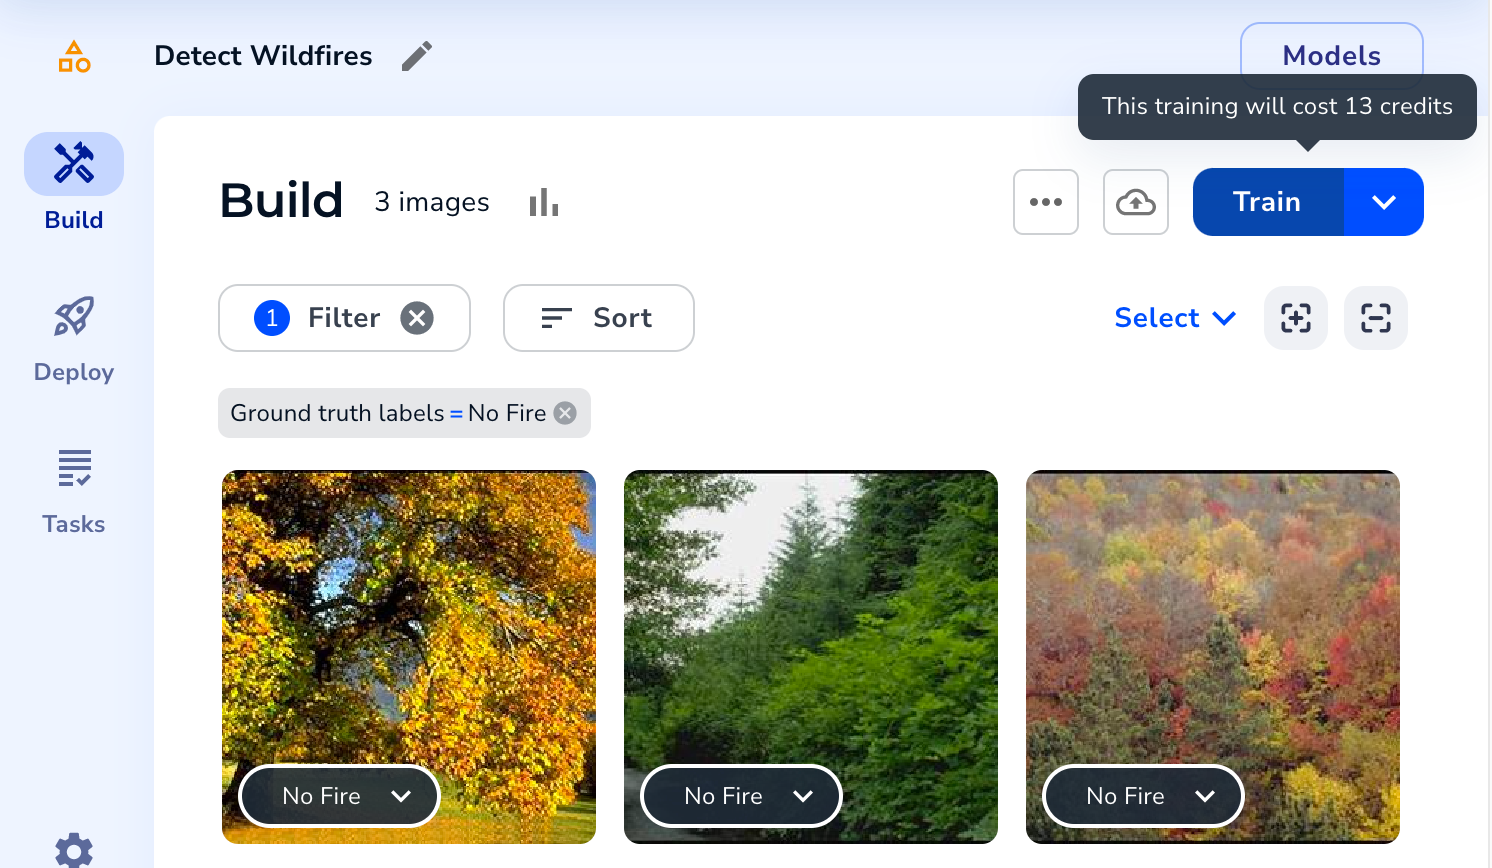
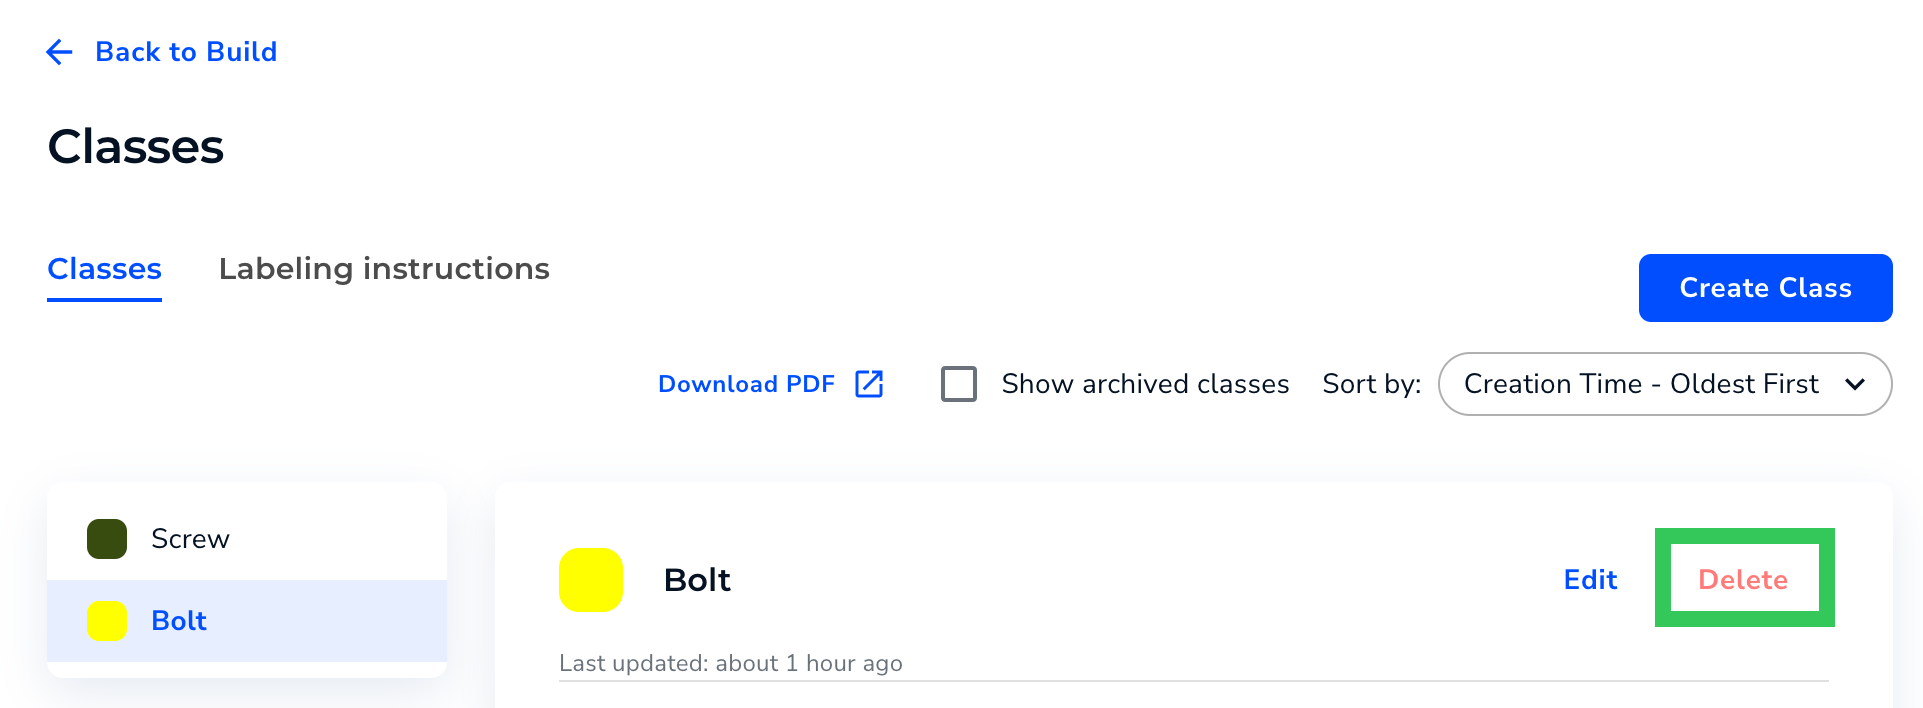
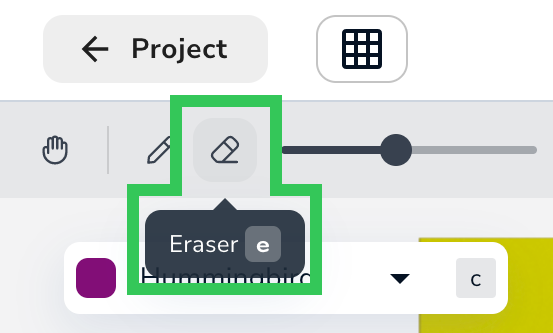 * Members that are Collaborators can now access other Organizations that they are members of in LandingLens. Users can only access Organizations that they are Admins or Collaborators of. For more information about accessing Organizations in LandingLens, go to [Switch Organizations](./organizations#switch-organizations).
### Bug Fixes
* The **Load Sample Data** pop-up window was briefly too narrow, which caused the text to overlap. This pop-up window has now been resized to fit all the text correctly.
* Members that are Collaborators can now access other Organizations that they are members of in LandingLens. Users can only access Organizations that they are Admins or Collaborators of. For more information about accessing Organizations in LandingLens, go to [Switch Organizations](./organizations#switch-organizations).
### Bug Fixes
* The **Load Sample Data** pop-up window was briefly too narrow, which caused the text to overlap. This pop-up window has now been resized to fit all the text correctly.
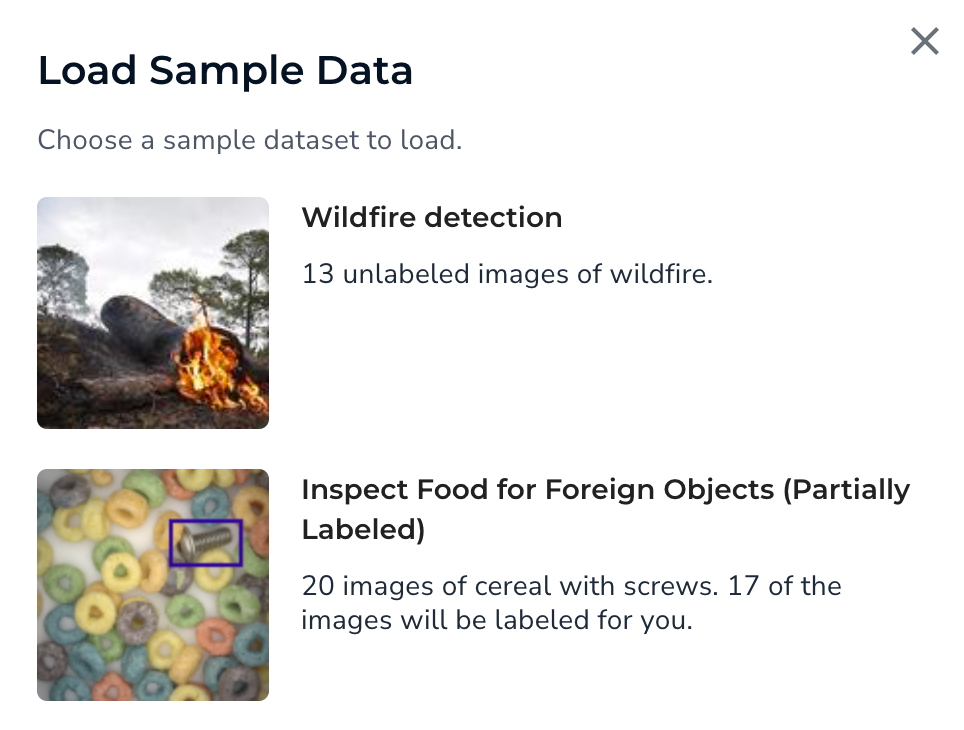 * If you add labels to an image in [Visual Processing](./visual-prompting), your changes are now saved if you select another image before clicking **Run**.
* The keyboard shortcuts for changing the **Brush size** and **Eraser** **size** in Visual Processing now work correctly.
### Other Updates
The Check Label Quality feature is temporary disabled due to some reported issues with this tool. We will notify you in the Release Notes once these issues have been fixed and the feature re-enabled.
* If you add labels to an image in [Visual Processing](./visual-prompting), your changes are now saved if you select another image before clicking **Run**.
* The keyboard shortcuts for changing the **Brush size** and **Eraser** **size** in Visual Processing now work correctly.
### Other Updates
The Check Label Quality feature is temporary disabled due to some reported issues with this tool. We will notify you in the Release Notes once these issues have been fixed and the feature re-enabled.
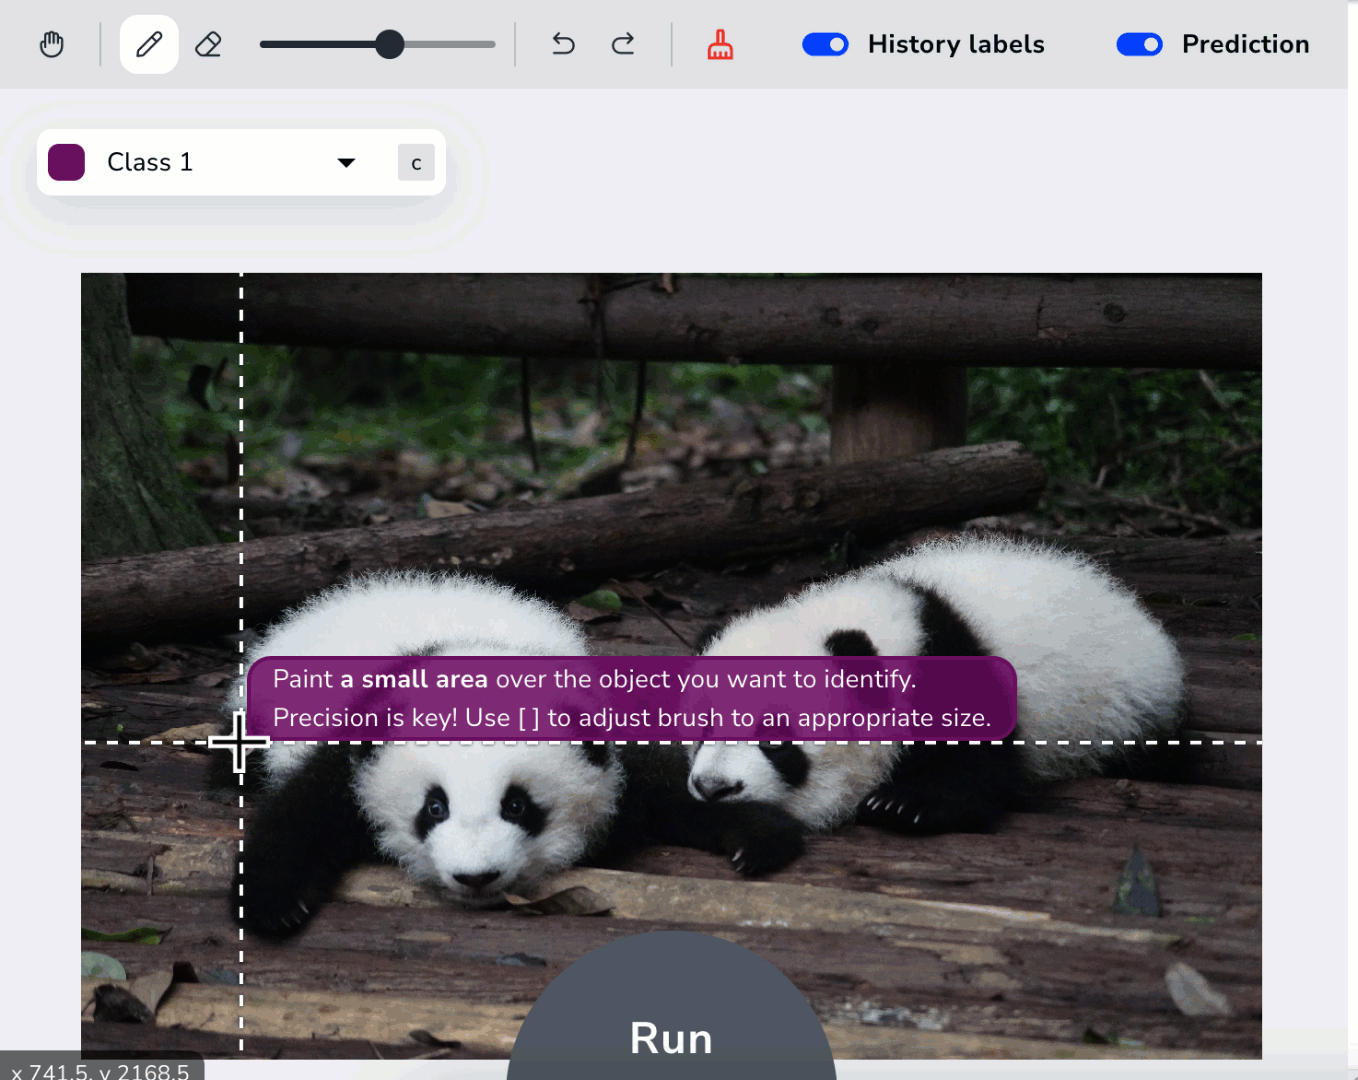 Then, use the Brush to paint a small area of another object you want to detect. This is your second Class. If you only want to detect one object type, that’s okay—simply name your second Class “Background” or something similar. You can have multiple Classes, but create at least two to get started.
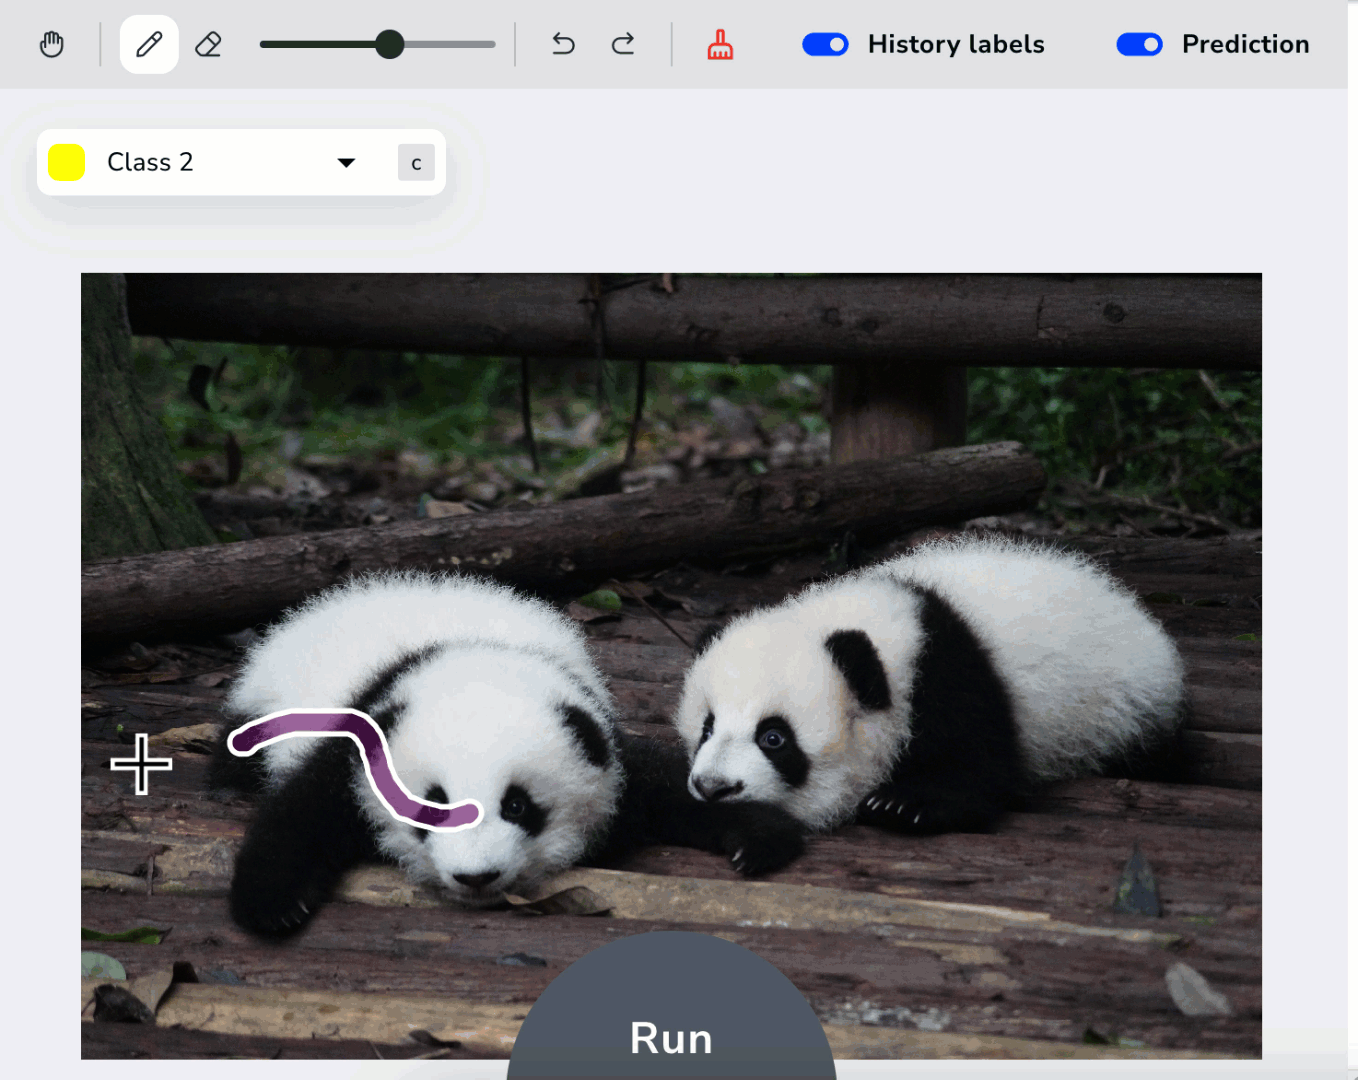 Then click **Run**! The Model shows you its Predictions in just a moment, in both the image you labeled and the other images in your dataset. In most cases, the Predictions won’t be perfect at first. Not only is that okay, that’s expected. You can now fine-tune your labels.
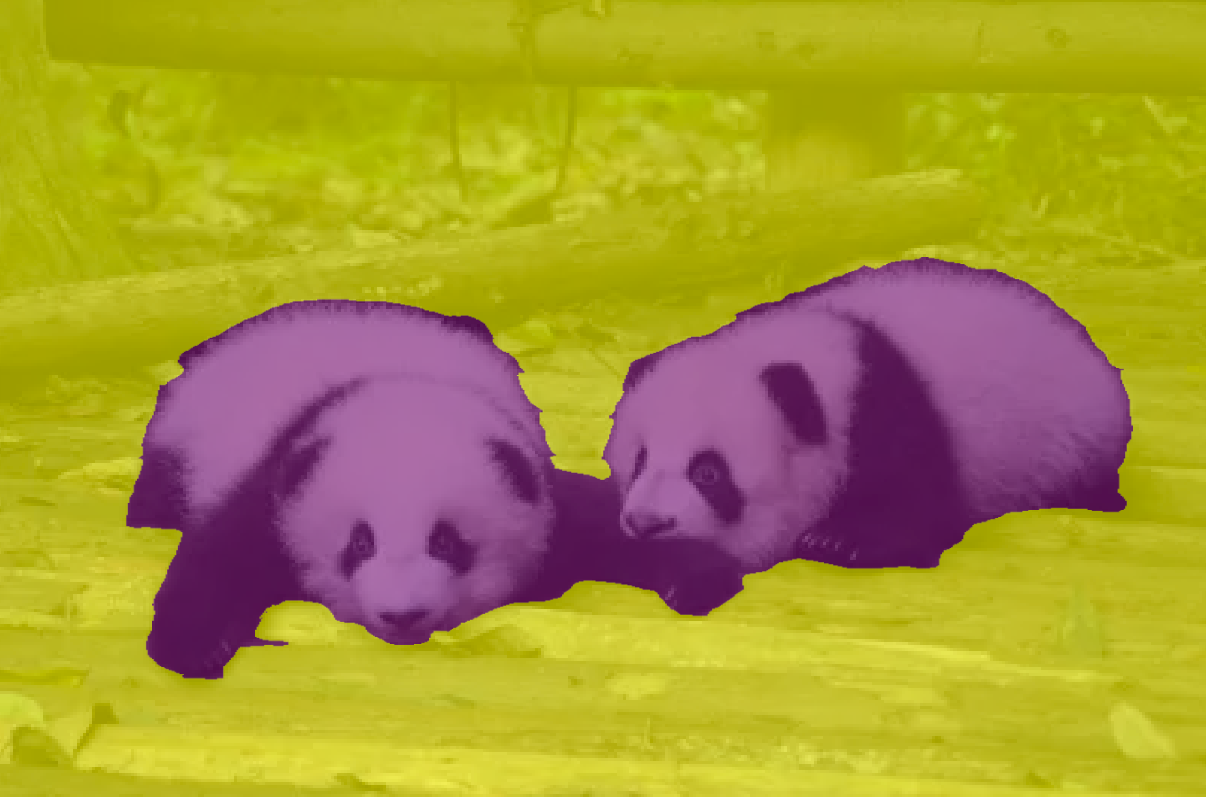 ### Get Started with {vp}
You can create a {vp} Model in seconds and deploy in minutes. You don’t even need a background in computer vision, machine learning, or any type of AI!
To learn more details, check out our full support article on [Visual Prompting](./visual-prompting). Start using {vp} today by signing up for a [LandingLens free trial](https://app.landing.ai/signup)!
### Get Started with {vp}
You can create a {vp} Model in seconds and deploy in minutes. You don’t even need a background in computer vision, machine learning, or any type of AI!
To learn more details, check out our full support article on [Visual Prompting](./visual-prompting). Start using {vp} today by signing up for a [LandingLens free trial](https://app.landing.ai/signup)!
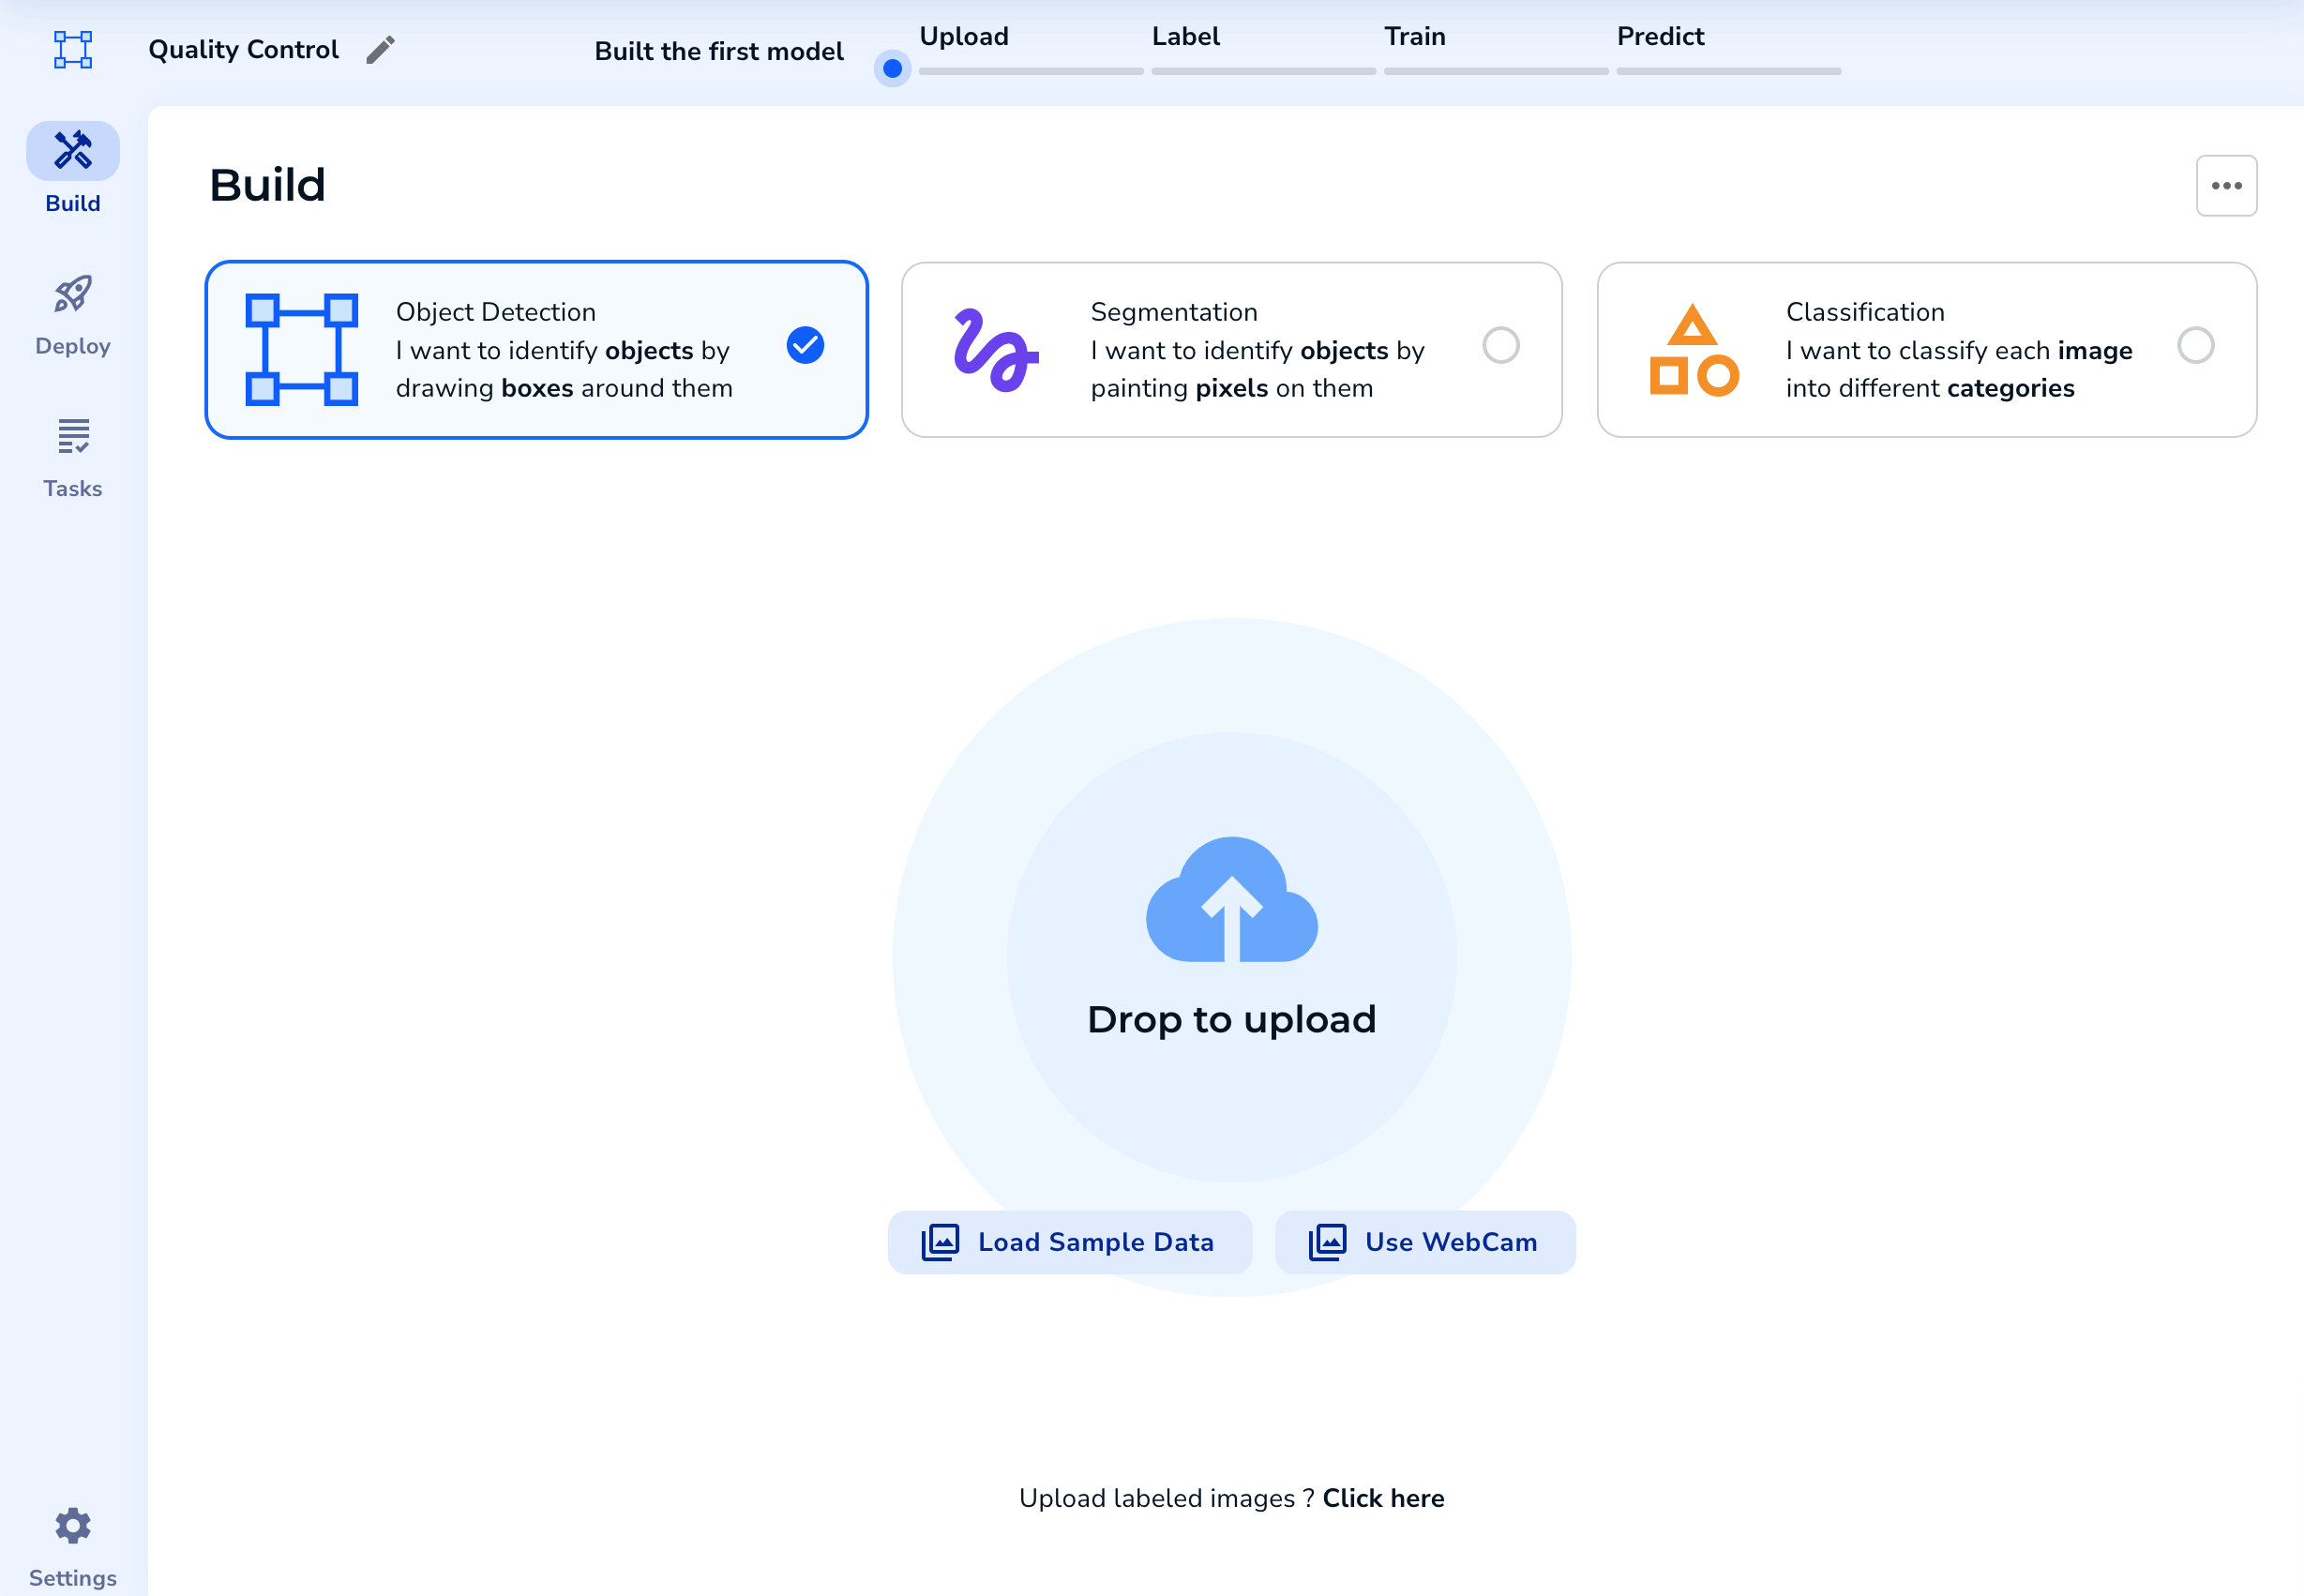
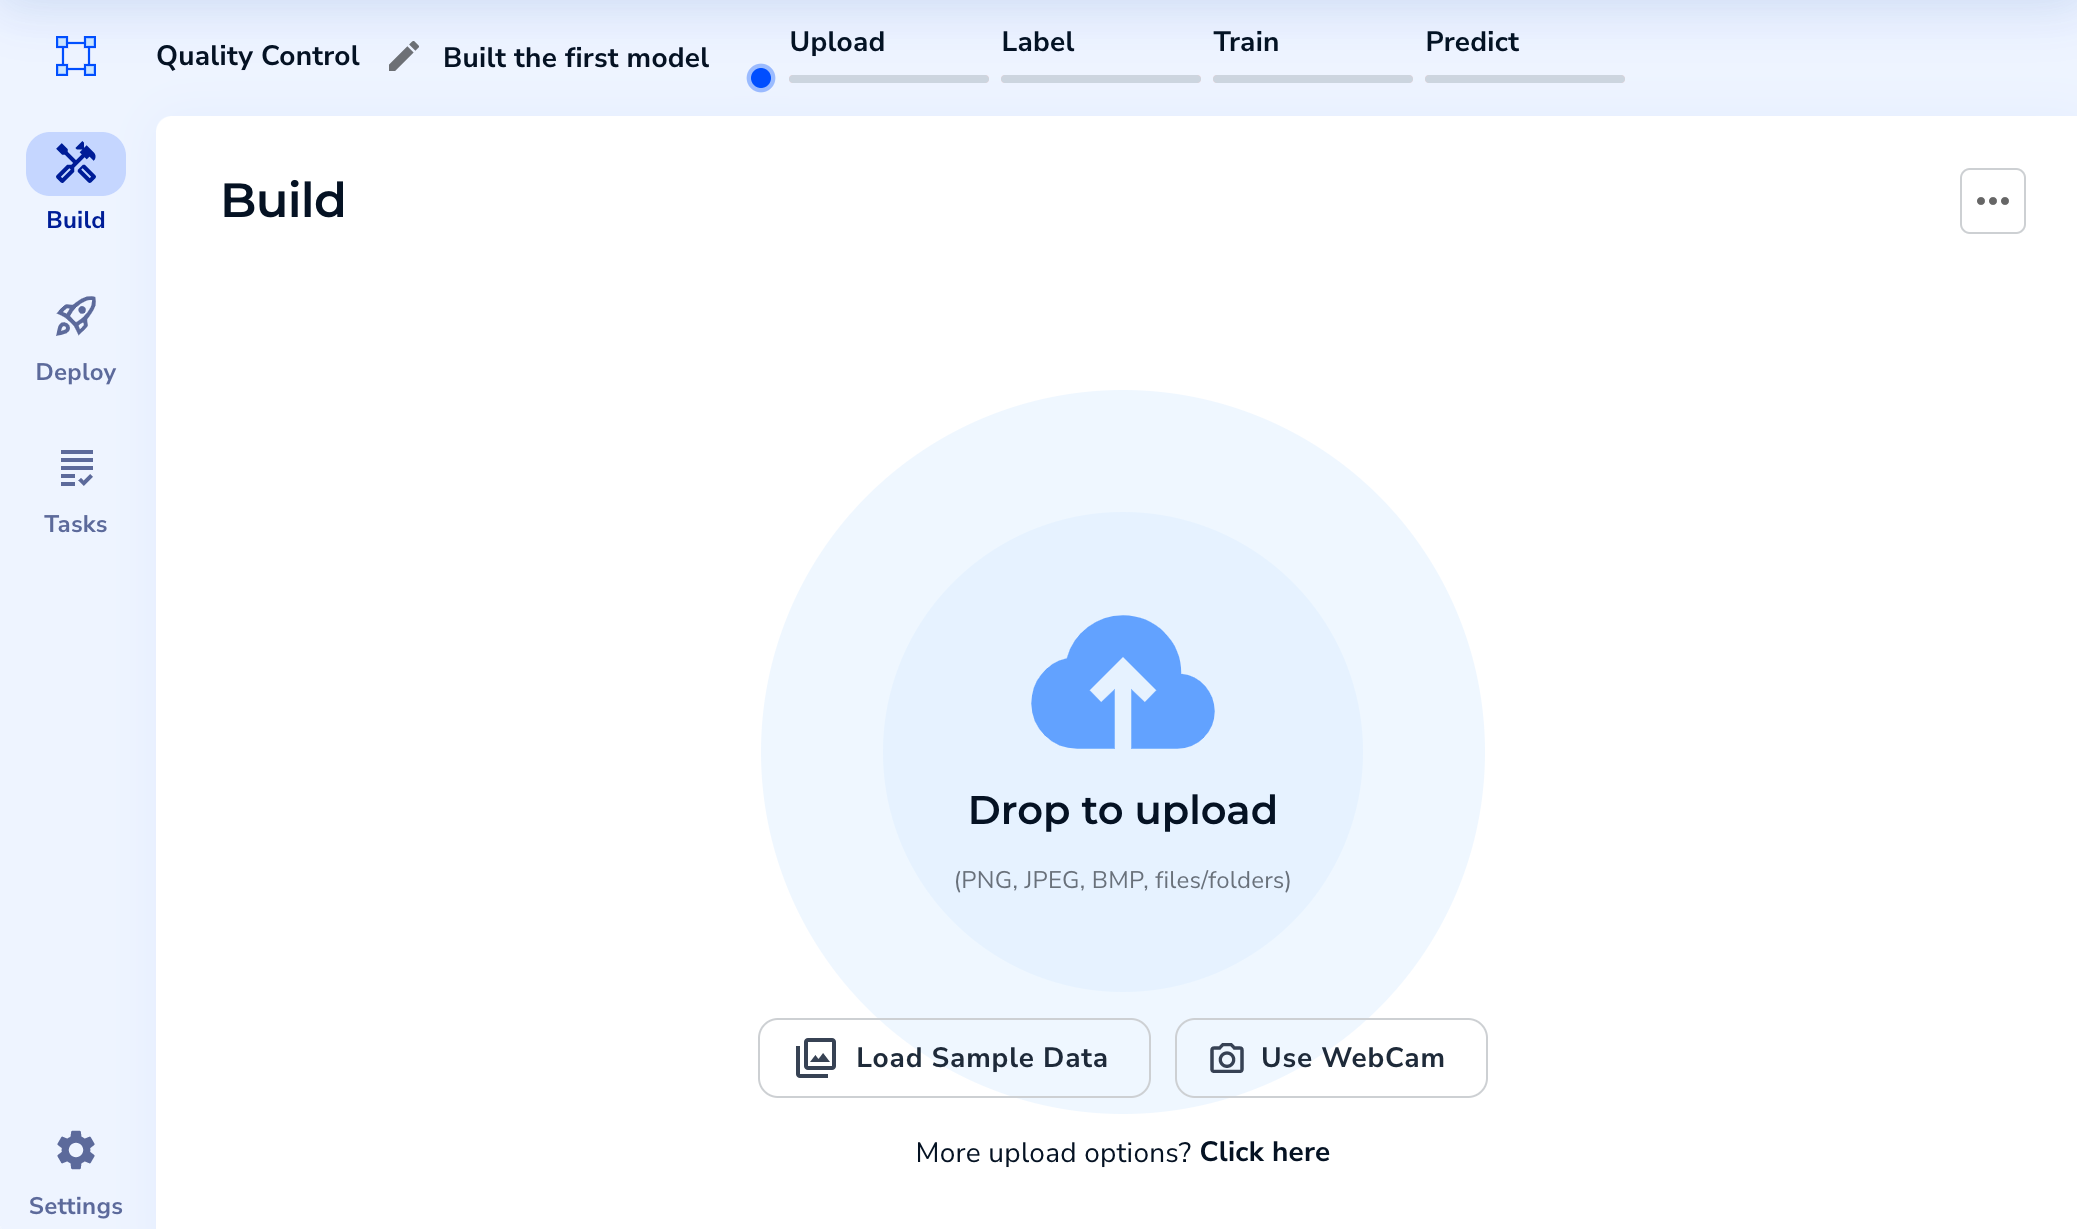

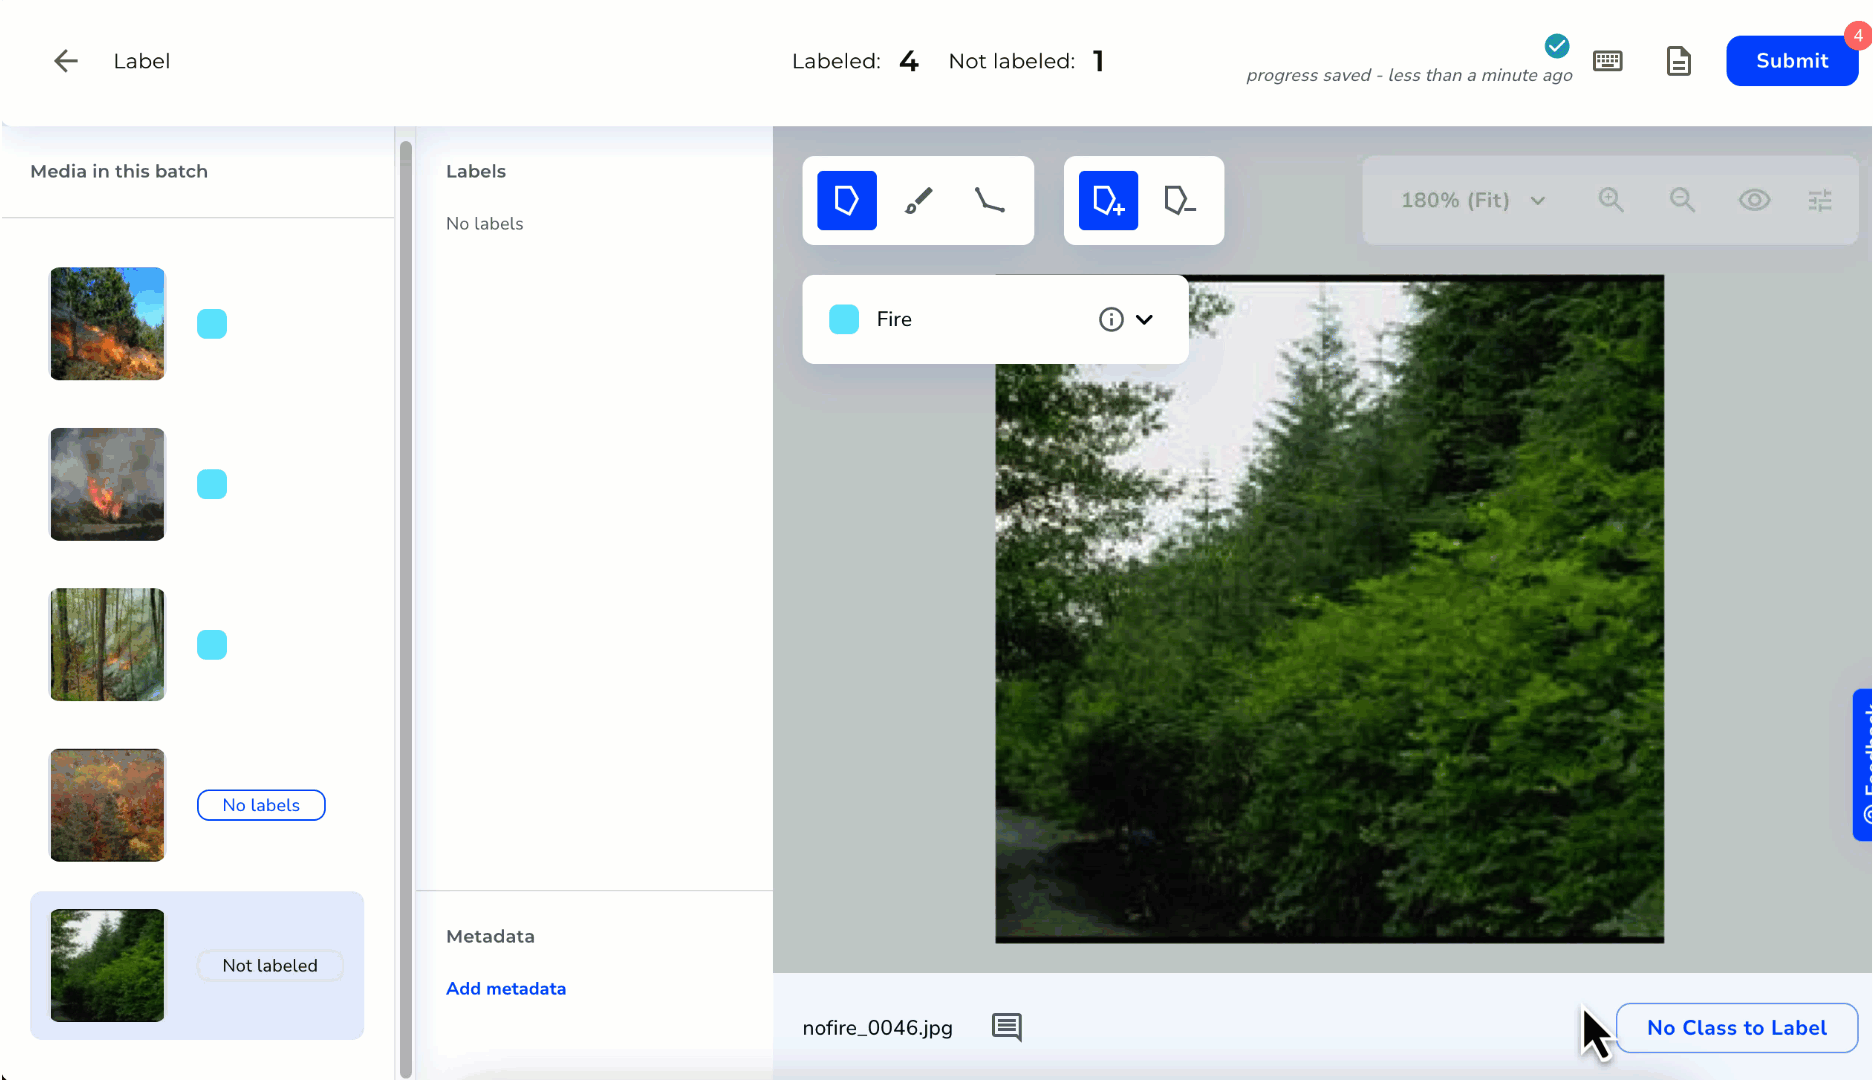
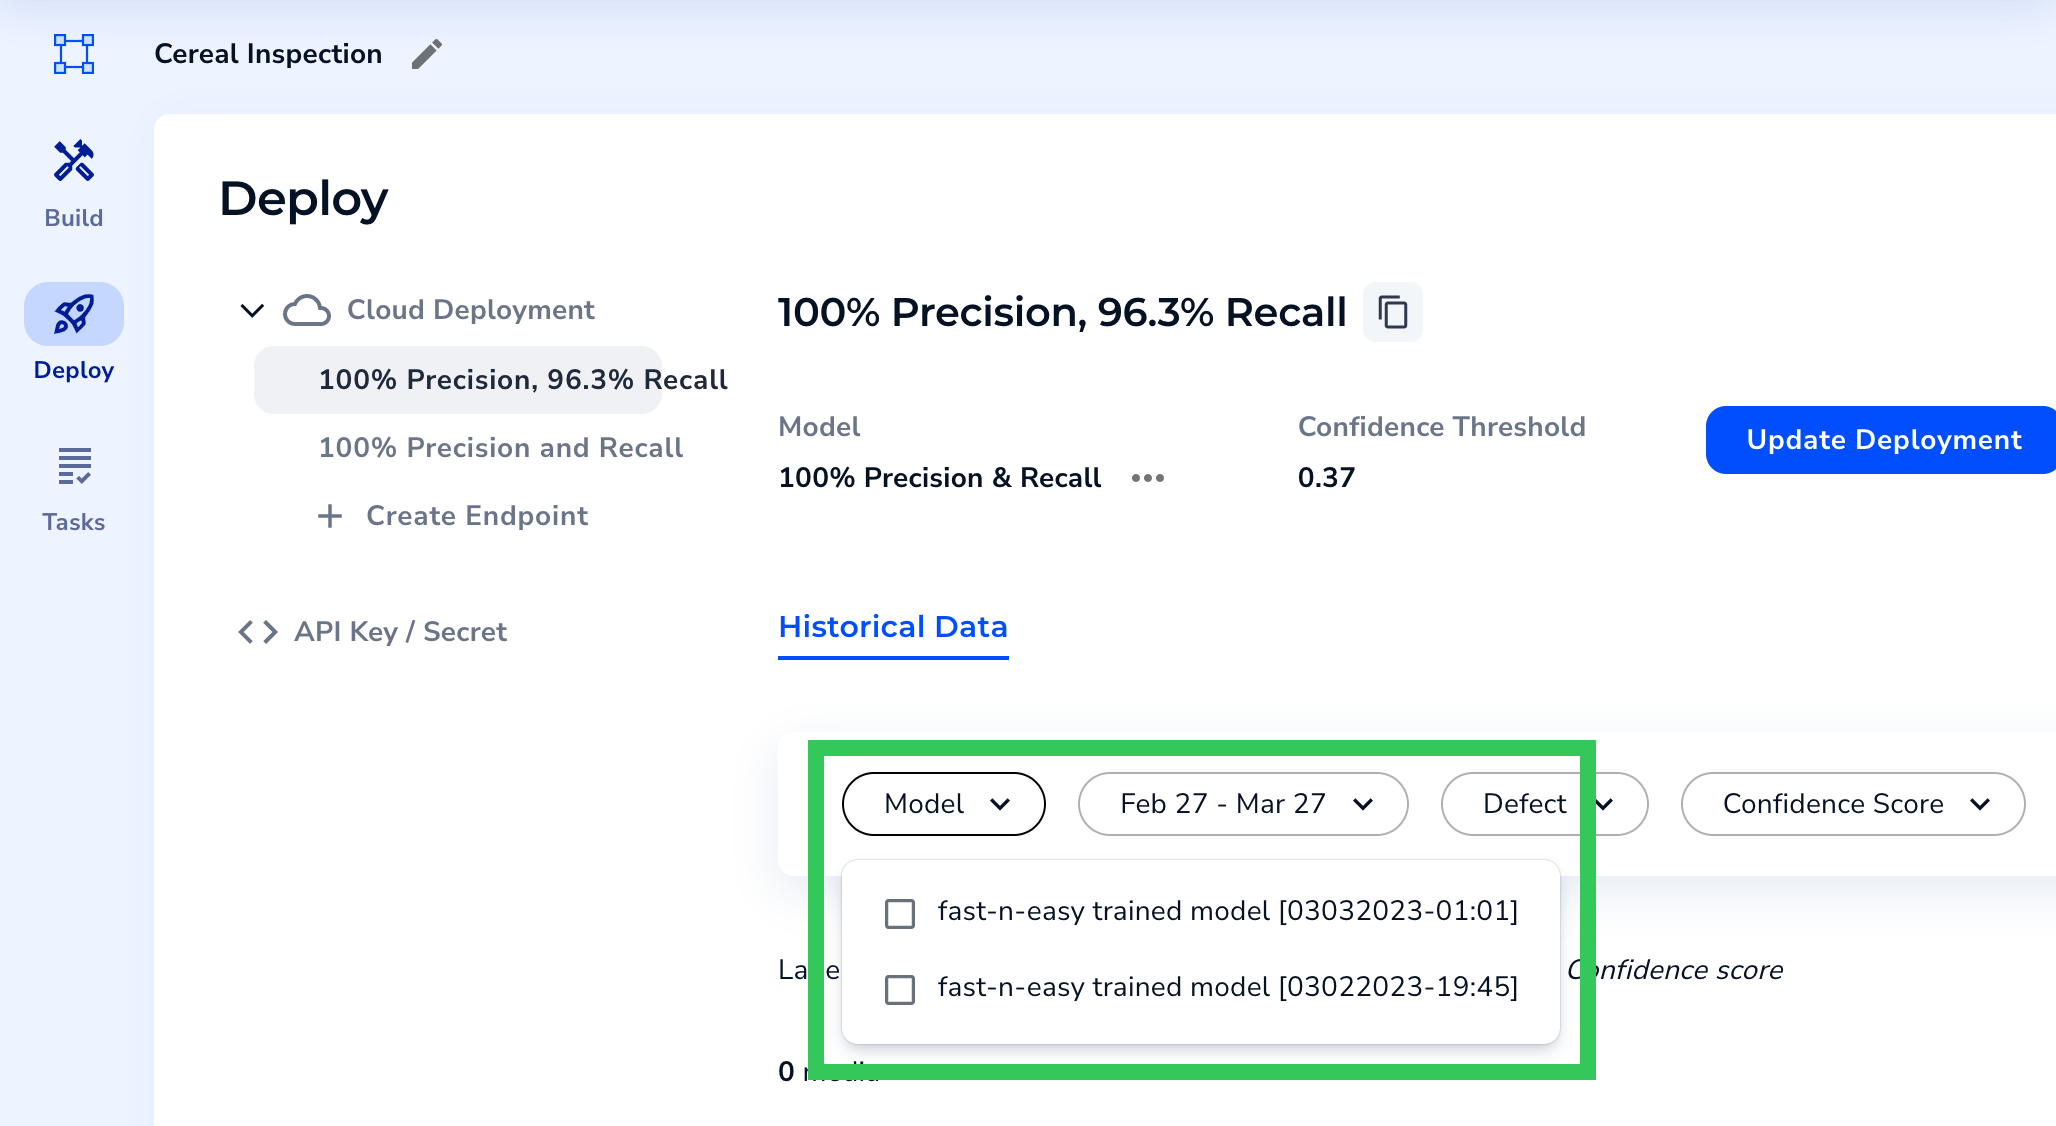
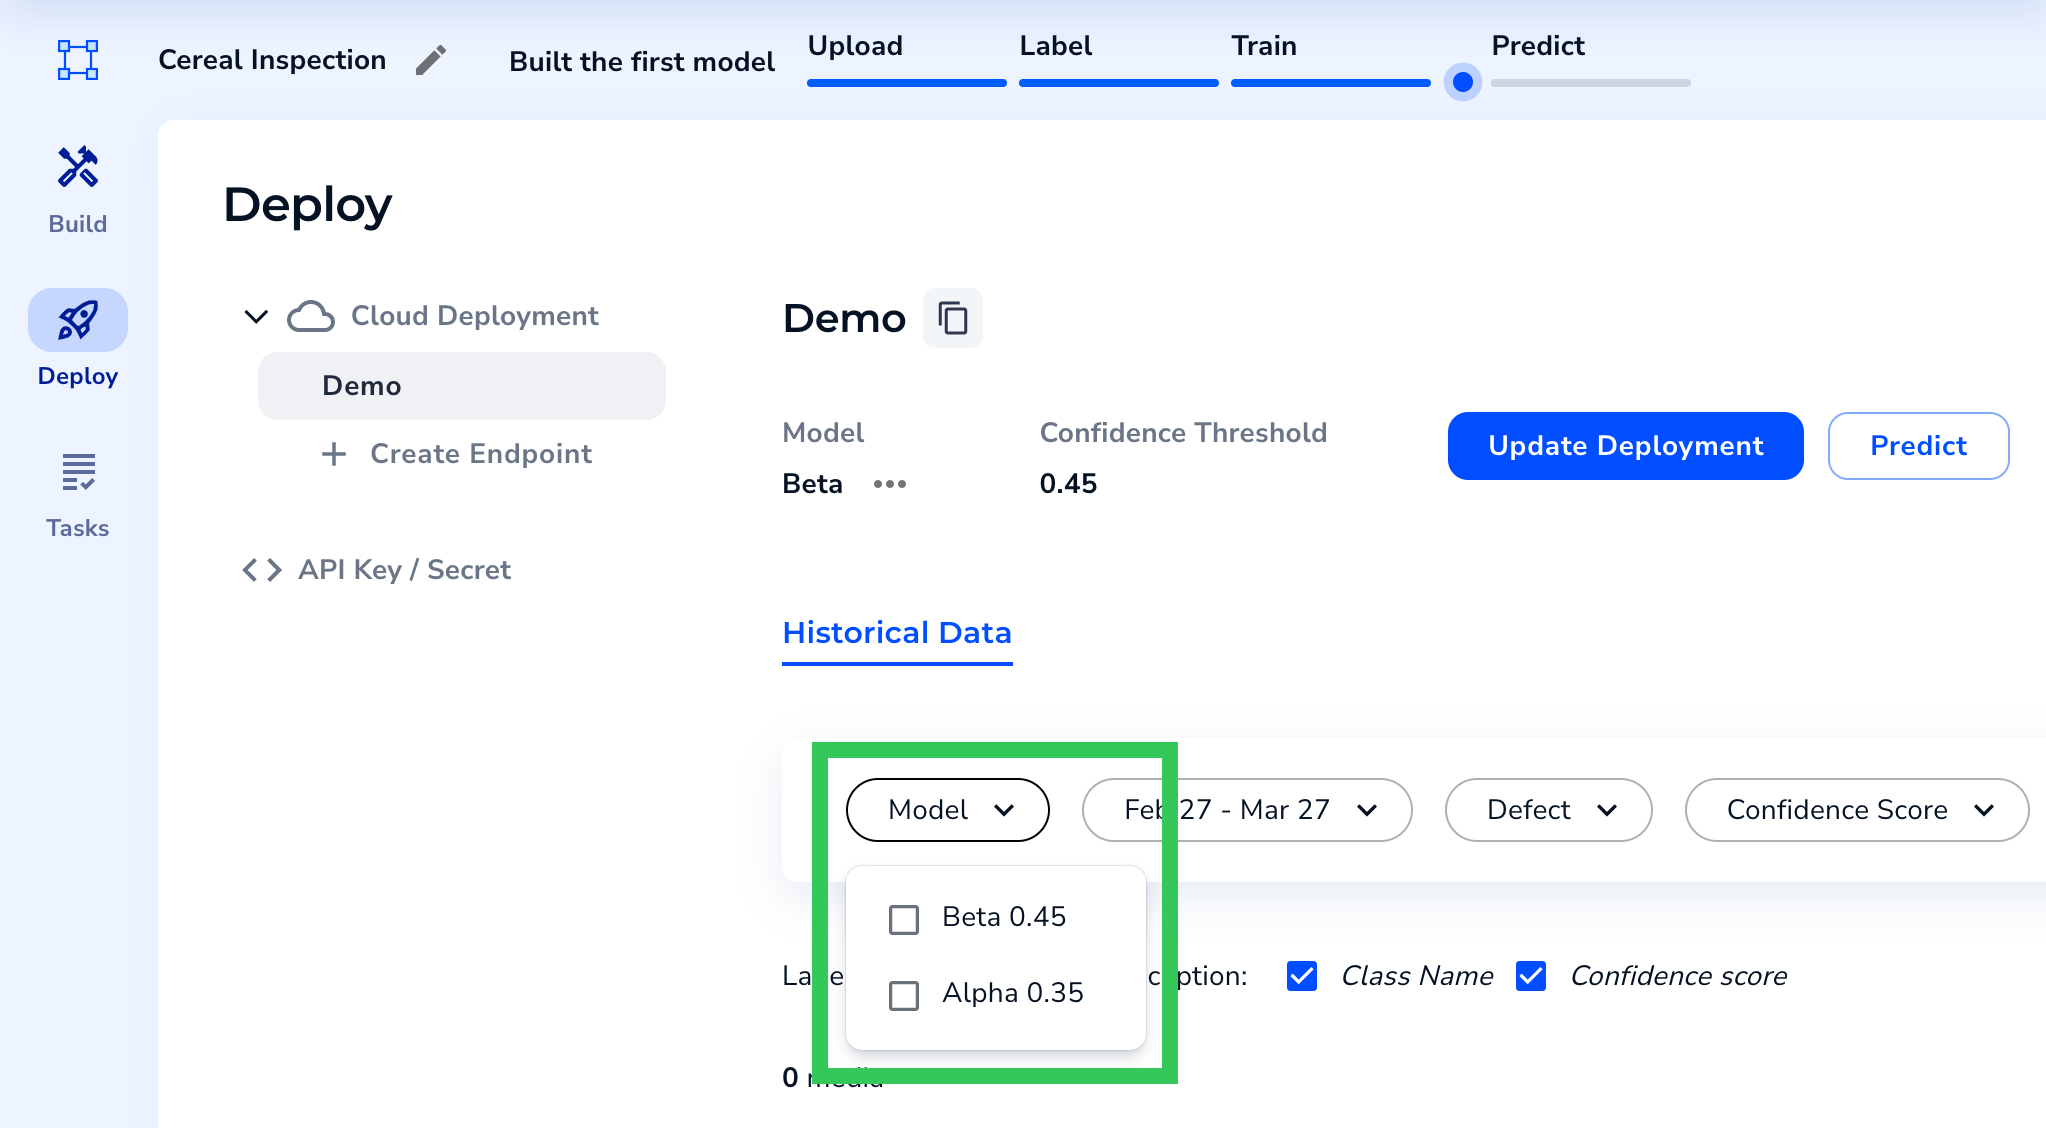 * We’ve made it easier to upload images to new Projects! Now you can click anywhere below the Project Types to open the Upload pop-up window. Previously, only clicking the Drop to Upload icon would open this pop-up.
 * We’ve changed how Model training runs in the LandingLens backend. This change isn’t visible in the user interface, and doesn’t impact the speed or accuracy of your Model.
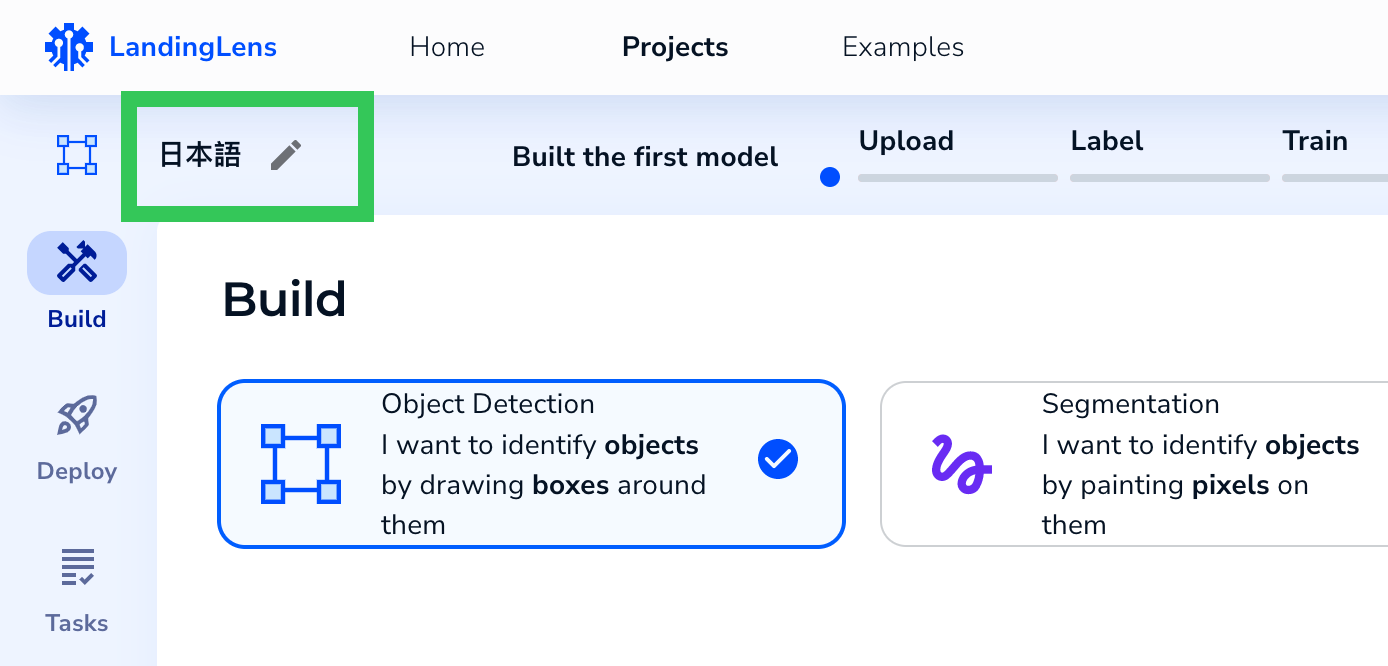 * If you rescale images for custom Model training, LandingLens now provides text to ensure that your image fits within the minimum and maximum area constraints.
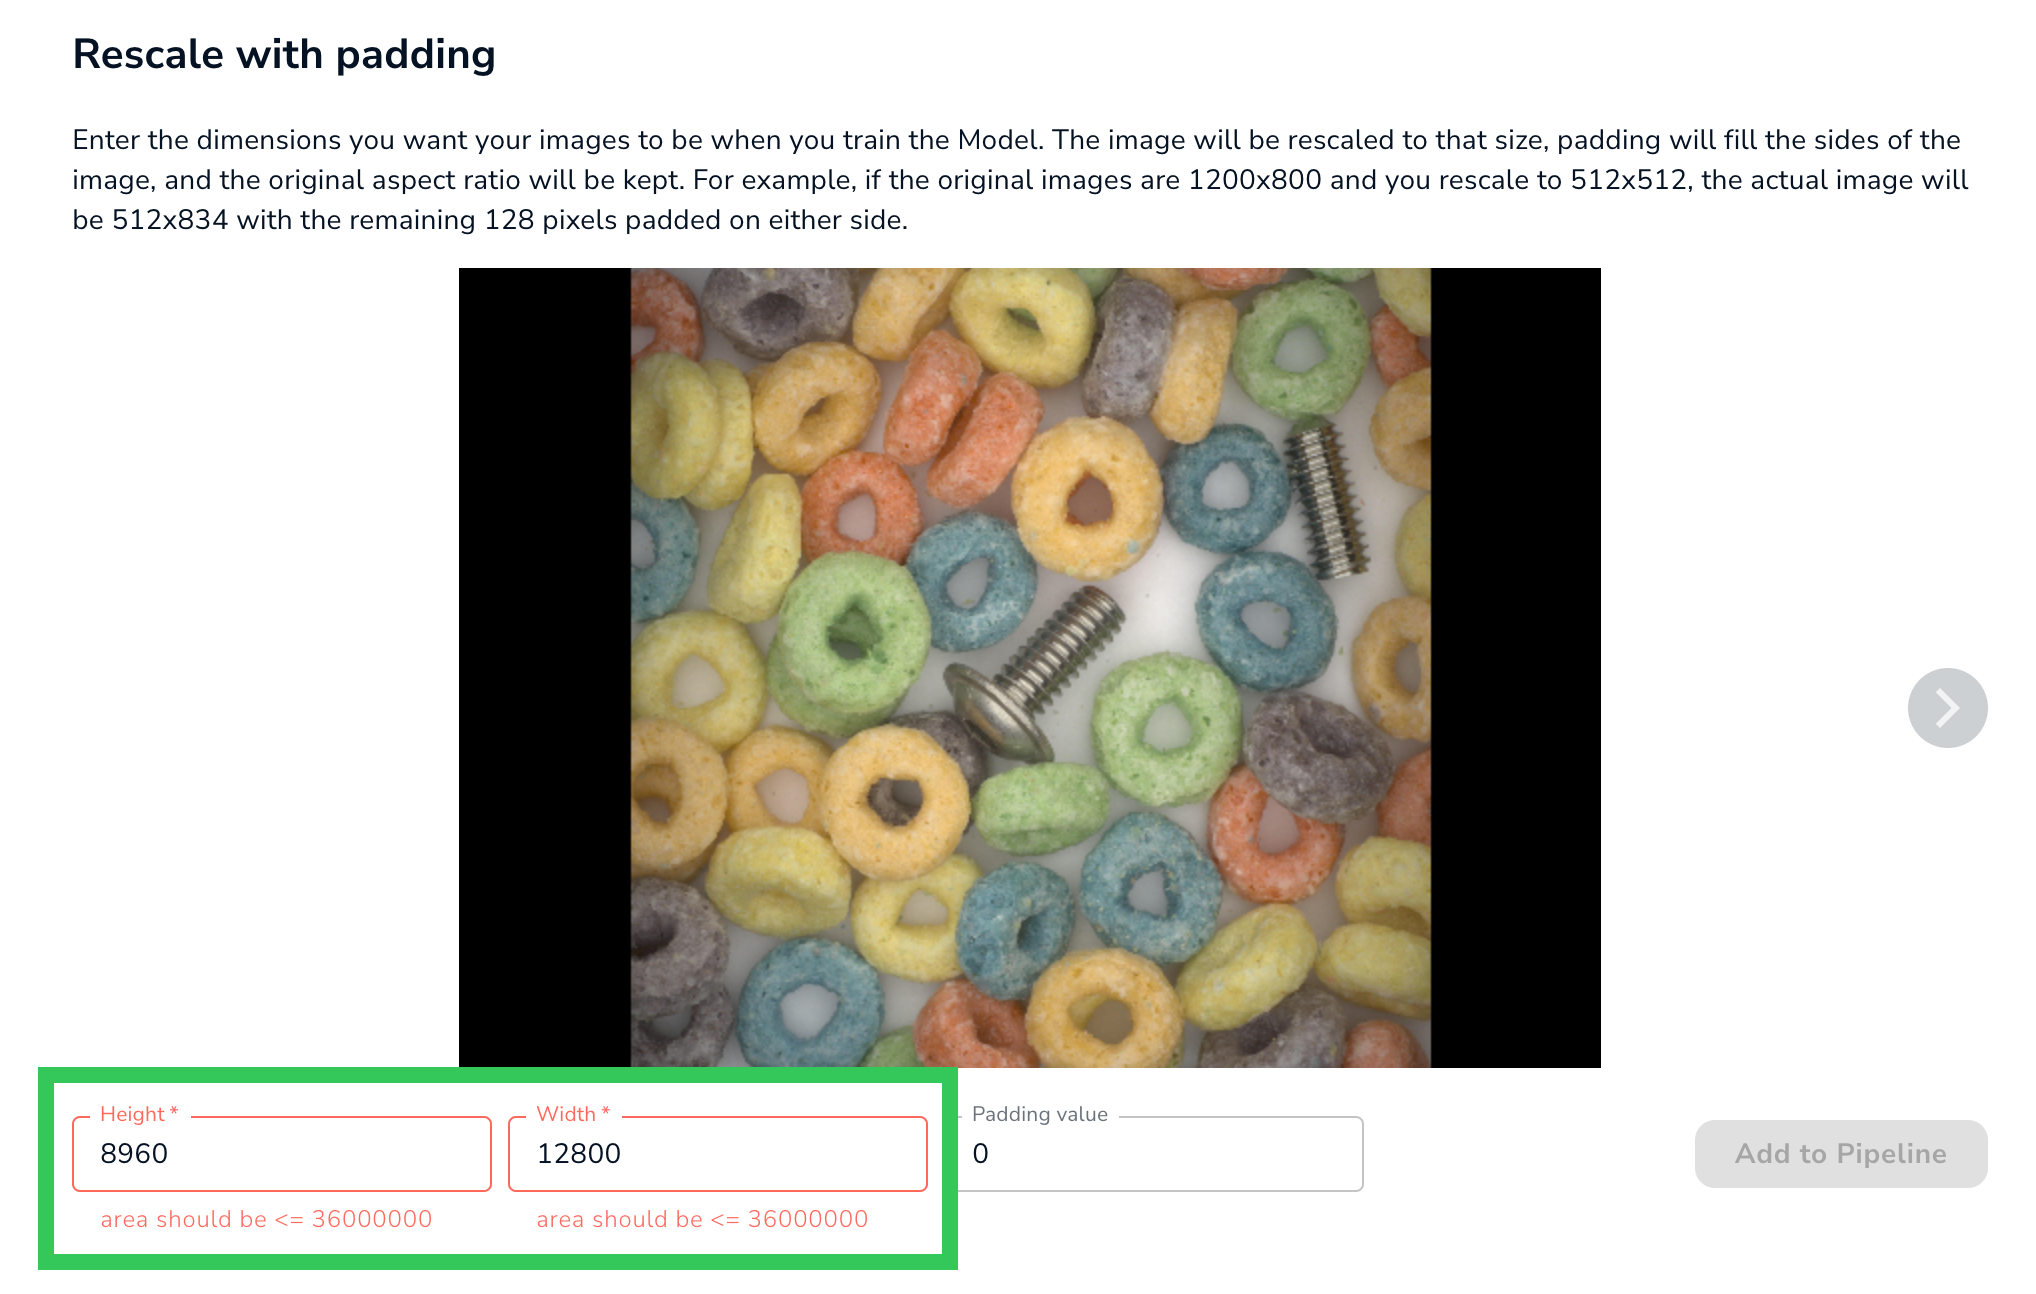 ### Bug Fixes
* Previously, if you selected a Model on the Deploy page and then opened the Build page, that same Model would be selected. Now, selecting a Model on the Deploy page doesn’t change the Model shown elsewhere.
* Previously, if you added Data Augmentation to custom Model training and then deleted those settings, the Data Augmentation would still be applied. This issue has been fixed. If Data Augmentation is deleted, it won’t impact training.
* We fixed a bug that occurred when trying to upload images from a WebCam to some Classification Projects.
### Bug Fixes
* Previously, if you selected a Model on the Deploy page and then opened the Build page, that same Model would be selected. Now, selecting a Model on the Deploy page doesn’t change the Model shown elsewhere.
* Previously, if you added Data Augmentation to custom Model training and then deleted those settings, the Data Augmentation would still be applied. This issue has been fixed. If Data Augmentation is deleted, it won’t impact training.
* We fixed a bug that occurred when trying to upload images from a WebCam to some Classification Projects.
.png?fit=max&auto=format&n=Hf67pwuPapd1A0aT&q=85&s=14de0a5819de4497199464765cba619f) * You can now track credit usage metrics in the new **Usage** dashboard. To view the dashboard, click the **User Menu** in the top right corner, and select **Usage**.
* You can now track credit usage metrics in the new **Usage** dashboard. To view the dashboard, click the **User Menu** in the top right corner, and select **Usage**.
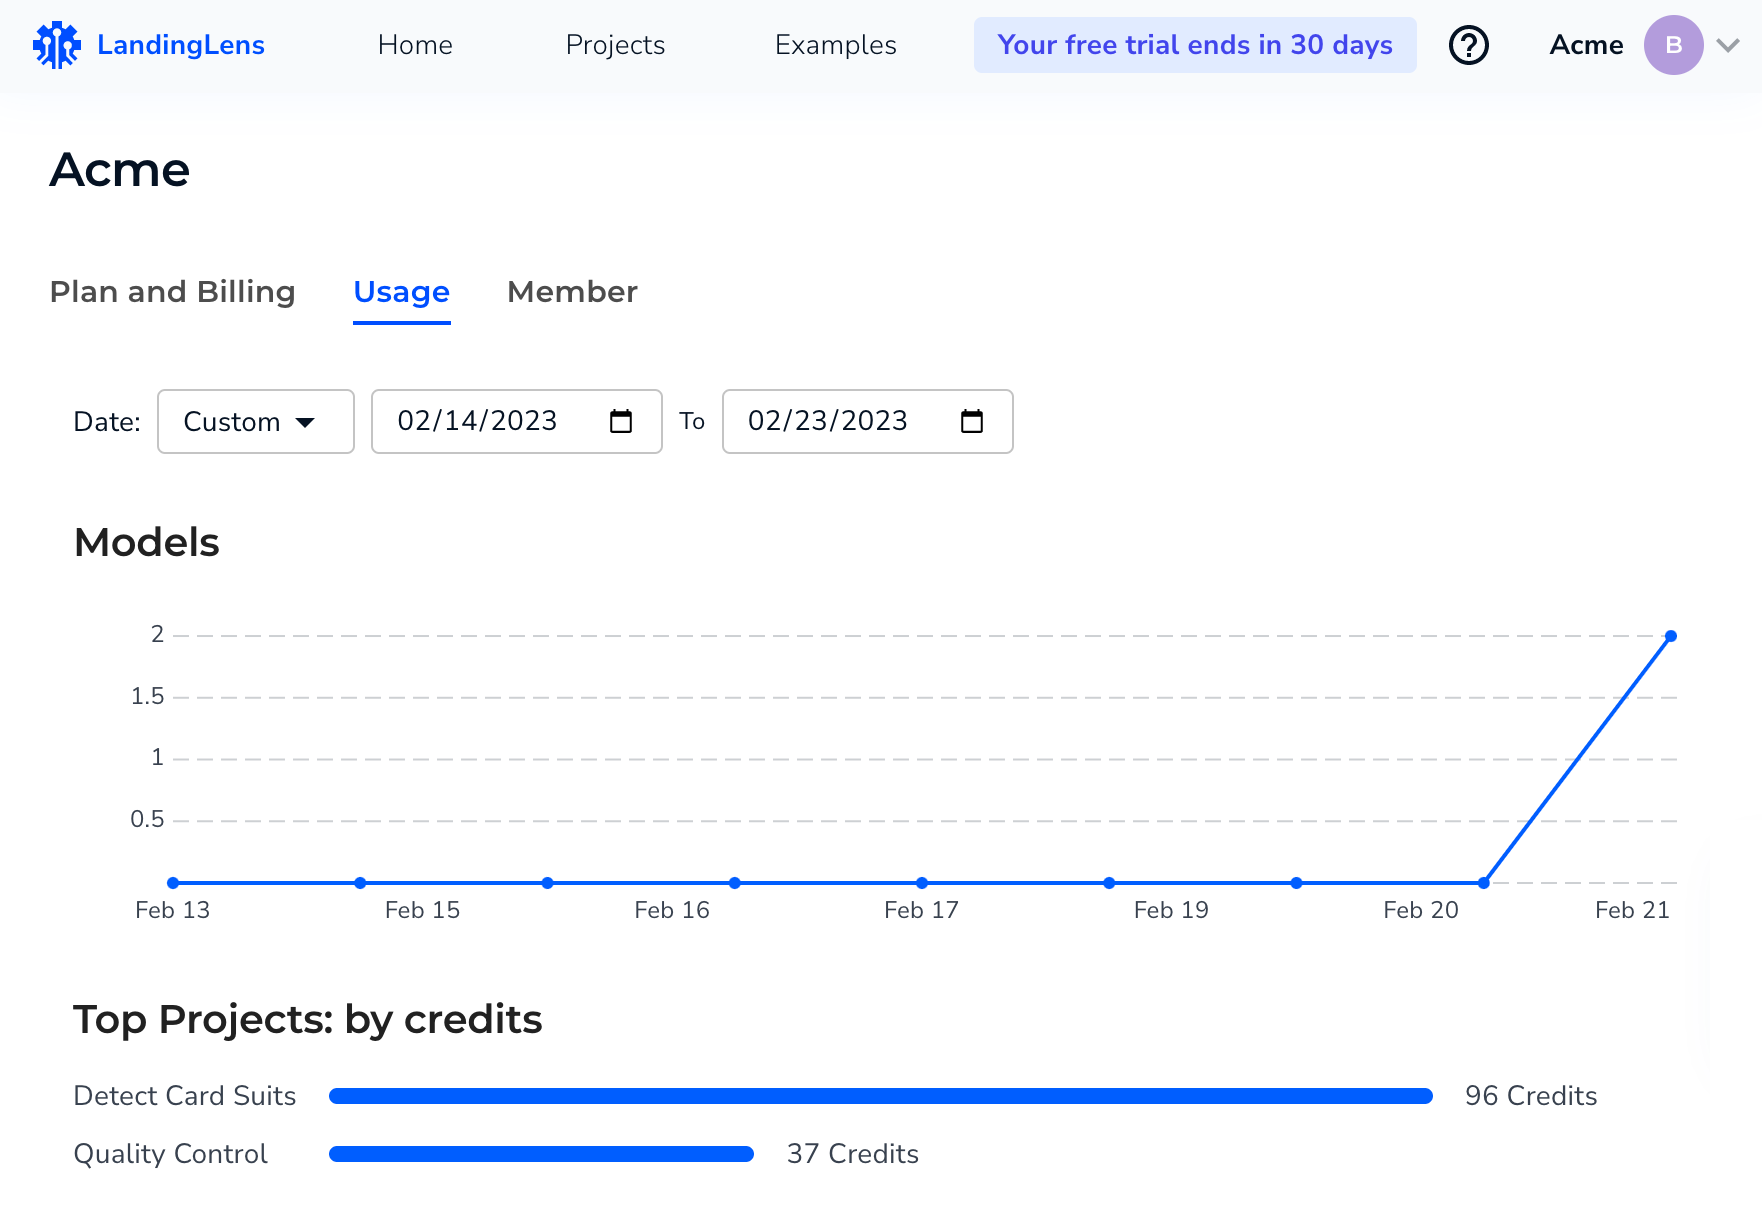 * You can now upload sample images to a Project directly from LandingLens. To do this, create a new Project and click **Load Sample Data**.
.png?fit=max&auto=format&n=HdZmNNXb6yecqmgJ&q=85&s=63a993589e8448d03ec04d98973c8768) ### Bug Fixes
* You can now see the total number of filtered images.
* We fixed a bug that hid images when switching from Instance View to Image View.
### Bug Fixes
* You can now see the total number of filtered images.
* We fixed a bug that hid images when switching from Instance View to Image View.
 * **Home page**: The new home page will be the new core page, where we will provide you with organization information, important updates, and access to your most recent projects.
 * **Pre-trained examples**: We have included some examples of how LandingLens can be used. Go to **Examples**, and check out some of our pre-trained models!
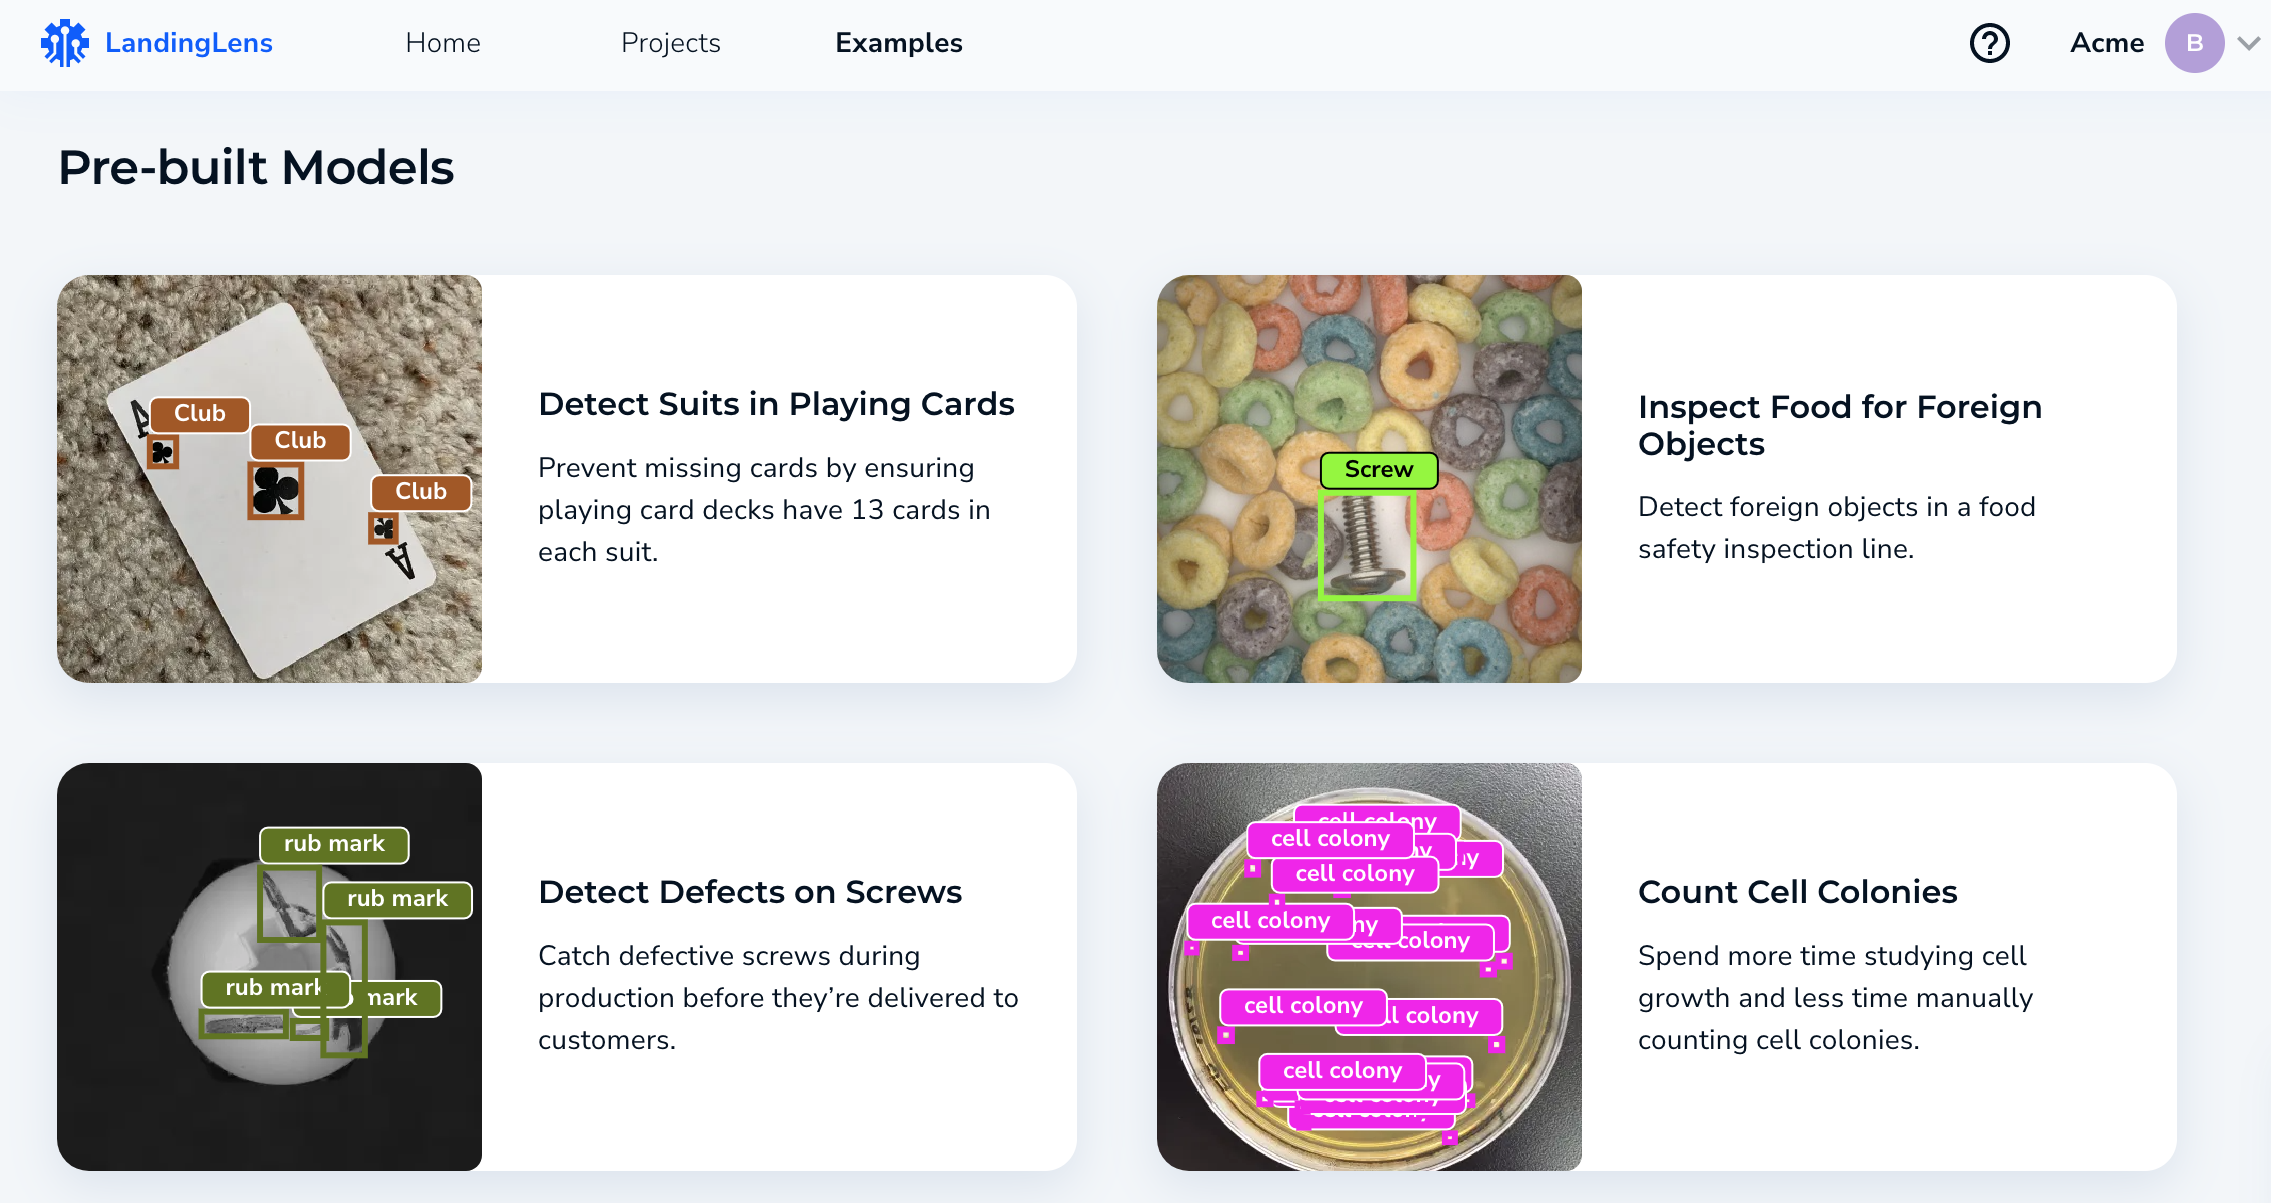 **Deployment Page**
We've got a new look and experience for the **Deploy** page. We have improved the flow and experience of the Deploy page by adding easier navigation across your various devices (now called "endpoints") and access to the historical data associated with each endpoint. For more information, go to [Cloud Deployment](./cloud-deployment).
**Deployment Page**
We've got a new look and experience for the **Deploy** page. We have improved the flow and experience of the Deploy page by adding easier navigation across your various devices (now called "endpoints") and access to the historical data associated with each endpoint. For more information, go to [Cloud Deployment](./cloud-deployment).
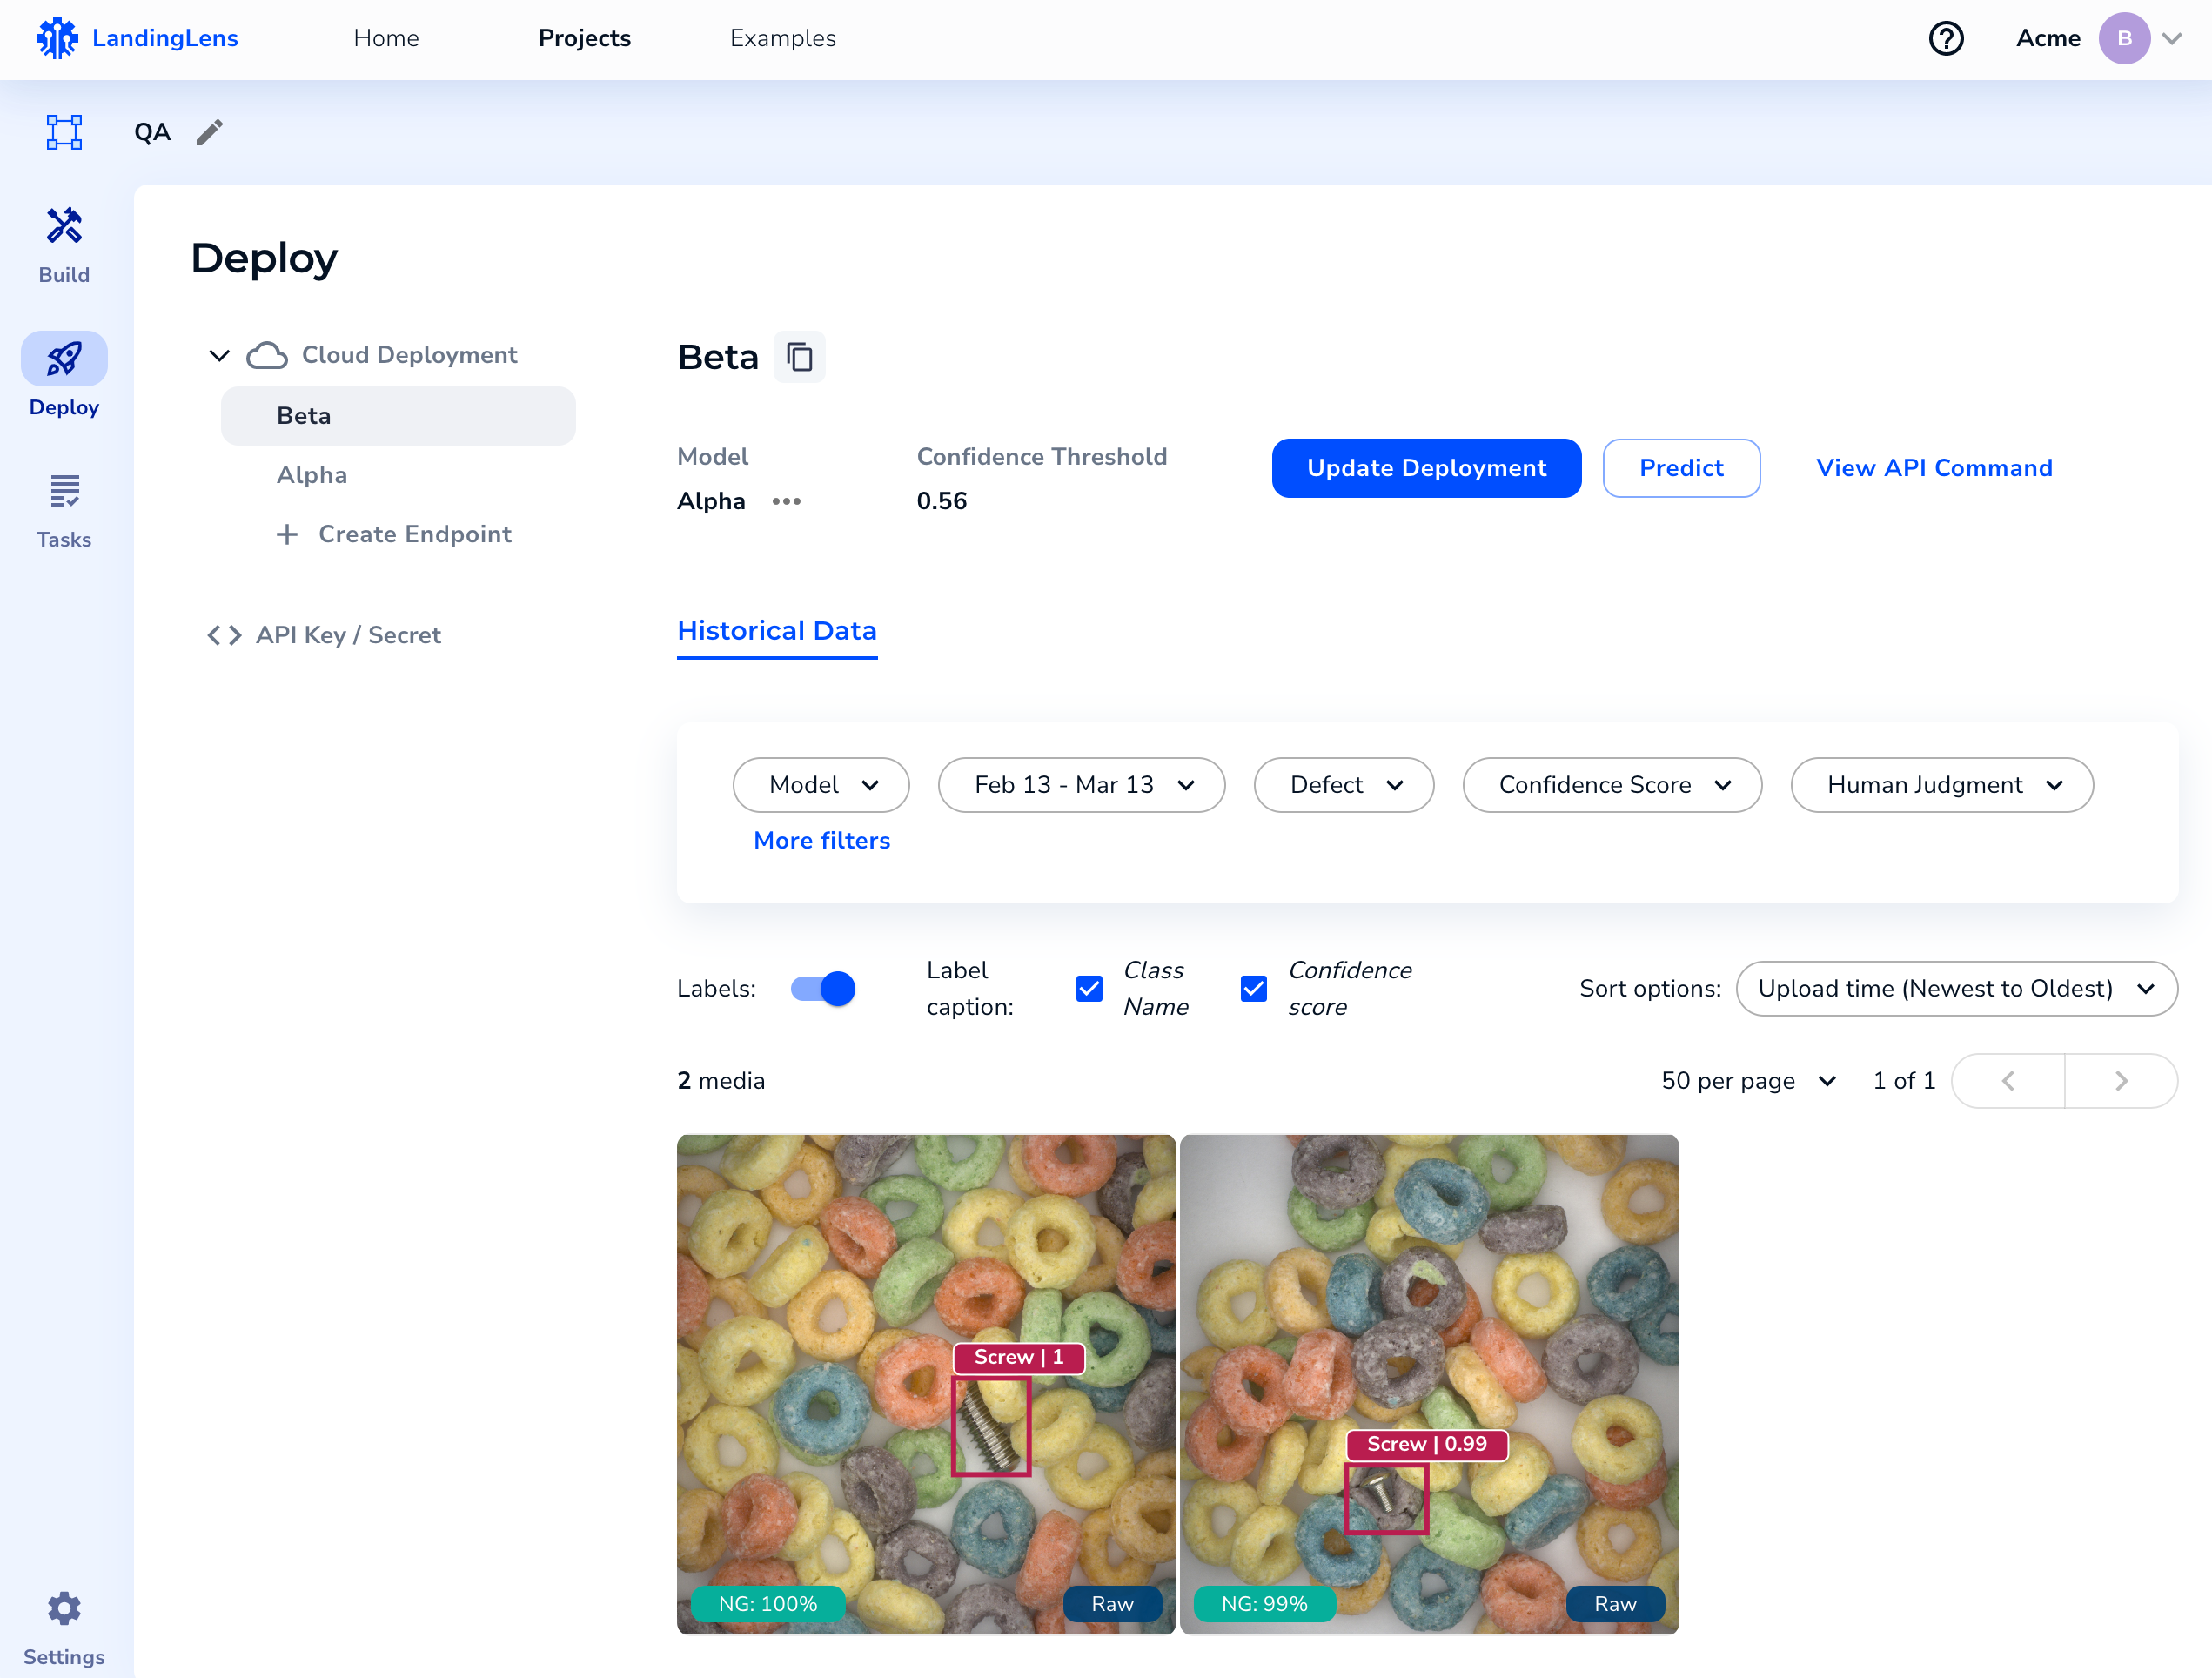 Here are some highlights:
* **Endpoints** (previously known as Devices) can be found under **Cloud Deployment** in the navigation bar on the left. You can deploy each endpoint with a trained Model and fixed Confidence Threshold. You can update your Model and Confidence Threshold by selecting **Update Deployment**.
* The **Predict** tool allows you to quickly drag and drop an image to run inference and test your Model.
* Images sent to the endpoint through the API integration will show up under **Historical Data**, just like before.
* You can find your **API Key** and **API Secret** conveniently located in the navigation bar on the left.
Here are some highlights:
* **Endpoints** (previously known as Devices) can be found under **Cloud Deployment** in the navigation bar on the left. You can deploy each endpoint with a trained Model and fixed Confidence Threshold. You can update your Model and Confidence Threshold by selecting **Update Deployment**.
* The **Predict** tool allows you to quickly drag and drop an image to run inference and test your Model.
* Images sent to the endpoint through the API integration will show up under **Historical Data**, just like before.
* You can find your **API Key** and **API Secret** conveniently located in the navigation bar on the left.
 * LandingLens introduces a new feature called "Predict". Predict allows you to quickly upload new images to your Model so that the Model can make predictions on those images. Predict streamlines the Run Live feature so you can deploy Models faster.