> ## Documentation Index
> Fetch the complete documentation index at: https://landinglens.docs.landing.ai/llms.txt
> Use this file to discover all available pages before exploring further.
# Dataset Snapshots
export const vp = 'Visual Prompting';
export const smartLabel = 'Smart Labeling';
export const productLL = 'LandingLens';
export const mi = 'Mobile Inference';
export const llsf = 'LandingLens on Snowflake';
export const companyName = 'LandingAI';
*This article applies to these versions of LandingLens:*
| LandingLens |
LandingLens on Snowflake |
| ✓ |
✓ |
You can create a "snapshot" of all or some images in your project's dataset at any time. A snapshot includes the selected images and their labels, splits, metadata, tags, and labeling tasks.
Data can't be added to a snapshot after it's created; you can think of it as "frozen". Keeping the data consistent allows you to accurately compare how different models perform on the same dataset.
With snapshots, you can:
* [Train a model](./dataset-snapshots#create-a-custom-trained-model-with-a-snapshot) based on the data in the snapshot.
* Create [new projects](./dataset-snapshots#create-new-projects-from-a-snapshot) from snapshots.
* [Revert your project](./dataset-snapshots#revert-to-a-snapshot) to a snapshot.
* [Download the dataset](./dataset-snapshots#download-the-dataset) and [class map](./dataset-snapshots#download-class-map) for a snapshot. This gives you the ability to re-upload the labeled images to LandingLens in the future, if needed.
* [Download a CSV](./dataset-snapshots#download-csv) with information about the images and labels in that snapshot.
## Create Snapshots
There are two ways that snapshots are created:
* Manually [create a snapshot](./dataset-snapshots#manually-create-snapshots), which saves the information currently in your project.
* Train a model. LandingLens automatically saves a snapshot of your dataset when you [train a model](./train-models).
### Manually Create Snapshots
To save a snapshot:
1. Select the images you want to include:
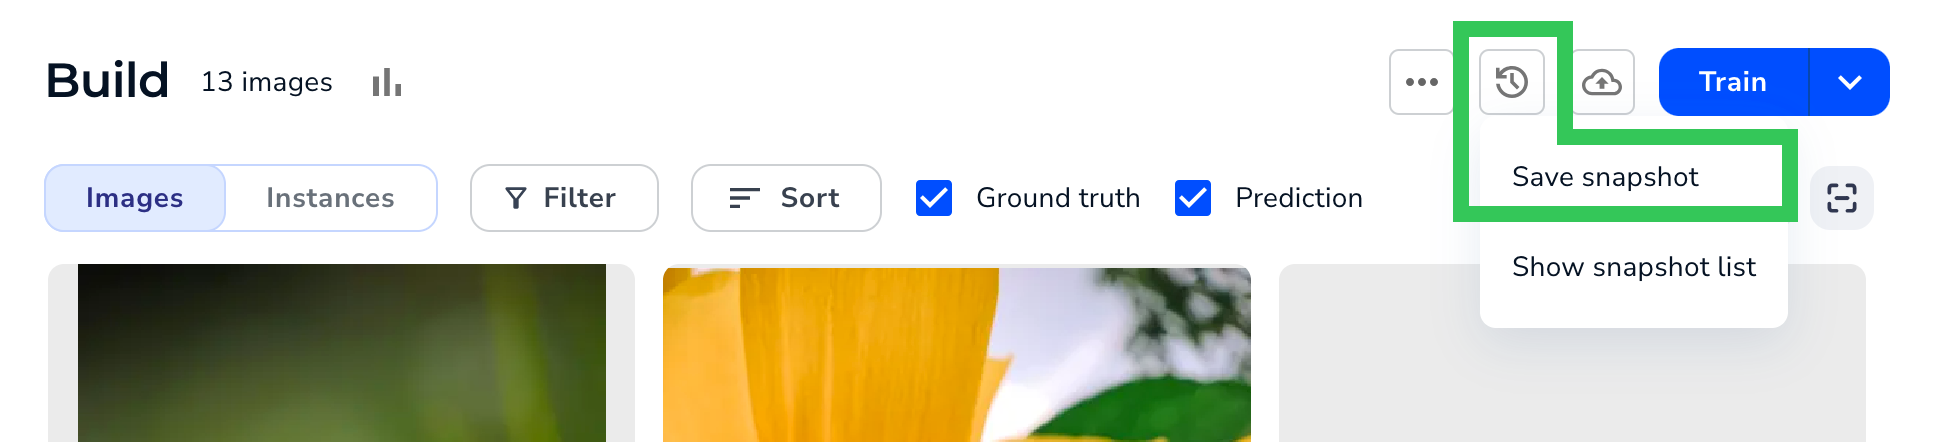
* To save all images in your dataset as a snapshot, click the **Snapshot** icon and select **Save snapshot**.
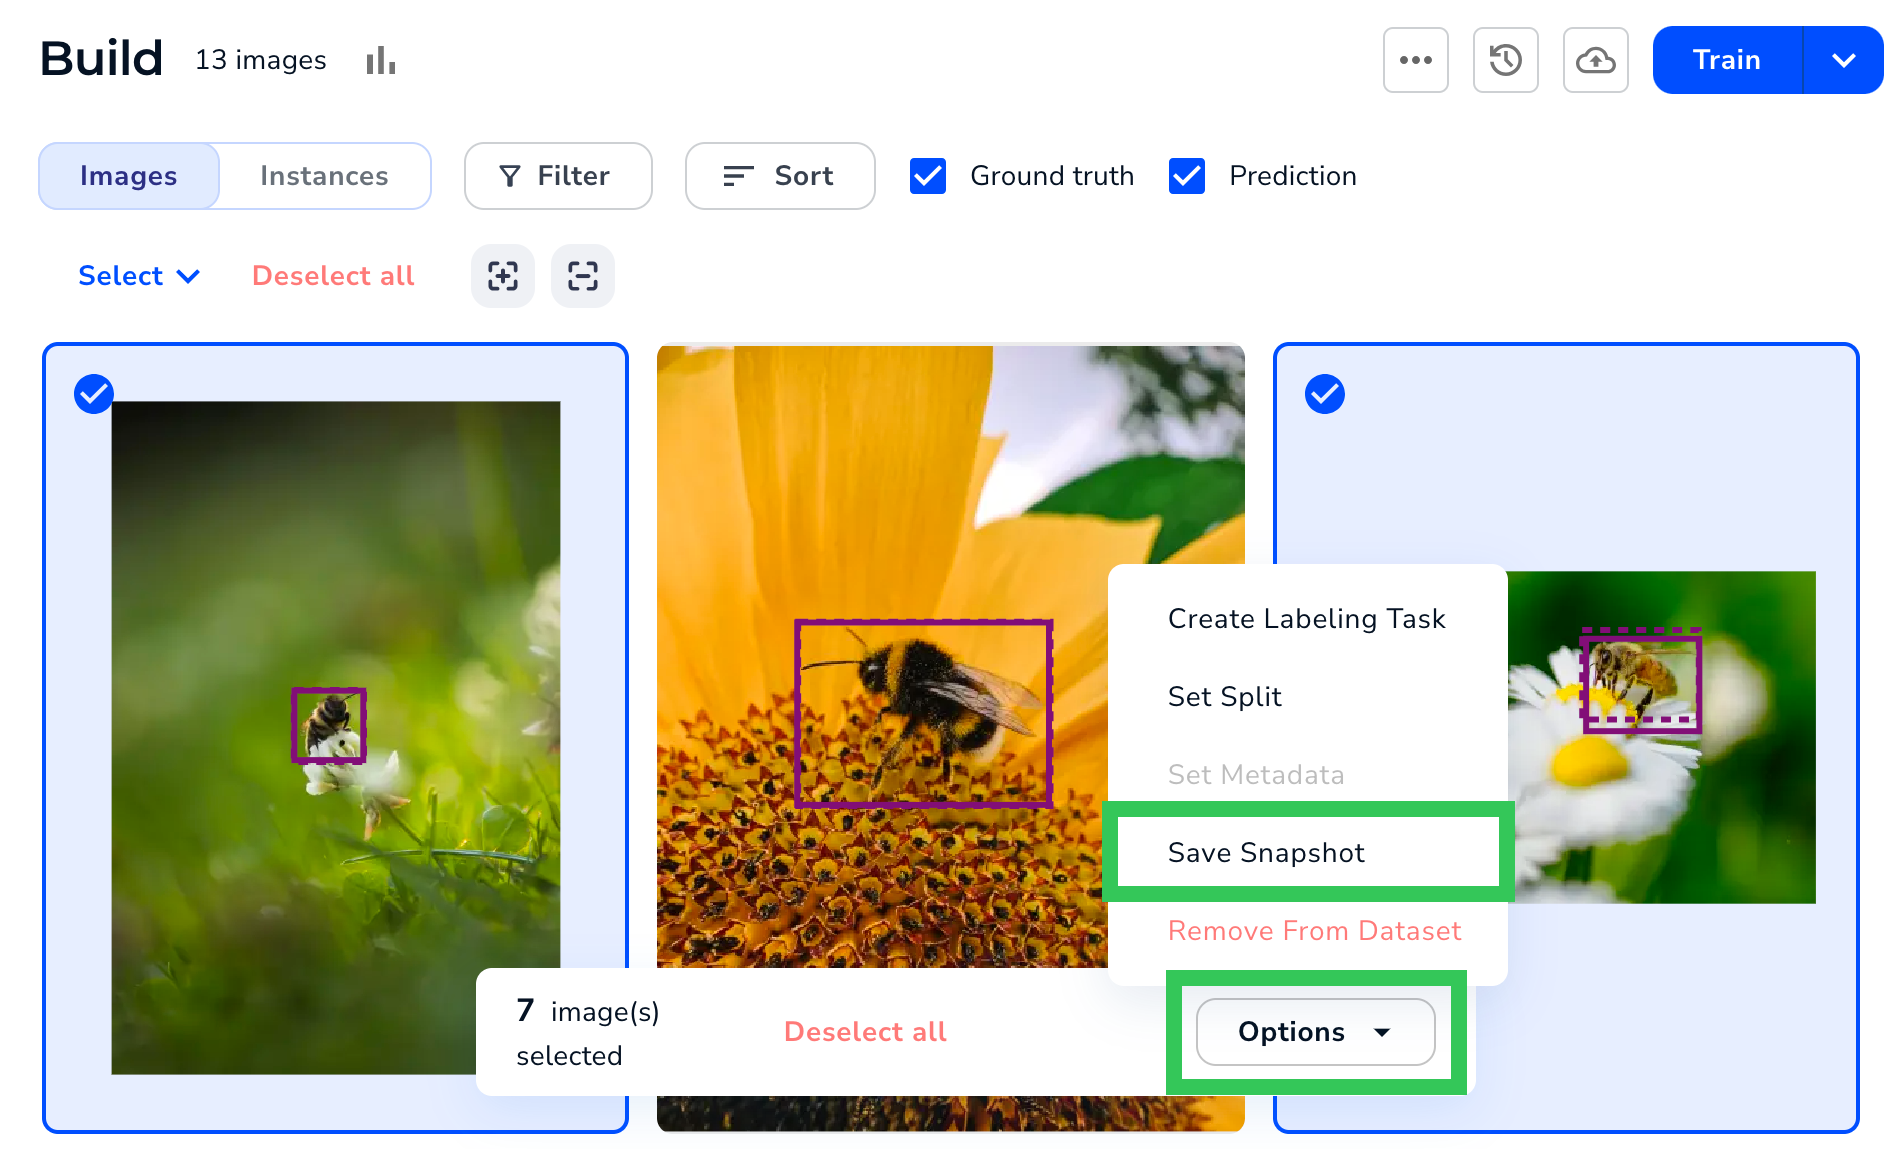
 * To save only some images in your dataset as a snapshot, select the images you want, click **Options**, and select **Save Snapshot**.
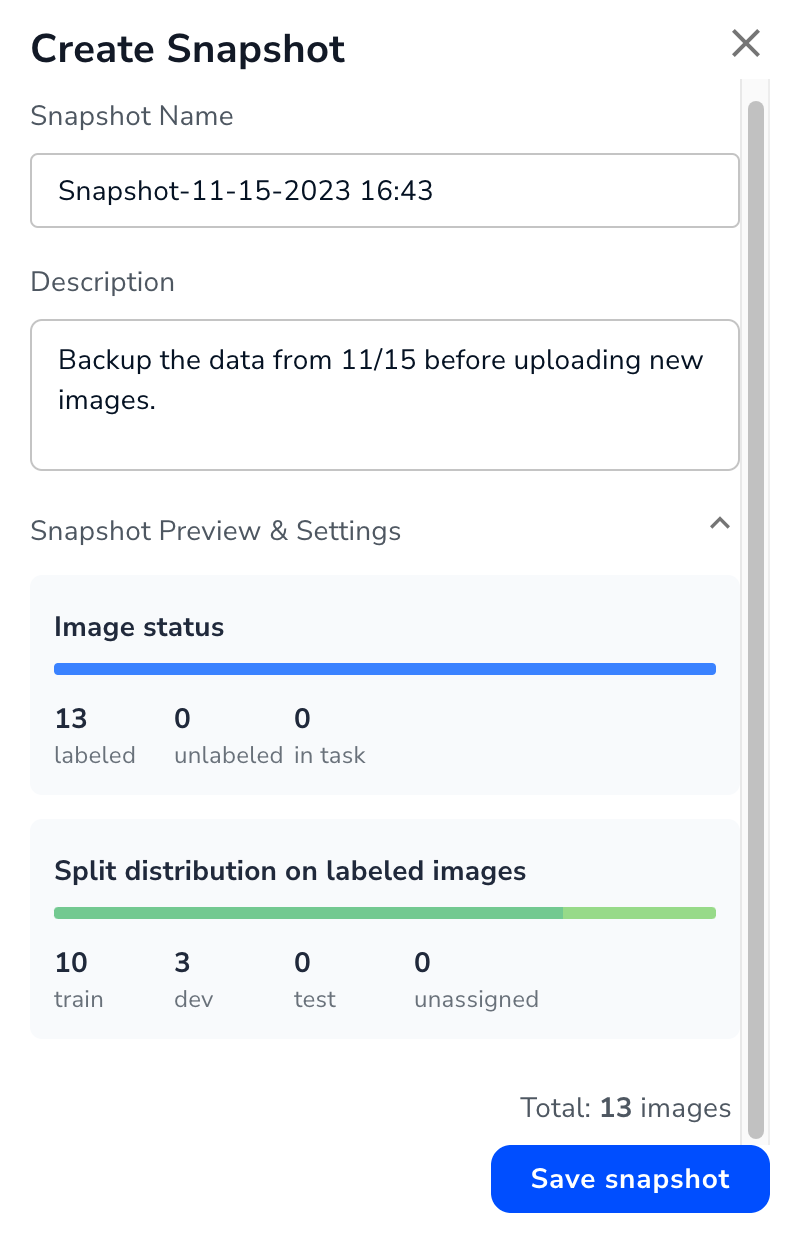
 2. LandingLens automatically names the snapshot with the current timestamp. If you’d like to change it, enter a custom name in the **Snapshot Name** field.
3. (Optional) Enter a short description of the snapshot in the **Description** field.
4. (Optional) If you want to review the splits and labeling status of the images, expand the section at the bottom.
5. Click **Save snapshot**.
2. LandingLens automatically names the snapshot with the current timestamp. If you’d like to change it, enter a custom name in the **Snapshot Name** field.
3. (Optional) Enter a short description of the snapshot in the **Description** field.
4. (Optional) If you want to review the splits and labeling status of the images, expand the section at the bottom.
5. Click **Save snapshot**.
 ## View Snapshots in the Snapshot Dashboard
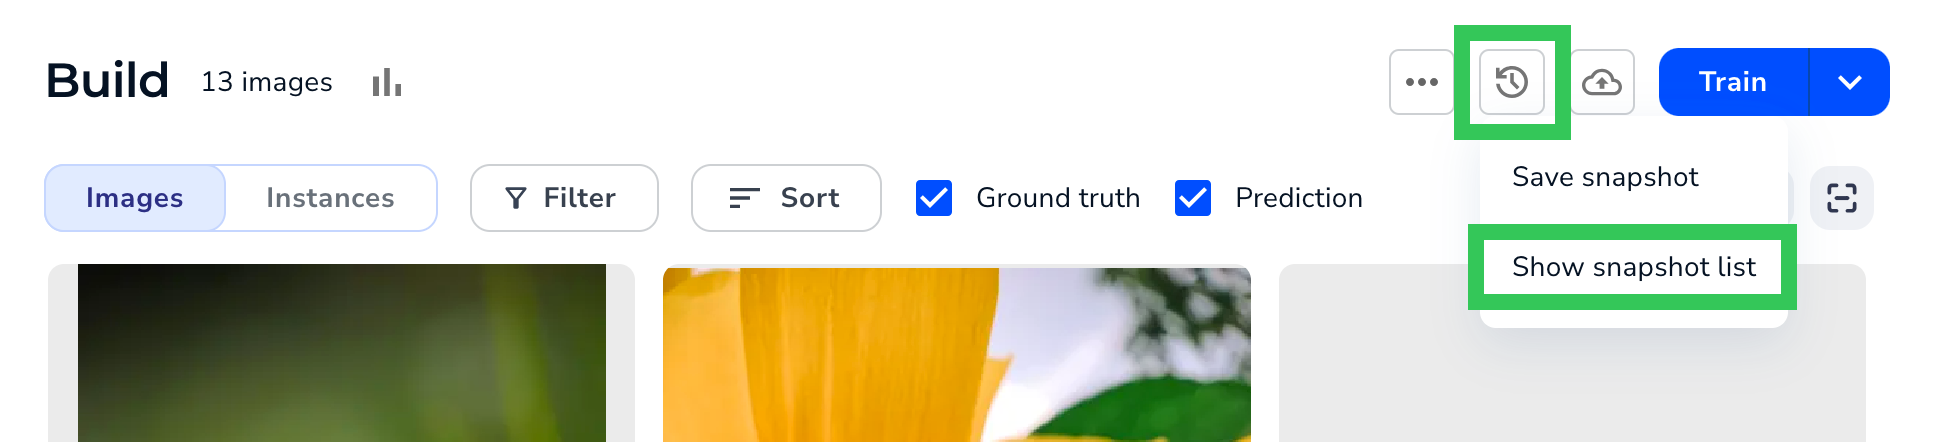
To view all the snapshots for a project, click the **Snapshot** icon and select **Show snapshot list**.
## View Snapshots in the Snapshot Dashboard
To view all the snapshots for a project, click the **Snapshot** icon and select **Show snapshot list**.
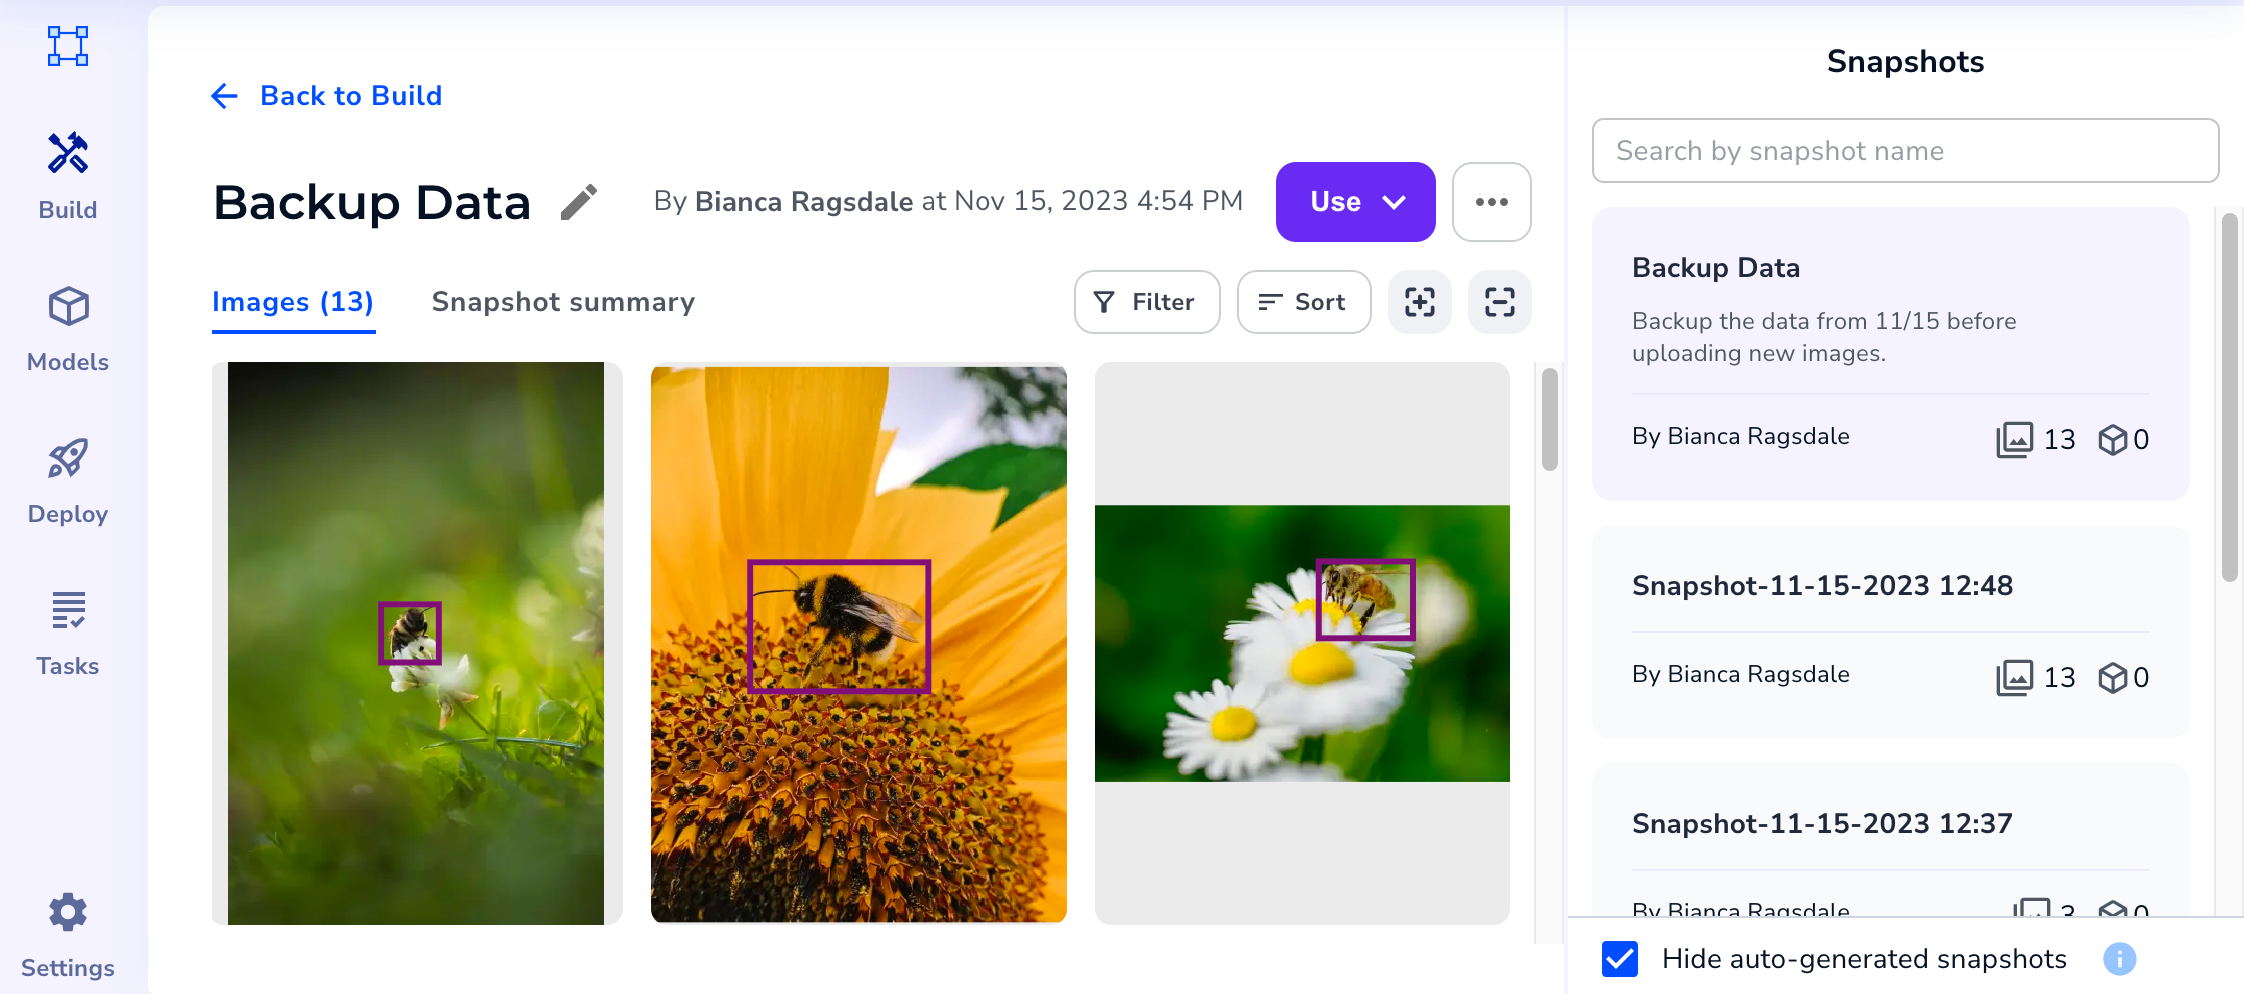
 This Snapshot dashboard allows you to review all of your snapshots and drill into each one. Here are the main sections of the Snapshot dashboard:
* [Snapshots Panel](./dataset-snapshots#snapshots-panel)
* [Images tab](./dataset-snapshots#images-tab)
* [Snapshot Summary tab](./dataset-snapshots#snapshot-summary-tab)
This Snapshot dashboard allows you to review all of your snapshots and drill into each one. Here are the main sections of the Snapshot dashboard:
* [Snapshots Panel](./dataset-snapshots#snapshots-panel)
* [Images tab](./dataset-snapshots#images-tab)
* [Snapshot Summary tab](./dataset-snapshots#snapshot-summary-tab)
 ### Snapshots Panel
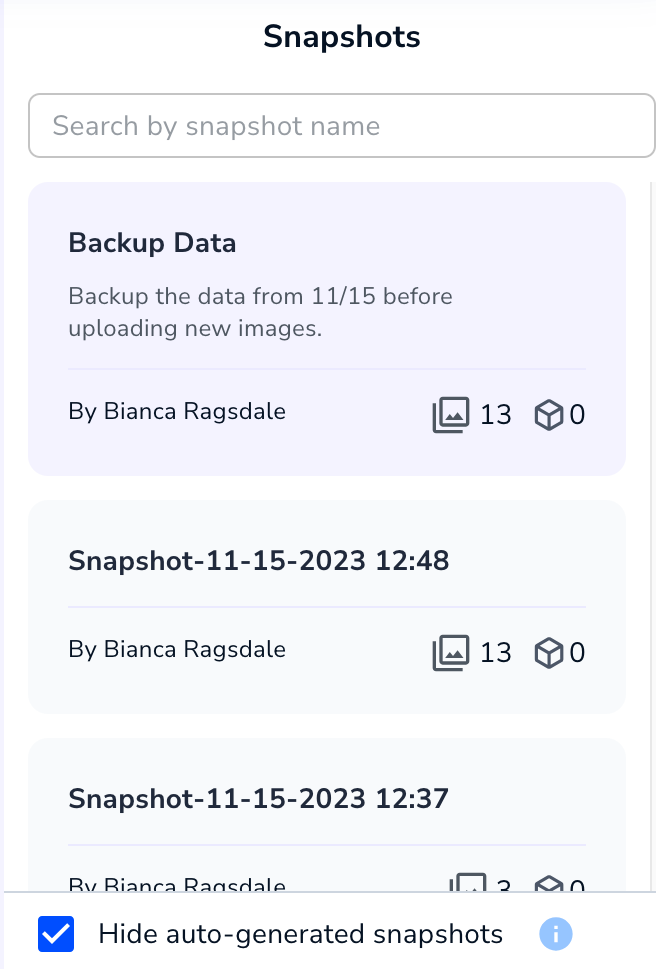
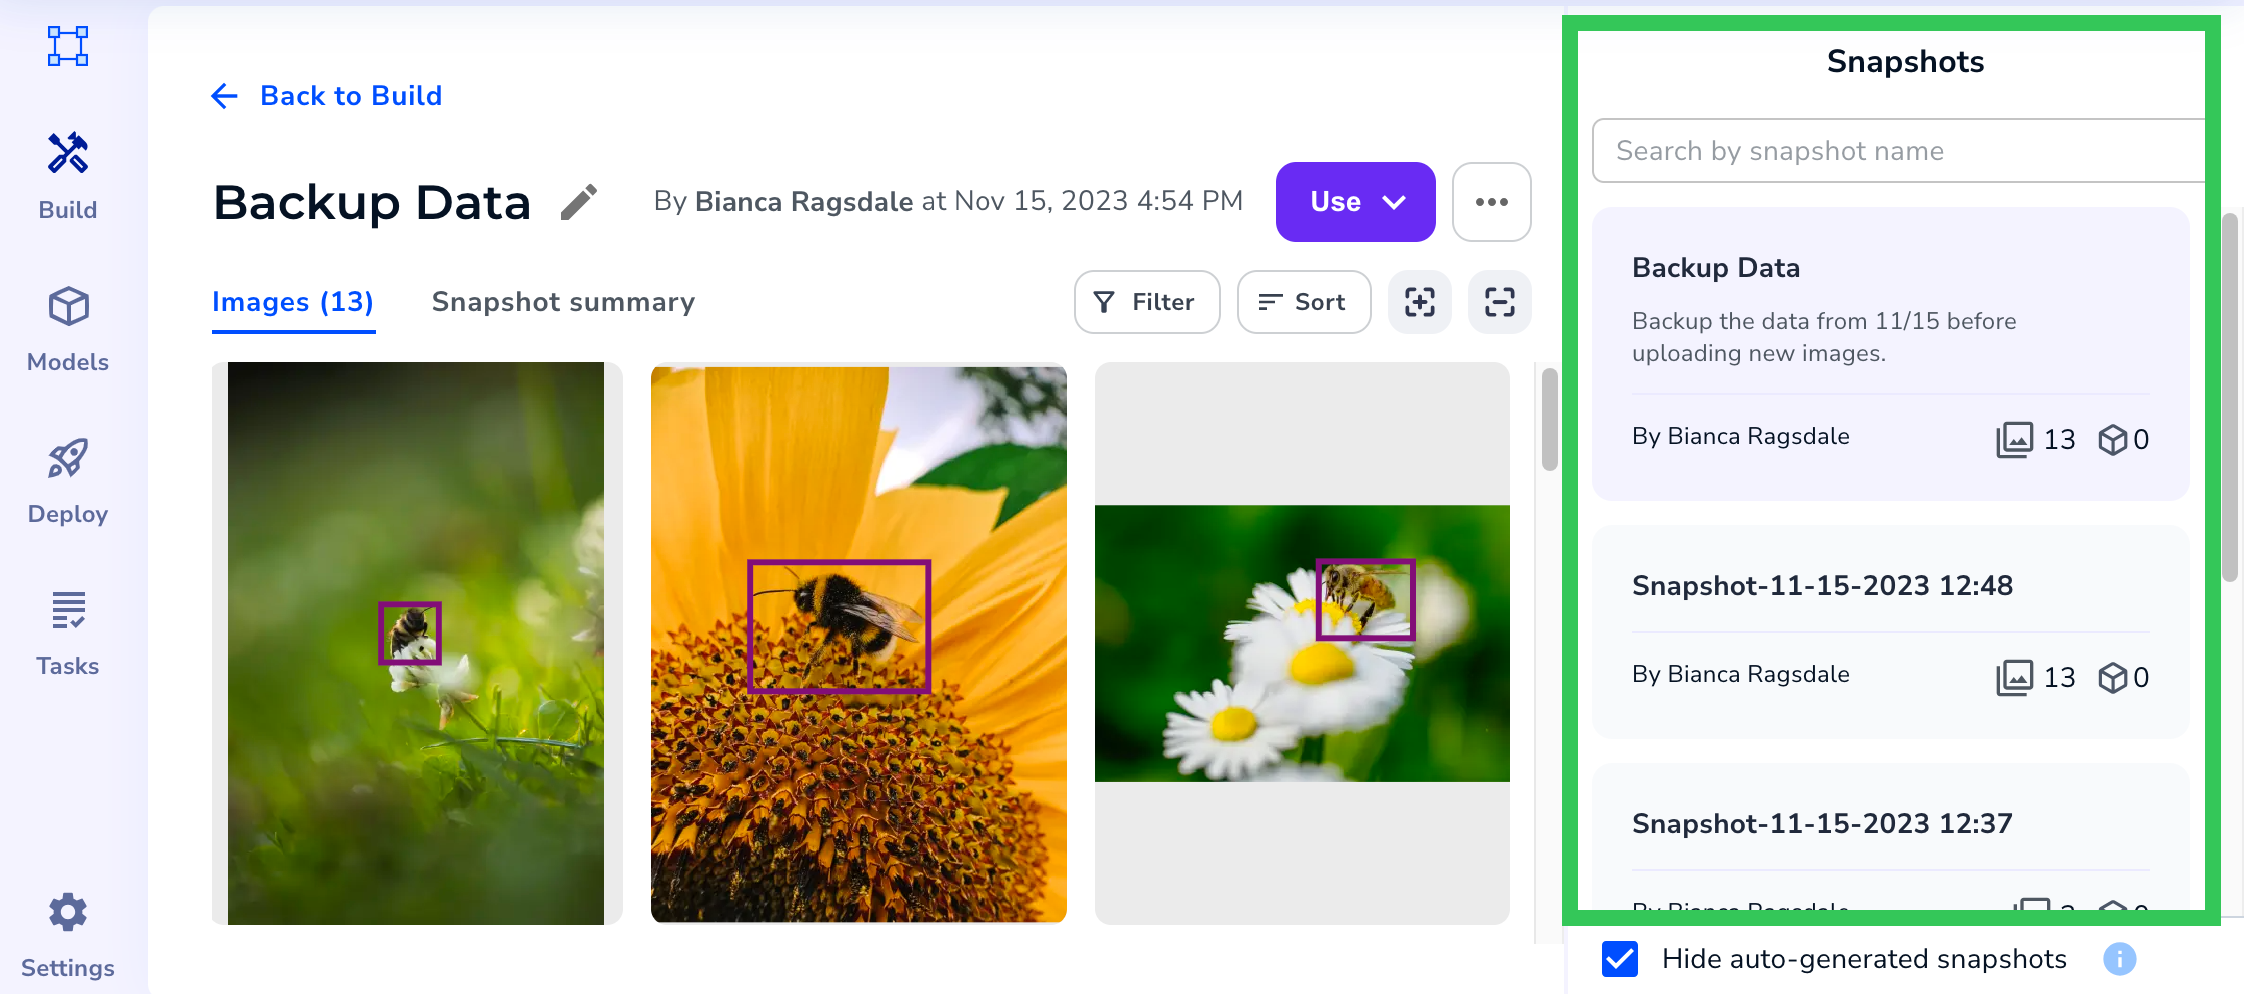
Click the snapshot you want to view in the Snapshots panel. Snapshots are listed in the chronological order they were created.
By default, the **Hide auto-generated snapshots** checkbox is selected. This hides the snapshots that LandingLens automatically created when you trained models.
### Snapshots Panel
Click the snapshot you want to view in the Snapshots panel. Snapshots are listed in the chronological order they were created.
By default, the **Hide auto-generated snapshots** checkbox is selected. This hides the snapshots that LandingLens automatically created when you trained models.
 ### Images Tab
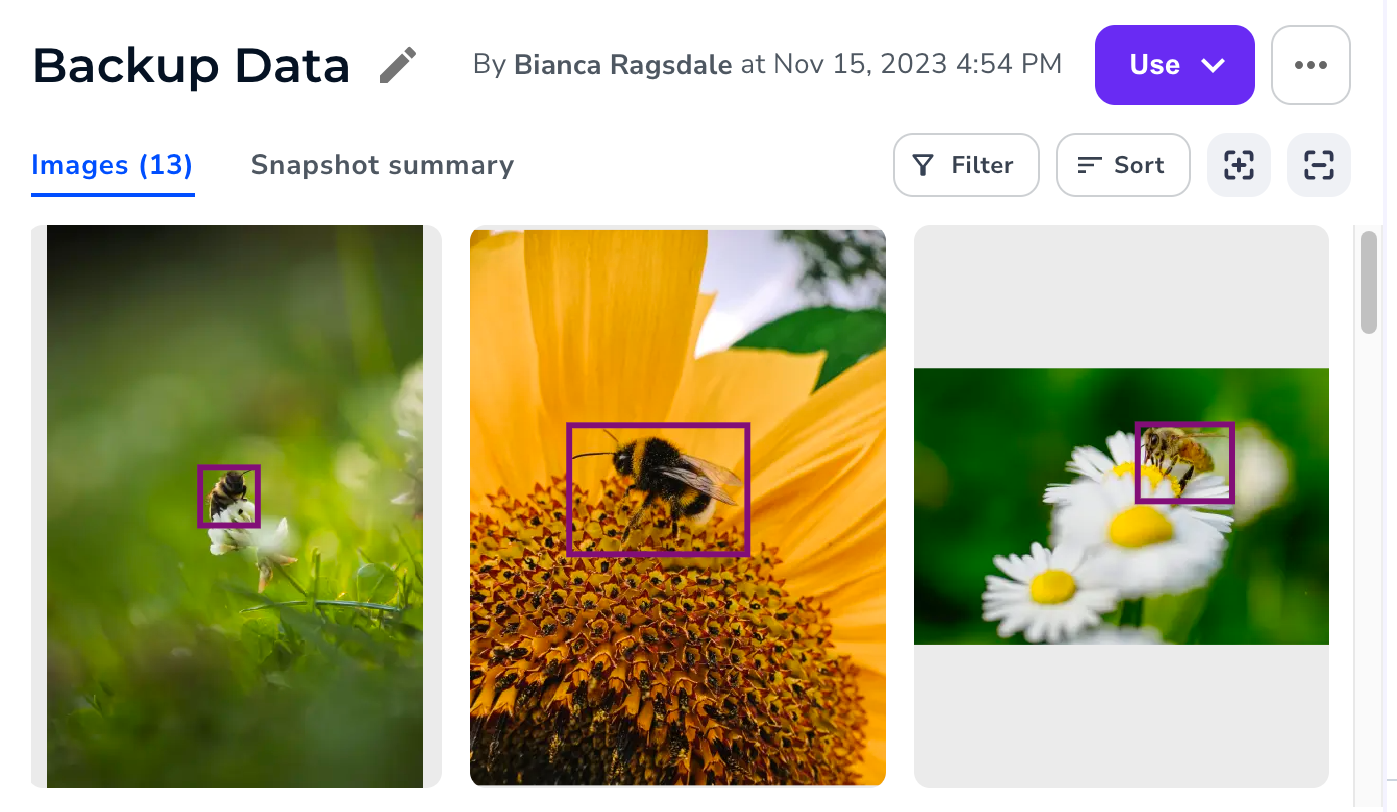
Open the **Images** tab to see the thumbnails for the images in the dataset. You can filter, sort, and change the sizes of the thumbnails, just as you can in the Build view.
### Images Tab
Open the **Images** tab to see the thumbnails for the images in the dataset. You can filter, sort, and change the sizes of the thumbnails, just as you can in the Build view.
 ### Snapshot Summary Tab
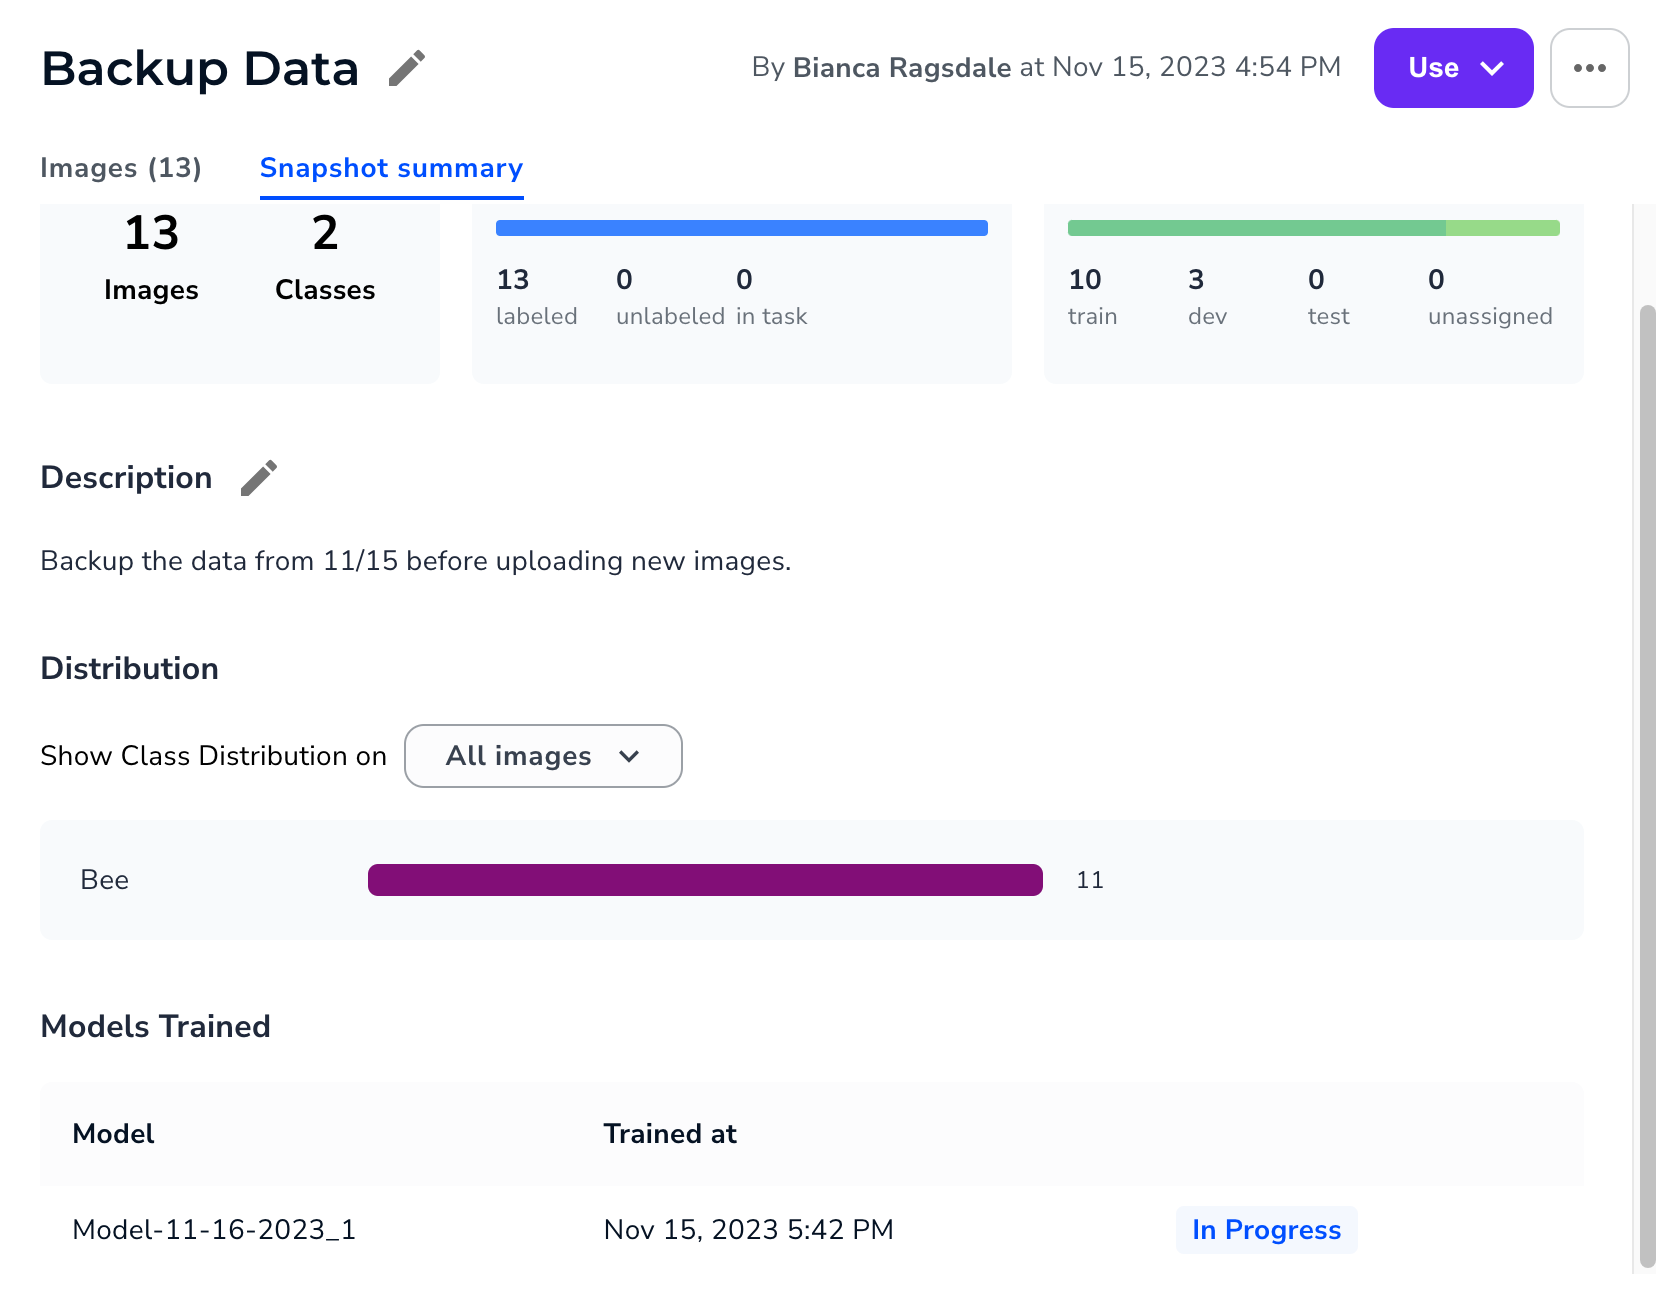
Open the **Snapshot Summary** tab to see the number of images and classes in the snapshot, the label statuses, the split distribution, the snapshot description, the class distribution, and what models were trained using the data in the snapshot.
### Snapshot Summary Tab
Open the **Snapshot Summary** tab to see the number of images and classes in the snapshot, the label statuses, the split distribution, the snapshot description, the class distribution, and what models were trained using the data in the snapshot.
 ## Create a Custom Trained Model with a Snapshot
The default training method (also known as [Fast Training](./train-models)) is not available for snapshots.
You can train a model based on the data in a snapshot. This allows you to generate multiple models on different datasets in a single project.
When you train a model based on a dataset, you will use Custom Training. For more information about how to configure Custom Training settings and hyperparameters, go to [Custom Training](./custom-training). Additionally, training a model this way doesn't trigger LandingLens to automatically create a snapshot, because the snapshot already exists.
To train a model on a snapshot:
1. Click the **Snapshot** icon and select **Show snapshot list**.
2. Select the snapshot you want to use from the **Snapshots** panel.
## Create a Custom Trained Model with a Snapshot
The default training method (also known as [Fast Training](./train-models)) is not available for snapshots.
You can train a model based on the data in a snapshot. This allows you to generate multiple models on different datasets in a single project.
When you train a model based on a dataset, you will use Custom Training. For more information about how to configure Custom Training settings and hyperparameters, go to [Custom Training](./custom-training). Additionally, training a model this way doesn't trigger LandingLens to automatically create a snapshot, because the snapshot already exists.
To train a model on a snapshot:
1. Click the **Snapshot** icon and select **Show snapshot list**.
2. Select the snapshot you want to use from the **Snapshots** panel.
 3. Click **Use** and select **Train with custom options**.
.png?fit=max&auto=format&n=PHcetUd-hiVs_otz&q=85&s=f3c3979bf56676408460bcdddd0f8b35) 4. Configure the training settings. For more information, go to [Custom Training](./custom-training).
5. Go to the **Build** page to see the model training details in the **Model** panel.
## Create New Projects from a Snapshot
You can create a new project by copying a snapshot. When you copy a snapshot, you can choose to include the existing labels, metadata, and tags.
Copying a snapshot doesn't copy project-specific settings, such as labeling tasks and project permissions.
To create a new project from a snapshot:
1. Click the **Snapshot** icon and select **Show snapshot list**.
2. Select the snapshot you want to use from the **Snapshots** panel.
3. Click **Use** and select **Create new project**.
4. Configure the training settings. For more information, go to [Custom Training](./custom-training).
5. Go to the **Build** page to see the model training details in the **Model** panel.
## Create New Projects from a Snapshot
You can create a new project by copying a snapshot. When you copy a snapshot, you can choose to include the existing labels, metadata, and tags.
Copying a snapshot doesn't copy project-specific settings, such as labeling tasks and project permissions.
To create a new project from a snapshot:
1. Click the **Snapshot** icon and select **Show snapshot list**.
2. Select the snapshot you want to use from the **Snapshots** panel.
3. Click **Use** and select **Create new project**.
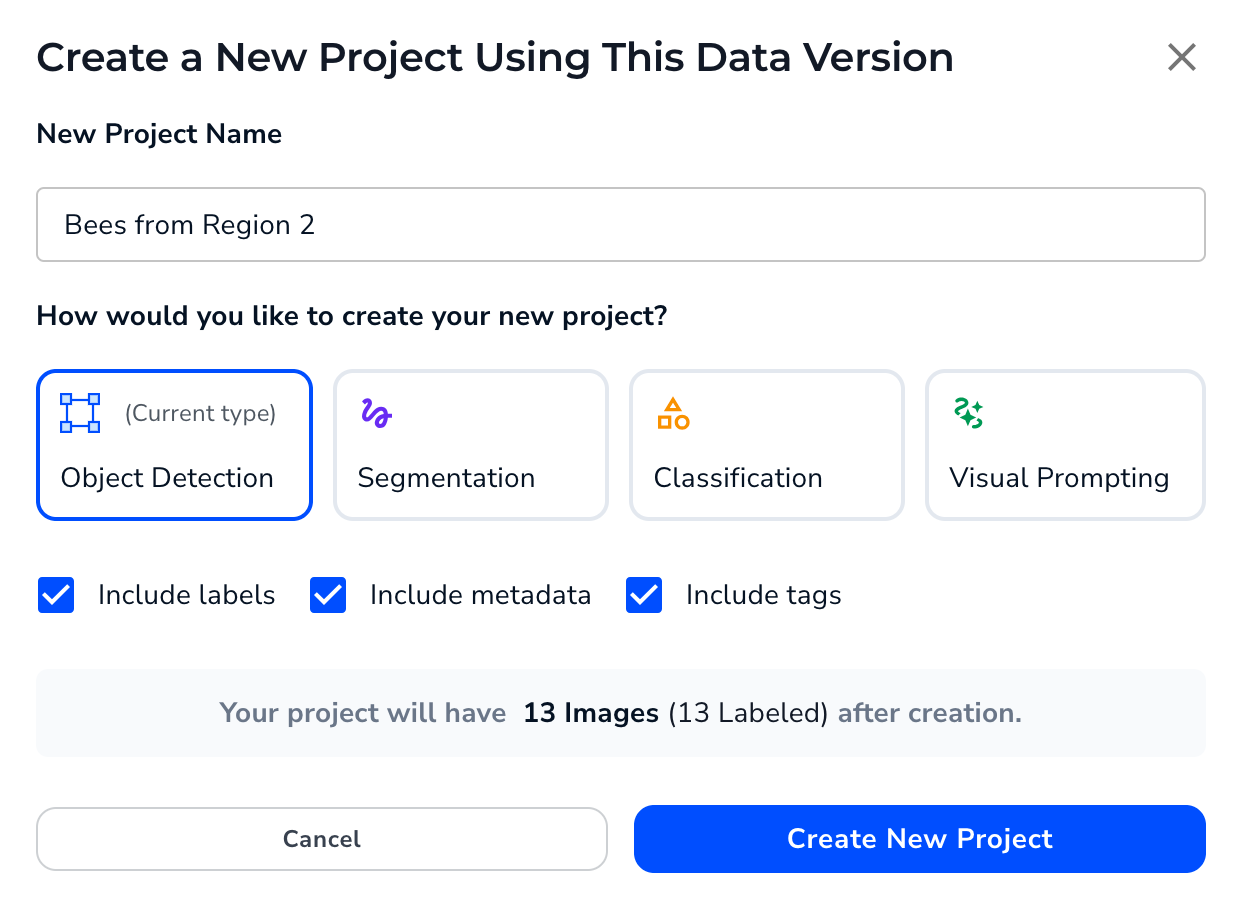
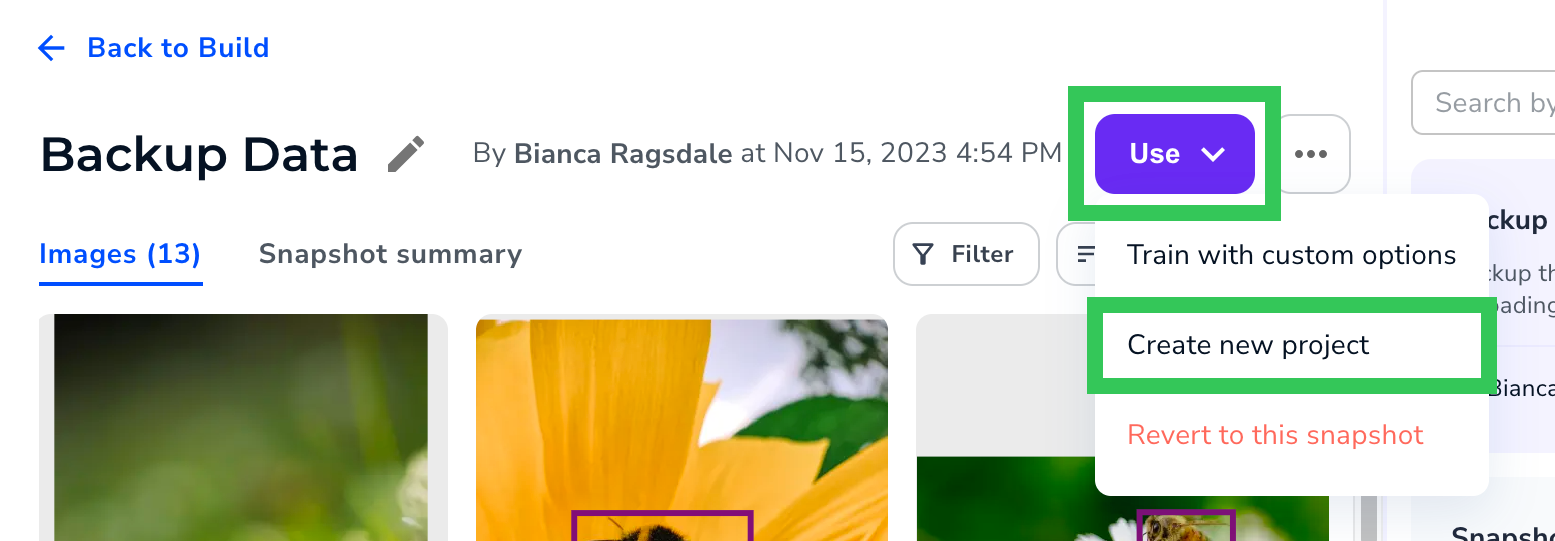 4. Enter a brief, descriptive name for your project in the **New Project Name** field. (You can also name the project later.)
5. Click the project type you want the new project to be.
6. If the selected project is the same type as the current project, you can select the **Include labels** checkbox to copy over the labels.
7. If you want the new project to include the metadata or [tags](./tags) from the images, select the **Include metadata** or **Include tags** checkboxes, respectively.
8. Click **Create New Project**.
4. Enter a brief, descriptive name for your project in the **New Project Name** field. (You can also name the project later.)
5. Click the project type you want the new project to be.
6. If the selected project is the same type as the current project, you can select the **Include labels** checkbox to copy over the labels.
7. If you want the new project to include the metadata or [tags](./tags) from the images, select the **Include metadata** or **Include tags** checkboxes, respectively.
8. Click **Create New Project**.
 9. The new project opens in a new tab. (If your browser has a pop-up blocker, you might need to deactivate it or allow it to open the tab. You might need to refresh the page in the new tab to see the new project.)
## Revert to a Snapshot
If you've made any changes to the dataset in the Build tab since the last time you saved a snapshot, those changes will be lost if you revert to a snapshot. Changes include uploaded images, new labels, new metadata, new tags, and new label tasks. If you want to save any changes, save the dataset as a snapshot before you revert to another snapshot.
If you are the project Owner, you can revert your dataset (in other words, the data on the **Build** tab) to a snapshot. For example, let's say that you saved a snapshot and later added more images to the dataset in the Build tab. You then decide that the new images are no longer relevant to your project, so you want to go back to the snapshot you saved. You can do this by reverting to the snapshot you saved.
After you revert to a snapshot, you can change the dataset again, including changing it to a snapshot that was created later.
Only project Owners can revert to a snapshot. The option to revert datasets does not display to other users.
To revert to a snapshot:
1. Click the **Snapshot** icon and select **Show snapshot list**.
2. Select the snapshot you want to revert to from the **Snapshots** panel.
3. Click **Use** and select **Revert to this snapshot**.
9. The new project opens in a new tab. (If your browser has a pop-up blocker, you might need to deactivate it or allow it to open the tab. You might need to refresh the page in the new tab to see the new project.)
## Revert to a Snapshot
If you've made any changes to the dataset in the Build tab since the last time you saved a snapshot, those changes will be lost if you revert to a snapshot. Changes include uploaded images, new labels, new metadata, new tags, and new label tasks. If you want to save any changes, save the dataset as a snapshot before you revert to another snapshot.
If you are the project Owner, you can revert your dataset (in other words, the data on the **Build** tab) to a snapshot. For example, let's say that you saved a snapshot and later added more images to the dataset in the Build tab. You then decide that the new images are no longer relevant to your project, so you want to go back to the snapshot you saved. You can do this by reverting to the snapshot you saved.
After you revert to a snapshot, you can change the dataset again, including changing it to a snapshot that was created later.
Only project Owners can revert to a snapshot. The option to revert datasets does not display to other users.
To revert to a snapshot:
1. Click the **Snapshot** icon and select **Show snapshot list**.
2. Select the snapshot you want to revert to from the **Snapshots** panel.
3. Click **Use** and select **Revert to this snapshot**.
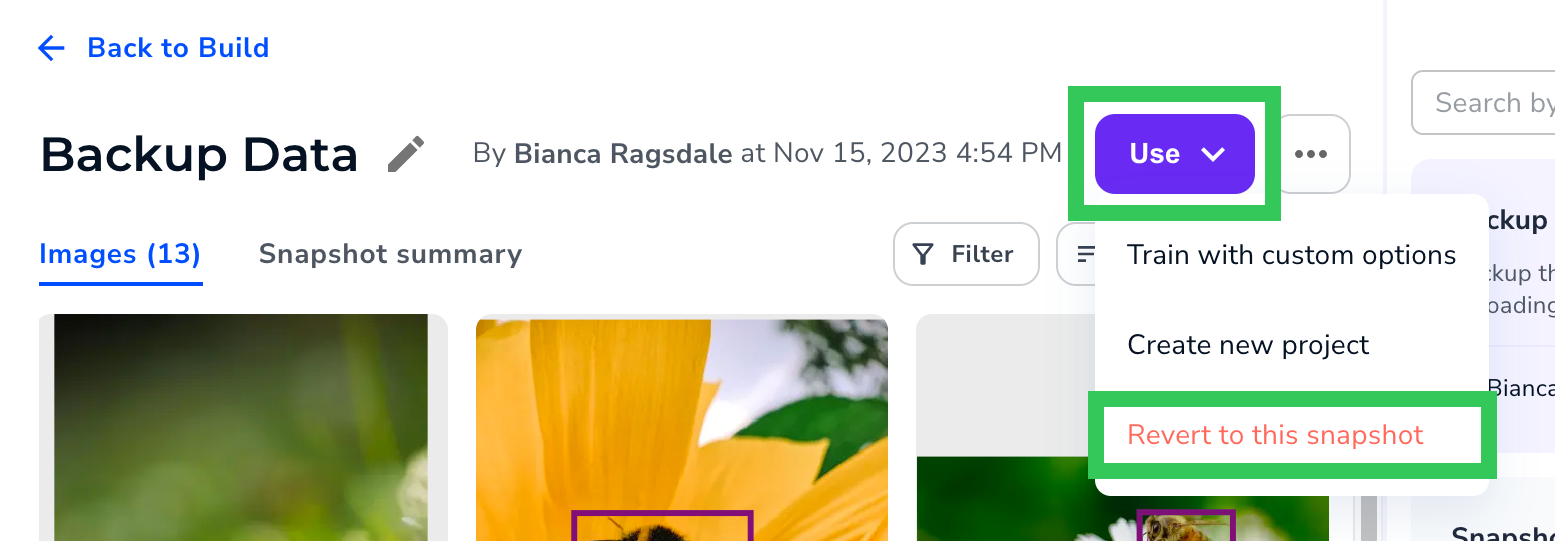 4. If you want to save the data on the **Build** tab as a snapshot (so that you don't lose any changes), select the **Save current project...** checkbox.
5. Click **Yes, Revert**.
4. If you want to save the data on the **Build** tab as a snapshot (so that you don't lose any changes), select the **Save current project...** checkbox.
5. Click **Yes, Revert**.
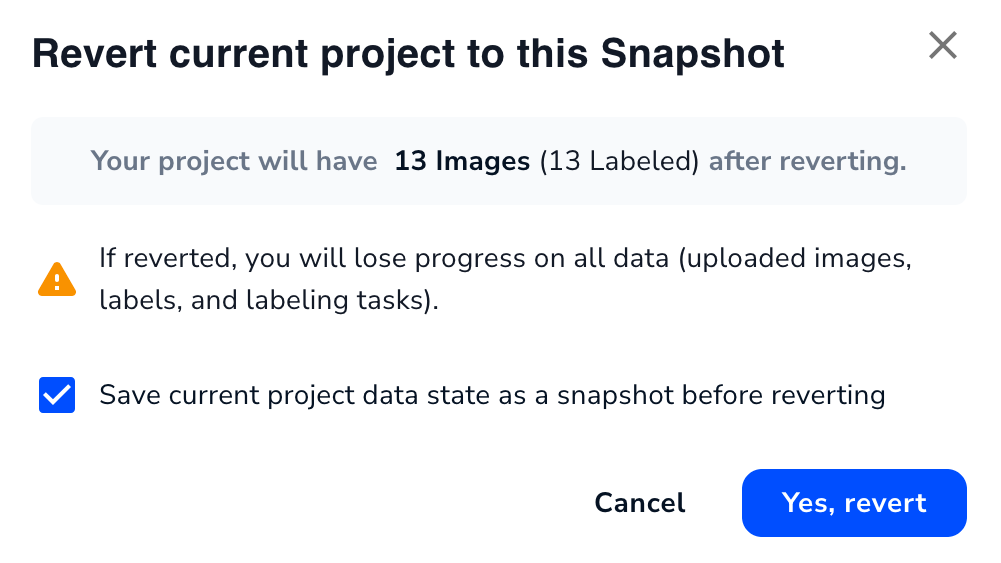 6. LandingLens closes the pop-up windows and loads the model you reverted to.
## Download the Dataset
The maximum dataset size that LandingLens can download is 25GB. If your dataset is larger than that, split the images in your project into multiple dataset snapshots, and then download each snapshot.
You can download the images, annotations, and defect map for the dataset as a zipped file. The format of the downloaded files allows you to upload the labeled images into other projects in LandingLens.
All downloaded datasets include a Defect Map JSON file that maps each class to a number. The folder structure of the downloaded dataset matches the project type:
* **Object Detection**: The files are downloaded in the Pascal VOC format. To understand this format and learn how to upload these files into other LandingLens Object Detection projects, go [here](./upload-labeled-images-od).
* **Segmentation**: The files are downloaded with Segmentation Masks. To understand this format and learn how to upload these files into other LandingLens Segmentation projects, go [here](./upload-labeled-images-seg).
* **Classification**: The downloaded images are grouped into folders based on class name. To learn how to upload these files into other LandingLens Classification projects, go [here](./classification).
* **Anomaly Detection**: The downloaded images are grouped into folders based on their labels: **abnormal** and **normal**. To learn how to upload these files into other LandingLens Anomaly Detection projects, go [here](./anomaly-detection).
To download the dataset:
1. Click the **Snapshot** icon and select **Show snapshot list**.
2. Select the snapshot you want to use from the **Snapshots** panel.
3. Click the **Action** icon and select **Download Dataset**.
6. LandingLens closes the pop-up windows and loads the model you reverted to.
## Download the Dataset
The maximum dataset size that LandingLens can download is 25GB. If your dataset is larger than that, split the images in your project into multiple dataset snapshots, and then download each snapshot.
You can download the images, annotations, and defect map for the dataset as a zipped file. The format of the downloaded files allows you to upload the labeled images into other projects in LandingLens.
All downloaded datasets include a Defect Map JSON file that maps each class to a number. The folder structure of the downloaded dataset matches the project type:
* **Object Detection**: The files are downloaded in the Pascal VOC format. To understand this format and learn how to upload these files into other LandingLens Object Detection projects, go [here](./upload-labeled-images-od).
* **Segmentation**: The files are downloaded with Segmentation Masks. To understand this format and learn how to upload these files into other LandingLens Segmentation projects, go [here](./upload-labeled-images-seg).
* **Classification**: The downloaded images are grouped into folders based on class name. To learn how to upload these files into other LandingLens Classification projects, go [here](./classification).
* **Anomaly Detection**: The downloaded images are grouped into folders based on their labels: **abnormal** and **normal**. To learn how to upload these files into other LandingLens Anomaly Detection projects, go [here](./anomaly-detection).
To download the dataset:
1. Click the **Snapshot** icon and select **Show snapshot list**.
2. Select the snapshot you want to use from the **Snapshots** panel.
3. Click the **Action** icon and select **Download Dataset**.
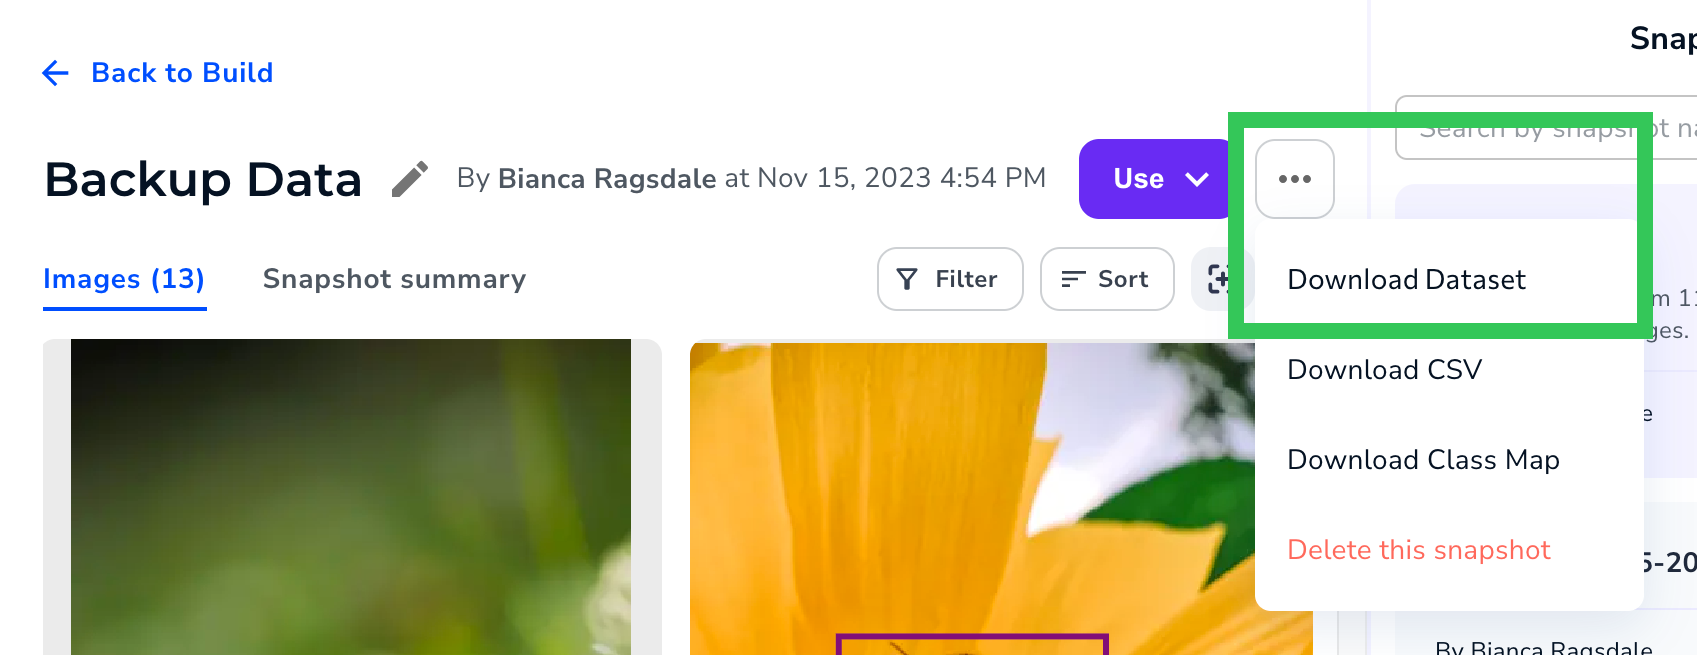 4. Your computer downloads the information as a **.tar.bz2** file, which is a compressed (zipped) folder.
5. Decompress (unzip) the file to view the file contents.
## Download Class Map
You can download the Class Map for the data in a snapshot. The Class Map is a JSON file that identifies the classes in the snapshot. You can use the Class Map to upload labeled images into Segmentation Projects in LandingLens. For more information, go to [Upload Labeled Images to Segmentation Projects](./upload-labeled-images-seg).
To download the Class Map for the data in a snapshot:
1. Click the **Snapshot** icon and select **Show snapshot list**.
2. Select the snapshot you want to use from the **Snapshots** panel.
3. Click the **Action** icon and select **Download Class Map**.
4. Your computer downloads the information as a **.tar.bz2** file, which is a compressed (zipped) folder.
5. Decompress (unzip) the file to view the file contents.
## Download Class Map
You can download the Class Map for the data in a snapshot. The Class Map is a JSON file that identifies the classes in the snapshot. You can use the Class Map to upload labeled images into Segmentation Projects in LandingLens. For more information, go to [Upload Labeled Images to Segmentation Projects](./upload-labeled-images-seg).
To download the Class Map for the data in a snapshot:
1. Click the **Snapshot** icon and select **Show snapshot list**.
2. Select the snapshot you want to use from the **Snapshots** panel.
3. Click the **Action** icon and select **Download Class Map**.
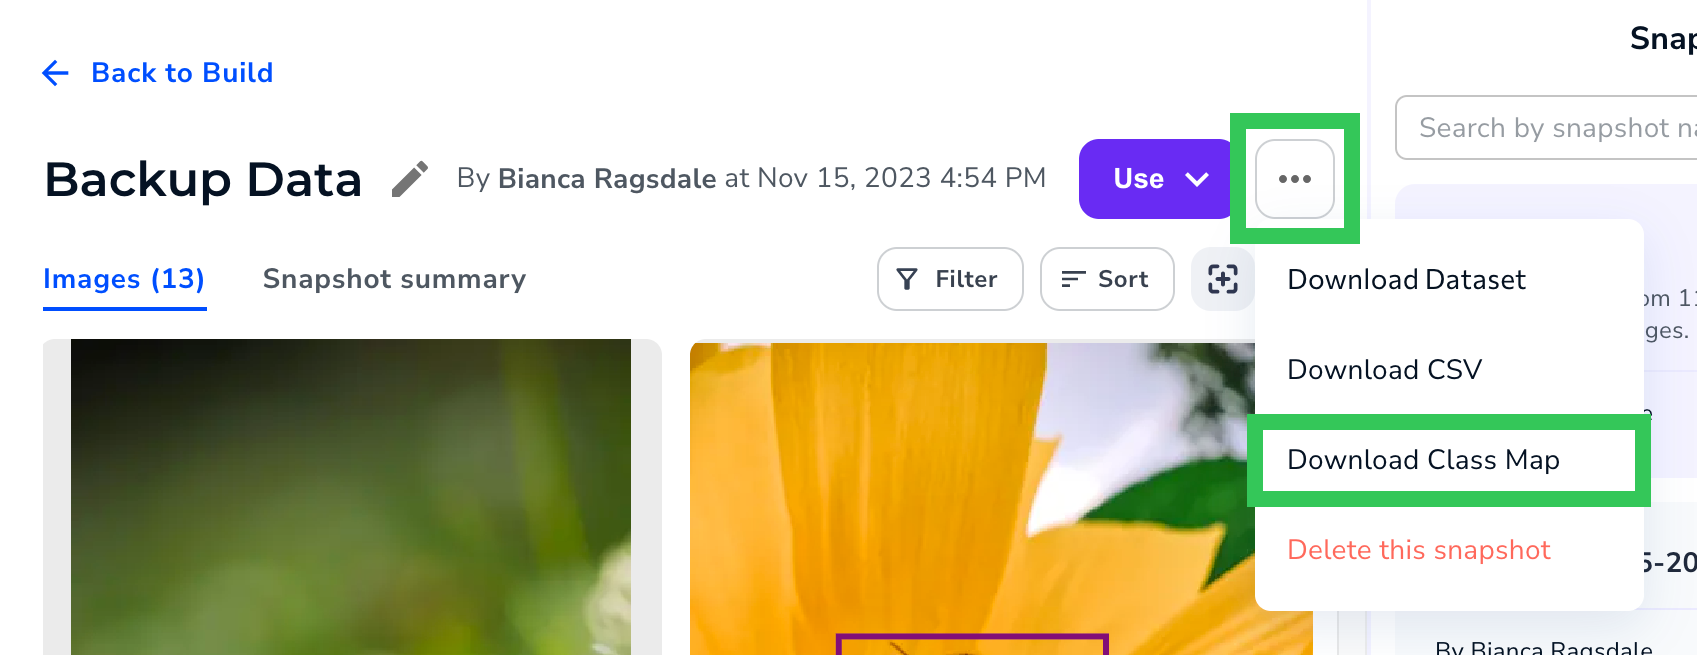 4. Your computer downloads the information in a compressed (zipped) folder.
5. Decompress (unzip) the folder to view the contents.
## Download CSV
You can download a CSV of information about the dataset. The CSV includes several columns of data, including image name and split.
To download a CSV of dataset data:
1. Click the **Snapshot** icon and select **Show snapshot list**.
2. Select the snapshot you want to use from the **Snapshots** panel.
3. Click the **Action** icon and select **Download CSV**.
4. Your computer downloads the information in a compressed (zipped) folder.
5. Decompress (unzip) the folder to view the contents.
## Download CSV
You can download a CSV of information about the dataset. The CSV includes several columns of data, including image name and split.
To download a CSV of dataset data:
1. Click the **Snapshot** icon and select **Show snapshot list**.
2. Select the snapshot you want to use from the **Snapshots** panel.
3. Click the **Action** icon and select **Download CSV**.
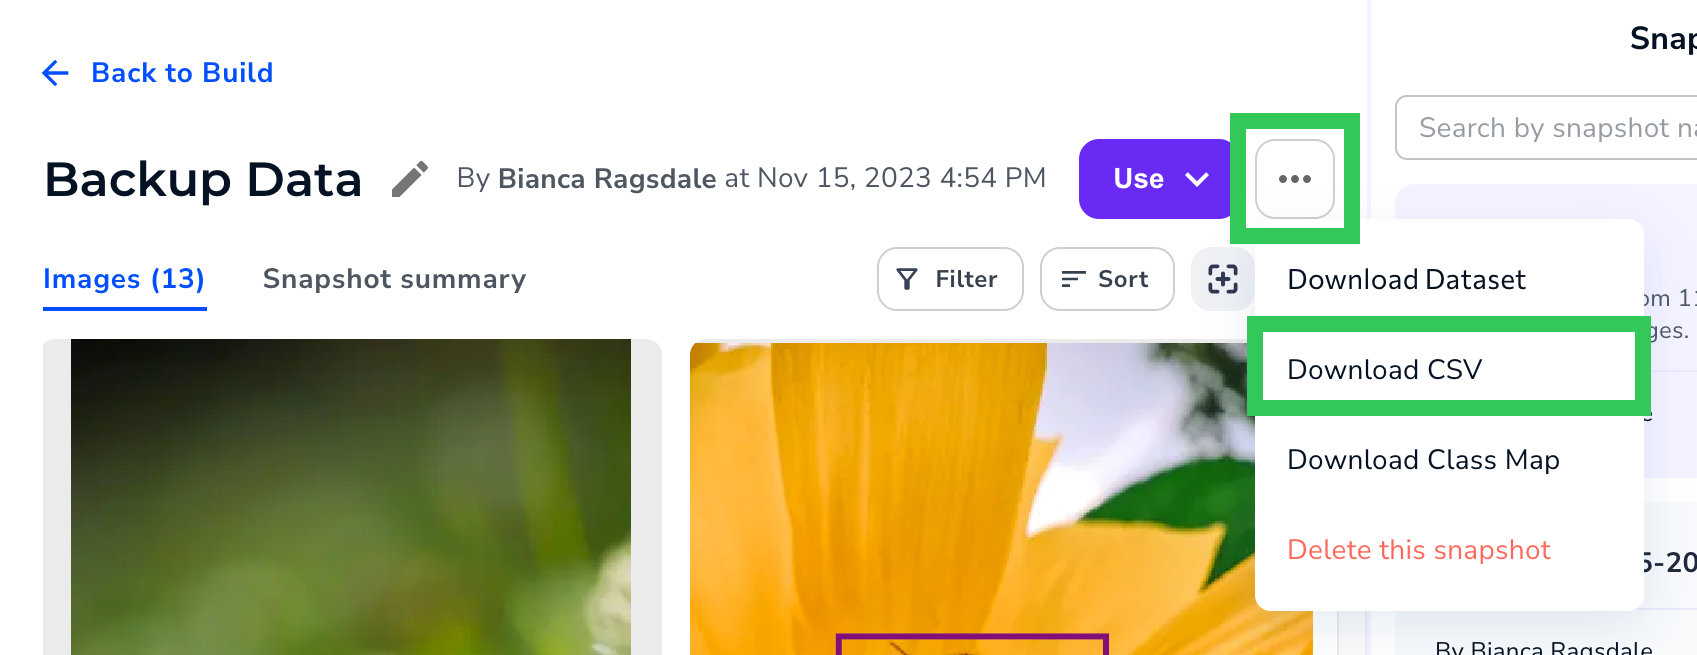 4. The file is downloaded to your computer. For a description of all data in the file, go to [CSV Data](./dataset-snapshots#csv-data).
### CSV Data
When you download a CSV of a snapshot, the file includes the information described in the following table.
| Item | Description | Example |
| ------------------- | -------------------------------------------------------------------------------------------------------------------------------------------------------------------------------------------------------------------------------------------------------------------------------------- | --------------------------------------------- |
| media\_id | Unique ID assigned to the image. | 30243316 |
| label\_id | Unique ID assigned to the set of labels on the image.
4. The file is downloaded to your computer. For a description of all data in the file, go to [CSV Data](./dataset-snapshots#csv-data).
### CSV Data
When you download a CSV of a snapshot, the file includes the information described in the following table.
| Item | Description | Example |
| ------------------- | -------------------------------------------------------------------------------------------------------------------------------------------------------------------------------------------------------------------------------------------------------------------------------------- | --------------------------------------------- |
| media\_id | Unique ID assigned to the image. | 30243316 |
| label\_id | Unique ID assigned to the set of labels on the image.
| 27200544 |
| media\_path | The URL of where the image is stored.
| s3://path/123/abc.jpg |
| bbox\_label\_path | The URL of where the XML file with the labels is stored.
If the image has no labels, the value is blank. | s3://path/123/abc.xml |
| seg\_label\_path | If the image is from a Segmentation project, this is the URL of where the [Segmentation Mask](./upload-labeled-images-seg#segmentation-mask) for the image is stored.
If the image has no labels, or if the snapshot isn't from a Segmentation project, the value is blank. | s3://path/123/abc.png |
| defect\_list | A comma-separated list of the classes labeled in the image.
If the image has no labels, the value is `[]`.
| `['Bee', 'Moth']` |
| metadata | Any metadata assigned to the image.
If the image doesn't have any metadata, the value is `{}`. | `{"Author":"Eric Smith","Organization":"QA"}` |
| split | The split assigned to the image.
If the image doesn't have a split, the value is blank. | train |
| media\_status | Identifies if the image is labeled or not.
- **approved**: The image has labels or is marked as "nothing to label".
- **raw**: The image isn't labeled.
| approved |
| labeler\_id
| The unique ID for the last user that labeled the image.
If the image isn't labeled, the value is blank. | 09ca76dd-18ab-4891-8146-52aa6aac5159
|
| labeler\_name
| The name of the last user that labeled the image.
If the image isn't labeled, the value is blank. | Lisa Johnson |
| tags | Any tags assigned to the image.
If the image doesn't have any tags, the value is `[]`. | `["Camera A","BTS"]`
|
## Delete Snapshots
If your project is [Private](./public-and-private-projects), only the project Owner can delete snapshots.
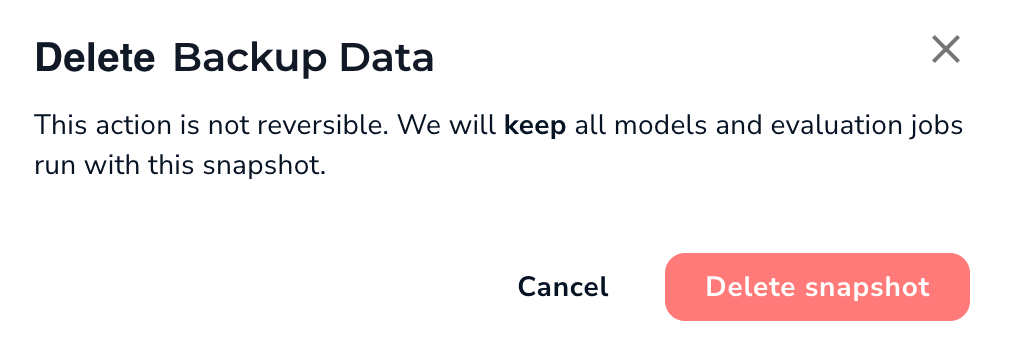
You can delete a snapshot if you no longer need it. Deleting a snapshot cannot be undone. Deleting a snapshot doesn't delete the models and evaluation jobs run with the snapshot.
To delete a snapshot:
1. Click the **Snapshot** icon and select **Show snapshot list**.
2. Select the snapshot you want to delete from the **Snapshots** panel.
3. Click the **Action** icon and select **Delete this snapshot**.
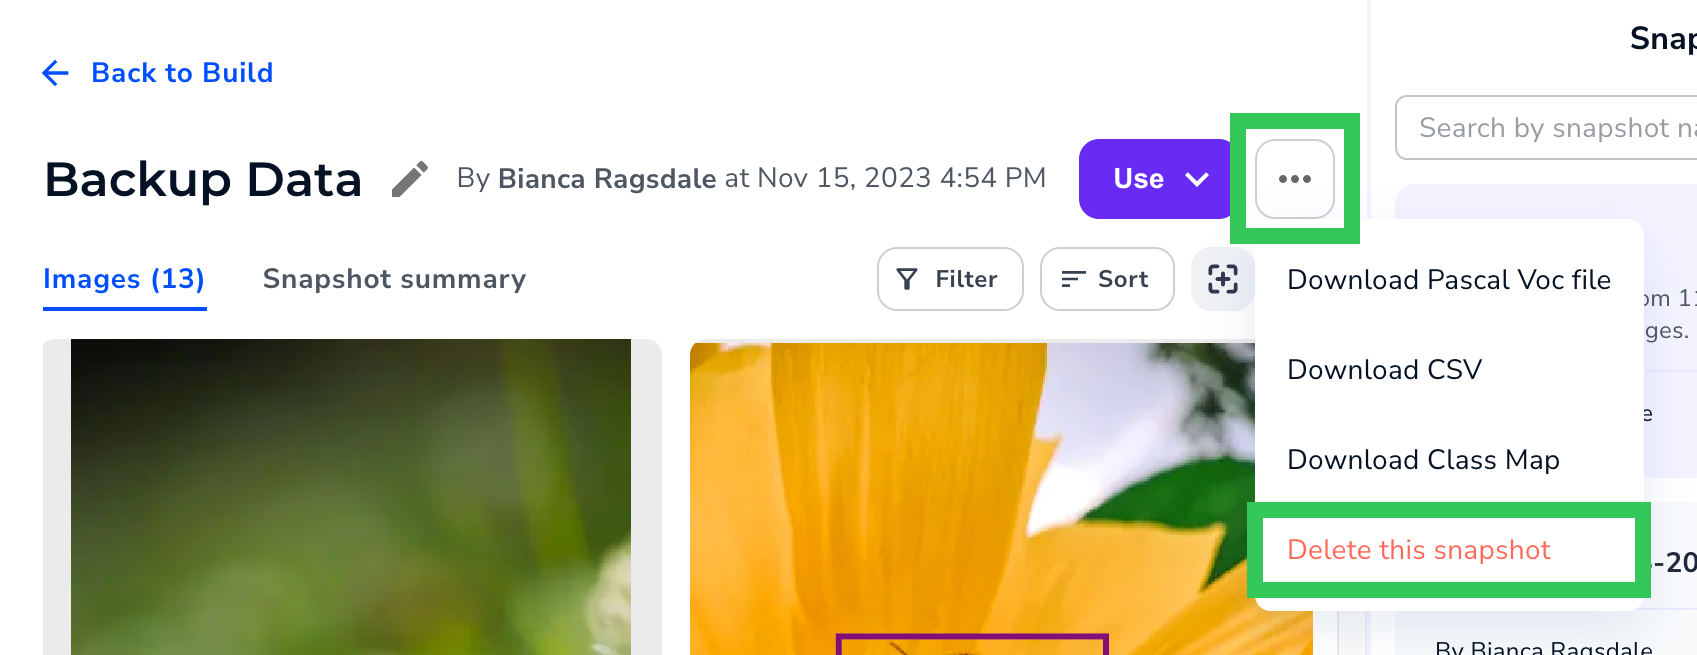 4. Click **Delete snapshot**.