> ## Documentation Index
> Fetch the complete documentation index at: https://landinglens.docs.landing.ai/llms.txt
> Use this file to discover all available pages before exploring further.
# Cloud Deployment
export const vp = 'Visual Prompting';
export const smartLabel = 'Smart Labeling';
export const productLL = 'LandingLens';
export const mi = 'Mobile Inference';
export const llsf = 'LandingLens on Snowflake';
export const companyName = 'LandingAI';
*This article applies to these versions of LandingLens:*
| LandingLens |
LandingLens on Snowflake |
| ✓ |
✓ (see exceptions below) |
The quickest and easiest deployment method is **Cloud Deployment**. At a high level, Cloud Deployment is the deployment tool built directly into LandingLens. You can set up the deployment in seconds, upload images, and see the predictions right away in LandingLens.
Now let's take a closer look at the Cloud Deployment process. First, you create an **endpoint**, which is a virtual environment hosted within the LandingLens app. If using {llsf}, the LandingLens app exists within your Snowflake environment, so the model will be hosted in Snowflake. The model you select for the deployment will run on the created endpoint. Next, you send images to the endpoint, and the model runs inference. The results then display in the LandingLens interface.
Use any of the following methods to send images to your model for inference:
* Send images using a script from our Python library
* Send images using a script from our JavaScript library (not available in {llsf})
* Send images using a [cURL command](./cloud-deployment#run-inference-using-curl-commands) (not available in {llsf})
* Send images from your phone using [{mi}](./mobile-inference) (not available in {llsf})
The Python, JavaScript, and cURL scripts automatically populate on the Deployment page when a model is deployed. You just need to fill in your API Key and image file path.
The only deployment option for {vp} is Cloud Deployment.
You can run inference up to 40 times per minute per endpoint. If you exceed that limit, the API returns a `429 Too Many Requests` response status code. We recommend implementing an error handling or retry function in your application. If you have questions about inference limits, please contact your LandingAI representative or [sales@landing.ai](mailto:sales@landing.ai).
## Deploy Models to Endpoints
You can set up multiple endpoints, which lets you run different models. After an endpoint is created, it can't be renamed or deleted. The model used for an endpoint also can't be changed.
To deploy a model to a cloud endpoint:
1. Open the project.
2. Click **Models**.
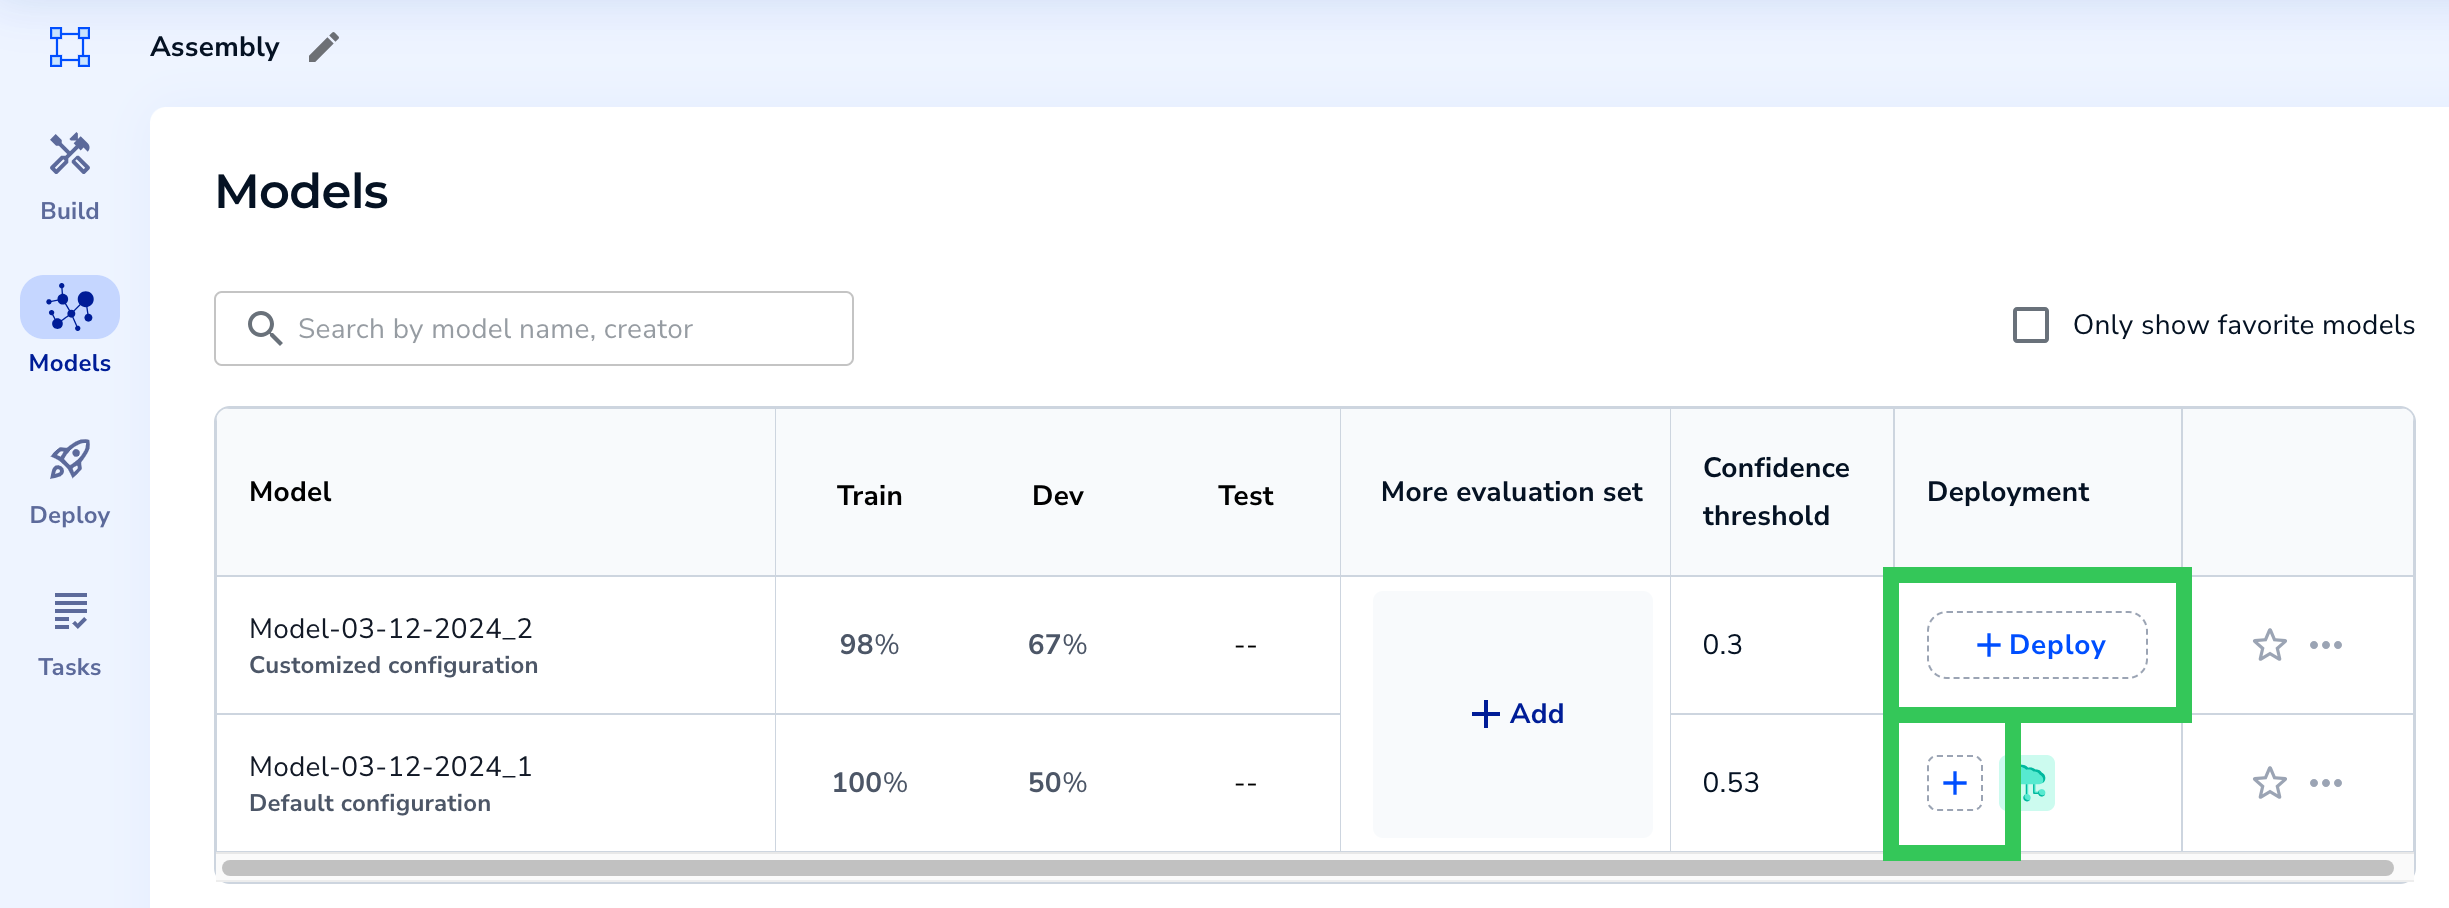
3. Click the **Deploy** or **+** button in the **Deployment** column for the model you want to deploy.
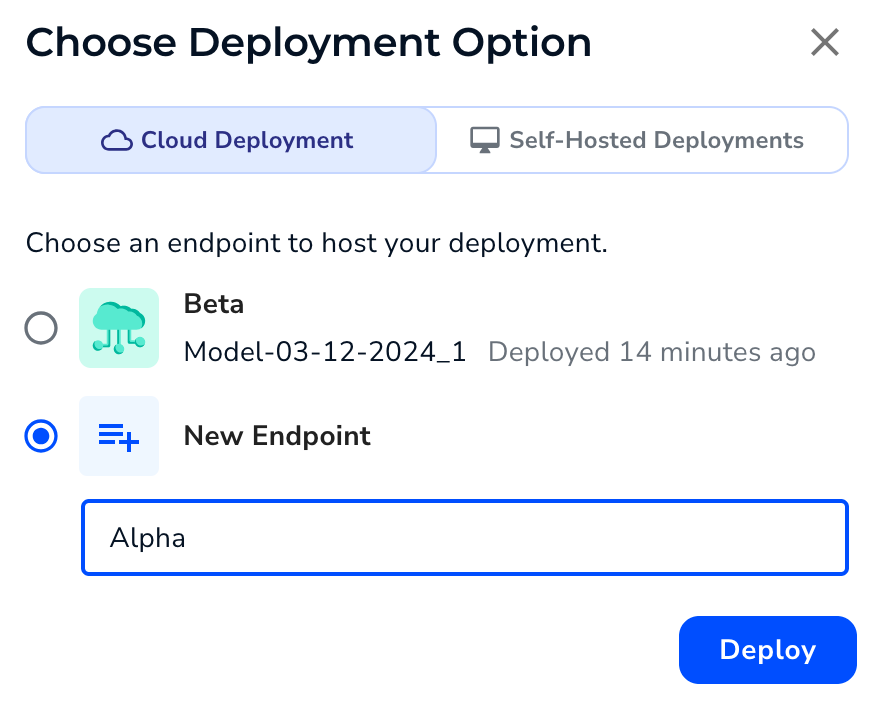
 4. Select an existing endpoint (if applicable) or click **New Endpoint** and name it.
5. Click **Deploy**.
4. Select an existing endpoint (if applicable) or click **New Endpoint** and name it.
5. Click **Deploy**.
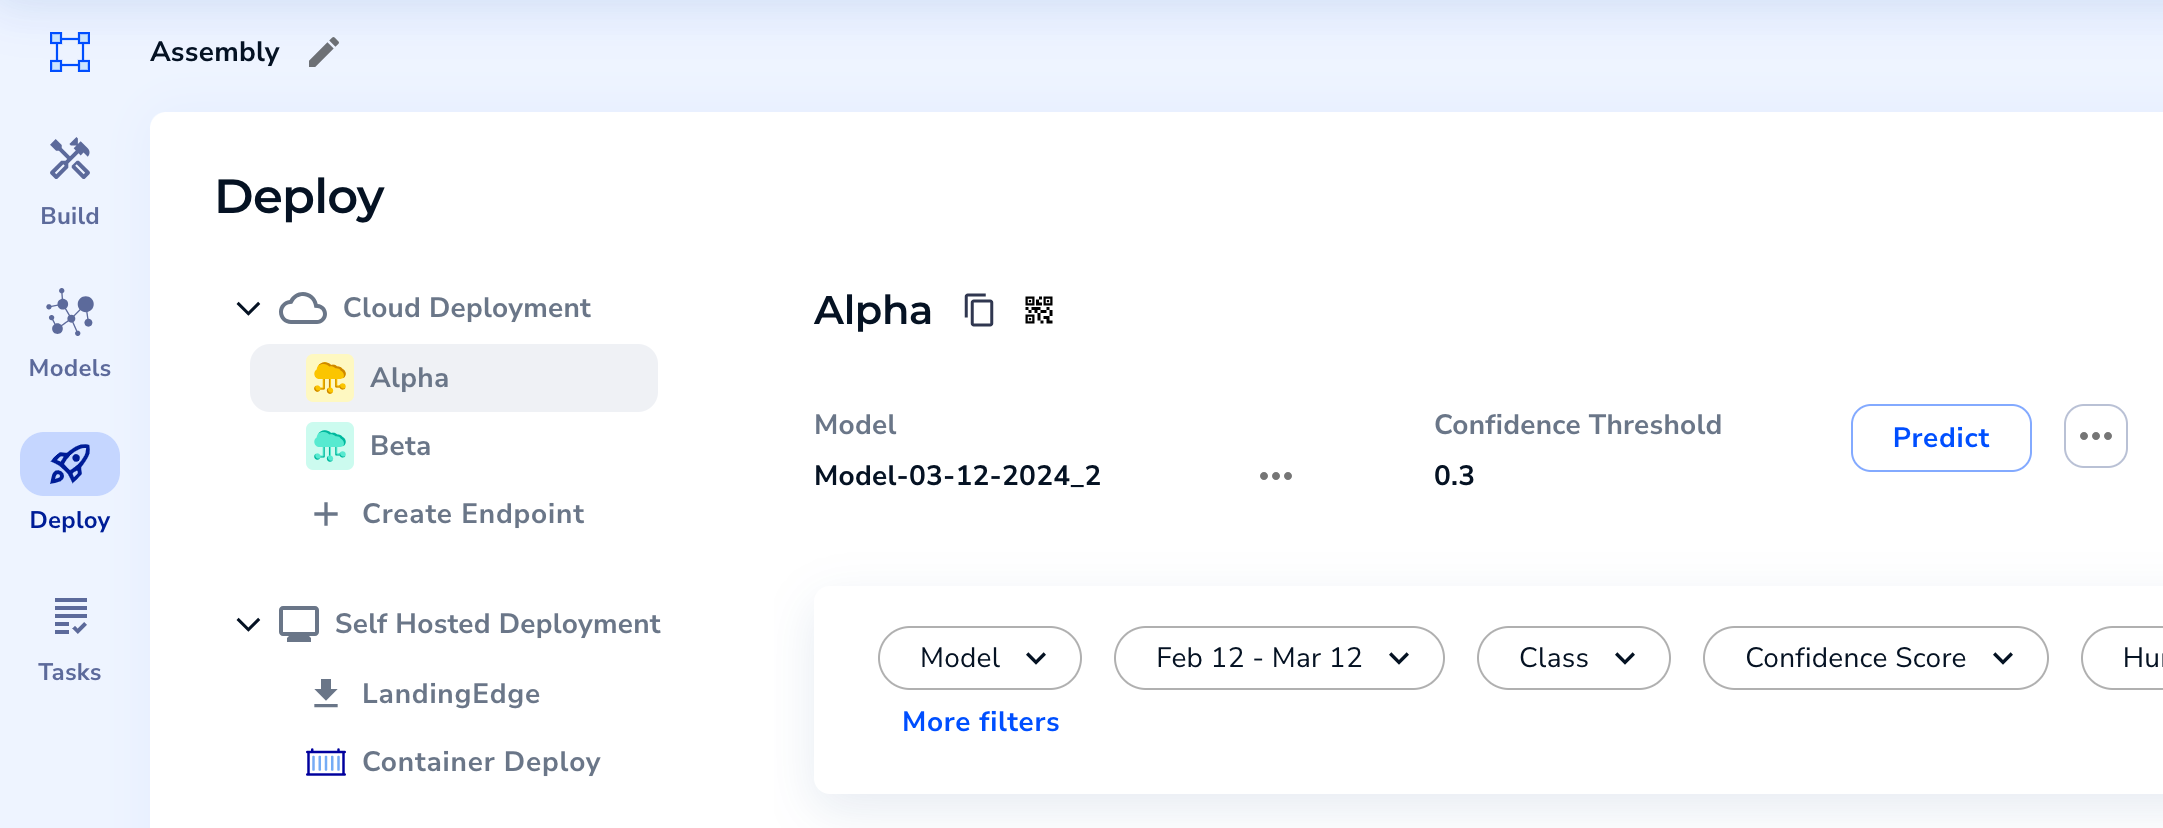
 6. LandingLens deploys the model to the endpoint and opens the **Deploy** page. You can now use this endpoint to run inference.
 You can create endpoints on the Deploy page, but you can't deploy models to those endpoints on that page.
## Try This Model
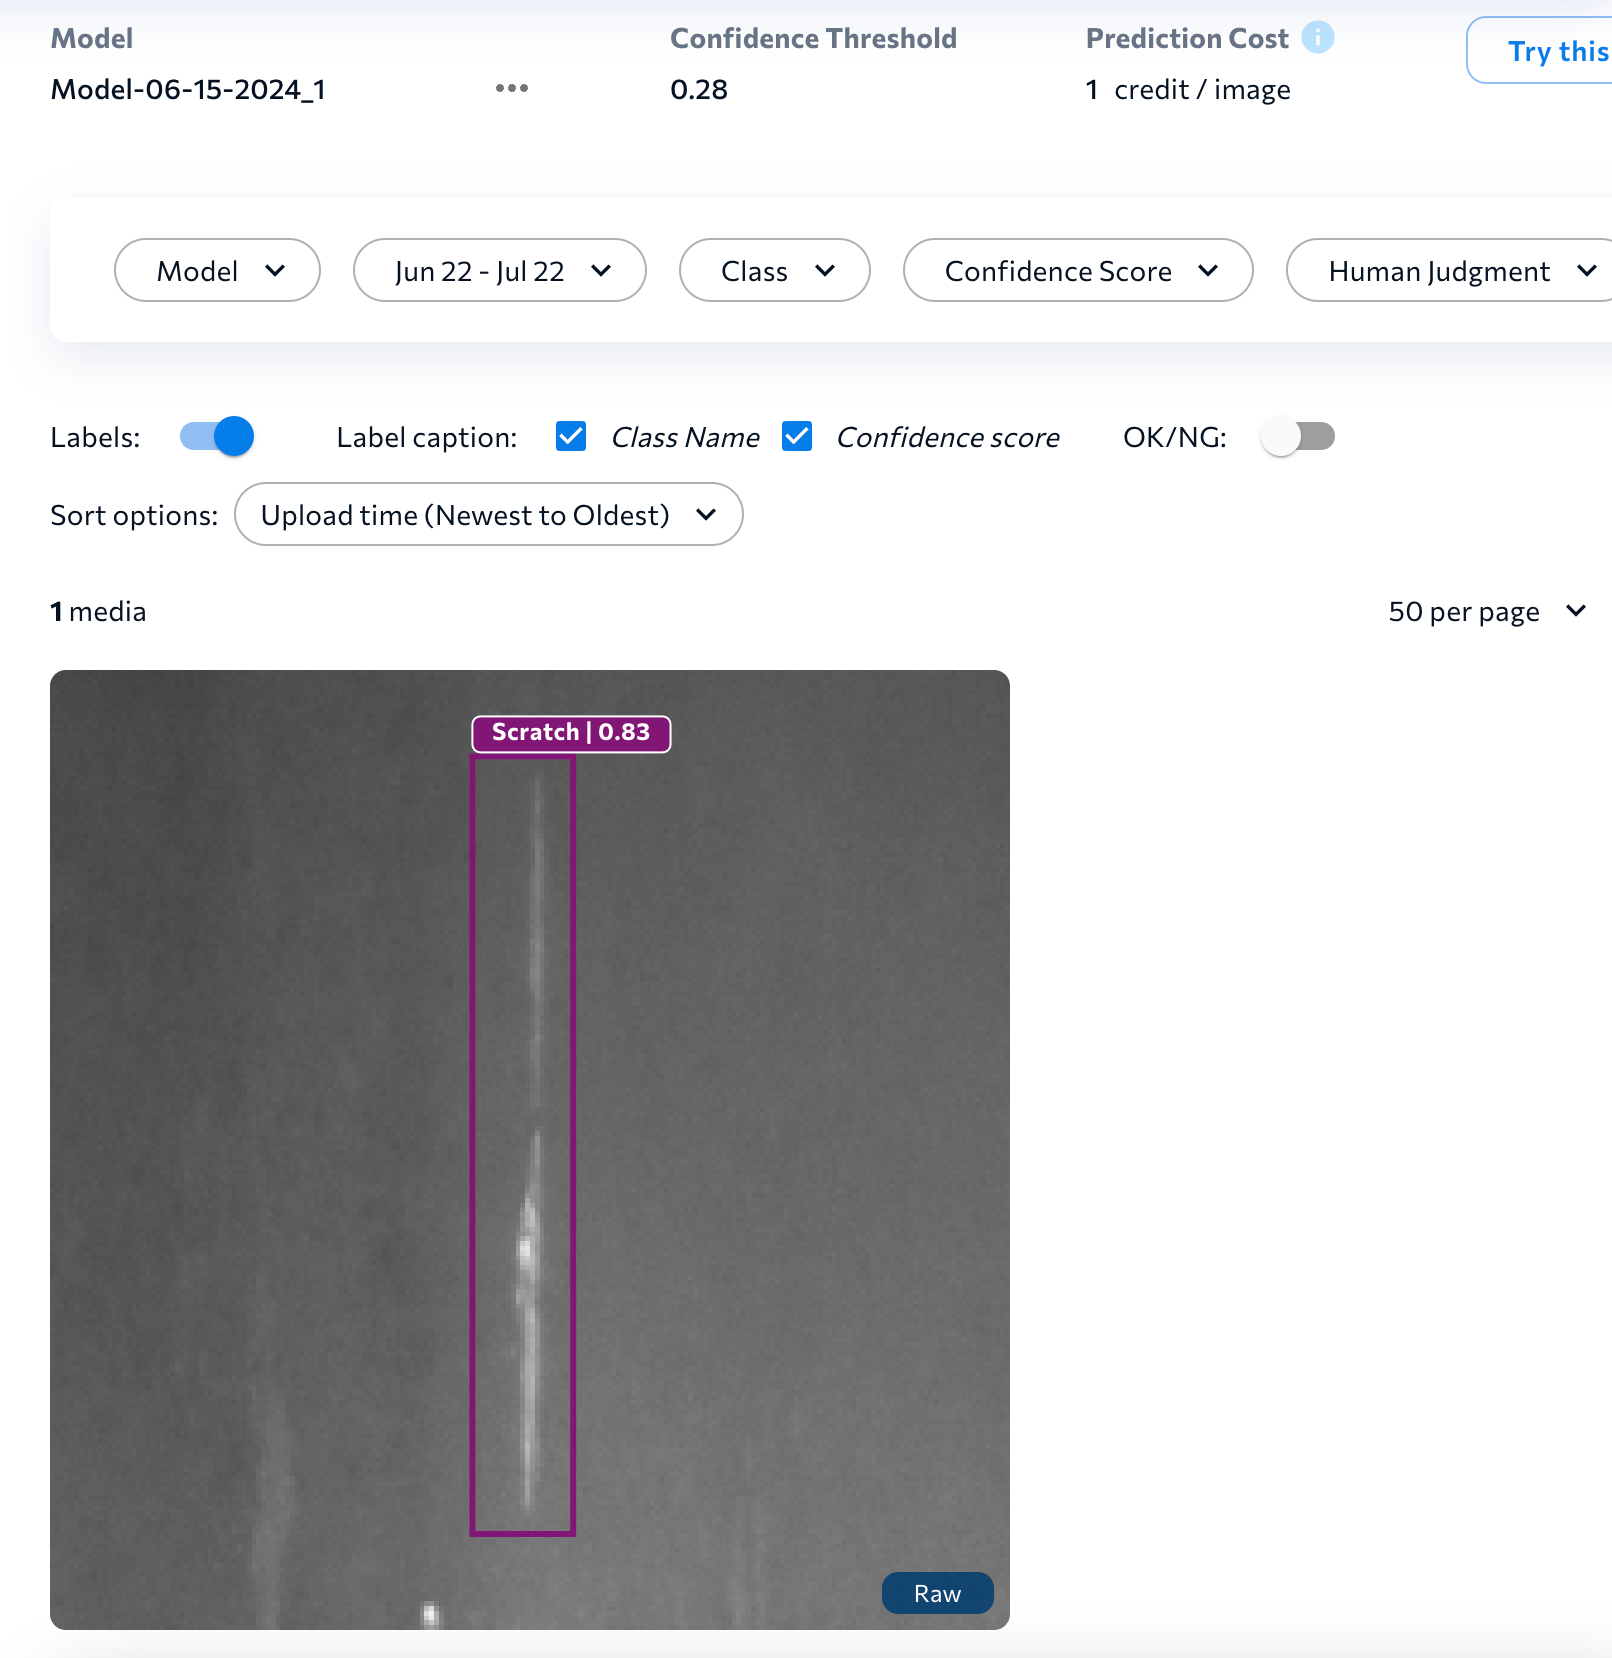
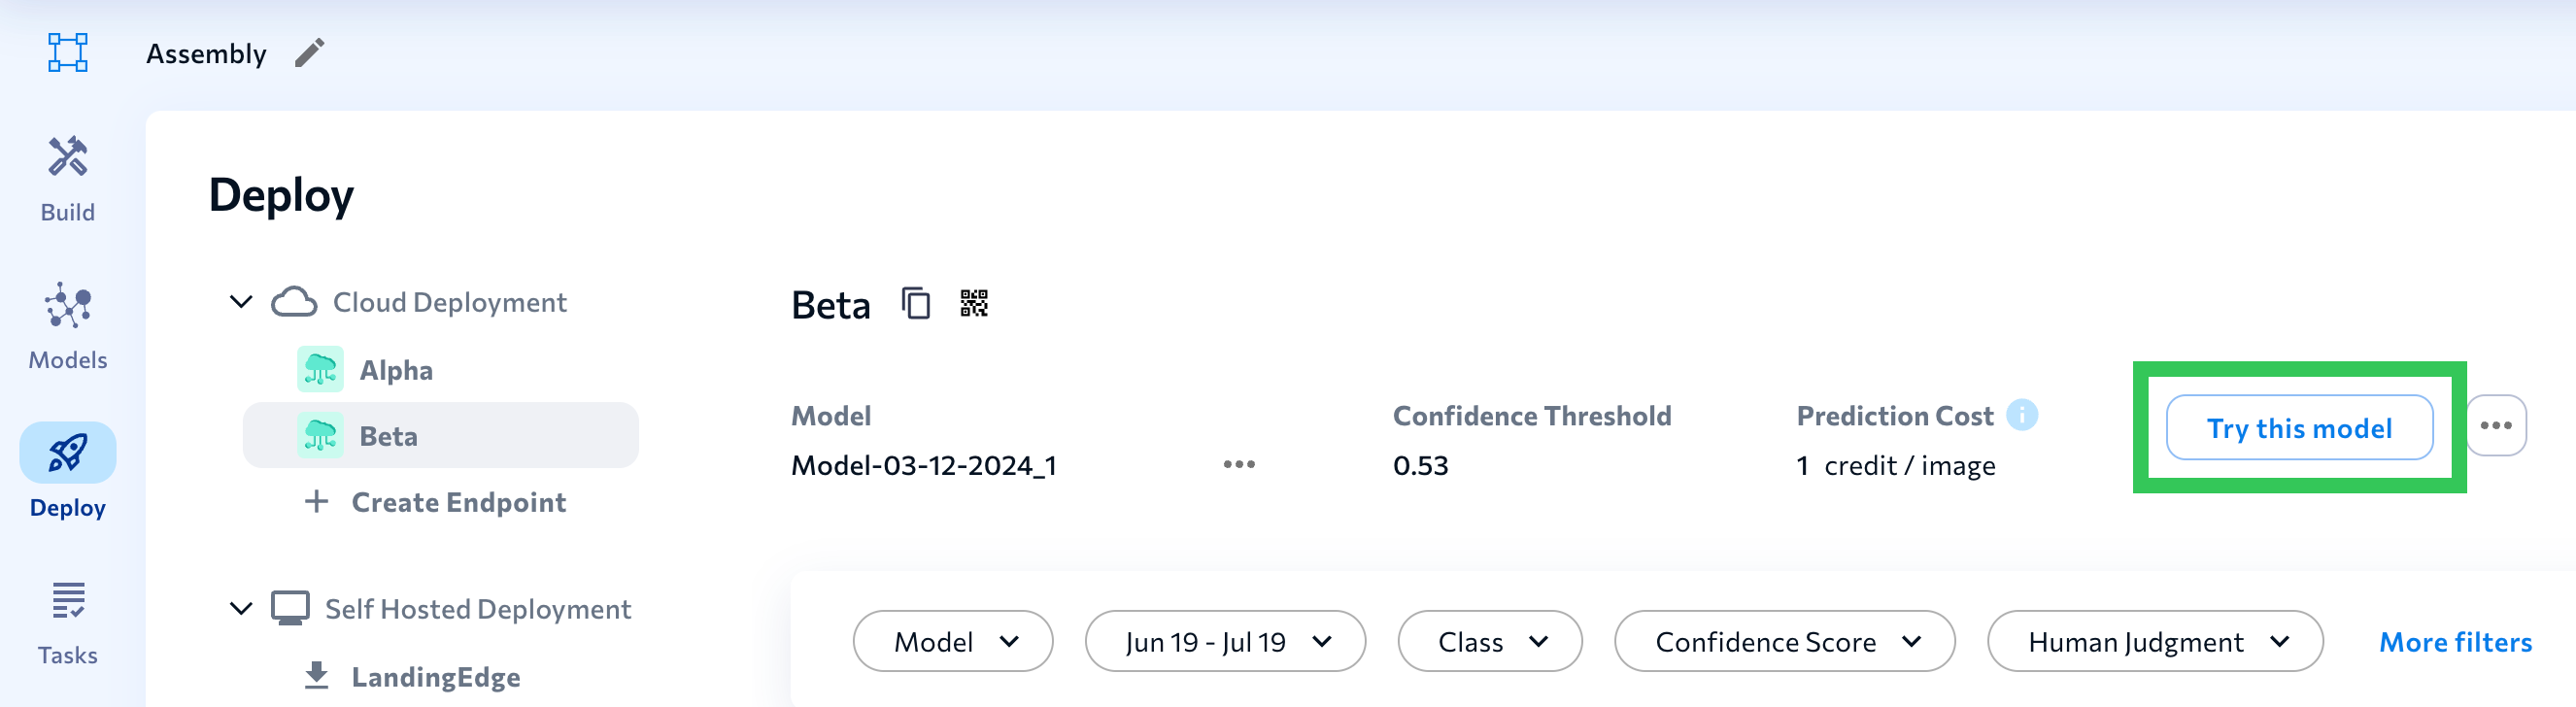
After you set up an endpoint, you can test model performance by using the **Try this model** tool. Using **Try this model** is a good way to "spot-check" a model's performance.
When you click **Try this model**, you can upload a few images to see how the model performs on them. Ideally, you should upload images that aren't already in the dataset and that match your real-world use case. If the model performs well on the new images, you can continue the deployment process. If the model doesn't perform well on the images, try uploading and labeling more images in your project. Then run **Try this model** again.
The **Try this model** tool runs inference on each image, so using this tool costs 1 credit per image. (The credit cost is not applicable when using {llsf}.)
To use **Try this model**:
1. Open a project.
2. Click **Deploy**.
3. Select the endpoint you want to use.
4. Click **Try this model**.
You can create endpoints on the Deploy page, but you can't deploy models to those endpoints on that page.
## Try This Model
After you set up an endpoint, you can test model performance by using the **Try this model** tool. Using **Try this model** is a good way to "spot-check" a model's performance.
When you click **Try this model**, you can upload a few images to see how the model performs on them. Ideally, you should upload images that aren't already in the dataset and that match your real-world use case. If the model performs well on the new images, you can continue the deployment process. If the model doesn't perform well on the images, try uploading and labeling more images in your project. Then run **Try this model** again.
The **Try this model** tool runs inference on each image, so using this tool costs 1 credit per image. (The credit cost is not applicable when using {llsf}.)
To use **Try this model**:
1. Open a project.
2. Click **Deploy**.
3. Select the endpoint you want to use.
4. Click **Try this model**.
 5. Upload images.
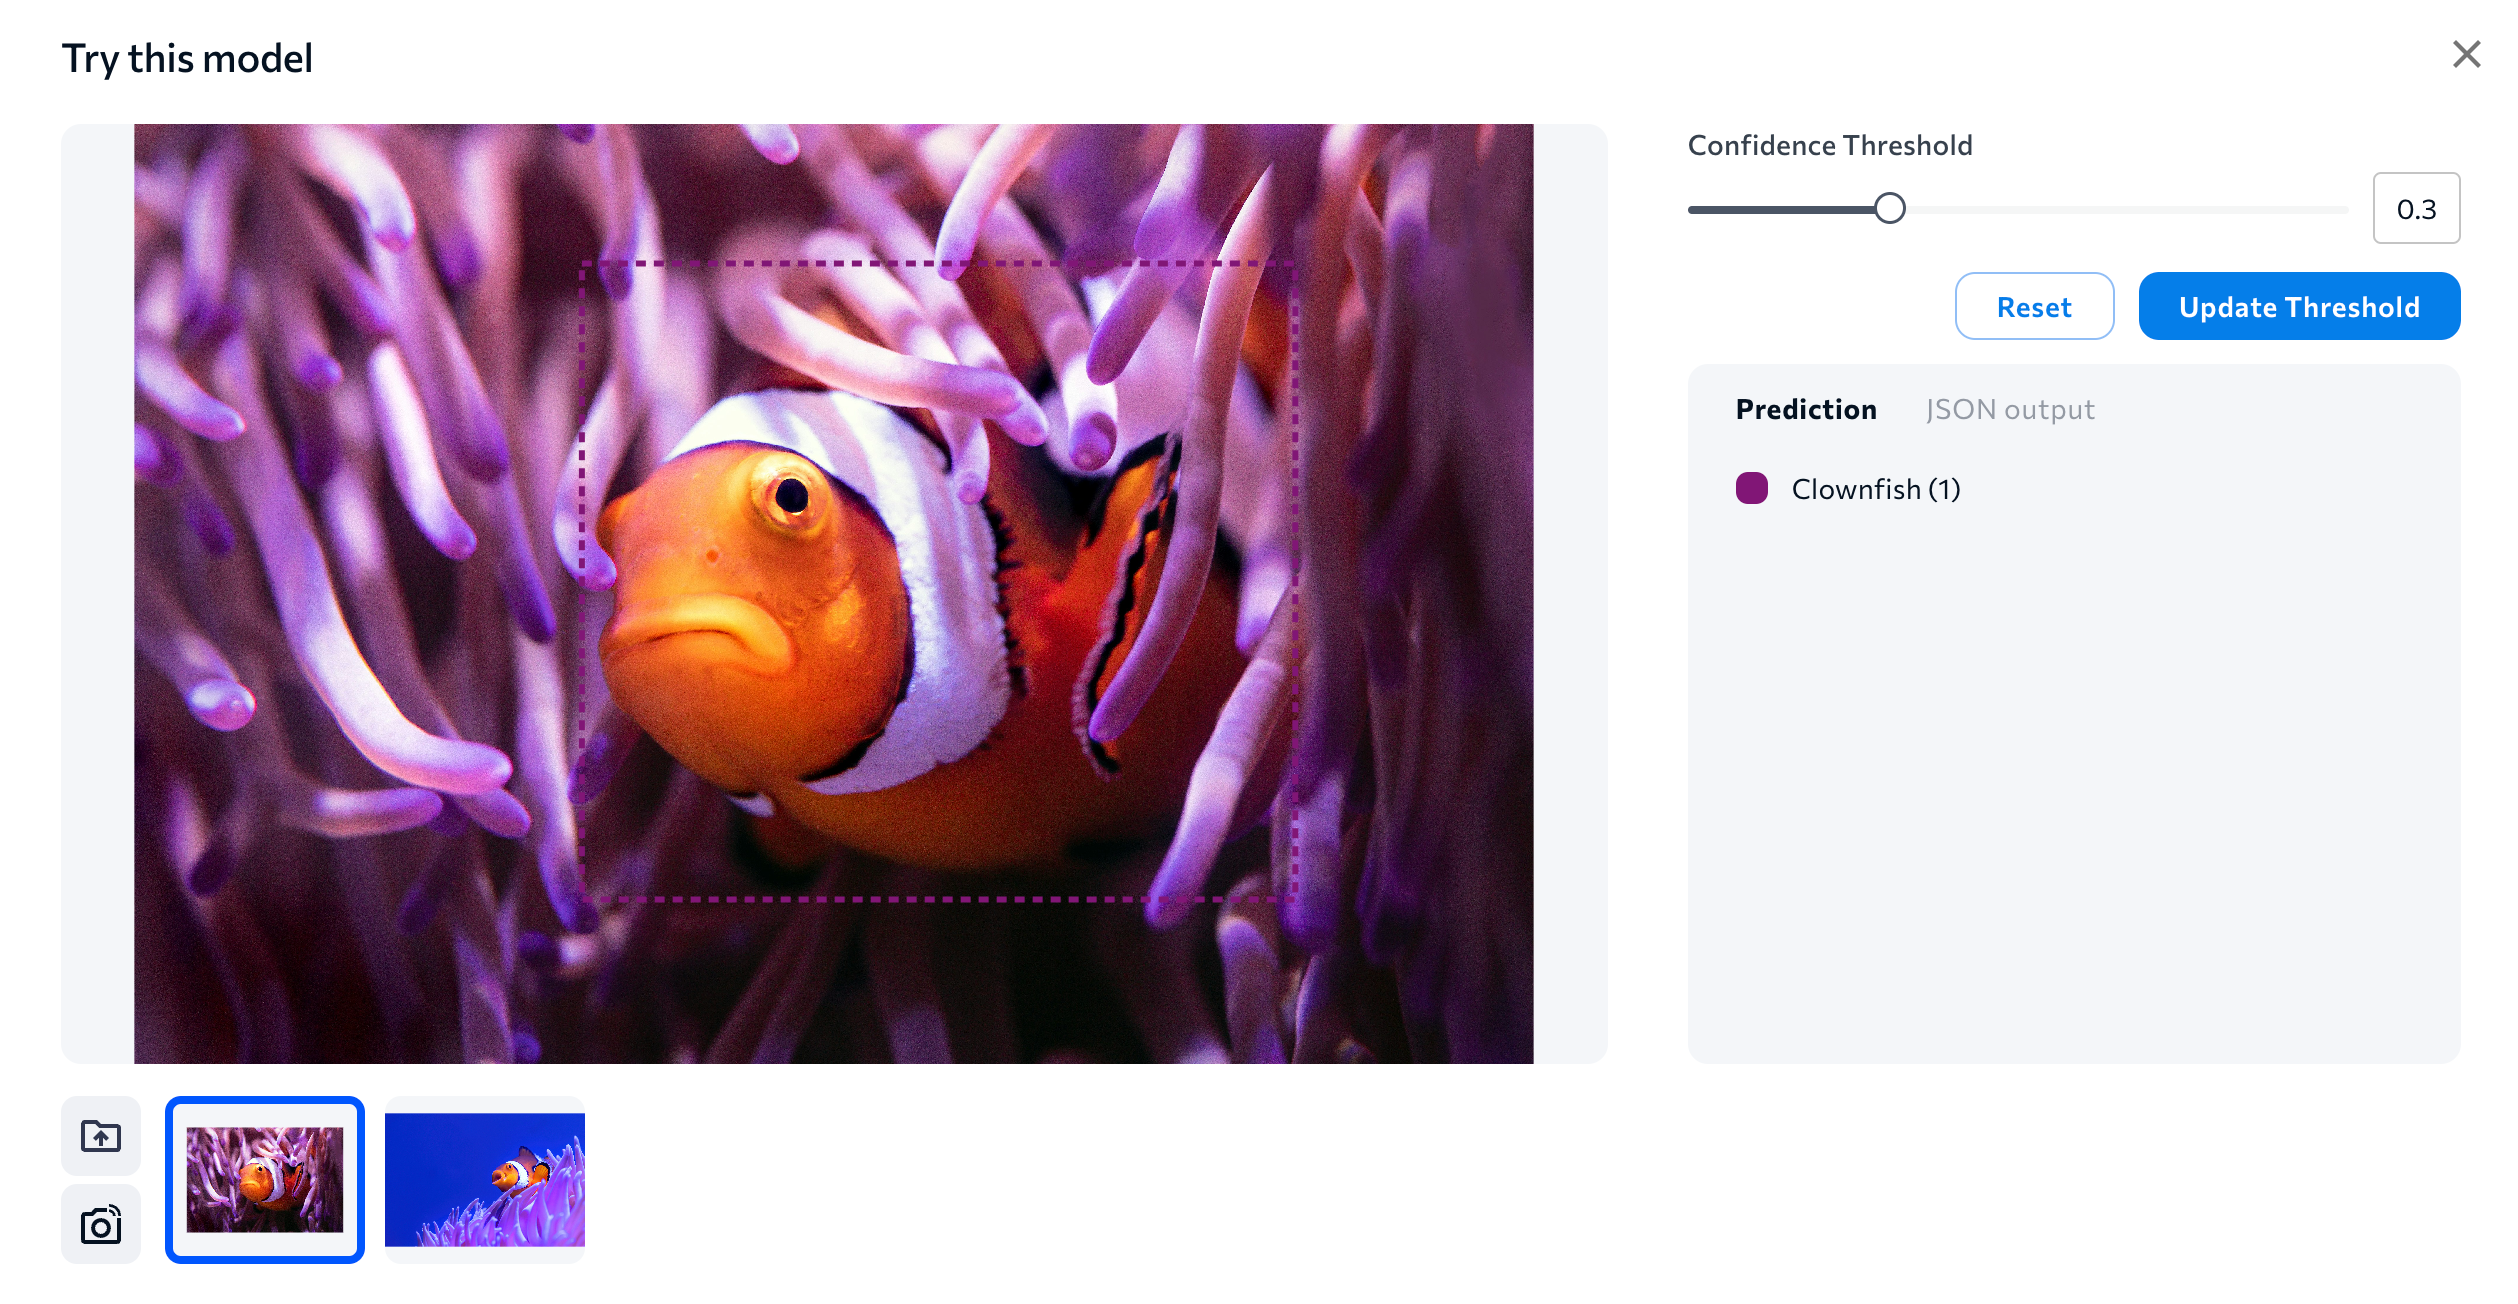
6. LandingLens runs the model and shows you the results. Adjust the **Confidence Threshold** slider to see how the model performs with different thresholds. Typically, a lower confidence threshold means that you will see more predictions, while a higher confidence threshold means you will see fewer.
5. Upload images.
6. LandingLens runs the model and shows you the results. Adjust the **Confidence Threshold** slider to see how the model performs with different thresholds. Typically, a lower confidence threshold means that you will see more predictions, while a higher confidence threshold means you will see fewer.
 ## JSON Output
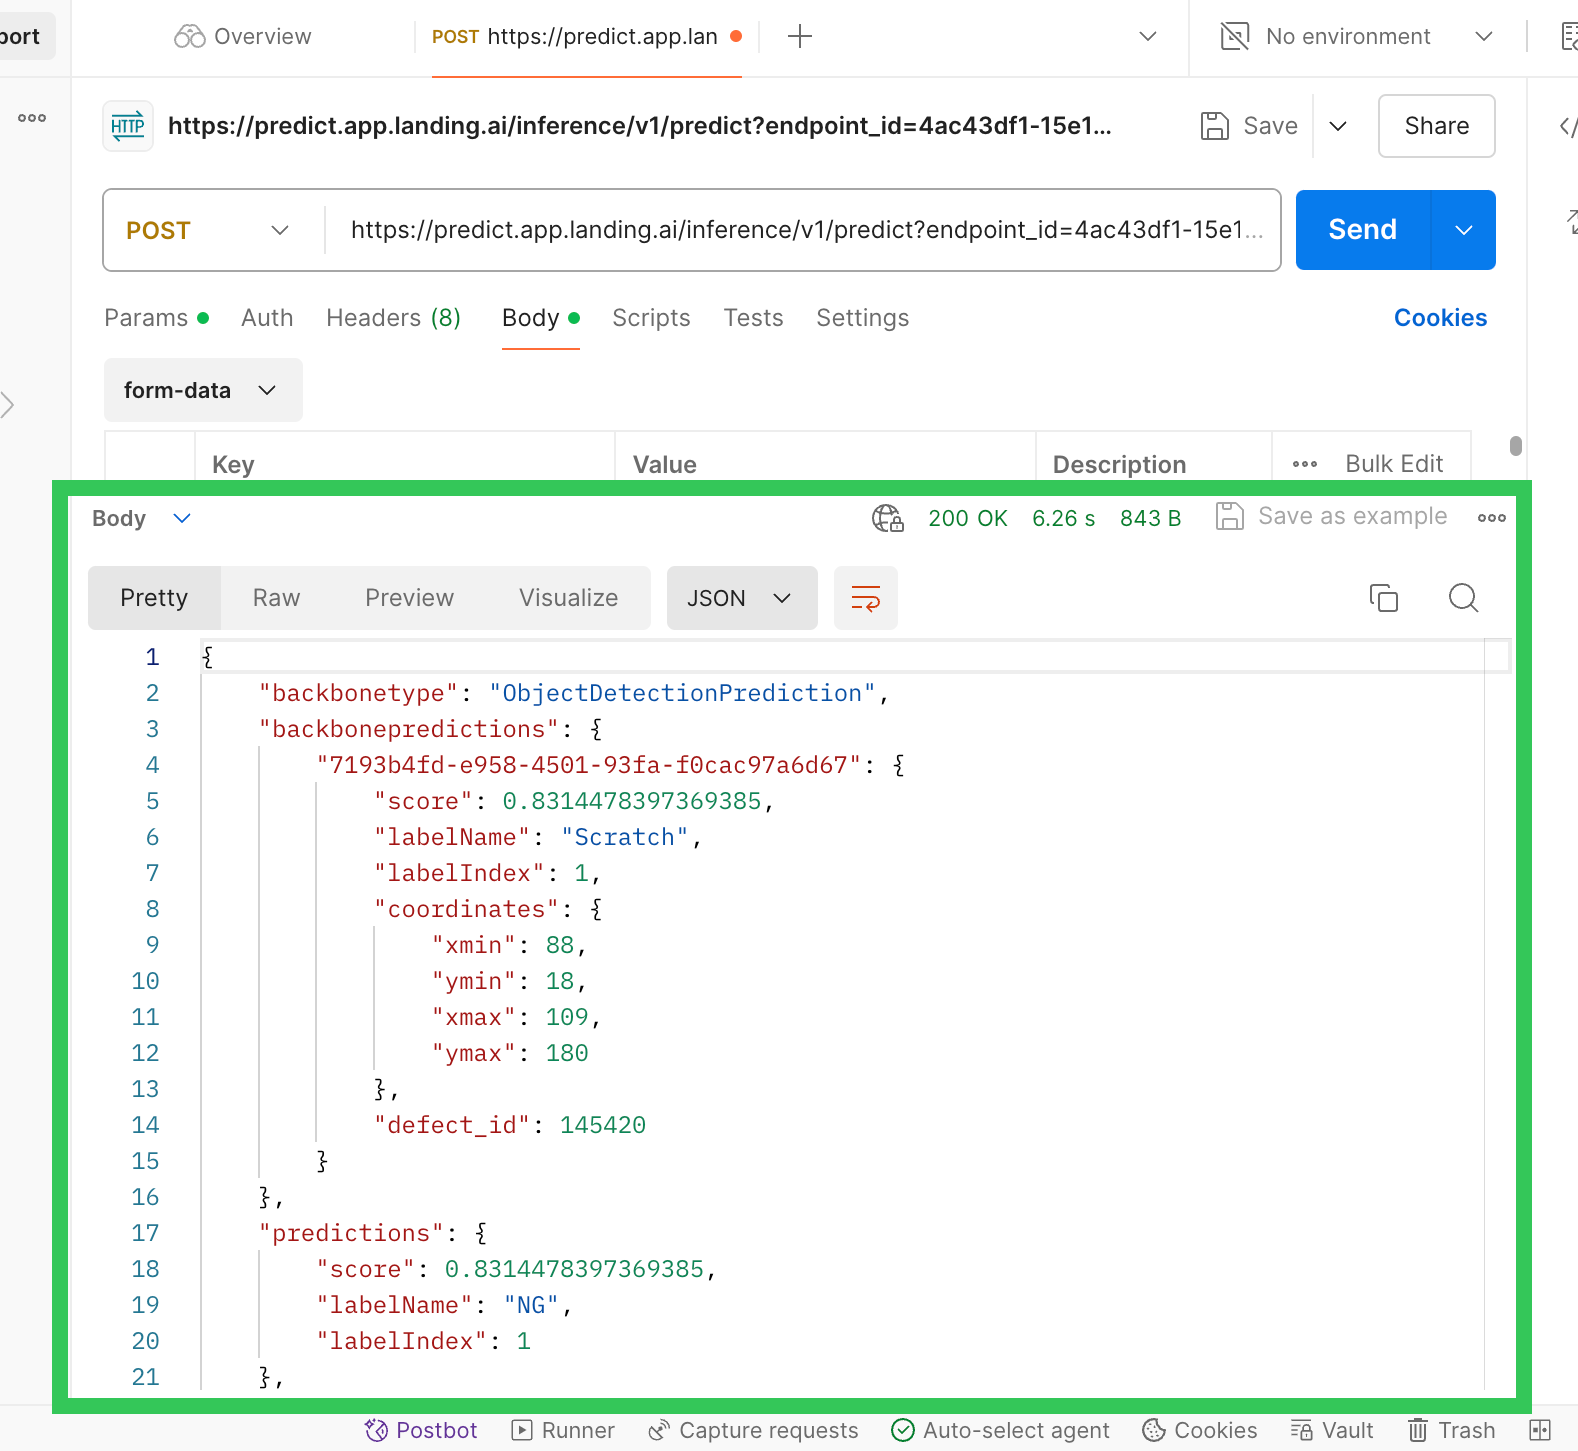
When you run inference on images, the prediction results display in a JSON format. Learn how to parse the JSON response in [JSON Prediction Responses](./json-responses).
## Run Inference Using cURL Commands
Sending images using a cURL command is not available in {llsf}.
You can run inference up to 40 times per minute per endpoint. If you exceed that limit, the API returns a `429 Too Many Requests` response status code. We recommend implementing an error handling or retry function in your application. If you have questions about inference limits, please contact your LandingAI representative or [sales@landing.ai](mailto:sales@landing.ai).
After you create an endpoint, you can run inference by running a cURL command. The cURL command automatically populates on the Deployment page when a model is deployed. You just need to fill in your API Key and image file path before running the command.
To run inference using a cURL command
1. Open a project.
2. Click **Deploy**.
3. Select the endpoint you want to use.
4. You can access the cURL command in two places:
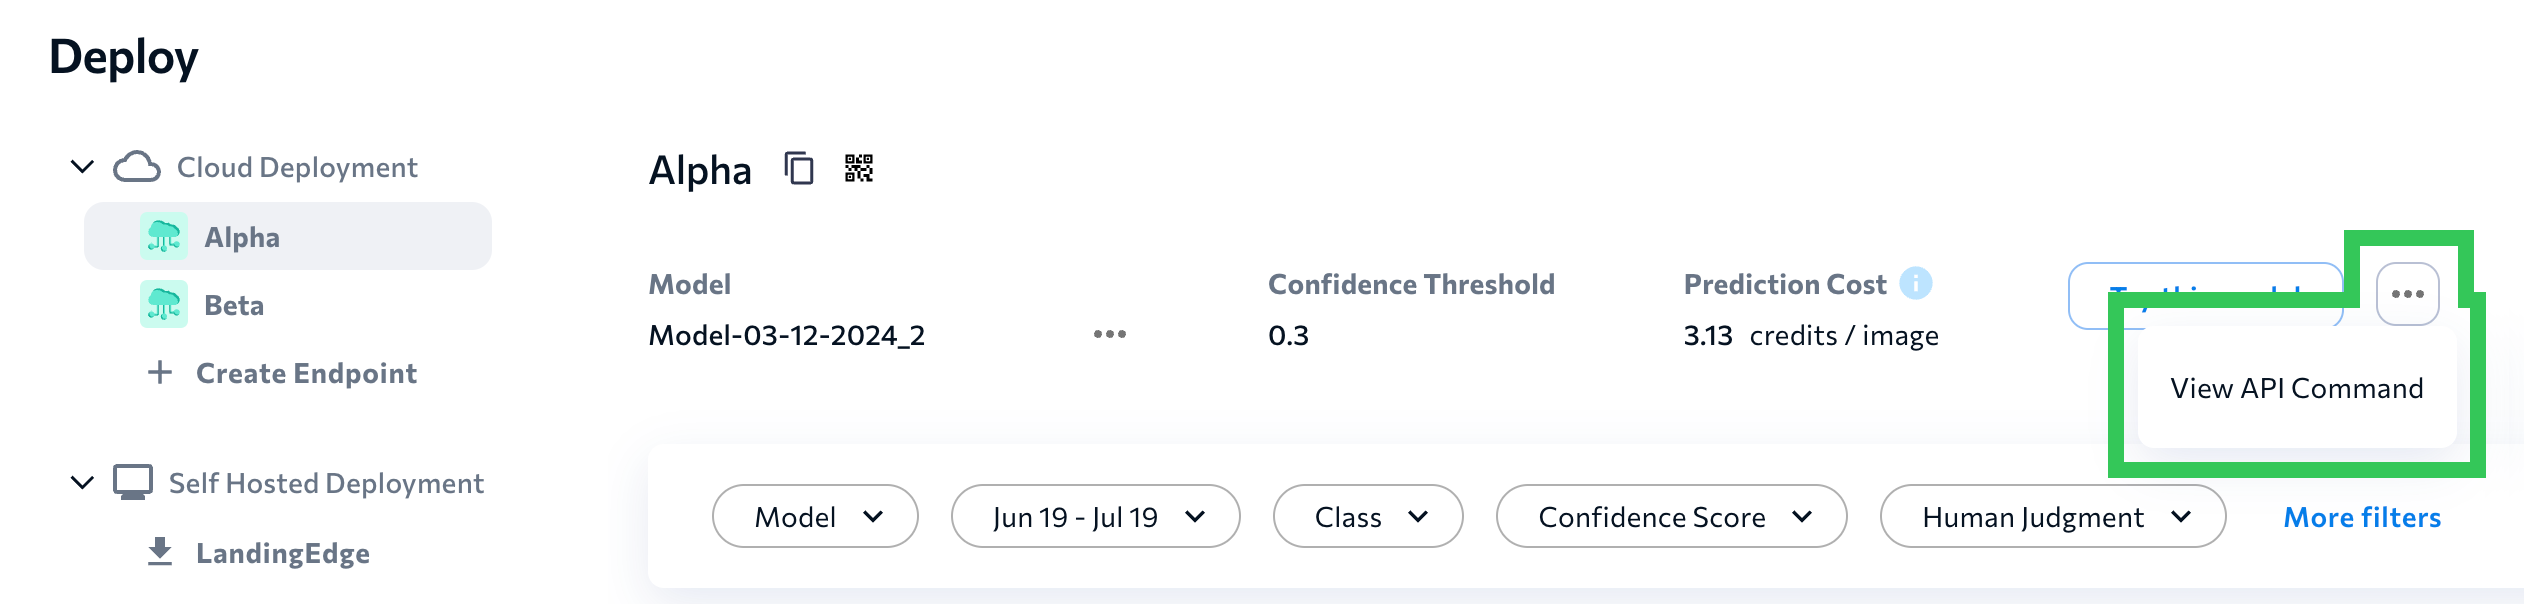
* If you haven't run inference, locate the **API Inference** section at the bottom of the page. Click the **cURL Command** tab and click **Copy** to save the cURL command to your clipboard.
## JSON Output
When you run inference on images, the prediction results display in a JSON format. Learn how to parse the JSON response in [JSON Prediction Responses](./json-responses).
## Run Inference Using cURL Commands
Sending images using a cURL command is not available in {llsf}.
You can run inference up to 40 times per minute per endpoint. If you exceed that limit, the API returns a `429 Too Many Requests` response status code. We recommend implementing an error handling or retry function in your application. If you have questions about inference limits, please contact your LandingAI representative or [sales@landing.ai](mailto:sales@landing.ai).
After you create an endpoint, you can run inference by running a cURL command. The cURL command automatically populates on the Deployment page when a model is deployed. You just need to fill in your API Key and image file path before running the command.
To run inference using a cURL command
1. Open a project.
2. Click **Deploy**.
3. Select the endpoint you want to use.
4. You can access the cURL command in two places:
* If you haven't run inference, locate the **API Inference** section at the bottom of the page. Click the **cURL Command** tab and click **Copy** to save the cURL command to your clipboard.
.png?fit=max&auto=format&n=hjeGEKEYbDsj6EG_&q=85&s=f6da9cf4ebf54c96ea7070ac549f85a1) * If you've already run inference, click the **Actions** icon (...) at the top of the page and select **View API Command**. Click the **cURL Command** tab and click **Copy** to save the cURL command to your clipboard.
* If you've already run inference, click the **Actions** icon (...) at the top of the page and select **View API Command**. Click the **cURL Command** tab and click **Copy** to save the cURL command to your clipboard.
 5. Paste the cURL command into an API platform (like Postman) or integrate it into a script.
6. Update `YOUR_APIKEY` with your API Key. To generate the key, go to [API Keys](./api-key).
7. Update `YOUR_IMAGE` with the image file names you want to run inference on. For example, after updating the parameters, your cURL command could look like this:
```bash theme={null}
curl --location --request POST 'https://predict.app.landing.ai/inference/v1/predict?endpoint_id=ab1cde23-2863-49be-ae86-181198ba5b1b' \
--header 'Content-Type: multipart/form-data' \
--header 'apikey: land_sk_a1bCdFGzrqeh0I782EEfCZaK8BzQ6d1pNw5YcAZN4iSsuZxyb0' \
--form 'file=@"manufacturing_qa_123.jpeg"'
```
8. Run the command.
9. In LandingLens, open the project to the **Deploy** page (if it's already open, refresh the page). The results [display](./historical-data) at the bottom of the page.
### Example: Run the cURL Command from Postman
The procedure in this section is based on the user interface of Postman at the time of this article’s publication. However, this interface may change over time. Refer to the [Postman documentation](https://learning.postman.com/) for the current information about how to use this application.
There are several ways to run the cURL command to run inferences. If you're not familiar with cURL commands, or you just want to test out the command, you can run the cURL command from Postman. Postman is a third-party application that, among other things, lets you run cURL commands for free. LandingAI isn't affiliated with Postman, and we recommend you do your own research to determine if this tool is right for you.
The following example is intended only to show you one of the ways to run the cURL command.
#### Prepare the cURL Command
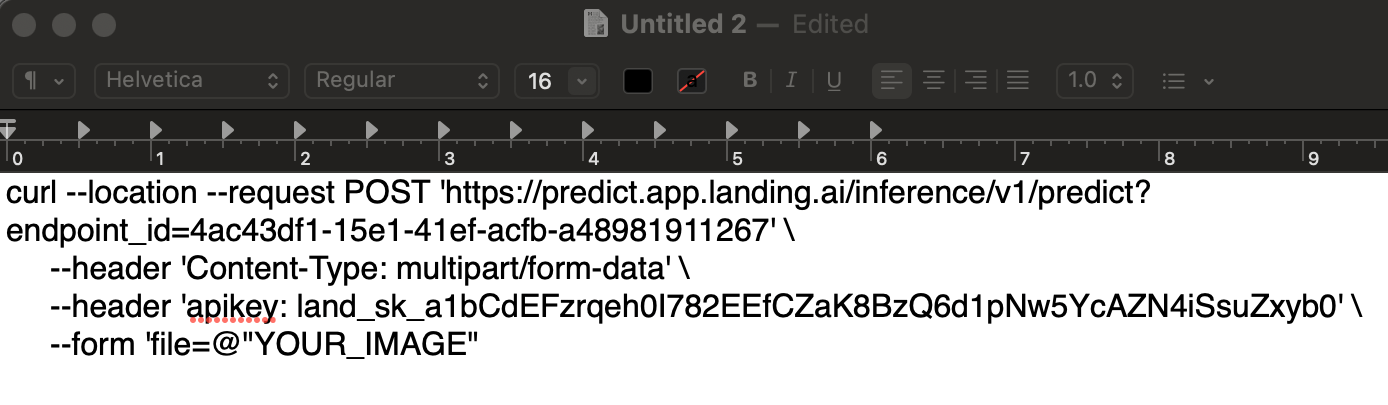
1. Copy the cURL command from the LandingLens Deploy page and paste it into a text editor.
5. Paste the cURL command into an API platform (like Postman) or integrate it into a script.
6. Update `YOUR_APIKEY` with your API Key. To generate the key, go to [API Keys](./api-key).
7. Update `YOUR_IMAGE` with the image file names you want to run inference on. For example, after updating the parameters, your cURL command could look like this:
```bash theme={null}
curl --location --request POST 'https://predict.app.landing.ai/inference/v1/predict?endpoint_id=ab1cde23-2863-49be-ae86-181198ba5b1b' \
--header 'Content-Type: multipart/form-data' \
--header 'apikey: land_sk_a1bCdFGzrqeh0I782EEfCZaK8BzQ6d1pNw5YcAZN4iSsuZxyb0' \
--form 'file=@"manufacturing_qa_123.jpeg"'
```
8. Run the command.
9. In LandingLens, open the project to the **Deploy** page (if it's already open, refresh the page). The results [display](./historical-data) at the bottom of the page.
### Example: Run the cURL Command from Postman
The procedure in this section is based on the user interface of Postman at the time of this article’s publication. However, this interface may change over time. Refer to the [Postman documentation](https://learning.postman.com/) for the current information about how to use this application.
There are several ways to run the cURL command to run inferences. If you're not familiar with cURL commands, or you just want to test out the command, you can run the cURL command from Postman. Postman is a third-party application that, among other things, lets you run cURL commands for free. LandingAI isn't affiliated with Postman, and we recommend you do your own research to determine if this tool is right for you.
The following example is intended only to show you one of the ways to run the cURL command.
#### Prepare the cURL Command
1. Copy the cURL command from the LandingLens Deploy page and paste it into a text editor.
 2. Update `YOUR_APIKEY` with your API Key. To generate the key, go to [API Keys](./api-key).
3. Keep the `YOUR_IMAGE` placeholder; you can upload images through Postman later.
2. Update `YOUR_APIKEY` with your API Key. To generate the key, go to [API Keys](./api-key).
3. Keep the `YOUR_IMAGE` placeholder; you can upload images through Postman later.
 #### Set Up Postman and Run the cURL Command
1. Sign up for a free version of Postman.
2. Set up the Postman web app and download Postman Agent. For more information, check out the [Postman installation instructions](https://learning.postman.com/docs/getting-started/installation/installation-and-updates/).
3. Create or open a workspace in Postman.
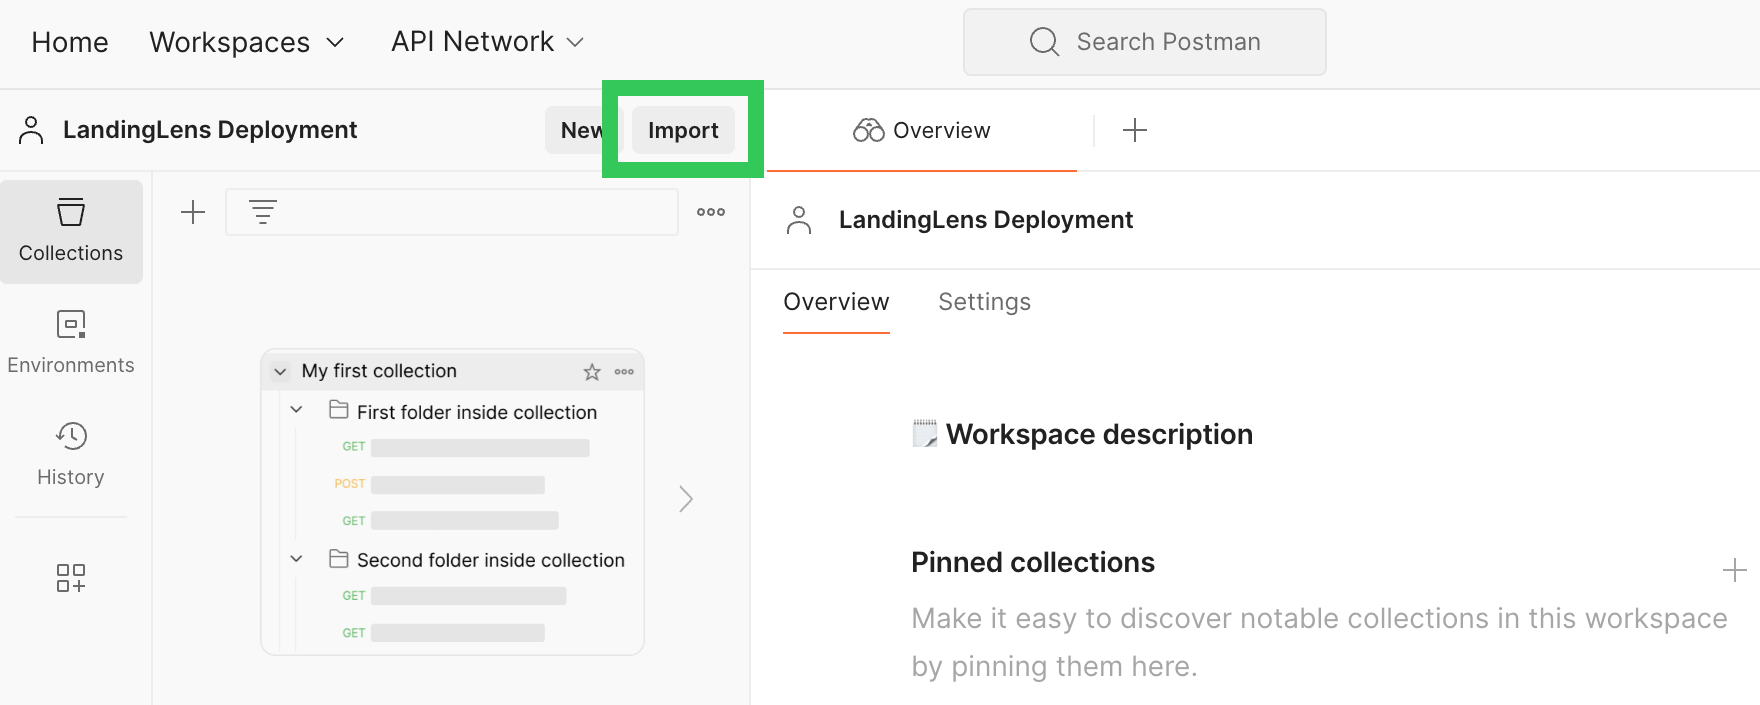
4. Click **Import** in the left side bar.
#### Set Up Postman and Run the cURL Command
1. Sign up for a free version of Postman.
2. Set up the Postman web app and download Postman Agent. For more information, check out the [Postman installation instructions](https://learning.postman.com/docs/getting-started/installation/installation-and-updates/).
3. Create or open a workspace in Postman.
4. Click **Import** in the left side bar.
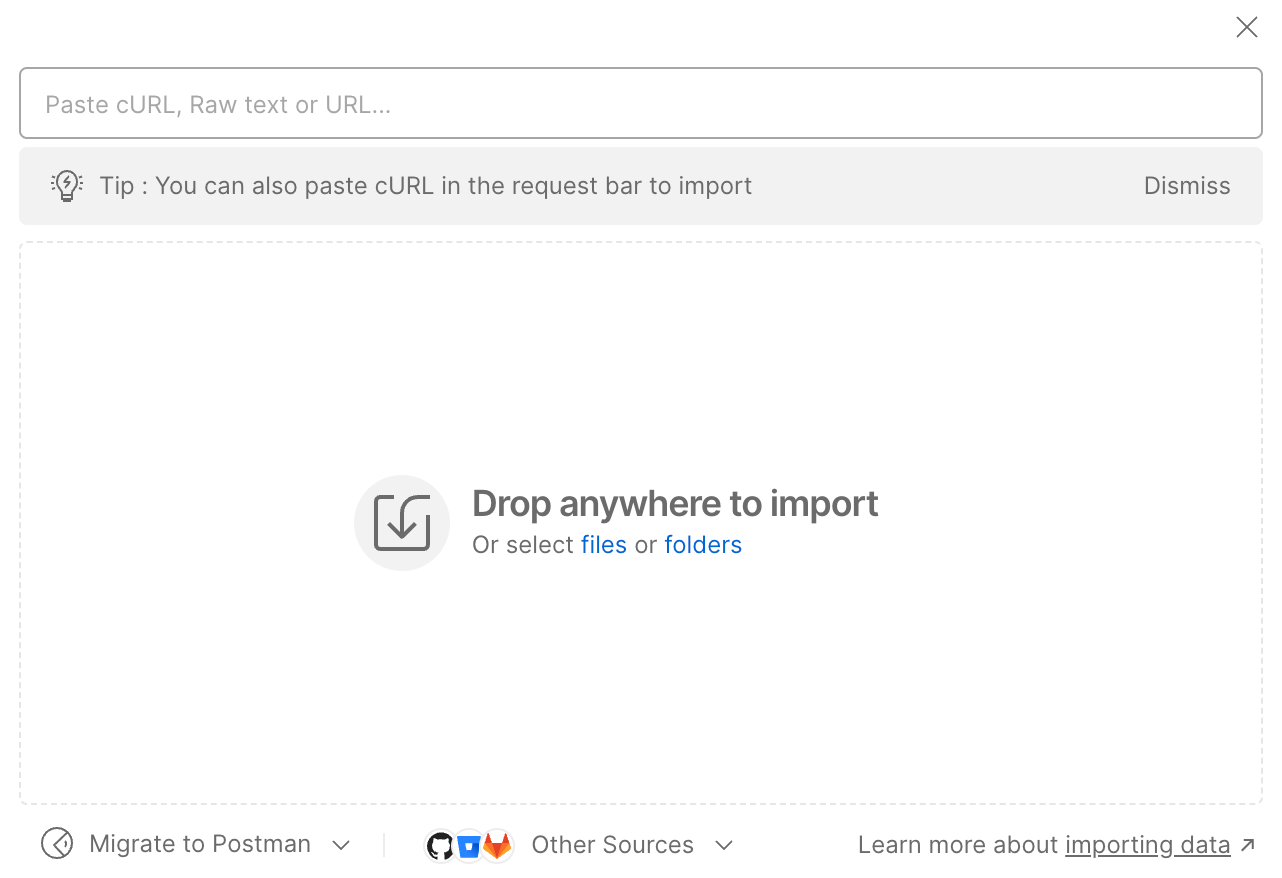
 5. Paste the cURL command. Postman automatically fills out the workspace with the command.
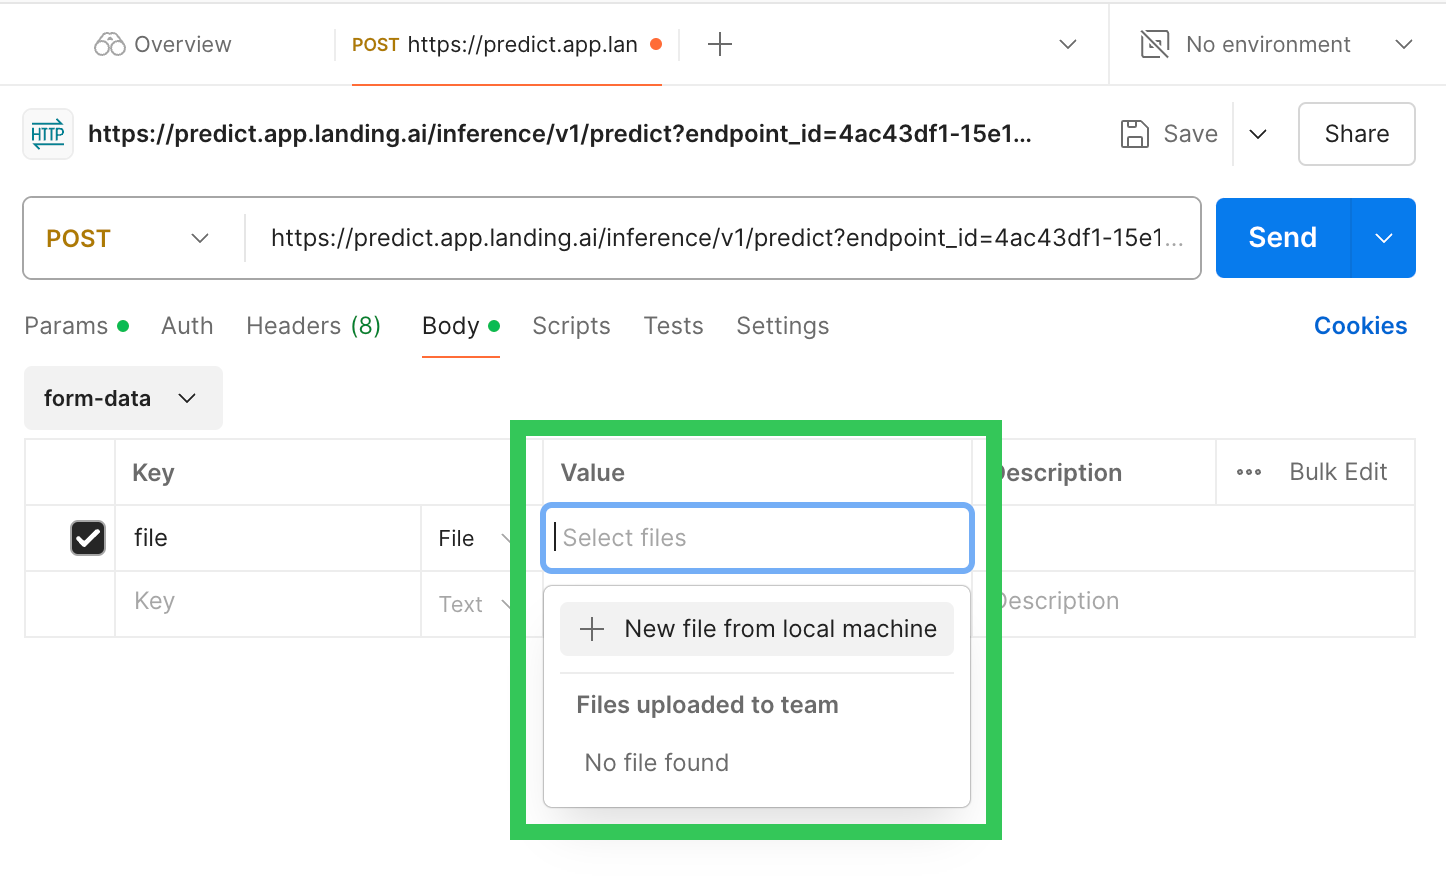
 6. Click **Body**.
7. Click **Select files** and upload an image you want to run inference on.
6. Click **Body**.
7. Click **Select files** and upload an image you want to run inference on.
 8. Click **Send**.
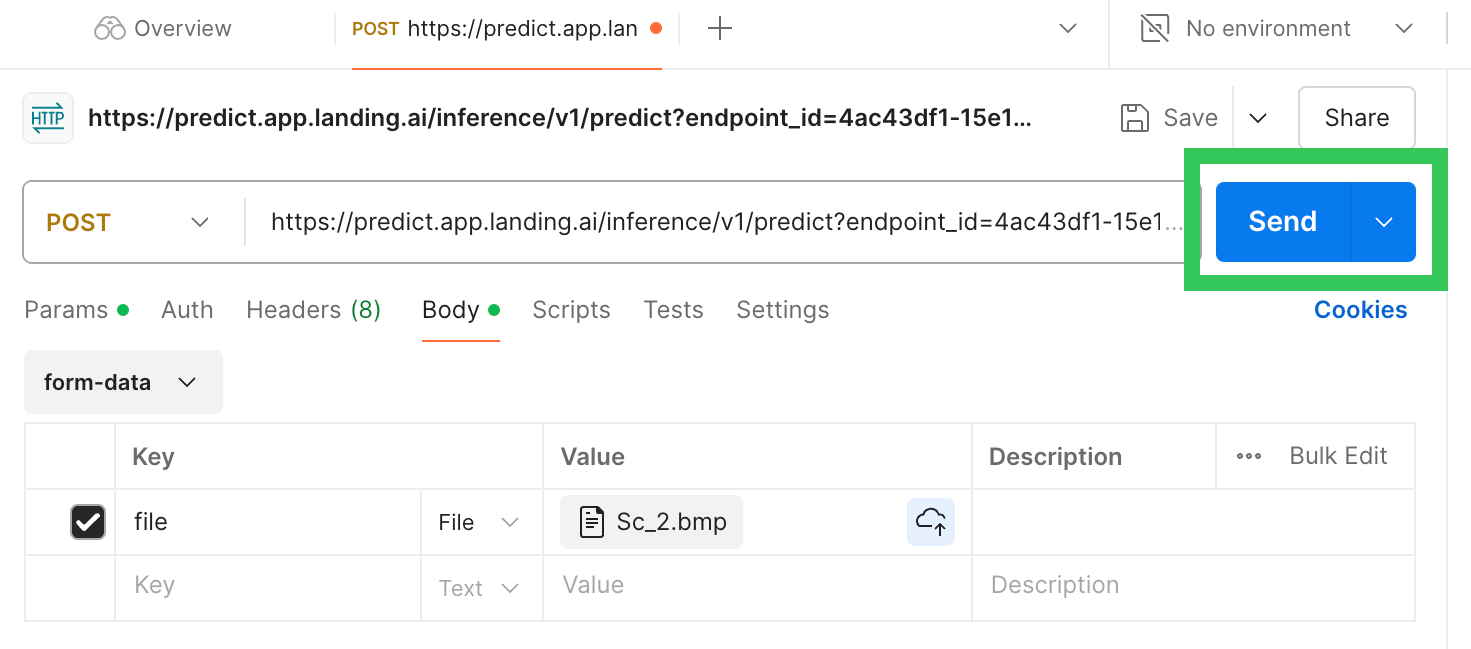 9. The response displays as [JSON](./json-responses) at the bottom of the page.
 10. In LandingLens, open the project to the **Deploy** page (if it's already open, refresh the page). The results display at the bottom of the page.